![Brother INNOV-IS QC-1000 — кнопка возврата к началу для комбинированных стежков [8]](/img/pdf.png)
Brother INNOV-IS QC-1000 — кнопка возврата к началу для комбинированных стежков [8]
![Brother INNOV-IS QC-1000 [8/0] V initial stitch page](/views2/1315746/page8/bg8.png)
6
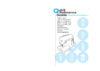
◆ IV) Back to Beginning Key
If sewing of a combined stitch pattern has stopped, press this key to restart sewing from the beginning of the pattern. (In
this example, sewing begins from “W”.)In addition, if this key is pressed when sewing is stopped, patterns can be added
at the end of a combined stitch pattern. (In this example, “!” is added.)
◆ IV) Taste „Zurück zum Anfang“
Drücken Sie diese Taste, nachdem das Nähen eines kombinierten Stichmusters angehalten hat, um das Muster wieder
vom Anfang an erneut zu nähen. (In diesem Beispiel beginnt das Nähen bei „W“.) Außerdem können mit dieser Taste
nach dem Nähen am Ende des ursprünglichen kombinierten Stichmusters weitere Muster hinzugefügt werden. (In diesem
Beispiel wird „!“ hinzugefügt.)
◆ IV) Retour à la touche de début
Si la couture d’un motif de point combiné s’est arrêtée, appuyez sur cette touche pour recommencer la couture à partir du
début du motif. (Dans cet exemple, la couture commence à partir de « W »). En outre, si vous appuyez sur cette touche
lorsque la couture est arrêtée, des motifs peuvent être ajoutés à la fin du motif de point combiné. (Dans cet exemple, « ! »
est ajouté).
◆ IV) Terug naar begintoets
Als het naaien van een gecombineerd steekpatroon is gestopt, drukt u op deze toets om opnieuw vanaf het begin van het
patroon te gaan naaien. (In dit voorbeeld begint het naaien bij “W”.) Als u op deze toets drukt wanneer u stopt met
naaien, kunt u bovendien patronen toevoegen aan het eind van een gecombineerd steekpatroon. (In dit voorbeeld wordt
“!” toegevoegd.)
◆ IV) Tasto Torna all’inizio
Se la cucitura di un disegno/punto combinato si arresta, premere questo tasto per riprendere a cucire dall’inizio del
disegno. (In questo esempio, la cucitura inizia da “W”.) Inoltre, premendo questo tasto quando si arresta la cucitura, è
possibile aggiungere i disegni alla fine del disegno/punto combinato iniziale. (In questo esempio, è aggiunto “!”.)
◆ IV) Tecla Volver al principio
Si se ha detenido la costura de un patrón combinado, pulse esta tecla para volver a comenzar la costura desde el
principio. (En este ejemplo, la costura comienza en “W”). Además, si se pulsa esta tecla con la costura detenida, se
pueden añadir patrones al final de un patrón combinado. (En este ejemplo, se ha añadido “!”).
◆ IV) Кнопкавозвратакначалу
В случае остановки вышивания комбинированного рисунка строчки нажмите эту кнопку, чтобы начать шитье с
начала рисунка строчки. (В показанном примере шитье начинается с вышивания буквы “W”.) Кроме того, если
эту кнопку нажать после остановки вышивания, можно добавить рисунки в конец комбинированного рисунка
строчки. (В показанном примере добавляется знак “!”.)
◆ V) Initial Stitch Page
Select whether the screen containing quilting stitches or utility stitches is the first screen that is displayed.
◆ V) Anfangsstichbildschirm
Wählen Sie, ob der Bildschirm mit Quiltstichen oder der Bildschirm mit Nutzstichen zuerst angezeigt werden
soll.
◆ V) Page de point initial
Indiquez si vous souhaitez que l’écran contenant les points quilting ou les points de couture courants s’affiche en
premier.
◆ V) Beginsteekscherm
Selecteer of het scherm met quiltsteken of naaisteken als eerste scherm moet verschijnen.
◆ V) Pagina iniziale dei punti
Selezionare l’opzione che consente di stabilire se la schermata contenente punti per trapuntatura o punti utili
sarà la prima schermata visualizzata.
◆ V) Pantalla inicial de puntadas
Seleccione si la pantalla que contiene las puntadas de acolchado o las puntadas de utilidad va a ser la primera
pantalla que se muestre.
◆ V) Начальнаястраницастрочек
Выберите экран, который будет отображаться первым: экран со стегальными строчками или основными
строчками
.
Hervorragende Funktionen
Speciale functies
Funciones excepcionales
Outstanding Features
Fonctions exceptionnelles
Caratteristiche importanti
Уникальныефункции
Содержание
- Uick reference guide p.1
- Winding the bobbin 7 inserting the bobbin 7 upper threading 8 selecting stitch patterns 9 p.2
- Summary of stitch patterns 11 p.2
- Outstanding features 2 p.2
- Nähmuster übersicht 11 p.2
- Inhalt p.2
- Hervorragende funktionen 2 p.2
- Contents p.2
- Aufspulen des unterfadens 7 einsetzen der unterfadenspule 7 einfädeln des oberfadens 8 wahl des nähmusters 9 p.2
- Avvolgimento della spolina 7 inserimento della spolina 7 infilatura superiore 8 selezione degli schemi punto 9 p.3
- Намоткашпульки 7 установкашпульки 7 заправкаверхнейнити 8 выборрисунковстрочек 9 p.3
- Table des matières p.3
- Spoel opwinden 7 de spoel plaatsen 7 inrijgen van de bovendraad 8 kiezen van de steekpatronen 9 p.3
- Speciale functies 2 p.3
- Sommario degli schemi punto 11 p.3
- Sommaires des motifs de point 11 p.3
- Resumen de tipos de puntada 11 p.3
- Overzicht van de steekpatronen 11 p.3
- Inhoudsopgave p.3
- Indice p.3
- Funciones excepcionales 2 p.3
- Fonctions exceptionnelles 2 p.3
- Devanado de la bobina 7 colocación de la bobina 7 hilo superior 8 selección de tipos de puntada 9 p.3
- Уникальныефункции 2 p.3
- Contenido p.3
- Caratteristiche importanti 2 p.3
- Содержание p.3
- Bobinage de la canette 7 insertion de la canette 7 enfilage supérieur 8 sélection des configurations de point 9 p.3
- Рисункистрочек 11 p.3
- Outstanding features hervorragende funktionen fonctions exceptionnelles speciale functies caratteristiche importanti funciones excepcionales уникальныефункции p.4
- Автоматическое опускание гребенок транспортера режим свободной подачи материала p.5
- Iii transporteur automatisch omlaag vrij modus p.5
- Iii selector automático de dientes de arrastre modo de costura libre p.5
- Iii entraînement par griffe automatique mode en mouvement libre p.5
- Iii automatischer untertransport freihandmodus p.5
- Iii automatic drop feed free motion mode p.5
- Iii alimentatore automatico modalità moto libero p.5
- Iv tecla volver al principio p.8
- Iv tasto torna all inizio p.8
- Iv taste zurück zum anfang p.8
- Iv retour à la touche de début p.8
- Iv back to beginning key p.8
- V начальнаястраницастрочек p.8
- V pantalla inicial de puntadas p.8
- V pagina iniziale dei punti p.8
- V page de point initial p.8
- V initial stitch page p.8
- V beginsteekscherm p.8
- V anfangsstichbildschirm p.8
- Iv кнопкавозвратакначалу p.8
- Iv terug naar begintoets p.8
- Winding the bobbin aufspulen des unterfadens bobinage de la canette spoel opwinden avvolgimento della spolina devanado de la bobina намотка шпульки p.9
- Inserting the bobbin einsetzen der unterfadenspule insertion de la canette de spoel plaatsen inserimento della spolina colocación de la bobina установка шпульки p.9
- Upper threading einfädeln des oberfadens enfilage supérieur inrijgen van de bovendraad infilatura superiore hilo superior заправкаверхнейнити p.10
- Sélection des configurations de point p.11
- Selecting stitch patterns wahl des nähmusters p.11
- Kiezen van de steekpatronen selezione degli schemi punto selección de tipos de puntada выборрисунковстрочек p.11
- Summary of stitch patterns nähmuster übersicht sommaires des motifs de point overzicht van de steekpatronen sommario degli schemi punto resumen de tipos de puntada рисункистрочек p.13
Похожие устройства
-
 Brother INNOV-IS 300Краткая инструкция
 -
 Brother INNOV-IS 300Руководство пользователя
 -
 Astralux H20AИнструкция по эксплуатации
 -
 Astralux 9910Инструкция по эксплуатации
 -
 Astralux H50AИнструкция по эксплуатации
 -
 Astralux H40AИнструкция по эксплуатации
 -
 Astralux H30AИнструкция по эксплуатации
 -
 Astralux H20AИнструкция по эксплуатации
 -
 Astralux H10AИнструкция по эксплуатации
 -
 Bosch WTZ 11310Руководство пользователя
 -
 Candy GO 2127 LMCРуководство пользователя
 -
Candy GOE 107 LMCРуководство пользователя
Узнайте, как использовать кнопку возврата к началу для комбинированных стежков. Начните шитье с начала или добавьте новые узоры к существующим.