![Citizen CL-S700 [37/80] Printer operation](/img/pdf.png)
Citizen CL-S700 [37/80] Printer operation
![Citizen CL-S700 [37/80] Printer operation](/views2/1204396/page37/bg25.png)
37
Printer Operation
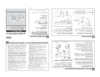
Menu Setup Mode
If the MENU key is pressed while the printer is in the On Line Ready state,
the printer enters menu setup mode. In this mode, the printer's configuration
can be changed using the operation panel. During menu setting mode, the
LCD indicates the current menu settings and the key function.
POWER ERROR
FEED
STOP
MENU
PAUSE
On Line
Ready
POWER ERROR
FEED
STOP
MENU
PAUSE
Main Menu
Page Setup
Exit Enter
Exit
Shift/Change
Shift/Change
Enter/Save
Caution
Functions of the keys
When you enter Menu Setup Mode, the LCD displays “Main Menu” on the
top line and Page Setup below.
In the menu setup mode, the four keys become “cursor keys” to navigate the
menu. Refer to the four small arrows in the centre of the keypad rather than
the names of the keys.
FEED key (Shift/Change)
The 5 key (Feed key) goes up the menu system or selects a higher
value
MENU key (Shift/Change)
The ∞ key (Menu key) goes down the menu system or selects a lower
value
STOP key (Enter/Save)
The 3 key (Stop key) selects or saves the item or enters a menu
PAUSE key (Exit)
The 2 key (Pause key) exits the current item (goes back) and eventually
exits the menu system
The menu settings are stored temporarily in the printer’s memory. They are
only permanently stored in the printer setup when you exit the menu system
and say “Yes” to the “Save Settings” question.
Mode Settings
Turning the power off while the printer is performing the “Save
Settings” function could cause a mis-save. Do not do this! If the
power is accidentally turned off, first reset the printer to factory
defaults.
Содержание
- Thermal transfer barcode label printer p.1
- Cl s700 series p.1
- Chapter 3 printer adjustments p.2
- Chapter 2 printer operation p.2
- Appendixes p.2
- Contents p.2
- Chapter 4 troubleshooting 64 p.2
- Chapter 1 setup p.2
- Before operation p.2
- Cl s700r only p.3
- Main features p.3
- Introduction p.3
- Hi ope p.3
- Before operation p.3
- Gs mark statement p.4
- Fcc compliance statementfor american users p.4
- Fcc compliance statement for american users p.4
- Compliance statementfor european users p.4
- Compliance statement for european users p.4
- Etat de conformite emi a l usagedes utilisateurs canadiens p.5
- Etat de conformite emi a l usage des utilisateurs canadiens p.5
- Emi compliance statementfor canadian users p.5
- Emi compliance statement for canadian users p.5
- Important safety instructions p.6
- Notice p.7
- Which must be strictly observed p.8
- Warning p.8
- Safety instructions p.8
- Caution p.8
- Precautions when installing the printer p.9
- General precautions p.9
- Caution p.9
- Removing the packing material p.10
- Confirmation of carton contents p.10
- Part names and functions p.11
- Inside the printer p.11
- Caution p.11
- Rewinder paper guide available as an option from your supplier p.15
- Rewinder cover p.15
- Peeler rollers p.15
- Part names and functions p.15
- Media entry slit cover p.15
- Rewinder flange p.15
- Operation panel p.16
- Rear view p.17
- Driver installation p.18
- Connection to power p.18
- Caution p.18
- Turn off both power switches of the printer and the computer 2 connect one end of the interface cable to the interface connector on the back of the printer and secure it with locks or locking screws where available 3 connect the other end of the interface cable to the interface connector on the computer and secure it with locks or locking screws where available p.19
- Serial interface p 0 parallel interface p 2 usb interface p 5 p.19
- Replacing the interface board p 6 p.19
- Connection to a computer p.19
- Turning on the power p.20
- Turning off the power p.20
- Printer operation p.20
- Power on off p.20
- Feed key feeds media p.21
- Stop key it stops printing and cancels the alarm p.21
- Printer operation p.21
- Pause key temporarily pauses printing p.21
- Normal operating mode p.21
- Menu key p.21
- Printer operation p.22
- Led functions p.22
- The position of label and tag media is sensed by either a transparent sensor or a reflective sensor transparent sensor detects the gaps between label media and notches of tag media reflective sensor detects the black mark p.23
- Setting the media p.23
- Printer operation p.23
- Media sizes p.23
- When using front sensors p.24
- When using adjustable sensor p.24
- Setting the media p.24
- Printer operation p.24
- Installing the media p.25
- Printer operation p.25
- Printer operation p.26
- Using the rewinder as a peeler cl s700r models peeling mode p.27
- Printer operation p.27
- Printer operation p.28
- Caution p.28
- Using the rewinder for batches of printed media cl s700r models rewind mode p.29
- Printer operation p.29
- Setting the media p.30
- Printer operation p.30
- Printer operation p.31
- Setting the ribbon p.32
- Setting method p.32
- Printer operation p.32
- Printer operation p.33
- Printer operation p.34
- When using label media p.35
- When using continuous media p.35
- Printer operation p.35
- Operation panel p 6 p.35
- Mode settings p.35
- Hex dump mode p.35
- Self print mode p.36
- Printer operation p.36
- Mode settings p.36
- Media adjustments p.36
- Case of label media p.36
- Case of continuous media p.36
- Mode settings p.37
- Menu setup mode p.37
- Functions of the keys p.37
- Caution p.37
- Printer operation p.37
- Printer operation p.38
- Mode settings p.38
- Example of changing a menu p.38
- Entering menu setup mode ensure lcd displays on line ready then press the menu key to enter menu setup mode where the printers settings can be changed or confirmed p.38
- To change the value of print darkness to 14 press the 5 key two times to display 14 on the screen then press the 3 key to temporarily save the value into the printer ram p.39
- Selecting print darkness from the sub menu press the key one time to display print darkness it is the second item within page setup p.39
- Printer operation p.39
- Mode settings p.39
- Entering sub menu press the 3 key the currently set item print speed is displayed p.39
- Displaying the set value of print darkness press the 3 key and the value 12 the currently set value is displayed p.39
- Save changes to settings unless you save your settings your changes will be lost when you turn off the printer p.40
- Printer operation p.40
- Mode settings p.40
- Mode settings p.41
- Example of changing a menu p 8 p.41
- You can get a list of the configuration settings in two ways press menu key whilst turning the printer on the power led flashes and print settings is displayed on the lcd after printing the printer will enter menu setup mode you can access the configuration print via the test mode print pattern current config from the setup menu p.41
- Printing a list of settings p.41
- Printer operation p.41
- Note citizen continually enhances its printers with new options and settings based on our customer s requests extra or changed menu items may appear on the above print out in some cases p.41
- Printer operation p.42
- Mode settings p.42
- Global configuration sets p.42
- Printer operation p.43
- Press the menu key in print possible status to enter menu setup mode use the keys on the operation panel according to the lcd display to setup the printer the contents that can be setup on the printer are shown below and the items that are actually displayed on the lcd are shown in p.43
- Page setup menu allows you to change settings related to the media or print quality system setup menu allows you to change settings for the printer hardware and basic control systems after print menu changes how the printer reacts after the label has been printed interfaces changes interface parameters such as baud rate machine information test mode allows you to check and or print test pages and information about the printer global config menu allows you to switch between 3 complete config sets contained within the printer p.43
- Mode settings datama p.43
- Menu setting table p.43
- Menu setting p.43
- Emulation p.43
- Datama p.43
- Printer operation p.44
- Emulation p.44
- Mode settings datama p.44
- Printer operation p.45
- Mode settings datama p.45
- Emulation p.45
- Printer operation p.46
- Mode settings datama p.46
- Emulation p.46
- Printer operation p.47
- Mode settings zebr p.47
- Emulation p.47
- Printer operation p.48
- Mode settings zebr p.48
- Emulation p.48
- Mode settings zebr p.49
- Emulation p.49
- Printer operation p.49
- Printer operation p.50
- Mode settings zebr p.50
- Emulation p.50
- Setting method p.51
- Quick setup of the print method p.51
- Printer operation p.51
- Menu setup mode p 7 p.51
- Caution p.51
- Printer operation p.52
- Emulation auto detection p.52
- Setting the menu for the rewinder cl s700r only p.53
- Rewinder capacity display p.53
- Printer operation p.53
- On line ready rewind p.53
- Important p.53
- When rewinding the liner using the peeler p.53
- When rewinding printed media without using the peeler p.53
- Sensor adjustments and calibration p.54
- Quick sensor selection method transparent reflective p.54
- Printer adjustments p.54
- Entering sensor adjustment mode p.54
- Printer adjustments p.55
- Adjusting the transparent sensor p.55
- Printer adjustments p.56
- Adjusting the reflective sensor p.56
- When using standard labels or thermal media p.57
- Printer adjustments p.57
- Media thickness adjustment p.57
- Looking in at the media thickness check window reset the printhead position so that it comes to the center line middle of the three lines by turning the media thickness adjustment screw with a screwdriver 2 then turn the media thickness adjustment screw two to four times clockwise with a screwdriver 3 make fine adjustments by checking the self test print p.57
- Looking in at the media thickness check window reset the printhead offset so that it comes to the center line middle of the three lines by turning the media thickness adjustment screw with a screwdriver then turn the media thickness adjustment screw two to four times counterclockwise with a screwdriver factory setting two turns 2 make fine adjustments by checking the self test print p.57
- Installing the media p 5 p 7 p.57
- When using thick media tags or other media p.57
- Printer adjustments p.58
- Media width adjustment p.58
- Setting the ribbon p 2 p.59
- Printer adjustments p.59
- General ribbon and media factory setting both marks on winding and feeding sections are set to standard so as to obtain the optimum printing condition for the recommended ink ribbon and media p.59
- Adjusting the ribbon p.59
- Adjusting places p.59
- Adjusting method p.59
- Printer adjustments p.60
- Printer adjustments p.61
- Operating procedure p.61
- Moving the adjustable sensor p.61
- Menu setting table p 3 ensure the adjustable sensor is selected p.61
- Measure your required detection position beforehand using the scale on the upper guide rail move the adjustable sensor to the required detection position by tuning the adjustable knob it is useful to align the yellow mark on the top of the adjustable sensor with the scale showing the required detection position p.61
- Cleaning p.62
- Printer adjustments p.62
- Printer adjustments p.63
- Cleaning p.63
- Caution p.63
- Troubleshooting p.64
- Setting the ribbon p 2 installing the media p 5 p27 setting method p 2 menu setting table p 3 cleaning p 2 p.64
- Items to check when a malfunction occurs p.64
- Connection to power p 8 p.64
- Cleaning p 2 p.64
- Setting the ribbon p 2 p.65
- Menu setting table p 3 p.65
- Media width adjustment p 8 p.65
- Media thickness adjustment p 7 p.65
- Led functions p 2 p.65
- Installing the media p 5 p27 setting method p 2 cleaning p 2 p.65
- Adjusting the ribbon p 9 p.65
- Troubleshooting p.65
- Specifications p.66
- Appendixes p.66
- Specifications p.67
- Appendixes p.67
- Unit mm inch p.68
- Specifications p.68
- Appendixes p.68
- Specifications p.69
- Appendixes p.69
- Specifications p.70
- Signal line and pin arrangement p.70
- Serial interface p.70
- Interfaces p.70
- Appendixes p.70
- Appendixes p.71
- Xon xoff protocol p.71
- Requirements to output x on code p.71
- Requirements to output the x off code p.71
- Interfaces p.71
- Dtr protocol p.71
- Specifications p.72
- Signal line and pin assignment table p.72
- Parallel interface p.72
- Interfaces p.72
- Appendixes p.72
- The status of a signal line will not be changed in bi directional mode such as nibble or ecp mode p.73
- Parallel port status signals when an error occurs p.73
- Note busy rises when strobe signal starts and data is latched with strobe signal starts p.73
- Interfaces p.73
- Compatible timing specification p.73
- Appendixes p.73
- While receiving data p.73
- When power is on time it goes off line p.73
- While receiving init signal p.74
- Relation of the timing of the busy signal and the ack signal p.74
- Note if the init signal does not have width of 10 to 15 µ sec or more it cannot act as an init signal if it is lower the init signal is ignored busy starts up when the init signal is perceived p.74
- Interfaces p.74
- Center ack p.74
- Appendixes p.74
- Usb interface p.75
- Specifications p.75
- Signal line and pin arrangement p.75
- Interfaces p.75
- Appendixes p.75
- Replacement method p.76
- Caution p.76
- Appendixes p.76
- Replacing the interface board p.76
- Appendixes p.77
Похожие устройства
-
 Citizen CL-E720Command Reference DMX
 -
 Citizen CL-E720Утилита для печати этикеток
 -
 Citizen CL-E720Command Reference ZPL
 -
 Citizen CL-E720Autocutter
 -
 Citizen CL-E720Сетевые карты
 -
 Citizen CL-S700Описание системы команд
 -
 Citizen CL-S700Краткая инструкция
 -
 Citizen CL-S700Брошюра
 -
 Citizen CL-E720Руководство пользователя
 -
 Citizen CL-E720Брошюра
 -
 Epson TM-T20III C31CH51011Руководство по эксплуатации
 -
 Mertech TLP100 Terra Nova 4588Руководство по эксплуатации