![Aten KN2124VA [29/287] Kn2140va kn4140va front view](/img/pdf.png)
Aten KN2124VA [29/287] Kn2140va kn4140va front view
![Aten KN2124VA [29/287] Kn2140va kn4140va front view](/views2/1211310/page29/bg1d.png)
Chapter 1. Introduction
11
Components
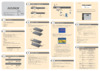
KN2124VA / KN4124VA Front View
KN2140VA / KN4140VA Front View
21 3
685 74
21 3
685 74
Содержание
- Kvm over ip switch user manual p.1
- Emc information p.2
- This product is rohs compliant p.3
- The following contains information that relates to china p.3
- Sj t 11364 2006 p.3
- User information p.4
- Telephone support p.4
- Online registration p.4
- For telephone support call this number p.4
- Be sure to register your product at our online support center p.4
- User notice p.5
- There is a risk of explosion if the battery is replaced with an incorrect type dispose of used batteries according to the relevant instructions p.5
- Il existe un risque d explosion si la batterie est remplacée par un incorrect tapez jeter les piles usagées selon la pertinente instructions p.5
- Battery safety notice p.5
- Batterie avis de sécurité p.5
- Package contents p.6
- Introduction p.7
- Hardware setup p.7
- Contents p.7
- Chapter 2 p.7
- Chapter 1 p.7
- The user interface p.8
- Super administrator setup p.8
- Logging in p.8
- Chapter 5 p.8
- Chapter 4 p.8
- Chapter 3 p.8
- Port access p.9
- Chapter 6 p.9
- User management p.10
- Device management p.10
- Chapter 8 p.10
- Chapter 7 p.10
- Maintenance p.11
- Chapter 9 p.11
- Chapter 10 p.11
- Port operation p.12
- Appendix p.12
- The log server p.12
- Download p.12
- Chapter 13 p.12
- Chapter 12 p.12
- Chapter 11 p.12
- Overview p.15
- About this manual p.15
- This manual uses the following conventions p.16
- Conventions p.16
- Chapter 13 the log server explains how to install and configure the log server p.16
- Chapter 12 port operation provides detailed information on accessing and operating the devices connected to the kvm over ip switch s ports p.16
- An appendix at the end of the manual provides technical and troubleshooting information p.16
- Terminology p.17
- Product information p.17
- This page intentionally left blank p.18
- Overview p.19
- Introduction p.19
- Chapter 1 p.19
- Local console p.20
- Management p.23
- Hardware p.23
- Features p.23
- Easy to use interface p.24
- Advanced security p.24
- Virtual remote desktop p.25
- Virtual media p.25
- New kn series exclusive p.25
- System requirements p.26
- Servers p.26
- Remote user computers p.26
- Cat 5e or higher cable is required to connect the kvm over ip switch to the kvm adapter cables see page 23 p.27
- The following kvm adapter cables are required for use with the kvm over ip switch p.27
- Note if you use adapter cables purchased prior to your switch purchase you p.27
- May have to upgrade the adapter s firmware see page 182 p.27
- Kvm adapter cables p.27
- Supported operating systems for the servers connected to the switch s ports are shown in the table below p.28
- Supported operating systems for remote user computers include windows 2000 and higher and those capable of running the java runtime environment jre 6 update 3 or higher linux mac sun etc p.28
- Supported browsers for users that log into the kvm over ip switch include the following p.28
- See mac systems page 233 for further information p.28
- Operating systems p.28
- Browsers p.28
- Kn2140va kn4140va front view p.29
- Kn2124va kn4124va front view p.29
- Components p.29
- Chapter 1 introduction p.29
- Kn2140va kn4140va rear view p.32
- Kn2124va kn4124va rear view p.32
- Kvm over ip user manual p.32
- This page intentionally left blank p.34
- Overview p.35
- Hardware setup p.35
- Chapter 2 p.35
- Before you begin p.35
- Stacking and rack mounting p.36
- Stacking p.36
- Rack mounting p.37
- Single stage installation p.41
- Single stage installation diagram p.42
- Chapter 2 hardware setup p.43
- Adapter cable connection diagram p.43
- Kvm over ip user manual p.44
- Adapter cable connection diagram cont p.44
- Two stage installation p.45
- Two stage installation diagram p.46
- The adapter id function p.47
- Powering off and restarting p.47
- Hot plugging p.47
- Port selection p.48
- Port id numbering p.48
- Port 3 p.48
- Port 20 p.48
- Id 20 3 p.48
- Super administrator setup p.49
- Overview p.49
- First time setup p.49
- Chapter 3 p.49
- After you successfully log in the local console main page appears p.50
- Network setup p.51
- Changing the super administrator login p.52
- Moving on p.54
- Overview p.55
- Logging in p.55
- Local console login p.55
- Chapter 4 p.55
- Browser login p.56
- Windows client ap login p.57
- The windows client ap connection screen p.58
- A description of the connection screen is given in the following table p.58
- Connecting windows client ap p.59
- Whenever a user runs the client program it opens with the values contained in the current work file the current work file consists of the values that were in effect the last time the program was closed p.60
- The file menu consists of the following items p.60
- The file menu allows the operator to create save and open user created work files a work file consists of all the information specified in a client session this includes the server list and server ip list items as well as the hotkey settings p.60
- The file menu p.60
- Java client ap login p.61
- A description of the connection screen is given in the following table p.62
- The java client ap connection screen p.62
- Connecting java client ap p.63
- This page intentionally left blank p.64
- The web browser main page p.65
- The user interface p.65
- Overview p.65
- Chapter 5 p.65
- The web page screen components are described in the table below p.66
- The mfg number manufacturing number is an internal serial number used by aten s factory and technical support staff to identify products this number does not affect products warranty if your product requires after sales services you may provide the mfg number to aten s sales or technical support staff to identify the product and model number p.66
- Page components p.66
- Manufacturing number p.66
- There are two small icons at the extreme right of the page their functions are described in the table below p.67
- The tab bar p.67
- The number and type of icons that appear on the tab bar at the top of the page are determined by the user s type super administrator administrator user and the permissions assigned when the user s account was created the functions associated with each of the icons are explained in the table below p.67
- The ap gui main page p.68
- Click this icon to close the gui main page and go to the display of the last selected port p.69
- There is an additional icon at the extreme right of the page p.69
- The gui can be navigated via the keyboard as shown in the table below p.69
- The major difference is that the local console main page doesn t have a tab for download p.70
- The local console gui main page is similar to the java and windows ap gui main page p.70
- The local console gui main page p.70
- In addition there are two small icons at the bottom right as described in the following table p.70
- Winclient control panel p.71
- The control panel p.71
- Winclient control panel functions p.73
- The control panel functions are described in the table below p.73
- Macros p.76
- An explanation of the hotkey actions is given in the table below p.77
- Video settings p.85
- The meanings of the video adjustment options are given in the table p.86
- Advanced video settings p.86
- Button bar the buttons on the button bar are toggles their actions are described in the table below p.90
- The message board p.90
- The kvm over ip switch supports multiple user logins which may cause access conflicts to alleviate the problem a message board has been provided which allows users to communicate with each other p.90
- Virtual media p.92
- The zoom icon controls the zoom factor for the remote view window settings are as follows p.95
- The on screen keyboard p.96
- Mouse pointer type p.98
- The size and number of screens in the display panel window depends on how the setup is configured see extended display page 119 for details p.99
- The extended displays icon provides the ability to view the screens in an extended display setup when you click the icon the display panel window appears with the extended screens as shown here p.99
- Extended displays p.99
- Display panel window p.99
- Mouse dynasync mode p.100
- The organization of the dialog box is described in the table below p.102
- Control panel configuration p.102
- Clicking the control panel icon brings up a dialog box that allows you to configure the items that appear on the control panel as well as its graphical settings p.102
- The java control panel p.104
- Ap gui p.105
- Port access p.105
- Overview p.105
- Chapter 6 p.105
- Browser gui p.105
- The sidebar tree structure p.107
- The sidebar p.107
- The meanings of the choices are explained in the following table p.109
- Filter allows you to control the number and type of ports that display in the sidebar as well as which ports get scanned when auto scan and array modes are invoked see scan and array above when you click filter the bottom of the panel changes to look similar to the image below p.109
- Filter p.109
- The following table lists and explains all of the possible items that may appear p.110
- The ap gui version port access connections page provides a convenient method to work with the sidebar tree when you right click an item a list with various options pops up p.110
- Sidebar utilities p.110
- Note the screenshot shows an example of just one of the pop ups that can appear the items that appear in the pop up depend on whether you are logged in remotely or from a local console what your user type is and whether you selected a switch or a port p.110
- Port outlet naming p.111
- Kvm devices and ports connections page p.113
- Device level p.113
- Port level p.114
- The blade configuration page p.115
- Blade servers connections page p.115
- Associating ports p.116
- Unassociating ports p.118
- History p.119
- Favorites p.120
- User preferences p.123
- The user preferences page allows users to set up their own individual working environments the switch stores a separate configuration record for each user profile and sets up the working configuration according to the username that was keyed into the login dialog box p.123
- The page settings are explained in the following table p.123
- This item is only available with the browser version p.124
- Sessions p.125
- Device level browser gui interface p.126
- Access p.126
- Port level browser gui interface p.127
- The port access settings are explained in the following table p.128
- The page is essentially the same as the one for the browser gui see page 108 with the exception that there are filters at the top of the columns the filters allow you to expand or limit the scope of the users and groups that are displayed as described in the following table p.129
- If a switch is chosen in the sidebar the main panel looks similar to the one below p.129
- Device level ap gui interface p.129
- The page is essentially the same as the one for the browser gui see page 109 with the exception that there are filters at the top of the columns the filters allow you to expand or limit the scope of the users and groups that are displayed as described in the following table p.130
- Port level ap gui interface p.130
- If a port is chosen in the sidebar the main panel looks similar to the one below p.130
- Saving changes p.131
- Click the save button at the lower right corner of the page to save any changes made on the access page p.131
- Port configuration p.132
- Device level p.132
- Select a port in the list and then click a column access mode port os os language to open the drop down menu and choose one of the options described in the table p.133
- Port level p.134
- When you have finished making your configuration changes click save p.135
- An explanation of the configuration fields is given in the table below p.135
- To view extended displays in a remote session see extended displays page 90 p.139
- Set the layout and click save p.139
- This page intentionally left blank p.140
- User management p.141
- Overview p.141
- Chapter 7 p.141
- Browser gui p.141
- Ap gui p.141
- To add a user and assign user permissions do the following p.143
- The kvm over ip switch supports three types of user as shown in the table bellow p.143
- Select users in the sidebar ap gui p.143
- Select accounts on the menu bar browser gui p.143
- Click add at the bottom of the main panel the user notebook opens with the user tab selected p.143
- Adding users p.143
- Enter the required information in the appropriate fields a description of each of the fields is given in the table below p.144
- Note optionally you can skip this step now to add more users and create p.146
- Groups and come back to it later p.146
- At this point you can assign the new user to a group by selecting the groups tab the groups page is discussed on page 133 you can also assign the user s port access rights by selecting the devices tab the devices page is discussed on page 137 p.146
- When your selections have been made click save p.146
- When the operation succeeded message appears click ok p.146
- Modifying user accounts p.147
- Deleting user accounts p.147
- Groups p.148
- Creating groups p.148
- Modifying groups p.150
- Deleting groups p.150
- Users and groups p.151
- Assigning users to a group from the user s notebook p.151
- Removing users from a group from the user s notebook p.152
- Assigning users to a group from the group s notebook p.153
- Removing users from a group from the group s notebook p.154
- Device assignment p.155
- Assigning device permissions from the user s notebook p.155
- Filters there are five filters at the top of the columns that allow you to expand or limit the scope of the ports that are displayed in the name column as described in the following table p.157
- When you have finished making your choices click save p.157
- Note in any of the columns you can use shift click or ctrl click to select a group of ports to configure clicking to cycle through the choices on any one of the selected ports causes all of them to cycle in unison p.157
- In the confirmation popup that appears click ok p.157
- Assigning device permissions from the groups notebook p.158
- Kvm devices p.159
- Device management p.159
- Device information p.159
- Chapter 8 p.159
- Version scroll through the list to see the additional entries p.160
- Note the ap gui version presents the same information as the browser p.160
- General the general section of the device information page displays the name of the selected device its firmware version the fpga field programmable gate array and information about its network configuration p.160
- Environment the lower panel presents information concerning the device s environment as described in the table below p.160
- Operating mode p.161
- The network page is used to specify the network environment p.163
- Network p.163
- Each of the elements on this page is described in the sections that follow p.163
- To set the login failures policy check the enable checkbox the default is for login failures to be enabled the meanings of the entries are explained in the table below p.176
- The security page is divided into 7 main panels as described in the sections that follow p.176
- Security p.176
- Note if login failures is not enabled users can attempt to log in an unlimited number of times with no restrictions for security purposes we recommend that you enable this function and enable the lockout policies p.176
- Login failures for increased security the login failures section allows administrators to set policies governing what happens when a user fails to log in successfully p.176
- The meanings of the account policy entries are explained in the table below p.181
- Account policy in the account policy section system administrators can set policies governing usernames and passwords p.181
- Working mode p.183
- An explanation of the working mode items is given in the table below p.183
- To perform this operation do the following p.185
- Fill in the form with entries that are valid for your site according to the example information in the following table p.185
- Click create csr the following dialog box appears p.185
- Certificate signing request the certificate signing request csr section provides an automated way of obtaining and installing a ca signed ssl server certificate p.185
- Date time p.187
- Configuration page p.189
- Blade servers p.189
- Select its icon in the sidebar then click add in the main panel the setup blade server dialog box comes up with the step 1 tab displayed p.190
- Fill in the fields according to the information provided in the table below p.190
- Blade server setup p.190
- Adding a blade server to configure a new blade server do the following p.190
- Web access p.191
- Modifying deleting a blade server p.191
- This page intentionally left blank p.192
- Overview p.193
- Chapter 9 p.193
- Browser gui p.193
- Ap gui p.193
- The log information page displays events that take place on the kvm over ip switch and provides a breakdown of the time the severity the user and a description of each one you can change the sort order of the display by clicking on the column headings p.194
- The log file tracks a maximum of 512 events when the limit is reached the oldest events get discarded as new events come in the purpose of the buttons at the bottom of the page are described in the following table p.194
- Log information p.194
- Filter lets you narrow the log event display to ones that occurred at specific times ones containing specific words or strings or ones involving specific users when you access this function the log filter dialog box appears at the bottom of the page p.194
- Filter p.194
- A description of the filter items is given in the table below p.195
- Log notification settings p.196
- Overview p.197
- Maintenance p.197
- Chapter 10 p.197
- Browser gui p.197
- Ap gui p.197
- Main firmware upgrade p.198
- Firmware upgrade recovery p.199
- Upgrade adapters p.200
- Browser gui p.200
- Ap gui p.200
- Upgrade adapters p.201
- Adapter firmware info p.202
- Update adapter display info p.203
- Display information p.203
- Adapter firmware upgrade recovery p.204
- Backup restore p.205
- Backup p.205
- Restore p.206
- Terminal p.207
- System operation p.208
- Restore default values p.208
- Reset on exit p.208
- Clear port names p.208
- Overview p.209
- Download p.209
- Chapter 11 p.209
- This page intentionally left blank p.210
- Port operation p.211
- Overview p.211
- Chapter 12 p.211
- Connecting to a port p.212
- The port toolbar p.213
- The toolbar icons p.214
- The meanings of the toolbar icons are explained in the table below p.214
- Toolbar hotkey port switching p.215
- Recalling the port access page p.217
- Gui hotkey summary table p.217
- Panel array mode p.218
- The panel array toolbar provides shortcut navigation and control of the panel array the toolbar can be dragged anywhere on the screen mousing over an icon brings up a tooltip that provides a short description of the icon s function the icon functions are described in the table below p.219
- Panel array toolbar p.219
- Note for issues affecting multiple user operation in panel array mode see p.219
- Multiuser operation page 202 p.219
- The kvm over ip switch supports multiuser operation when multiple users simultaneously access the switch from client computers the rules of precedence that apply are shown in the following table p.220
- Multiuser operation p.220
- Users and buses p.221
- This page intentionally left blank p.222
- The log server p.223
- Installation p.223
- Chapter 13 p.223
- Starting up p.224
- The menu bar p.225
- Configure p.225
- The events menu has two items search and maintenance p.226
- Search search allows you to search for events containing specific words or strings when you access this function a screen similar to the one below appears p.226
- Fill in or modify the fields then click ok to finish p.226
- Events p.226
- A description of the fields is given in the table below p.226
- A description of the items is given in the table below p.227
- Maintenance this function allows the administrator to perform manual maintenance of the database such as erasing specified records before their expiration time is up p.228
- Options p.229
- The log server main screen p.230
- Overview p.230
- The lower panel displays log events for the currently selected unit note that if there are more than one units even though they aren t currently selected if their recording checkbox is checked the log server records their log events and keeps them in its database p.231
- The list panel contains six fields p.231
- The list panel p.231
- The event panel p.231
- This page intentionally left blank p.232
- Safety instructions p.233
- General p.233
- Appendix p.233
- Rack mounting p.235
- Général p.236
- Consignes de sécurité p.236
- Montage sur bâti p.239
- Technical support p.240
- North america p.240
- International p.240
- Appendix p.241
- Specifications p.241
- Kn2124va kn4124va p.241
- Function kn2124va kn4124va p.241
- Kvm over ip user manual p.242
- Function kn2124va kn4124va p.242
- Kn2140va kn4140va p.243
- Function kn2140va kn4140va p.243
- Appendix p.243
- Troubleshooting p.244
- General operation p.244
- Mouse problems p.246
- Web browser p.248
- Virtual media p.248
- The winclient activex viewer and the winclient ap p.249
- The java applet and java client ap p.250
- Mac systems p.251
- To resolve the problem consult the sun vga card s manual p.251
- These solutions work for most common sun vga cards if using them fails p.251
- Sun systems p.251
- The log server p.252
- Redhat systems p.252
- Panel array mode p.252
- The local console p.255
- Ip installer p.255
- Ip address determination p.255
- Browser p.256
- Link local ipv6 address p.257
- Ipv6 stateless autoconfiguration p.258
- Port forwarding p.259
- Note when using key combinations press and release the first key ctrl p.260
- Mac keyboard p.260
- Keyboard emulation p.260
- Then press and release the activation key p.260
- The pc compatible 101 104 key keyboard can emulate the functions of the mac keyboard the emulation mappings are listed in the table below p.260
- Then press and release the activation key p.261
- The pc compatible 101 104 key keyboard can emulate the functions of the sun keyboard when the control key ctrl is used in conjunction with other keys the corresponding functions are shown in the table below p.261
- Sun keyboard p.261
- Note when using key combinations press and release the first key ctrl p.261
- Ka7140 configuration and operation p.262
- Configuration p.262
- When you have finished making your selections click save p.263
- To operate the device connected to the port in the port access page double click the port to establish a serial connection to the device p.263
- Operation p.263
- In the properties section drop down each of the lists to select the port property values that match the ones used by the connected serial console device the port property settings that the ka7140 supports are given in the following table p.263
- Pin assignments for the ka7140 adapter are given in the table below p.264
- Ka7140 pin assignments p.264
- Navigation p.265
- Internal serial interface configuration p.265
- When you have finished with your session press the hotkey see page 248 and 249 that brings you back to the access page p.266
- Use the up and down arrow keys p.266
- To highlight a device in the left panel then press enter to open a command line terminal session on the accessed device p.266
- To finish with this function move the highlight bar to logout in the right panel of the access page press the down arrow key to highlight exit then press enter p.266
- The right panel configuration settings that can be made when the kvm over ip switch is selected in the left panel are described in the table below p.266
- Switch level configuration p.266
- Operation p.266
- When a serial interface device is selected in the left panel the screen looks similar to the one below p.267
- The configuration settings that can be made when a serial interface device is selected are described in the table below p.267
- Port level configuration p.267
- Windows p.268
- Additional mouse synchronization procedures p.268
- Sun linux p.269
- Additional video resolution procedures p.270
- Trusted certificates p.271
- Overview p.271
- Installing the certificate p.272
- Certificate trusted p.273
- Self signed private certificates p.275
- Importing the files p.275
- Examples p.275
- Fan location and speed information p.276
- Fan location p.276
- Clear login information p.277
- The default settings are as follows p.278
- Serial adapter pin assignments p.278
- Sa0142 rj45 f to db9 m black connector dte to dce p.278
- Factory default settings p.278
- Supported kvm switches p.279
- Winclient activex viewer winclient ap p.280
- Virtual media support p.280
- Java client viewer java client ap p.280
- Limited warranty p.281
- This page intentionally left blank p.282
Похожие устройства
-
 Aten KN4132Руководство пользователя
 -
 Aten KN4132Описание и спецификации продукта
 -
 Aten KN4132Краткое руководство по установке
 -
Aten KN4116Руководство пользователя
-
Aten KN4116Описание и спецификации продукта
-
Aten KN4116Краткое руководство по установке
-
Aten KN2132Руководство пользователя
-
Aten KN2132Описание и спецификации продукта
-
Aten KN2132Краткое руководство по установке
-
 Aten KH1516iРуководство пользователя
 -
 Aten KH1516iОписание и спецификации продукта
 -
 Aten KH1516iКраткое руководство по установке