
Condtrol HR с детектором X-actRoto в комплекте, 500 метров 7-2-091 Инструкция к товару онлайн
1
not protect from laser radiation as well as ultraviolet radiation
and reduce color perception.
- Avoid heating the batteries to avoid the risk of explosion and
electrolyte leakage. In case of liquid contact with skin, wash
it immediately with soap and water. In case of contact with
eyes, flush with clean water during 10 minutes and consult a
healthcare practitioner.
INTENDED USE
Roto HR / HG CONDTROL is a self-levelling rotary laser
designed specially for professionals in construction works,
repair, landscape design for projection of horizontal plane and
laser dots (zenith and nadir).
This rotary laser has a wide range of functions, it is easy to use
and features other significant characteristics:
- Remote control via Bluetooth and free App.
- Digital laser receiver with millimeter scale.
- Easy to operate. Only 3 buttons!
- The accuracy is 3 times higher than that of line lasers.
- Shock-resistant, well protected from dust and moisture.
- Li-ion battery.
Rotary laser is suitable for use on both indoor and outdoor
construction sites.
TECHNICAL SPECIFICATIONS
Roto HR Roto HG
Working range with
receiver (in diameter)
500 m
Accuracy 30” (±0,15 mm/1 m)
Self-leveling range ±5°
Manual slope
for axis X and Y *
±10%
Rotation speed * 0, 120, 300, 600 rpm
Scanning mode *
Scanning sector
0°, 10°; 45°; 90°; 180°
Laser type
Class II
630-685 nm
< 1 mW
Class II
515-520 nm
< 1 mW
Operating temperature -20
0
C ~ +50
0
C
Storage temperature -20
0
C ~ +50
0
C
Power supply of rotary
laser
2 x 4000mah Li-ion 7,4V
rechargeable battery
Power supply of laser
receiver
1 x 6F22 9V
Type of tripod thread 35h 25h
Dimensions IP55
Weight 5/8"
Dimensions 150 X 128 X 161 mm
Weight 1,5 kg
* – app “Roto Remote” is required for this function.
DELIVERY PACKAGE
Rotary laser – 1 pc.
Universal mount – 1pc.
Charger – 1 pc.
Laser receiver – 1 pc.
Mount for laser receiver – 1 pc.
Laser intensive glasses – 1 pc.
Magnetic target board – 1 pc.
User manual – 1 pc.
Plastic case – 1 pc.
DESCRIPTION
11
Roto HR/HG
User manual
Rotary laser
EN
Rotary Laser
EN User manual 1
DE Bedienungsanleitung 2
RU Руководство по эксплуатации 3
Rotationslaser
EN
DE
Roto HR/HG
Ротационный лазерный
нивелир
RU
Congratulations on your purchase of rotary laser Roto HR /
Roto HG CONDTROL.
Safety instructions can be found in the end of this user manual
and should be carefully read before you use the device for the
first time.
SAFETY INSTRUCTIONS
Attention! This user manual is an essential part of this
instrument.
The user manual should be read carefully before you use the
instrument for the first time. If the instrument is given to
someone for temporary use, be sure to enclose user manual
to it.
- Do not misuse the instrument.
- Do not remove warning signs and protect them from abrasion,
because they contain information about safe operation of the
instrument.
-Do not look into the laser beam or its reflection, with
unprotected eye or through an optical instrument. Do not
point the laser beam at people or animals without the need.
You can dazzle them.
-To protect your eyes close them or look aside.
- Always install the instrument in such a way, so that laser line
is below or above eye level.
- Do not let unauthorized people enter the zone of operation.
- Store the instrument beyond reach of children and
unauthorized people.
- It is prohibited to disassemble or repair the instrument
yourself. Entrust instrument repair to qualified personnel and
use original spare parts only.
- Do not use the instrument in explosive environment, close to
flammable materials.
- Laser intensive glasses are used for better recognition of the
laser beam; do not use it for other purposes. Laser glasses do
Roto HR
Laser radiation!
Do not stare
into beam
Class 2 laser
<1 mW 630-685 nm
EN60825-1:2007-03
Roto HG
Laser radiation!
Do not stare
into beam
Class 2 laser
<1 mW 515-520 nm
EN60825-1:2007-03
6
3
2
5
4
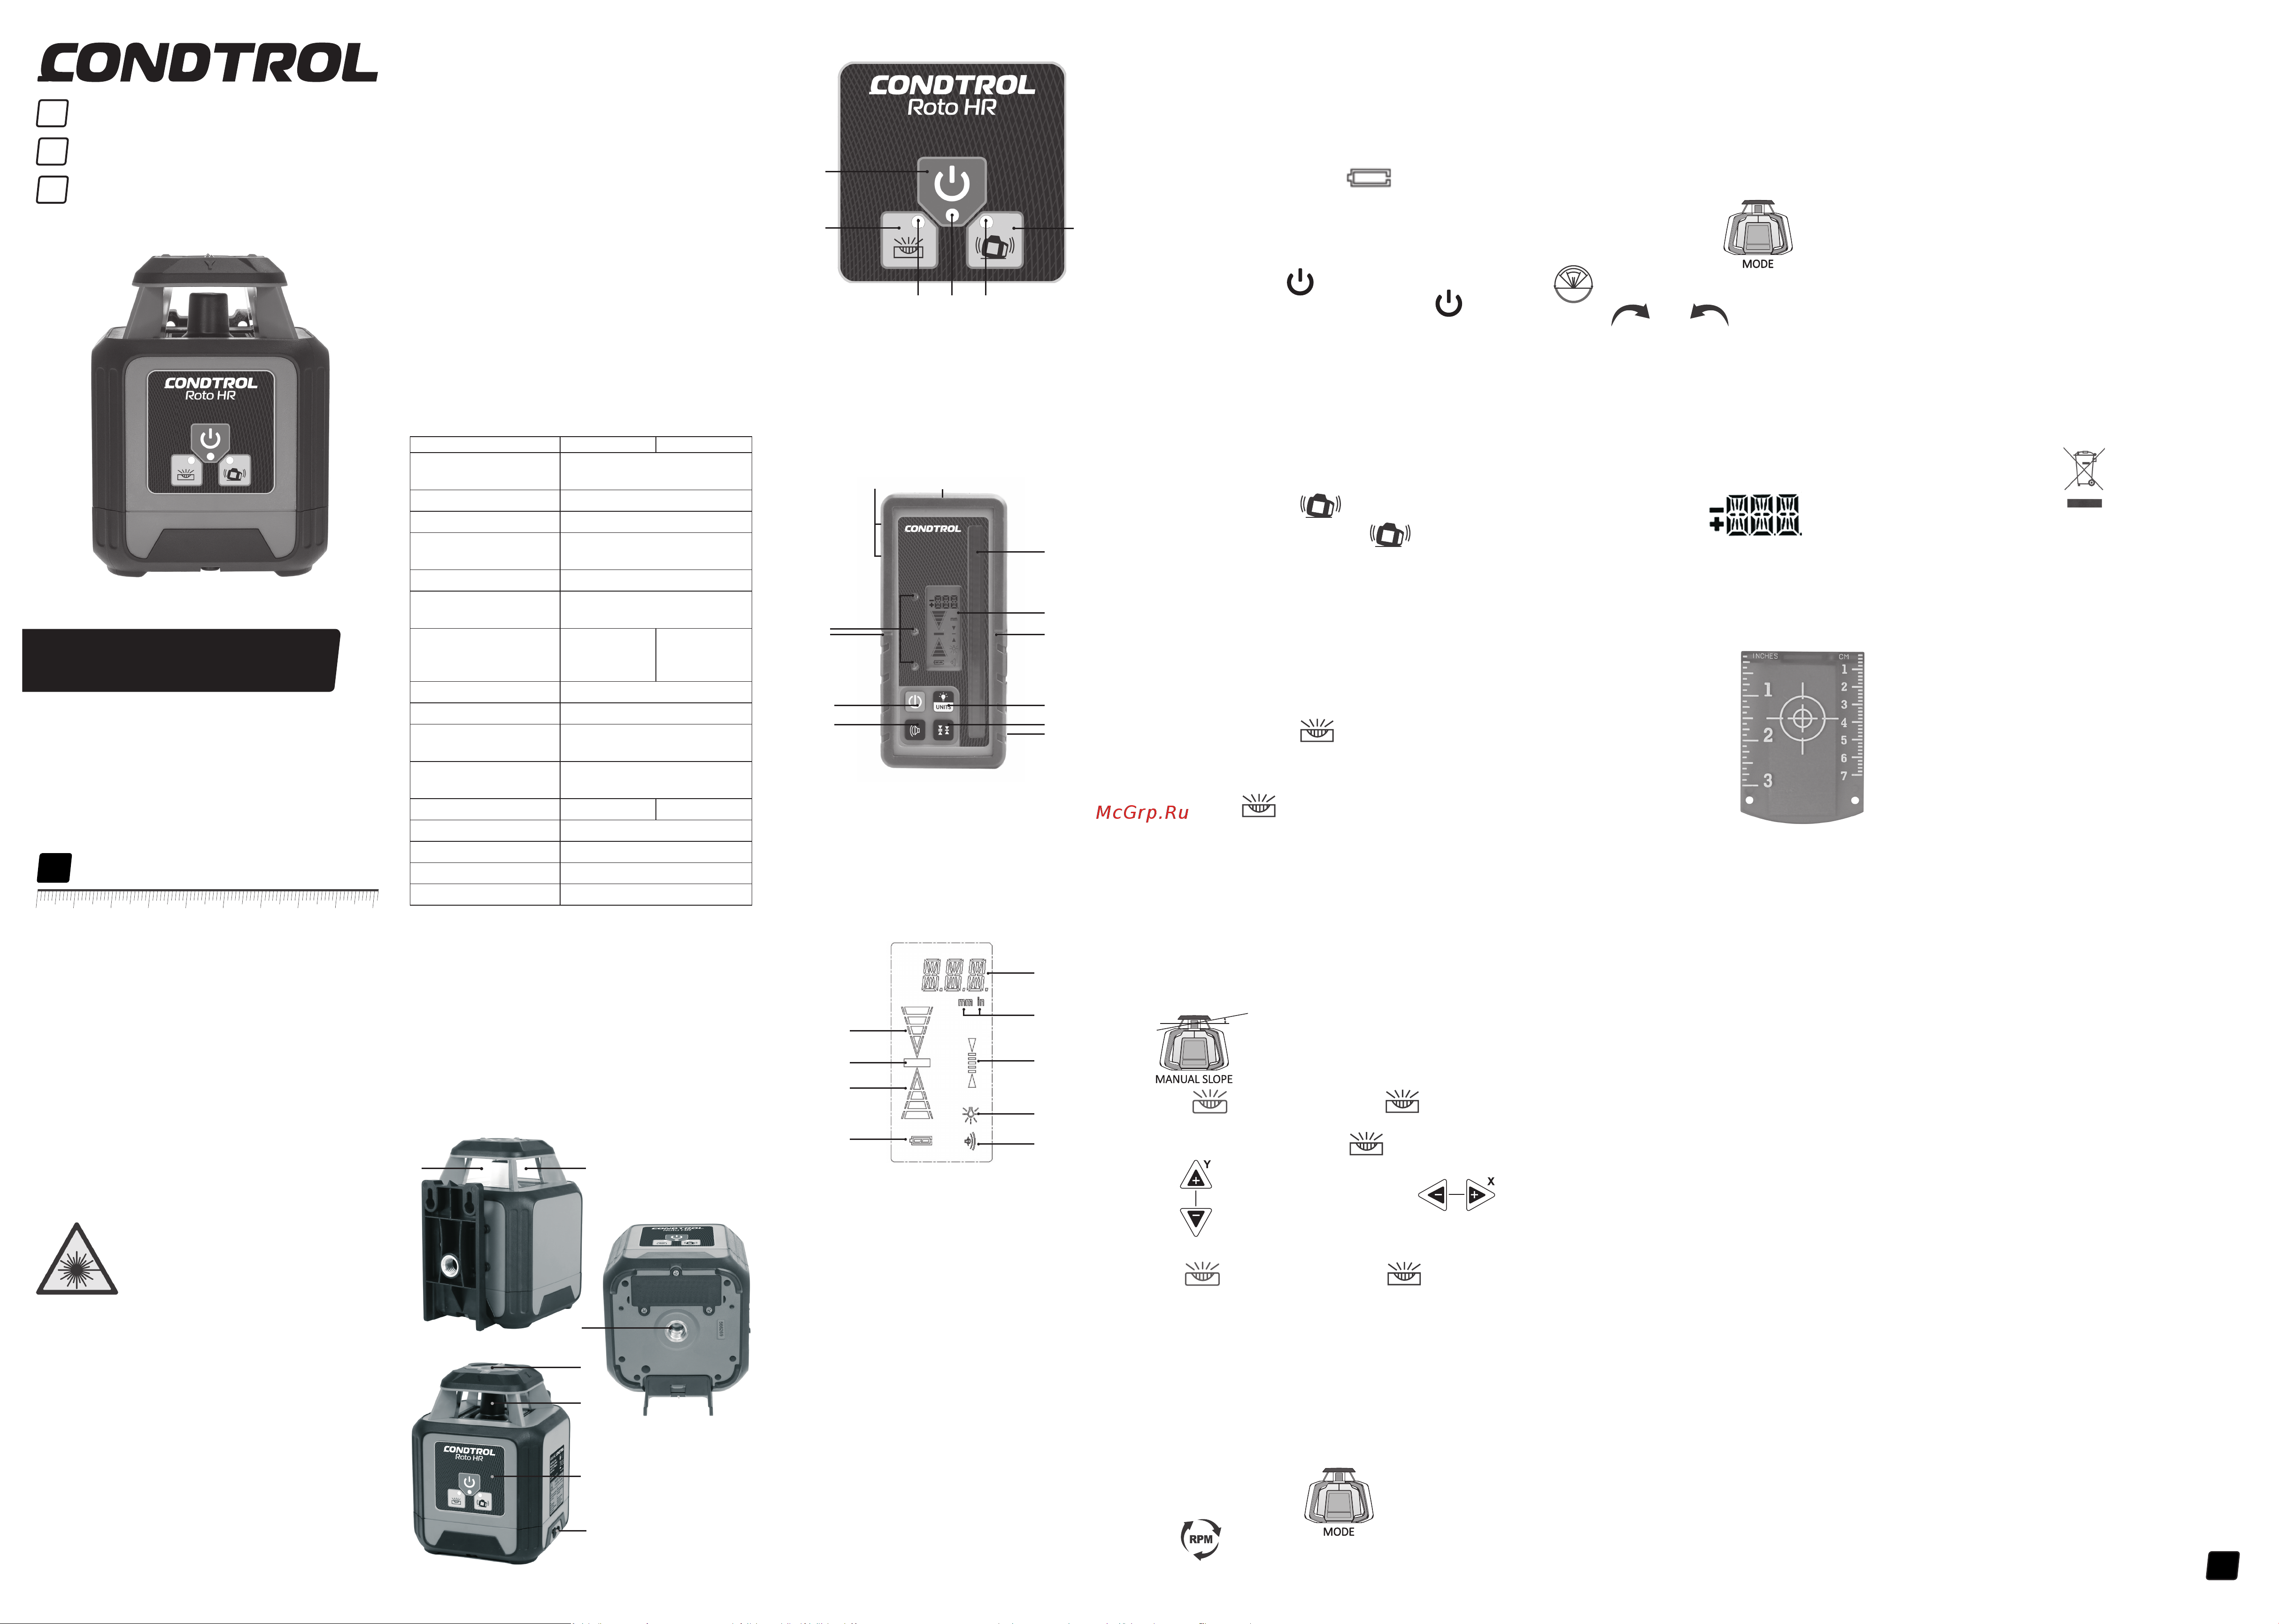
Control panel
1. Switch on/off the rotary laser
2. Switch on/switch off manual mode
3. Stop self-leveling after misalignment of the rotary laser
LED indicators
4. Manual mode
5. Power
6. Stop self-leveling after misalignment of the rotary laser
Laser receiver
1. LCD:
1.1 Distance to the laser line
1.2. Measuring units (mm, inch)
1.3. Indication of accuracy
1.4. Indication of backlight
1.5. Indication of audio signal
1.6. Indication of battery charge level
1.7. Indication of movement direction
1.8. Indication of detected laser line
2. Keyboard:
2.1. Switch on/off
2.2. Select measuring unit / LCD backlight
2.3. Switch on/off audio signal
2.4. Select high / middle / rough accuracy
3. LED indicators
4. Receiver sensor
5. Battery compartment
6. Magnets
7. Level marks
OPERATION
Battery charging
The rotary laser is powered by Li-ion rechargeable batteries.
If the power indicator starts flashing during operation, the
battery must be charged.
Use the charger, included in the delivery package, for charging
of Li-ion batteries.
It takes about 5 hours to fully charge the battery. Light
indicator on the charger will be red while charging.
When light indicator on the charger turns green, the battery is
full. Disconnect the charger.
The batteries should be charged at least every three months so
as to extend the battery service life.
3
4 65
1
2
1. Laser exit window
2. Rotating head
3. Laser dot exit window
(zenith)
4. Control panel
5. Charging jack
6. Tripod thread 5/8” /
laser dot exit window
(nadir)
1.1
1.2
1.3
1.4
1.5
1.6
1.8
1.7
1.7
4
1
3
2.2
5
6
2.4
2.1
2.3
6
7
7
Replace batteries in laser receiver
Laser receiver is powered by 6F22 9V included in the delivery
package.
Battery compartment is located on the back side of laser
receiver.
Open the battery cover, install the battery, observing correct
polarity. Close the battery cover.
Replace the battery as soon as the symbol of battery charge
level becomes empty on the LCD .
Use batteries 9V 6LR61/6F22 only. Remove the battery from
laser receiver if it is not used for a long time to avoid corrosion
and battery discharging.
Switch on/off the rotary laser
Short press the button to switch on/off the laser.
When the laser is switched on, the power indicator turns
red and switch off when the laser is off.
OPERATION MODES
Self-leveling mode
Place the instrument on a flat surface, tripod 5/8” or universal
mount.
Switch on the laser. As soon as self-leveling is finished the head
starts rotating clockwise at 600 rpm.
If the slope of the rotary laser exceeds (5°), laser beam will be
flashing, the head won’t rotate. Switch off the laser, set it on
the surface and switch it on again.
Short press the button to switch off self-leveling
after the laser is misaligned. Indicator will be flashing
green.
If the rotary laser is unbalanced by some external influence,
the laser will not align. Switch off the laser, then switch it on
again and repeat operation.
Manual mode
This mode allows to project plane at any slope.
Place the rotary laser on a solid and flat surface. Switch on
the laser. Power indicator will turn red. The laser beam will be
flashing while self-leveling.
As soon as self-leveling is finished, the head will start rotating
clockwise at 600 rpm.
Short press the button to activate manual mode.
The laser will switch to manual mode; indicator of manual
mode will switch on. Set the device at the desired angle and
fix its position.
Short press to exit manual mode. Manual mode
indicator will switch off.
Projection of inclined laser plane (axis X and Y)
This function can be operated by the APP “Roto Remote”.
It allows to project inclined horizontal laser plane tilted up to
±10% for the axes X and Y.
Place the instrument on a solid and flat surface. Switch on the
laser.
Switch on Bluetooth in your smartphone. Start the APP “Roto
Remote”.
The app will detect the rotary laser automatically. After
successful connection of the app with the rotary laser select
in the app menu.
Tap or short press the button on the rotary
laser to activate manual mode. The laser will switch to manual
mode. Indicator of manual mode will be green.
Tap to adjust the slope for the axis Y. Tap
to adjust the slope for the axis X.
Tap or short press the button to exit the
manual mode.
Laser dots
This laser can project laser dots (zenith and nadir). They are
always on as long as the laser is on too.
Rotation speed
This function can be operated by the APP “Roto Remote” only.
Switch on the laser. Switch on Bluetooth in your smartphone.
Start the APP “Roto Remote”. The app will detect the rotary
laser automatically. After successful connection of the app
with the rotary laser select .
Tap repeatedly to change the rotation speed.
Rotation speed set by default is 600 rpm.
Rotation speed will change in the following way: 600-0-120-
300-600… rpm.
Attention! The slower rotation speed, the brighter the laser
beam.
Scan mode
This function can be operated by the APP “Roto Remote” only.
Switch on the rotary laser. Switch on Bluetooth in your
smartphone. Start the APP “Roto Remote”. The app will detect
the rotary laser automatically. After successful connection of
the app with the rotary laser select .
Tap repeatedly to select the scan sector – 0°, 10°; 45°;
90°; 180°. Tap and to move the scan sector
clockwise or counterclockwise accordingly.
Operation with laser receiver
Switch on the laser receiver. Fix the laser receiver on the
leveling rod, metal surface etc.
Place the laser receiver in front of the laser beam. Move the
detector up / down following the arrows on the LCD (front or
back, whichever is more convenient) and LED indicators. A
down arrow on the display indicates that the receiver should
be moved down; an up arrow indicates that the receiver
should be moved up. Indicator shows the
exact distance to the laser line. When the laser beam hits the
center of the receiver sensor and position of the laser beam
coincides with levels marks, the receiver emits audio signal (if
the audio signal is switched on) and symbol of detected laser
line appears on the display.
Magnetic target board
A magnetic laser target will
help to mark up ceiling systems
or frame structures, such as
drywall. The built-in magnet
allows to fix the target on the
ceiling rails or on the frame
profile. The target has a linear
marking on its surface, which
helps to determine deviation
from the nominal level and
transfer control points when
marking with a laser level.
ACCURACY CHECK
Axis X
1.Place the instrument at 0.5 m distance from one wall and
10 m distance from another wall, so that axis X is aimed at
the wall.
2.Switch on the instrument. As soon as self-leveling is finished,
mark location of laser beam on both walls by points X1 and X2.
3.Switch off the instrument. Move it to the opposite wall,
position of the instrument should remain unchanged.
4.Switch on the instrument. Align laser line with the previously
made point X2. Mark point X3 on the opposite wall.
5.If distance between points X1 и X3 is more than 3 mm –
switch off the instrument and contact service center.
Axis Y
1.Place the instrument at 0.5 m distance from one wall and
10 m distance from another wall, so that axis Y is aimed at
the wall.
2.Switch on the instrument. As soon as self-leveling is finished,
mark location of laser beam on both walls by points Y1 and Y2.
3.Switch off the instrument. Move it to the opposite wall,
position of the instrument should remain unchanged.
4.Switch on the instrument. Align laser line with the previously
made point Y2. Mark point Y3 on the opposite wall.
5.If distance between points Y1 и Y3 is more than 3 mm –
switch off the instrument and contact service center.
CARE AND MAINTENANCE
Rotary laser is a high-precision instrument and requires careful
handling. Before using as well as after physical impact (falling,
hitting) carry out accuracy check.
Observation of the following recommendations will extend
the life of the device:
1) Store the instrument, spare parts and its accessories beyond
reach of children and unauthorized people.
2) The instrument should be transported in the off state inside
the case only.
3) Do not store the instrument in dusty or dirty locations. The
instrument is dust and dirt resistant, but long-time exposure
to these elements may damage internal moving parts of the
instrument.
4) Store the instrument in dry locations. The instrument
is water resistant, but precipitate, humidity and liquids
containing minerals may damage the electrical circuits of
the instrument. Do not try to dry the instrument by fire or a
hairdryer.
5) Do not store the instrument in locations where temperature
is more than +50°С. High temperatures reduce the life of
electronic devices, damage batteries, deform or melt some
plastic parts.
6) Do not store the instrument in locations where temperature
is less than -20°С.
After storage in low temperature conditions and subsequent
transfer to a warm room, the instrument is heated, causing
moisture condense inside the instrument and damage the
electronic components.
7) Protect the instrument from bumps, drops, strong
vibrations, as they may reduce the accuracy.
8) Carry out accuracy check regularly (see paragraph
«Accuracy check»).
9) To clean the instrument use a soft wet cloth. Do not use
harsh chemicals, cleaning solvents or detergents.
10) Сlean laser aperture regularly with a soft lint-free cloth
with isopropyl alcohol.
11) Remove batteries from the instrument if it not used
12) Do not leave discharged batteries in the instrument.
UTILIZATION
Expired tools, accessories and package should be passed for
waste recycle. Please send the instrument to the following
address for proper recycling:
CONDTROL GmbH
Wasserburger Strasse 9
84427 Sankt Wolfgang
Germany
Do not throw the instrument in municipal waste!
According to European directive 2002/96/ЕC expired
measuring tools and their components must be collected
separately and submitted to environmentally friendly recycle
of wastes.
WARRANTY
All CONDTROL GmbH products go through post-production
control and are governed by the following warranty terms. The
buyer’s right to claim about defects and general provisions of
the current legislation do not expire.
1) CONDTROL GmbH agrees to eliminate all defects in the
product, discovered while warranty period, that represent the
defect in material or workmanship in full volume and at its own
expense.
2) The warranty period is 24 months and starts from the date
of purchase by end customer (see the original supporting
document).
3) The warranty doesn’t cover defects resulting from wear
and tear or improper use, malfunction of the product caused
by failure to observe the instructions of this user manual,
untimely maintenance and service and insufficient care, the
use of non-original accessories and spare parts. Modifications
in design of the product relieve the seller from responsibility
for warranty works. The warranty does not cover cosmetic
damage, that doesn’t hinder normal operation of the product.
4) CONDTROL GmbH reserves the right to decide on
replacement or repair of the device.
5) Other claims not mentioned above, are not covered by the
warranty.
6) After holding warranty works by CONDTROL GmbH warranty
period is not renewed or extended.
7) CONDTROL GmbH is not liable for loss of profit or
inconvenience associated with a defect of the device, rental
cost of alternative equipment for the period of repair.
This warranty applies to German law except provision of the
United Nations Convention on contracts for the international
sale of goods (CISG).
In warranty case please return the product to retail seller or
send it with description of defect to the following address:
CONDTROL GmbH
Wasserburger Strasse 9
84427 Sankt Wolfgang
Germany
Похожие устройства
- Condtrol hg с детектором x-actroto в комплекте, 500 метров 7-2-087 Инстркуция
- Kraftool RL600 34600_z01 Инструкция к товару
- Stabila LAR 160 + ресивер REC160 RG + строительный штатив BST-S + нивелирная рейка NL + визирная пластина + очки 19241 Инструкция к товару
- Stabila LAR 350 19111 Каталог 2020
- Stabila LAR 350 19111 Инструкция по эксплуатации
- Bosch ARM 3200 0.600.8A6.008 Инструкция к Bosch ARM 3200 06008A6008
- Bosch Rotak 320 0.600.885.A00 Инструкция к Bosch Rotak 320 0.600.885.A00
- Grinda 1300 Вт GLM-38 Инструкция к Grinda GLM-38
- Skil 0711RA F0150711RA Инструкция к Skil 0711RA F0150711RA
- STARWIND ELM-1500 электрическая 1500 Вт 1909396 Расширенное описание
- Huter 71/3/59 Паспорт
- Huter 71/3/60 Инструкция к товару
- Cleanfix R 44-180 741.000.1 Инструкция к Cleanfix R 44-180 741.000.1
- Cleanfix R 44-DuoSpeed 790.000 Инструкция к Cleanfix R 44-DuoSpeed 790.000
- Калибр НР-01/56 для универсального снегоуборщика МУ-5,5 00000050693 Инструкция к товару
- Arlight INTELLIGENT DALI-233-BR-DIM-IN 0 26772 Инструкция к товару
- Arlight LN-500-TE-NF 0 27605 Инструкция к товару
- Arlight LN-500-TE-NF 0 27605 Инструкция к товару
- Hunter PGJ 04 3 шт. PGJ04 Брошюра
- Hunter PGJ 04 3 шт. PGJ04 Инструкция к Hunter PGJ 04 PGJ04