![Haier HOQ-F6QSN3GB — бүйірлік тіректерді алып тастау: Нұсқаулық және қауіпсіздік шаралары [110/124]](/img/pdf.png)
Haier HOQ-F6QSN3GB — бүйірлік тіректерді алып тастау: Нұсқаулық және қауіпсіздік шаралары [110/124]
![Haier HOQ-F6QAN3DG Инструкция по эксплуатации онлайн [110/124] 873365](/views2/2112293/page110/bg6e.png)
108
Бүйірлік тіректі алып тастау
МАҢЫЗДЫ!
Алдымен міндетті түрде қуат баусымын рəзеткеден суыру арқылы
тұмшапешті өшіріңіз. Жұмысқа кіріспес бұрын тұмшапештің толық өшкеніне
көз жеткізіңіз.
Бүкіл сөрені алыңыз:
Бүкіл сөрені тартып, шығарыңыз.
Оңай алу үшін тұмшапеш есігін алуға кеңес беріледі. Тұмшапеш есігін алу
жəне қайта орнату бөлімін қараңыз.
Removing the side rack
IMPORTANT!
A
lways turn off the oven at the wall first. Ensure the oven has
cooled down completely before starting.
Remove all shelves:
Slide out all shelves and remove.
For easier access we recommend removing the oven door. See
'Removing and refitting the oven door
.
Remove both side racks:
Unscrew and remove the fixing nut at the front of the side rack Use
a coin to loosen the screw if necessary.
1. Pull the side rack toward the center of the oven until the front tab
is clear of the fixing scre .
2. Slide the side rack forward until the rear prongs are clear of the
holes.
Fixing nut
Fixing screw
Rear prong
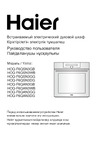
Екі жақ бүйірлік тіреулерін алу:
Бүйірлік тіреудің алдыңғы бөлігіндегі бекіткіш сомынды бұрап, шығарыңыз.
Қажет болса, бұранданы босату үшін монета пайдаланыңыз.
1. Бүйірлік тіреуді алдыңғы таяныш бекіткіш бұрандадан босайтындай етіп,
тұмшапештің ортасына қарай тартыңыз.
2. Бүйірлік тіреуді артқы істіктер саңылаудан шыққанша алға қарай
жылжытыңыз.
37
Removing the side rack
IMPORTANT!
A
lways turn off the oven at the wall first. Ensure the oven has
cooled down completely before starting.
Remove all shelves:
Slide out all shelves and remove.
For easier access we recommend removing the oven door. See
'Removing and refitting the oven door
.
Remove both side racks:
Unscrew and remove the fixing nut at the front of the side rack Use
a coin to loosen the screw if necessary.
1. Pull the side rack toward the center of the oven until the front tab
is clear of the fixing scre .
2. Slide the side rack forward until the rear prongs are clear of the
holes.
Rear prong
Артқы істік
Бекіткіш сомын
Бекіткіш бұранда
Похожие устройства
-
 Haier HOX-P09NTBРуководство по эксплуатации
 -
 Haier HOQ-F6QAN3GBИнструкция по эксплуатации
 -
Haier HOQ-F6QAN3GGИнструкция по эксплуатации
-
Haier HOQ-F6QAN3DGИнструкция по эксплуатации
-
Haier HOQ-F6QSN3GGИнструкция по эксплуатации
-
Haier HOQ-F6QSN3DGИнструкция по эксплуатации
-
Haier HOQ-F6QSN3WBИнструкция по эксплуатации
-
 Haier HOX-P09NTBИнструкция по эксплуатации
 -
 Haier HOX-T08AMTBИнструкция по эксплуатации
 -
 Haier HOX-FT5AMTBИнструкция по эксплуатации
 -
 Simfer H10-20-220-035 (ревизия 005)Инструкция к устройству
 -
 Schtoff CME 7307 WHРуководство по использованию
Бүйірлік тіректерді қауіпсіз түрде алып тастау үшін қажетті нұсқаулық. Тұмшапешті өшіріп, сөрелерді шығарып, есікті алу бойынша кеңестер.