![Haier HOQ-F6QSN3GB — инструкция по снятию боковой стойки духового шкафа [49/124]](/img/pdf.png)
Haier HOQ-F6QSN3GB — инструкция по снятию боковой стойки духового шкафа [49/124]
![Haier HOQ-F6QSN3GB Инструкция по эксплуатации онлайн [49/124] 873364](/views2/2112293/page49/bg31.png)
47
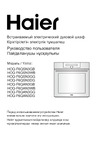
Снятие боковой стойки
ВАЖНО!
Сначала обязательно отключите духовку, вытащив шнур питания из
розетки. Перед началом работ убедитесь, ч
то духовой шкаф полностью остыл.
Снимите все полки:
Выдвиньте все полки и снимите их.
Для облегчения доступа рекомендуется снять дверцу духового шкафа.
См. раздел Снятие и повторная установка
дверцы духового шкафа.
Removing the side rack
IMPORTANT!
A
lways turn off the oven at the wall rst. Ensure the oven has
cooled down completely before starting.
Remove all shelves:
Slide out all shelves and remove.
For easier access we recommend removing the oven door. See
'Removing and retting the oven door'
.
Remove both side racks:
Unscrew and remove the xing nut at the front of the side rack. Use
a coin to loosen the screw if necessary.
1. Pull the side rack toward the center of the oven until the front tab
is clear of the xing screw.
2. Slide the side rack forward until the rear prongs are clear of the
holes.
Fixing nut
Fixing screw
Rear prong
Снятие обеих боковых стоек:
Отверните и снимите крепежную гайку в передней части боковой стойки.
Воспользуйтесь монетой для ослабления винта при необходимости.
1.Потяните боковую стойку к центру духового шкафа так, чтобы передний
упор освободился от крепежного винта.
2. Сдвигайте боковую стойку вперед, пока задние штыри не выйдут
из отверстий.
37
Removing the side rack
IMPORTANT!
A
lways turn off the oven at the wall rst. Ensure the oven has
cooled down completely before starting.
Remove all shelves:
Slide out all shelves and remove.
For easier access we recommend removing the oven door. See
'Removing and retting the oven door'
.
Remove both side racks:
Unscrew and remove the xing nut at the front of the side rack. Use
a coin to loosen the screw if necessary.
1. Pull the side rack toward the center of the oven until the front tab
is clear of the xing screw.
2. Slide the side rack forward until the rear prongs are clear of the
holes.
Fixing nut
Fixing screw
Rear prong
Задний штырь
Крепежная гайка
Крепежный винт
Похожие устройства
-
 Haier HOX-P09NTBРуководство по эксплуатации
 -
 Haier HOQ-F6QAN3GBИнструкция по эксплуатации
 -
Haier HOQ-F6QAN3GGИнструкция по эксплуатации
-
Haier HOQ-F6QAN3DGИнструкция по эксплуатации
-
Haier HOQ-F6QSN3GGИнструкция по эксплуатации
-
Haier HOQ-F6QSN3DGИнструкция по эксплуатации
-
Haier HOQ-F6QSN3WBИнструкция по эксплуатации
-
 Haier HOX-P09NTBИнструкция по эксплуатации
 -
 Haier HOX-T08AMTBИнструкция по эксплуатации
 -
 Haier HOX-FT5AMTBИнструкция по эксплуатации
 -
 Simfer H10-20-220-035 (ревизия 005)Инструкция к устройству
 -
 Schtoff CME 7307 WHРуководство по использованию
Узнайте, как правильно снять боковые стойки духового шкафа. Следуйте пошаговым инструкциям для безопасного выполнения работы и обеспечения легкого доступа.