
Joyetech eVic AIO, 75w, без аккумулятора, стальной Инструкция по эксплуатации онлайн
Похожие устройства
- Joyetech eVic AIO, 75w, без аккумулятора, черный Инструкция по эксплуатации
- Joyetech eGo AIO Box, 2100 mAh, 2 мл, черный Инструкция по эксплуатации
- Joyetech Ultimo 4 мл, черный Инструкция по эксплуатации
- Joyetech Ultimo 4 мл, стальной Инструкция по эксплуатации
- Joyetech eGo Mega Twist, 2300 mAh, 4 мл, черный Инструкция по эксплуатации
- Prestigio MultiPhone 3400 DUO Руководство пользователя
- Prestigio MultiPhone 3350 DUO Руководство по быстрому старту
- Prestigio MultiPhone 3350 DUO Руководство пользователя
- Prestigio MultiPhone 5044 Duo Руководство по быстрому старту
- Prestigio MultiPhone 5044 Duo Руководство пользователя
- Prestigio MultiPhone 5501 Руководство пользователя
- Prestigio MultiPhone 5501 Руководство по быстрому старту
- Prestigio MultiPhone 7500 Руководство по быстрому старту
- Prestigio MultiPhone 7500 Руководство пользователя
- Prestigio MultiPhone 4044 DUO Руководство по быстрому старту
- Prestigio MultiPhone 4044 DUO Руководство пользователя
- Prestigio MultiPhone 4020 DUO Руководство по быстрому старту
- Prestigio MultiPhone 5000 DUO Руководство по быстрому старту
- Prestigio MultiPhone 5000 DUO Руководство пользователя
- Prestigio MultiPhone 4300 DUO Руководство по быстрому старту
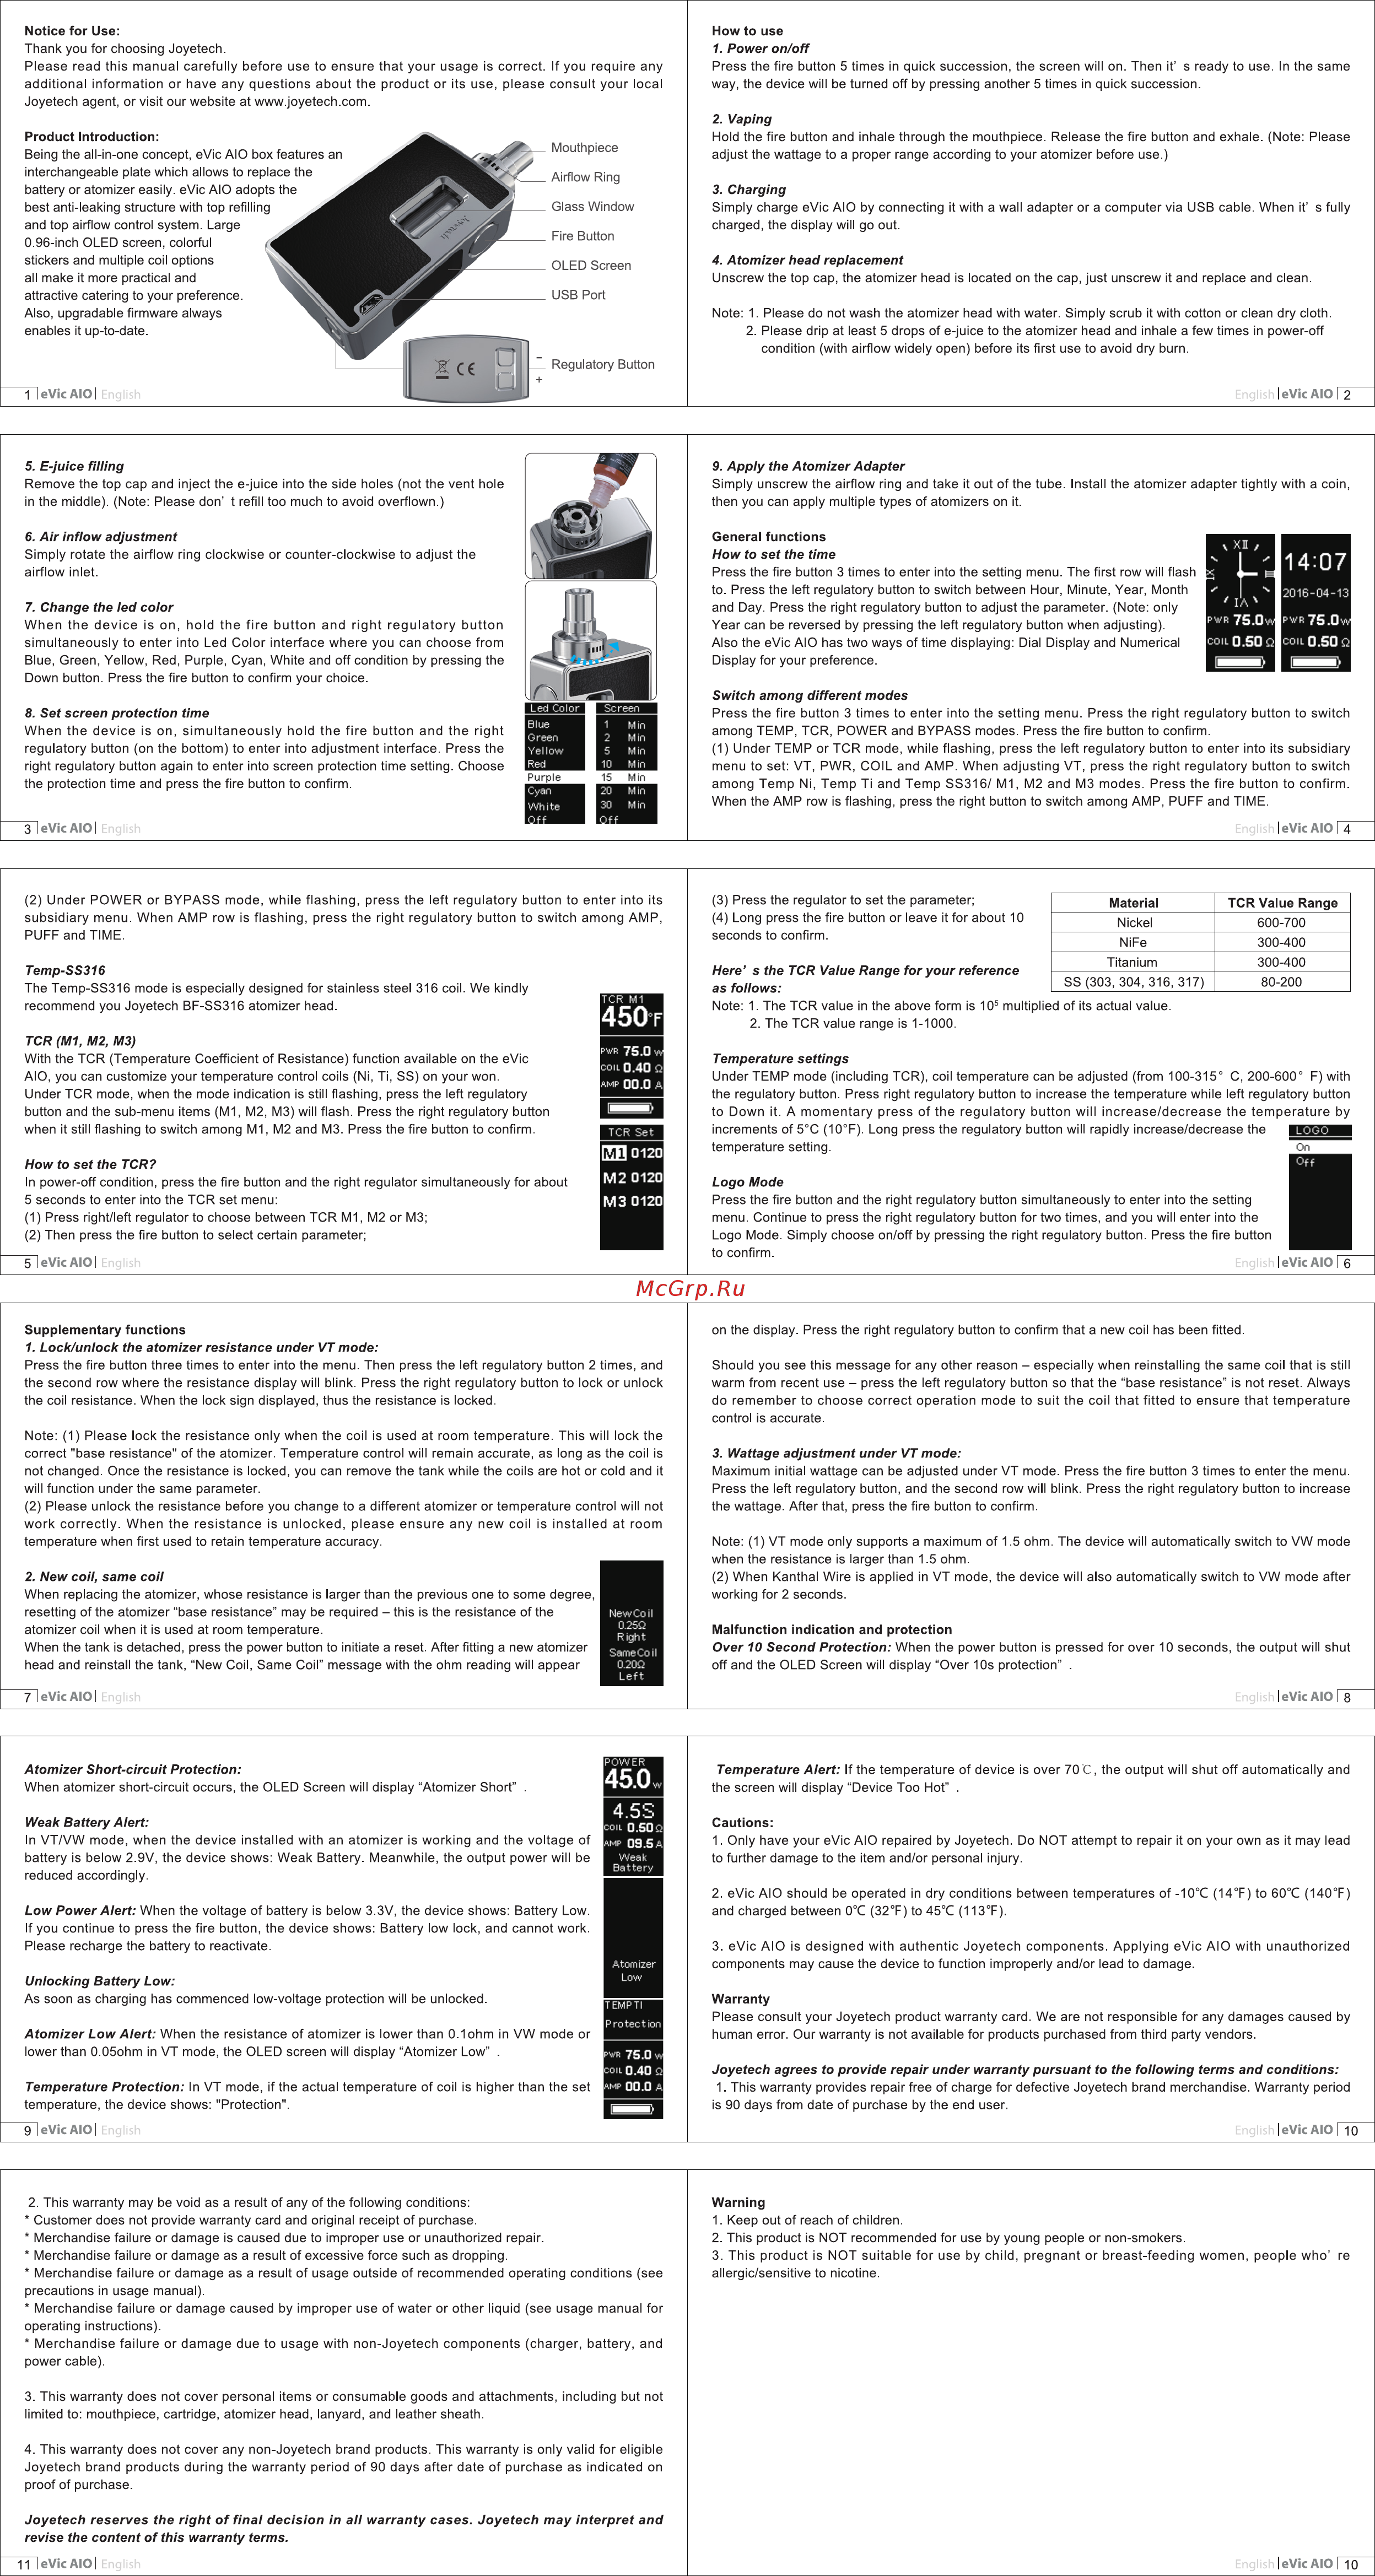
Notice for Use Thank you for choosing Joyetech Please read this manual carefully before use to ensure that your usage is correct If you require any additional information or have any questions about the product or its use please consult your local Joyetech agent or visit our website at www joyetech com Product Introduction Being the all in one concept eVic AIO box features an interchangeable plate which allows to replace the battery or atomizer easily eVic AIO adopts the best anti leaking structure with top refilling and top airflow control system Large 0 96 inch OLED screen colorful stickers and multiple coil options all make it more practical and attractive catering to your preference Also upgradable firmware always enables it up to date How to use 1 Power on off Press the fire button 5 times in quick succession the screen will on Then it s ready to use In the same way the device will be turned off by pressing another 5 times in quick succession 2 Vaping Hold the fire button and inhale through the mouthpiece Release the fire button and exhale Note Please adjust the wattage to a proper range according to your atomizer before use Mouthpiece Airflow Ring 3 Charging Simply charge eVic AIO by connecting it with a wall adapter or a computer via USB cable When it s fully charged the display will go out Glass Window Fire Button 4 Atomizer head replacement Unscrew the top cap the atomizer head is located on the cap just unscrew it and replace and clean OLED Screen USB Port Note 1 Please do not wash the atomizer head with water Simply scrub it with cotton or clean dry cloth 2 Please drip at least 5 drops of e juice to the atomizer head and inhale a few times in power off condition with airflow widely open before its first use to avoid dry burn __ Regulatory Button Engli eVic AIO 2 9 Apply the Atomizer Adapter 5 E juice filling Remove the top cap and inject the e juice into the side holes not the vent hole in the middle Note Please don t refill too much to avoid overflown Simply unscrew the airflow ring and take it out of the tube Install the atomizer adapter tightly with a coin then you can apply multiple types of atomizers on it 6 Air inflow adjustment Simply rotate the airflow ring clockwise or counter clockwise to adjust the airflow inlet General functions How to set the time Press the fire button 3 times to enter into the setting menu The first row will flash to Press the left regulatory button to switch between Hour Minute Year Month and Day Press the right regulatory button to adjust the parameter Note only Year can be reversed by pressing the left regulatory button when adjusting Also the eVic AIO has two ways of time displaying Dial Display and Numerical Display for your preference 7 Change the led color When the device is on hold the fire button and right regulatory button simultaneously to enter into Led Color interface where you can choose from Blue Green Yellow Red Purple Cyan White and off condition by pressing the Down button Press the fire button to confirm your choice Switch among different modes Press the fire button 3 times to enter into the setting menu Press the right regulatory button to switch among TEMP TCR POWER and BYPASS modes Press the fire button to confirm 1 Under TEMP or TCR mode while flashing press the left regulatory button to enter into its subsidiary menu to set VT PWR COIL and AMP When adjusting VT press the right regulatory button to switch among Temp Ni Temp Ti and Temp SS316 M1 M2 and M3 modes Press the fire button to confirm When the AMP row is flashing press the right button to switch among AMP PUFF and TIME 8 Set screen protection time When the device is on simultaneously hold the fire button and the right regulatory button on the bottom to enter into adjustment interface Press the right regulatory button again to enter into screen protection time setting Choose the protection time and press the fire button to confirm Purple 15 Min Cyan White 31 Vic AIO 2 Under POWER or BYPASS mode while flashing press the left regulatory button to enter into its subsidiary menu When AMP row is flashing press the right regulatory button to switch among AMP PUFF and TIME 3 Press the regulator to set the parameter 4 Long press the fire button or leave it for about 10 seconds to confirm Temp SS316 The Temp SS316 mode is especially designed for stainless steel 316 coil We kindly recommend you Joyetech BF SS316 atomizer head Titanium Here s the TCR Value Range for your reference SS 303 304 316 317 as follows Note 1 The TCR value in the above form is 105 multiplied of its actual value 2 The TCR value range is 1 1000 Material TCR Value Range Nickel 600 700 NiFe 300 400 300 400 80 200 TCR Ml M2 M3 Temperature settings Under TEMP mode including TCR coil temperature can be adjusted from 100 315 C 200 600 F with the regulatory button Press right regulatory button to increase the temperature while left regulatory button to Down it A momentary press of the regulatory button will increase decrease the temperature by increments of 5 C 10 F Long press the regulatory button will rapidly increase decrease the temperature setting With the TCR Temperature Coefficient of Resistance function available on the eVic AIO you can customize your temperature control coils Ni Ti SS on your won Under TCR mode when the mode indication is still flashing press the left regulatory button and the sub menu items Ml M2 M3 will flash Press the right regulatory button when it still flashing to switch among M1 M2 and M3 Press the fire button to confirm How to set the TCR In power off condition press the fire button and the right regulator simultaneously for about 5 seconds to enter into the TCR set menu 1 Press right left regulator to choose between TCR Ml M2 or M3 2 Then press the fire button to select certain parameter Logo Mode Press the fire button and the right regulatory button simultaneously to enter into the setting menu Continue to press the right regulatory button for two times and you will enter into the Logo Mode Simply choose on off by pressing the right regulatory button Press the fire button to confirm 51 eVic AIO Enc Supplementary functions 1 Lock unlock the atomizer resistance under VT mode Press the fire button three times to enter into the menu Then press the left regulatory button 2 times and the second row where the resistance display will blink Press the right regulatory button to lock or unlock the coil resistance When the lock sign displayed thus the resistance is locked Note 1 Please lock the resistance only when the coil is used at room temperature This will lock the correct base resistance of the atomizer Temperature control will remain accurate as long as the coil is not changed Once the resistance is locked you can remove the tank while the coils are hot or cold and it will function under the same parameter 2 Please unlock the resistance before you change to a different atomizer or temperature control will not work correctly When the resistance is unlocked please ensure any new coil is installed at room temperature when first used to retain temperature accuracy 2 New coil same coil When replacing the atomizer whose resistance is larger than the previous one to some degree resetting of the atomizer base resistance may be required this is the resistance of the atomizer coil when it is used at room temperature When the tank is detached press the power button to initiate a reset After fitting a new atomizer head and reinstall the tank New Coil Same Coil message with the ohm reading will appear NewCoil 0 25Q Right Same Co 0 20Q Left il on the display Press the right regulatory button to confirm that a new coil has been fitted Should you see this message for any other reason especially when reinstalling the same coil that is still warm from recent use press the left regulatory button so that the base resistance is not reset Always do remember to choose correct operation mode to suit the coil that fitted to ensure that temperature control is accurate 3 Wattage adjustment under VT mode Maximum initial wattage can be adjusted under VT mode Press the fire button 3 times to enter the menu Press the left regulatory button and the second row will blink Press the right regulatory button to increase the wattage After that press the fire button to confirm Note 1 VT mode only supports a maximum of 1 5 ohm The device will automatically switch to VW mode when the resistance is larger than 1 5 ohm 2 When Kanthal Wire is applied in VT mode the device will also automatically switch to VW mode after working for 2 seconds Malfunction indication and protection Over 10 Second Protection When the power button is pressed for over 10 seconds the output will shut off and the OLED Screen will display Over 10s protection 71 Vic AIO I English eVic AIO Hs Atomizer Short circuit Protection When atomizer short circuit occurs the OLED Screen will display Atomizer Short Temperature Alert If the temperature of device is over 70 C the output will shut off automatically and the screen will display Device Too Hot Weak Battery Alert Cautions 1 Only have your eVic AIO repaired by Joyetech Do NOT attempt to repair it on your own as it may lead to further damage to the item and or personal injury In VT VW mode when the device installed with an atomizer is working and the voltage of battery is below 2 9V the device shows Weak Battery Meanwhile the output power will be reduced accordingly Low Power Alert When the voltage of battery is below 3 3V the device shows Battery Low If you continue to press the fire button the device shows Battery low lock and cannot work Please recharge the battery to reactivate 2 eVic AIO should be operated in dry conditions between temperatures of 10 C 14 F to 60 C 140 F and charged between 0 C 32 F to 45 C 113 F 3 eVic AIO is designed with authentic Joyetech components Applying eVic AIO with unauthorized components may cause the device to function improperly and or lead to damage Unlocking Battery Low As soon as charging has commenced low voltage protection will be unlocked Atomizer Low Alert When the resistance of atomizer is lower than 0 1 ohm in VW mode or lower than 0 05ohm in VT mode the OLED screen will display Atomizer Low Temperature Protection In VT mode if the actual temperature of coil is higher than the set temperature the device shows Protection Warranty Please consult your Joyetech product warranty card We are not responsible for any damages caused by human error Our warranty is not available for products purchased from third party vendors Joyetech agrees to provide repair under warranty pursuant to the following terms and conditions 1 This warranty provides repair free of charge for defective Joyetech brand merchandise Warranty period is 90 days from date of purchase by the end user 91 eVic AIO English 2 This warranty may be void as a result of any of the following conditions Customer does not provide warranty card and original receipt of purchase Merchandise failure or damage is caused due to improper use or unauthorized repair Merchandise failure or damage as a result of excessive force such as dropping Merchandise failure or damage as a result of usage outside of recommended operating conditions see precautions in usage manual Merchandise failure or damage caused by improper use of water or other liquid see usage manual for operating instructions Merchandise failure or damage due to usage with non Joyetech components charger battery and power cable lish eVic AIO 10 Warning 1 Keep out of reach of children 2 This product is NOT recommended for use by young people or non smokers 3 This product is NOT suitable for use by child pregnant or breast feeding women people who re allergic sensitive to nicotine 3 This warranty does not cover personal items or consumable goods and attachments including but not limited to mouthpiece cartridge atomizer head lanyard and leather sheath 4 This warranty does not cover any non Joyetech brand products This warranty is only valid for eligible Joyetech brand products during the warranty period of 90 days after date of purchase as indicated on proof of purchase Joyetech reserves the right of final decision in all warranty cases Joyetech may interpret and revise the content of this warranty terms TTleVic AIO eVic AIO FÍO