![Haier HOQ-K2ANN3GB — как правильно очищать аксессуары для гриля и духовки [26/79]](/img/pdf.png)
Haier HOQ-K2ANN3GB — как правильно очищать аксессуары для гриля и духовки [26/79]
![Haier HOQ-K2ANN3GB Руководство по эксплуатации онлайн [26/79] 803088](/views2/2034840/page26/bg1a.png)
24
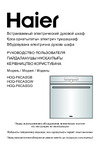
ЧТО? КАК? ВАЖНО!
Лоток для гриля Решетка
для гриля Боковые
решетки Уровни духовки
Противень
• Для очистки используйте раствор
мягкого моющего средства и горячей
воды.
• Предварительно замочите стойкие
пригоревшие пятна в растворе
порошка для посудомоечной машины
и горячей воды.
• За исключением противня эти
детали можно мыть в посудомоечной
машине.
/
Уплотнения духовки
Очистите раствором мягкого
моющего средства и горячей воды.
/
Капельный канал
Используйте губку для впитывания
влаги, которая собирается в
капельном канале с задней стороны
дверцы.
/
Содержание
- Руководство пользователя пайдаланушы нұсқаулығы p.1
- Встраиваемый электрический духовой шкаф кіріктірілетін электрлік тұмшапеш p.1
- Built in electric oven p.1
- User guide p.1
- Содержание p.2
- Правила техники безопасности p.3
- Инструкции по установке p.7
- Правила техники безопасности p.7
- Важные указания по безопасности p.8
- Утилизация устройства p.8
- Управления 20 p.9
- A габаритная высота устройства 595 p.9
- Габариты и размеры устройства мм p.9
- Габариты и размеры устройства p.9
- Сбоку p.9
- C габаритная глубина устройства 565 p.9
- G глубина рамы духовки и панели p.9
- Спереди p.9
- F габаритная глубина корпуса 545 p.9
- H глубина дверцы духовки в p.9
- D габаритная высота корпуса 575 p.9
- B габаритная ширина устройства 597 p.9
- Сверху p.9
- Полностью открытом состоянии 450 p.9
- E габаритная ширина корпуса 552 p.9
- Распаковка духовки p.10
- Unpacking the oven p.10
- Remove all packaging and dispose of it responsibly recycle items that you can place the unpacked oven onto wooden blocks or similar supports to prevent damaging the lower edge of the oven p.10
- Important p.10
- Ifting do not lift the oven by the door handle use the handles on the side of the chassis if present p.10
- Hen you remove the oven from the carton be careful not to damage the lower edge which is important for both ventilation and excess condensation p.10
- He roast trays may be deformed when cooking this is a normal phenomenon cooling will restore their original shape p.10
- Подключение к источнику питания p.11
- Установка духовки внутри кухонной мебели p.12
- Position the oven in the prepared cavity important p.12
- Oven may vary p.12
- Open the oven door fully 3 use the supplied screws to secure the oven to the cabinetry p.12
- O not over tighten the screws do not seal the oven into the cabinetry with silicone or glue this makes future servicing difficult haier will not cover the costs of removing the oven or of damage caused by this removal p.12
- O not lift the oven by the door handle p.12
- Important p.12
- Securing the oven to the cabinetry p.12
- Система нагрева p.13
- Расположение полок p.13
- Введение p.13
- Панель управления p.14
- Индикатор дисплея p.14
- Первое использование p.15
- First use p.15
- While the oven is heating up the indicator light will be on when the oven has reached the preset temperature the indicator light will go out p.16
- Turn the function selector to select the bake function 2 turn the value dial to set the temperature to 200 c p.16
- There will be a distinctive smell and a small amount of smoke during the conditioning process as manufacturing residue is burnt off this is normal but make sure the kitchen is well ventilated during the conditioning once cooled wipe out the oven with a damp cloth and mild detergent and dry thoroughly p.16
- After 30 minutes select the fan grill function leave the temperature at 200 c for 5 mins 4 after 5 minutes turn the oven off turn function selector and value dial to 0 p.16
- Функции устройства p.17
- Функция установки времени p.17
- Установка продолжительности времени приготовления p.17
- Установка таймера p.18
- Выпечка p.19
- Кулинарный справочник p.19
- Жаркое p.19
- Кондитерская выпечка p.19
- Общие рекомендации p.19
- Конвекционный гриль p.20
- Гриль p.20
- Выпечка с конвекцией p.20
- Акваочистка p.21
- Использование функции расстойки теста p.21
- Important p.22
- Open the door to allow the oven to cool down p.22
- If you want to proof the dough again p.22
- If you set a duration the display will count down the remaining time p.22
- If you set a duration for dough proof when the dough proof function is finished a tone will sound and you can take the bowl out of oven check dough to see if it is sufficiently risen your dough should look much larger in size to check if your dough has proofed gently press with one finger the indent should slowly fill back in if you don t set a duration you must monitor the proof status of dough and stop the proof by turning the function selector to neutral position when the dough proof is completed p.22
- Depending on your cooking experience you can set a dough proof duration p.22
- Turnto the function selector back to the dough proof function follow the steps on the previous page to reset the dough proof function p.22
- To cancel dough proof turn the function selector to another function p.22
- Select the bake function to preheat the oven for up to 5 minutes after 5 minutes of preheating turn the function selector to select the dough proof note if the cavity is too hot p.22
- Place the dough in a heatproof bowl and cover with a plastic wrap and or a clean damp cloth then put the bowl in the centre of the oven p.22
- O not put dough in before the oven has cooled down p.22
- Продукты на противне или в корзине аэрогриля этот режим воспроизводит условия приготовления в аэрогриле p.23
- Более здоровый способ жарки при котором продукты становятся p.23
- Аэрогриль p.23
- Хрустящими при меньшем количестве используемого масла для достижения наилучших результатов смажьте продукты 1 2 столовыми ложками масла для продуктов в упаковке если производитель рекомендует готовить p.23
- Продукт без использования вентилятора уменьшите температуру на 20 c 70 f приготовление на одной полке готовьте в верхней части духовки p.23
- Но не на самой верхней полке p.23
- Идеально подходит для приготовления замороженных продуктов или полуфабрикатов в кляре и панировке которые обычно готовят во фритюре p.23
- Для достижения наилучшего результата приготовления разложите p.23
- Уход и очистка p.24
- Очистка вручную p.24
- Всегда никогда p.24
- Что как важно p.24
- To fit 1 ensure the slides are the correct way around the front of the slide has the triangular shaped tab as shown 2 fit the top of the clips over the side rack the front clip should be fitted as close to the front of the side rack as possible make sure the rear clip has engaged 3 rotate the slide down and click the bottom of the clips into place p.28
- Slide the rear prongs of the side rack into the holes at the rear of the oven 2 fit the side rack front tab over the fixing screw 3 replace the fixing nut you may use a coin to tighten the nut p.28
- Replace the side rack p.28
- Removing and refitting the sliding shelf supports purchased separately p.28
- Ompact ovens only the sliding shelf supports cannot be used on shelf positions 3 and 4 p.28
- Important p.28
- Снятие дверцы установка дверцы на место p.30
- Важно будьте осторожны дверца духовки тяжелая p.30
- Снятие и повторная установка дверцы духовки p.30
- To remove the door p.30
- To refit the door p.30
- Removing and refitting the oven door p.30
- Important p.30
- Ake care the oven door is heavy p.30
- The light is located in the ceiling of the oven center front p.35
- Some models use g9 halogen bulbs with the specifications 220 240v 50hz and 25w always hold the replacement bulb in a soft cloth touching the bulb will reduce its lifespan p.35
- Replacing the oven light bulbs p.35
- Note oven bulb replacement is not covered by your warranty p.35
- Important t urn the oven off at the wall before continuing 2 turning anti clockwise unscrew the glass cover 3 carefully pull out the faulty halogen bulb 4 carefully pull in the new light bulb 5 turning clockwise screw the glass cover 6 turn the oven back on and set the clock see first use for instructions p.35
- Changing the bulb 1 let the oven cavity and grill element cool down before changing the bulb p.35
- Таблица поиска и устранения неисправностей p.36
- При возникновении неисправности проверьте по таблице ниже можете ли вы устранить ее если проблему не удается устранить или она сохраняется обратитесь в авторизованный сервисный центр или в отдел обслуживания клиентов p.36
- Поиск и устранение неисправностей p.36
- Условия гарантийного и дополнительного сервисного обслуживания p.38
- Уважаемый покупатель p.38
- Гарантийные условия p.38
- Обслуживание клиентов p.39
- Мазмұны p.41
- Қауіпсіздік техникасы қағидалары p.42
- Орнату бойынша нұсқаулар p.46
- Қауіпсіздік техникасы қағидалары p.46
- Қауіпсіздік жөніндегі маңызды нұсқаулар p.47
- Аспапты кәдеге жарату p.47
- Құрылғының габариттері және өлшемдері p.48
- Тақтасының тереңдігі 20 p.48
- Жанынан p.48
- Есігінің тереңдігі 450 p.48
- Алдынан p.48
- H толығымен ашық күйінде тұмшапеш p.48
- G пеш жақтауы мен басқару p.48
- F корпустың жалпы тереңдігі 545 p.48
- E корпустың жалпы ені 552 p.48
- D корпустың жалпы биіктігі 575 p.48
- C құрылғының жалпы тереңдігі 565 p.48
- B құрылғының жалпы ені 597 p.48
- A құрылғының жалпы биіктігі 595 p.48
- Үстінен p.48
- Құрылғының габариттері және өлшемдері мм p.48
- Тұмшапешті қаптамадан шығару p.49
- Unpacking the oven p.49
- Remove all packaging and dispose of it responsibly recycle items that you can place the unpacked oven onto wooden blocks or similar supports to prevent damaging the lower edge of the oven p.49
- Important p.49
- Ifting do not lift the oven by the door handle use the handles on the side of the chassis if present p.49
- Hen you remove the oven from the carton be careful not to damage the lower edge which is important for both ventilation and excess condensation p.49
- He roast trays may be deformed when cooking this is a normal phenomenon cooling will restore their original shape p.49
- Қорек көзіне қосу p.50
- Position the oven in the prepared cavity important p.51
- Oven may vary p.51
- Open the oven door fully 3 use the supplied screws to secure the oven to the cabinetry p.51
- O not over tighten the screws do not seal the oven into the cabinetry with silicone or glue this makes future servicing difficult haier will not cover the costs of removing the oven or of damage caused by this removal p.51
- O not lift the oven by the door handle p.51
- Important p.51
- Пешті ас үй жиһазының ішіне орнату p.51
- Securing the oven to the cabinetry p.51
- Қыздыру жүйесі p.52
- Сөрелердің орналасуы p.52
- Кіріспе p.52
- Дисплей индикаторы p.53
- Басқару панелі p.53
- Бірінші пайдалану p.54
- First use p.54
- While the oven is heating up the indicator light will be on when the oven has reached the preset temperature the indicator light will go out p.55
- Turn the function selector to select the bake function 2 turn the value dial to set the temperature to 200 c p.55
- There will be a distinctive smell and a small amount of smoke during the conditioning process as manufacturing residue is burnt off this is normal but make sure the kitchen is well ventilated during the conditioning once cooled wipe out the oven with a damp cloth and mild detergent and dry thoroughly p.55
- After 30 minutes select the fan grill function leave the temperature at 200 c for 5 mins 4 after 5 minutes turn the oven off turn function selector and value dial to 0 p.55
- Құрылғының функциялары p.56
- Уақытты орнату функциясы p.56
- Пісіру уақытының ұзақтығын орнату p.56
- Таймерді орнату p.57
- Қуырдақ p.58
- Пісіру p.58
- Кондитерлік пісірме p.58
- Жалпы ұсыныстар p.58
- Аспаздық анықтамалық p.58
- Гриль p.59
- Конвекциямен пісіру p.59
- Конвекциялық гриль p.59
- Қамырды толықсытуға арналған функцияны пайдалану p.60
- Автотазалау p.60
- Important p.61
- If you want to proof the dough again p.61
- If you set a duration the display will count down the remaining time p.61
- If you set a duration for dough proof when the dough proof function is finished a tone will sound and you can take the bowl out of oven check dough to see if it is sufficiently risen your dough should look much larger in size to check if your dough has proofed gently press with one finger the indent should slowly fill back in if you don t set a duration you must monitor the proof status of dough and stop the proof by turning the function selector to neutral position when the dough proof is completed p.61
- Depending on your cooking experience you can set a dough proof duration p.61
- Turnto the function selector back to the dough proof function follow the steps on the previous page to reset the dough proof function p.61
- To cancel dough proof turn the function selector to another function p.61
- Select the bake function to preheat the oven for up to 5 minutes after 5 minutes of preheating turn the function selector to select the dough proof note if the cavity is too hot p.61
- Place the dough in a heatproof bowl and cover with a plastic wrap and or a clean damp cloth then put the bowl in the centre of the oven p.61
- Open the door to allow the oven to cool down p.61
- O not put dough in before the oven has cooled down p.61
- Өнімді дайындауды ұсынса температураны 20 c 70 f төмендетіңіз бір сөреде пісіру пештің жоғарғы жағында пісіріңіз бірақ ең жоғарғы p.62
- Қуырудың пайдалы әдісі онда тағамдар аз мөлшерде қолданылған p.62
- Сөреде емес p.62
- Пісірудің жақсы нәтижесіне қол жеткізу үшін тағамды пісіру табағына p.62
- Немесе аэрогриль себетіне салыңыз бұл режим аэрогрильде пісіру шарттарын қайталайды p.62
- Маймен қытырлақ болады жақсы нәтижеге қол жеткізу үшін өнімдерді 1 2 ас қасық маймен майлаңыз қаптамадағы өнімдер үшін егер өндіруші желдеткішті пайдаланбай p.62
- Келесі тағамдарды дайындау үшін тамаша келеді мұздатылған тағамдарды немесе әдетте фритюрде пісірілетін жартылай дайын өнімдерді дайындау p.62
- Аэрогриль p.62
- Не қалай маңызды p.63
- Күтім жасау және тазалау p.63
- Үнемі ешқашан p.63
- Қолмен тазалау p.63
- Не қалай маңызды p.64
- Не қалай маңызды p.65
- To fit 1 ensure the slides are the correct way around the front of the slide has the triangular shaped tab as shown 2 fit the top of the clips over the side rack the front clip should be fitted as close to the front of the side rack as possible make sure the rear clip has engaged 3 rotate the slide down and click the bottom of the clips into place p.67
- Slide the rear prongs of the side rack into the holes at the rear of the oven 2 fit the side rack front tab over the fixing screw 3 replace the fixing nut you may use a coin to tighten the nut p.67
- Replace the side rack p.67
- Removing and refitting the sliding shelf supports purchased separately p.67
- Ompact ovens only the sliding shelf supports cannot be used on shelf positions 3 and 4 p.67
- Important p.67
- Есікті алу есікті орнына қою p.69
- To remove the door p.69
- To refit the door p.69
- Removing and refitting the oven door p.69
- Important p.69
- Ake care the oven door is heavy p.69
- Тұмшапеш есігін алу және қайта орнату p.69
- Маңызды абай болыңыз тұмшапештің есігі ауыр p.69
- Ақауларды іздеу және оларды жою кестесі p.75
- Ақауларды іздеу және жою p.75
- Ақау пайда болған жағдайда оны жою қолыңыздан келетін келмейтінін төмендегі кесте арқылы тексеріңіз егер мәселені шешу мүмкін болмаса немесе ақау жойылмаса авторланған сервистік орталыққа немесе клиенттерге қызмет көрсету бөліміне жүгініңіз p.75
- Құрметті сатып алушы p.77
- Кепілдікті жəне сервистік қызмет көрсетудің шарттары p.77
- Кепілдік шарттары p.77
- Тұтынушылық қызметі p.78
- Шығарылған күні жəне кепілдік мерзімі құрылғының заттаңбасында көрсетілген p.79
- Дата изготовления и гарантийный срок указаны на этикетке устройства p.79
Похожие устройства
-
 Haier HOX-FP5RACGРуководство по эксплуатации
 -
Haier HOX-FP5RAGGРуководство по эксплуатации
-
Haier HOX-FP5RABXРуководство по эксплуатации
-
 Haier HWO60SM5S5B1HРуководство пользователя
 -
Haier HWO60SM5S9B1HРуководство пользователя
-
 Haier HOQ-P16AN5GBUРуководство пользователя
 -
 Haier HOQ-F6CASGWИнструкция по работе
 -
 Haier HOQ-K5AAN3GWРуководство по эксплуатации
 -
 Haier HOQ-F5AABXРуководство по эксплуатации
 -
 Haier HOD-P08TGBXРуководство по эксплуатации
 -
Haier HOD-P08TGWРуководство по эксплуатации
-
Haier HOD-P08WGBРуководство по эксплуатации
Узнайте, как эффективно очищать лотки, решетки и другие аксессуары для гриля и духовки с помощью простых методов и средств. Поддерживайте чистоту и долговечность вашей техники.