![Чайка 425 М — как правильно подключить швейную машину и использовать её функции [8/48]](/img/pdf.png)
Чайка 425 М — как правильно подключить швейную машину и использовать её функции [8/48]
![Чайка 425 М [8/48] Your machine will not operate until the power light switch is turned on the same switch controls both the power and the light when servicing the machine or changing needles etc machine must be disconnected from the power supply](/views2/2026586/page8/bg8.png)
8
3
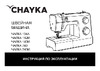
KNOWING YOUR SEWING MACHINE
Power line cord/foot control
Make sure that the sewing machine is turned off (the
power switch is set to “O”), and then connect the plug
of the power line and into the appliance inlet and your
wall outlet.
The foot that comes on your sewing machine
is called zigzag foot and will be used for the
majority of your sewing.
Setting up your machine
Bu sure to wipe off any surplus oil from needle
plate area before using your machine the first
time.
Power/light switch
Your machine will not operate until the power/light switch is turned on. The same switch controls
both the power and the light.
When servicing the machine, or changing needles, etc., machine must be disconnected from
the power supply.
Accessories
1.Bobbins (3pcs)
2.Needle 3 pcs and twin needle 1 pc
3.Multi-functi
on screwdriver
4.Embroiderer plate
5.Seam guide(optional)
6.Ripper/Brush
7.Buttonhole foot
8.Guide presser foot
9.Zipper foot
10.Button fitting foot
NOTE:
When foot control is disconnected,
the machine will not operate.
Always disconnect the machine from power
supply by removing the plug from the wall-outlet.
Sewing speed can be varied the foot control.
The harder you press on the control, the faster
machine runs.
Power/light
switch “OFF”
Power/light
switch “ON”
1
1
2
2
4
4
5
5
6
7
8
3
3
9
ПОДГОТОВКА К РАБОТЕ
Стандартные принадлежности
q Шпульки прозрачные
w Комплект игл ORGAN 130/705 H (3 шт.)
e Отвёртка
r Штопальная пластина
t Вспарыватель
y Рамка для петли
u Направитель для потайного шва
i
Лапка для молнии двухсторонняя
o Лапка для пуговиц
Подключение машины к электросети
Включение – (ON).
Отключение – (OFF)
Посмотрите, чтобы выключатель питания машины был
в положении «OFF».
Сначала подключите штепсель педали в гнездо
на машине.
А затем вилку питания включите в электрическую сеть.
Установите выключатель электропитания положение
«ON».
Ваша машина и подсветка включены.
q Вилка электрического шнура
w Включатель / выключатель
e Розетка
r Гнездо для шнура
t Штепсель и шнур педали
Ножная педаль
Скорость шитья на машине может изменяться с помощью
педали.
Чем сильнее нажимаете на педаль, тем выше скорость
шитья.
Не оставляйте включенную машину без присмотра.
Выключайте машину из сети, если она не используется.
Не ставьте и не кладите на педаль машины никаких
предметов, это может привести с самопроизвольному
включению машины, либо к выходу из строя регулятора
скорости или электродвигателя.
ВНИМАНИЕ:
ВНИМАНИЕ:
RUS
Содержание
- Инструкция по эксплуатации p.1
- Швейная машина p.1
- Внимани p.2
- Важные инструкции по безопасности p.2
- Во избежание риска удара электрическим током p.2
- Сохраняйте эти инструкции p.2
- Опасн p.2
- Қауіпті p.3
- Қауіпсіздік бойынша маңызды нұсқаулар p.3
- Электр тоғы соғу қаупі болмауы үшін p.3
- Осы нұсқаулықты сақтап қойыңыз p.3
- Назар аударыңыз p.3
- Содержание p.4
- Мазмұны p.5
- Конструкция машины p.6
- Наименование частей p.6
- Knowing your sewing machine p.6
- Main parts p.6
- Машинаның конструкциясы p.7
- Бөліктерінің атауы p.7
- Main parts p.7
- Knowing your sewing machine p.7
- Setting up your machine p.8
- Power line cord foot control p.8
- Power light switch p.8
- Make sure that the sewing machine is turned off the power switch is set to o and then connect the plug of the power line and into the appliance inlet and your wall outlet p.8
- Knowing your sewing machine p.8
- Bu sure to wipe off any surplus oil from needle plate area before using your machine the first time p.8
- Bobbins 3pcs 2 needle 3 pcs and twin needle 1 pc 3 multi function screwdriver 4 embroiderer plate 5 seam guide optional 6 ripper brush 7 buttonhole foot 8 guide presser foot 9 zipper foot 10 button fitting foot p.8
- Always disconnect the machine from power supply by removing the plug from the wall outlet p.8
- Accessories p.8
- Your machine will not operate until the power light switch is turned on the same switch controls both the power and the light when servicing the machine or changing needles etc machine must be disconnected from the power supply p.8
- When foot control is disconnected the machine will not operate p.8
- The foot that comes on your sewing machine is called zigzag foot and will be used for the majority of your sewing p.8
- Sewing speed can be varied the foot control the harder you press on the control the faster machine runs p.8
- When foot control is disconnected the machine will not operate p.9
- The foot that comes on your sewing machine is called zigzag foot and will be used for the majority of your sewing p.9
- Sewing speed can be varied the foot control the harder you press on the control the faster machine runs p.9
- Setting up your machine p.9
- Power line cord foot control p.9
- Power light switch p.9
- Make sure that the sewing machine is turned off the power switch is set to o and then connect the plug of the power line and into the appliance inlet and your wall outlet p.9
- Knowing your sewing machine p.9
- Bu sure to wipe off any surplus oil from needle plate area before using your machine the first time p.9
- Bobbins 3pcs 2 needle 3 pcs and twin needle 1 pc 3 multi function screwdriver 4 embroiderer plate 5 seam guide optional 6 ripper brush 7 buttonhole foot 8 guide presser foot 9 zipper foot 10 button fitting foot p.9
- Always disconnect the machine from power supply by removing the plug from the wall outlet p.9
- Accessories p.9
- Your machine will not operate until the power light switch is turned on the same switch controls both the power and the light when servicing the machine or changing needles etc machine must be disconnected from the power supply p.9
- Your machine can be used either as a flat bed or as a free arm model with the extension table in position it provides a large working surface as a standard flat bed model to remove the extension table hold it firmly with both hands and pull it off to the left as shown to replace slide the extension table back into place until it clicks with the extension table removed the machine converts into a slim free arm model for sewing children s clothes cuffs trouser legs and other hard to reach places p.10
- When free sewing or sewing buttons install the embroidery plate as the right picture p.10
- There are three positions for your presser foot 1 lower the presser foot to sew 2 raise the lifter to the middle position to insert or remove fabric 3 lift it to its highest position to change the presser foot or to remove thick fabric p.10
- Reverse sewing lever p.10
- Presser foot lifter p.10
- Knowing your sewing machine p.10
- Embroidery plate p.10
- Converting to free arm sewing p.10
- As long as you are pressing down this button while sewing the machine will feed the fabric backwards p.10
- Reverse sewing lever p.11
- Presser foot lifter p.11
- Knowing your sewing machine p.11
- Embroidery plate p.11
- Converting to free arm sewing p.11
- As long as you are pressing down this button while sewing the machine will feed the fabric backwards p.11
- Your machine can be used either as a flat bed or as a free arm model with the extension table in position it provides a large working surface as a standard flat bed model to remove the extension table hold it firmly with both hands and pull it off to the left as shown to replace slide the extension table back into place until it clicks with the extension table removed the machine converts into a slim free arm model for sewing children s clothes cuffs trouser legs and other hard to reach places p.11
- When free sewing or sewing buttons install the embroidery plate as the right picture p.11
- There are three positions for your presser foot 1 lower the presser foot to sew 2 raise the lifter to the middle position to insert or remove fabric 3 lift it to its highest position to change the presser foot or to remove thick fabric p.11
- Намотка нитки на шпульку p.12
- Установка катушек с нитками p.12
- Разметка на игольной пластине p.12
- Fals e p.12
- Шөлмекке жіп орау p.13
- Ине пластинасындағы белгілеме p.13
- Жібі бар катушкаларды орнату p.13
- Fals e p.13
- Заправка нижней нити p.14
- Установка шпульного колпачка p.14
- Установка тканенаправителя p.14
- Снятие и установка прижимной лапки p.14
- Астыңғы жіпті сабақтау p.15
- Қысқышқа салыңыз p.15
- Матаның бағыттауышын қысқыштың артқы жағындағы p.15
- Жібі бар катушкаларды орнату p.15
- Гидтер ұстағышын орнату p.15
- Басып тұратын табанды алу және орнату p.15
- Заправка нитей двух катушек p.16
- Заправка верхней нити p.16
- Үстіңгі жіпті сабақтау p.17
- Екі катушкалардың жіптерін толтыру p.17
- Внимание p.18
- Примечание p.18
- Нитевдевающее устройство p.18
- Жіп кіргізу құрылғысы p.19
- Регулировка натяжения верхней нити p.20
- Вытягивание шпульной нити p.20
- Шөлмектегі жіпті тарту p.21
- Үстіңгі жіптің тартылуын реттеу p.21
- Ткань нитки размер иглы p.22
- Замена швейной иглы p.22
- Внимание p.22
- Таблица соотношения номеров нитей и типа ткани p.22
- Проверка иглы p.22
- Примечания p.22
- Тігін инесін ауыстыру p.23
- Мата жіп иненің өлшемі p.23
- Инені тексеру p.23
- Жіптің нөмірлері мен матаның түрі арасындағы ара қатынастар кестесі p.23
- Переключатель строчек p.24
- Регулятор длины стежка p.24
- Тігімдерді ауыстырып қосқыш p.25
- Инешаншымның ұзындығын реттеуіш p.25
- Изменение направления шитья p.26
- Тігу бағытын өзгерту p.27
- Основные строчки прямая строчка p.28
- Негізгі тігімдер түзу тігім p.29
- Оверлочный шов p.30
- Строчка зигзаг p.30
- Қабырғаға жабыңыз p.31
- Итрек тігім p.31
- Трикотажные строчки стрейч p.32
- Пришивание пуговиц p.32
- Вспомогательные строчки эластичная строчка p.32
- Түйме қадау p.33
- Тігістердің оюлары жиналып қалғанда реттеуішті қарай бұрыңыз тігістер созылып кетіп жатса реттеуішті қарай бұрыңыз p.33
- Стрейч трикотаж тігімдері p.33
- Серпімді стекинг p.33
- Көмекші желілер p.33
- Рамка для петли p.34
- Кружевпен айналдырыңыз p.35
- Ілмек p.35
- Подгибка потайной строчкой p.36
- Вшивание молнии p.36
- Қадау найзағай p.37
- Жасырын тігімнің бүкпесі p.37
- Декоративные строчки краеобметочный шов фестончатый p.38
- Трикотажные строчки стрейч p.38
- Тігістердің оюлары жиналып қалғанда реттеуішті қарай бұрыңыз тігістер созылып кетіп жатса реттеуішті қарай бұрыңыз p.39
- Сәндік тігімдер фестонды шеттерді торлау тігісі p.39
- Стрейч трикотаж тігімдері p.39
- Штопка p.40
- Сатиновые строчки p.40
- Выполнение оборок соты p.40
- Сатин стежки p.41
- Дарн p.41
- Ұяшық желбіршектерін жасау p.41
- Уход за машиной p.42
- Разборка и сборка челночного устройства p.42
- Подсветка p.42
- Шөлмек құрылғысын бөлшектеу және құрастыру p.43
- Машинаны күту жарықтандыру p.43
- Неисправности и способы их устранения p.44
- Неисправность вероятная причина совет p.44
- Жөнсіздіктер және оларды жою жолдары p.45
- Жөнсіздік ықтимал себебі кеңес p.45
- Өндірілген күні сериялық нөмірі мынадай ақпаратты қамтиды 1 ші көрсеткіш саны жылдың соңғы саны өндіріс мысалы 5 2015 жыл 2 ші көрсеткіш ай шығару 1 қаңтар наурыз 2 сәуір мен маусым 3 шілде қыркүйек 4 қазан желтоқсан қалған сандар жалпы ақпарат өндірушінің p.46
- Куәлік нөмірі p.46
- На швейную машину p.47
- Дата продажи p.47
- Гарантийный тало p.47
- Адрес телефон сервисного центра p.47
- Штамп магазина p.47
- Условия гарантии p.47
- Таблица гарантийных ремонтов p.47
- Серийный номер p.47
- Подпись продавца p.47
- Наименование изделия модель p.47
Похожие устройства
-
 Чайка 425 МРуководство по эксплуатации
 -
 Чайка Art 55Руководство по эксплуатации
 -
Чайка Art 55Руководство по эксплуатации
-
 Чайка SewLux 200Руководство по эксплуатации
 -
 Чайка ЧАЙКА 110Руководство по эксплуатации
 -
 Чайка 145MРуководство по эксплуатации
 -
 Чайка HandyStitch 33Руководство по эксплуатации
 -
Чайка 425МРуководство по эксплуатации
-
 Чайка NEW WAVE 750Руководство по эксплуатации
 -
 Чайка NEW WAVE 4030Руководство по эксплуатации
 -
 Чайка 745M WhiteРуководство по эксплуатации
 -
 Чайка 134А WhiteРуководство по эксплуатации
Узнайте, как правильно подключить швейную машину, использовать её функции и аксессуары для комфортного шитья. Подготовьте свою машину к работе с нашими советами.