
Thermaltake Toughpower GT Snow 750W (PS-TPT-0750FNFAGE-W) Инструкция по эксплуатации онлайн
TOUGHPOWER GT SNOW
850W / 750W
Komponentenprüfung
- Befestigungsschrauben x 4
1. No desenchufe el cable de alimentación de corriente alterna cuando la fuente de alimentación esté
en uso. Si lo hace, podría dañar los componentes.
2. No coloque la fuente de alimentación en ambientes de alta temperatura y/o humedad.
3. En la fuente de alimentación hay alto voltaje. No abra la caja de la fuente de alimentación a menos
que usted sea un técnico o electricista autorizado. Si lo hace, anulará la garantía.
4. La fuente de alimentación debe alimentarse con el tipo de suministro indicado en la etiqueta de
identificación.
5. Utilice únicamente cables modulares Thermaltake originales con los modelos de fuente de
alimentación Gestión de Cable Thermaltake. Los cables de otros fabricantes podrían no ser
compatibles y provocar daños graves en su sistema y en la fuente de alimentación.La garantía se
anula si se utilizan cables de otros fabricantes.
6. En caso de no cumplir las advertencias y precauciones indicadas en este manual, todas las
garantías quedarán anuladas.
Comprobación de los componentes
- Unidad de fuente de alimentación TOUGHPOWER GT
- Manual de usuario
- Cable de alimentación de corriente alterna
- Tornillos de montaje x 4
1. Non disconnettere il cavo di alimentazione CA, quando l’alimentatore è in uso. In caso contrario,
i componenti potrebbero essere danneggiati.
2. Non posizionare l’alimentatore in un ambiente con temperatura e/o umidità elevata.
3. L’alimentatore presenta voltaggi elevati. Non aprire il vano dell’alimentatore, salva se elettricisti
o tecnici autorizzati. In caso contrario, la garanzia sarà nulla.
4. L’alimentazione deve essere alimentata dalla sorgente indicata nell’apposita etichetta di
classificazione.
5. Utilizzare esclusivamente cavi modulari Thermaltake di dimensioni originali modelli di
alimentazione con gestione cavi Thermaltake. I cavi di altri produttori potrebbero risultare
incompatibili e causare seri danni al sistema e all’alimentatore. L’utilizzo di cavi di altri
produttori comporta l’annullamento della garanzia.
6. In caso di mancata osservanza delle avvertenze indicate nel presente manuale, tutte le garanzie
verranno annullate.
Controllo dei componenti
- Unità alimentatore TOUGHPOWER GT
- Manuale utente
- Cavo di alimentazione AC
- 4 viti di montaggio
EMI Y SEGURIDAD
EMI & SICUREZZA
1. Não desligue o cabo de alimentação AC quando estiver a utilizar a fonte de alimentação. Se o fizer,
pode danificar os seus componentes.
2. Não coloque a fonte de alimentação num ambiente de elevada humidade e/ou temperatura.
3. A fonte de alimentação possui tensões elevadas. Não abra a caixa da fonte de alimentação, excepto se
for um técnico ou electricista de serviço autorizado. Se o fizer, irá anular a garantia.
4. A fonte de alimentação deve ser alimentada pela fonte indicada na etiqueta informativa.
5. Utilize apenas cabos modulares originais da Thermaltake com os modelos de fonte de alimentação de
Gestão de Cabo da Thermaltake. Os cabos de outras marcas podem não ser compatíveis e provocar
graves danos ao seu sistema e à fonte de alimentação. A garantia será anulada com a utilização de
cabos de outras marcas.
6. Todas as garantias e certificações serão anuladas, se não cumprir nenhum dos avisos e precauções
presentes neste manual.
Verificação dos Componentes
- Fonte de alimentação TOUGHPOWER GT
- Manual do utilizador
- Cabo de alimentação AC
- 4 parafusos de montagem
EMI & SEGURANÇA
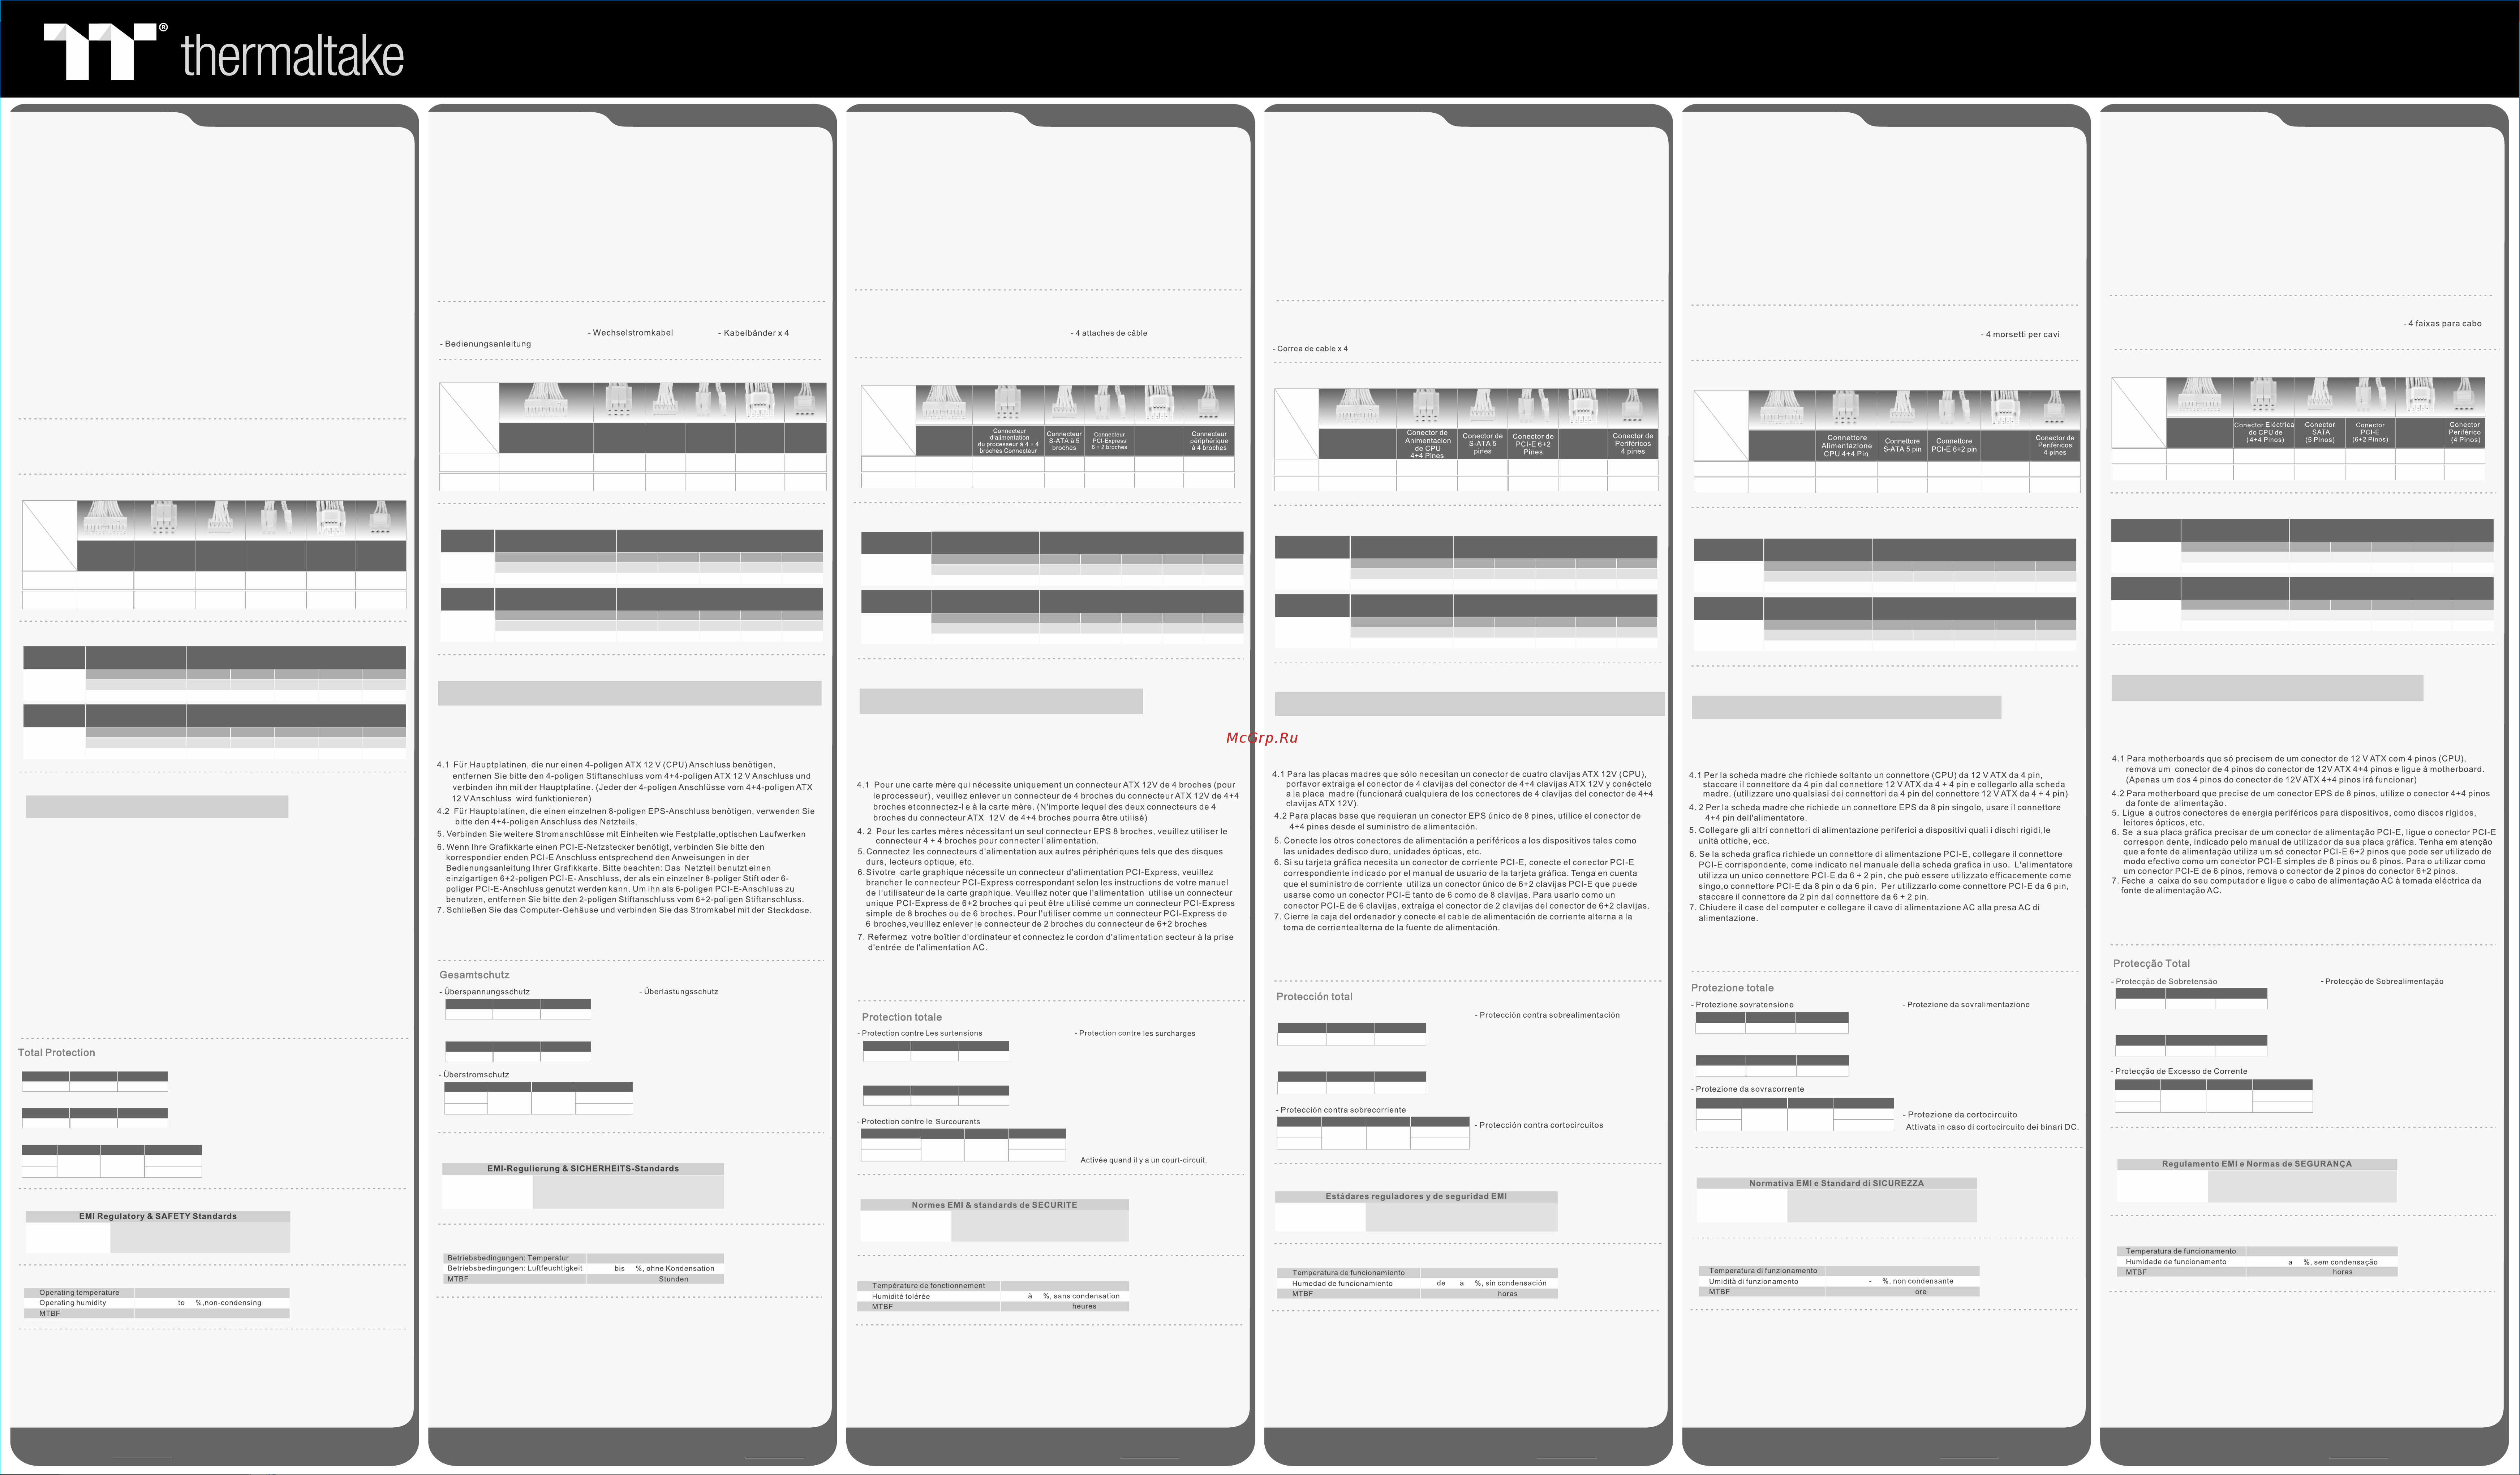
Vorstellung der Anschlüsse
8. Achtung! Wenn das Smart-Zero-Lüftersystem eingeschaltet ist, arbeitet der Lüfter erst, wenn das
Netzteil etwa 40 % der Nennlast erreicht; es ist normal, wenn der Lüfter bei geringer Arbeitslast des
Computers nicht arbeitet.
Introducción del conector de alimentación
Pasos de instalación
Nota: Asegúrese de que el sistema está apagado y desenchufado.
Desconecte el cable de alimentación de corriente alterna de la antigua fuente de alimentación.
8. ¡Atención! Cuando el Sistema de Ventilador Smart Zero está activado, el ventilador no funcionará hasta
que la alimentación llega aproximadamente al 40% de la carga nominal; Es normal si el ventilador no
funciona cuando el ordenador tiene una carga baja de funcionamiento.
1. Abra la caja del ordenador; le recomendamos que consulte las instrucciones del manual del chasis.
2. Instale la fuente de alimentación en la caja con los cuatro tornillos suministrados.
3. Si la placa madre requiere un conector de alimentación principal de 24 pines, conecte el conector de
alimentación principal de 24 pines a la placa madre.
Especificaciones de salida
Connettore di alimentazione: Introduzione
Passaggi per l’installazione
Nota: verificare che il sistema sia spento e scollegato.
Disconnettere il cavo di alimentazione CA dal precedente alimentatore.
8. Attenzione! Quando Smart Zero Fan System è acceso, la ventola non funzionerà finché
l’alimentazione non raggiunge circa il 40% del carico nominale. Quindi è normale che la ventola
non funzioni quando il computer lavora con carichi bassi.
1. Aprire il case del computer; consultare il manuale di istruzioni fornito con lo chassis.
2. Installare la PSU nel case con le quattro viti fornite.
3. Se la scheda madre richiede un connettore di alimentazione principale da 24 pin, collegare il
connettore di alimentazione principale da 24 pin alla scheda madre.
Specifiche di output
Introdução do Conector de Alimentação
Etapas da Instalação:
Nota: Certifique-se que o seu sistema está desligado e sem corrente eléctrica.
Desligue o cabo de alimentação AC da sua antiga fonte de alimentação.
1. Abra a caixa do seu computador; consulte o manual de instruções fornecido com a sua caixa.
2. Instale o PSU na caixa com os quatro parafusos incluídos.
3. Se a sua motherboards precisar de um conector de Corrente Eléctrica de 24 pinos, ligue o conector
de Corrente Eléctrica de 24 pinos à motherboard.
Especificação de Saída
1. Ne débranchez pas le cordon secteur lorsque l'alimentation est en cours d’utilisation. Cela pourrait
endommager vos composants.
2. Ne mettez pas l’alimentation dans un endroit très humide et ou à température élevée.
3. Il y a des voltages élevés dans l'alimentation. N’ouvrez pas le boîtier de l’alimentation à moins
d’être autorisé par un technicien de maintenance ou un électricien. Cela va annuler la garantie.
4. L’alimentation doit être fournie par la source indiquée sur l’étiquette.
5. Veuillez utiliser uniquement les câbles modulaires Thermaltake authentiques avec les modèles
Thermaltake dotés de gestion de câble. Les câbles tiers pourraient ne pas être compatibles et
provoquer des dommages importants à votre système et à alimentation. La garantie est annulée si
vous utilisez des câbles tiers.
6. Toutes les garanties seront annulées, si les avertissements et mises en garde contenus dans ce
manuel ne sont pas suivis.
Vérification des composants
- Bloc d’alimentation TOUGHPOWER GT
- Guide de l'utilisateur
- Cordon d’alimentation secteur
- 4 vis de montage
EMI & SÉCURITÉ
Introduction au connecteur dalimentation
Etapes d’installation
Remarque: Assurez-vous que le système est éteint et débranché.
Débranchez le cordon secteur de votre ancienne alimentation.
8. Attention ! Lorsque système Smart Zero Fan est activé, le ventilateur ne fonctionne pas tant que le
bloc d'alimentation n’atteint pas environ 40% de charge nominale; Il est normal que le ventilateur ne
fonctionne pas lorsque l'ordinateur est à une faible charge de fonctionnement.
1. Ouvrez le boîtier de votre ordinateur et veuillez vous reporter au manuel d'instruction fourni avec votre
châssis.
2. Installez l’alimentation dans le boîtier avec les 4 vis fournies.
3. Si votre carte mère nécessite un connecteur d’alimentation principale de 24 broches, veuillez brancher
le connecteur d’alimentation de 24 broches à la carte mère.
Caractristiques de sortie
Components Check
- TOUGHPOWER GT power supply unit
- AC power cord
- User manual
- Mounting screws x 4
1. Ziehen Sie nicht den Netzstecker, wenn das Netzteil in Gebrauch ist. Wenn Sie das tun, können Ihre
Komponenten beschädigt werden.
2. Verwenden Sie das Netzteil nicht in Umgebungen mit hoher Luftfeuchtigkeit und / oder Temperaturen.
3. Im Netzteil liegen gefährliche Hochspannungen an. Öffnen Sie auf keinen Fall das Netzteilgehäuse,
wenn Sie kein autorisierter Wartungstechniker oder Elektriker sind. Sollten Sie das Gehäuse öffnen,
verfällt Ihre Gewährleistung.
4. Das Netzteil sollte durch die Quelle gespeist werden, die auf dem Rating-Etikett angegeben ist.
5. Bitte benutzen Sie nur originale Thermaltake Modularkabel mit den Thermaltake Cable Management
Netzteilmodellen. Kabel von Fremdherstellern sind evtl. nicht kompatibel und können erhebliche
Schäden an Ihrem System und am Netzteil verursachen. Der Gewährleistungsanspruch erlischt, wenn
Kabel von Fremdherstellern verwendet werden.
6. Alle Gewährleistungen und Garantien verfallen, wenn Sie eine der Warnungen und
Vorsichtsmaßnahmen in dieser Bedienungsanleitung nicht beachten.
EMI & SAFETY
Output Specification
Power Connector Introduction
EMI & SICHERHEIT
Ausgangsspezifikation
Installationsschritte
Anmerkung: Stellen Sie sicher, dass Ihr System ausgeschaltet und alle Stromkabel gezogen sind.
Entfernen Sie das alte Wechselstromkabel von Ihrem alten Netzteil.
1. Öffnen Sie Ihr Computergehäuse; bitte befolgen Sie dabei die Instruktionen für Ihr Gehäuse.
2. Installieren Sie die PSU im Gehäuse und verwenden Sie die vier mitgelieferten Schrauben.
3. Wenn Ihre Hauptplatine einen 24-poligen Stromversorgungsanschluss benötigt,
Verbinden Sie bitte den 24-polige Hauptstromversorgungsanschluss mit der Hauptplatine.
Main Power
Connector
(20+4 Pin)
PCI-E
Connector
(6+2 Pin)
SATA
Connector
(5 Pin)
Peripheral
Connector
(4 Pin)
CPU
Connector
(4+4 Pin)
6
6
4
4
DC OUTPUT
Max Output Current
Max Output Power
AC INPUT
Input Voltage: 100 - 240V~ ;
Input Current: 10A Max. ; Frequency: 50Hz - 60Hz
+3.3V
+5V
+12V
20A20A 70.8A
100W 849.6W
+5VSB
0.3A 3A
3.6W 15W
850W
Continuous
Power
-12V
- TOUGHPOWER GT Netzteil
+3,3V
+5V
+12V
20A20A 70,8A
100W 849,6W
+5VSB
0,3A 3A
3,6W 15W
850W
-12V
GLEICHSTROMAUSGANG
WECHSELSTROMEINGANG
Max. Ausgangsspannung
Max. Ausgangs-Stromversorgung
EINGANGSSPANNUNG: 100 - 240 V~ ;
Eingangsspannung: 10A max. ; Frequenz: 50Hz - 60Hz
Dauerleistung
+3,3V
+5V
+12V
20A20A
70,8A
100W 849,6W
+5VSB
0,3A 3A
3,6W 15W
850W
-12V
Entrée courant secteur
SORTIE DC
Courant de sortie max
Puissance de sortie max
Puissance continue
Tension d'entrée : 100 - 240 V~ ;
Courant d'entrée : 10A Max. ; Fréquence : 50Hz - 60Hz
+3,3V
+5V
+12V
20A20A
70,8A
100W 849,6W
+5VSB
0,3A 3A
3,6W 15W
-12V
Tensión de entrada: 100 - 240 V~ ;
Corriente de entrada: 10A Máx. ; Frecuencia: 50 Hz - 60 Hz
ENTRADA DE CA
SALIDA DE CC
Corriente máx. de salida
Potencia máx. de salida
+3,3V
+5V
+12V
20A20A 70,8A
100W 849,6W
+5VSB
0,3A 3A
3,6W 15W
-12V
INGRESSO AC
USCITA DC
Corrente in uscita max.
Alimentazione in uscita max.
Voltaggio in entrata: 100 - 240V~ ;
Corrente in entrata: 10A max. ; Frequenza: 50Hz - 60Hz
+3,3V
+5V
+12V
20A20A 70,8A
100W 849,6W
+5VSB
0,3A 3A
3,6W 15W
850W
-12V
ENTRADA AC
SAÍDA DC
Corrente Máx. de Saída
Potência Máx. de Saída
Tensão de Entrada: 100 - 240V~ ;
Corrente de Entrada: 10A máx. ; Frequência: 50Hz - 60Hz
Potência Contínua
1
1
2
2
4
4
DC OUTPUT
Max Output Current
Max Output Power
AC INPUT
Input Voltage: 100 - 240V~ ;
Input Current: 10A Max. ; Frequency: 50Hz - 60Hz
+3.3V
+5V
+12V
20A20A 62.5A
100W 750W
+5VSB
0.3A 3A
3.6W 15W
750W
Continuous
Power
-12V
CABLE
Wattage
850W
+3,3V
+5V
+12V
20A20A 62,5A
100W 750W
+5VSB
0,3A 3A
3,6W 15W
750W
-12V
GLEICHSTROMAUSGANG
WECHSELSTROMEINGANG
Max. Ausgangsspannung
Max. Ausgangs-Stromversorgung
Dauerleistung
+3,3V
+5V
+12V
20A20A 62,5A
100W 750W
+5VSB
0,3A 3A
3,6W 15W
750W
-12V
Entrée courant secteur
SORTIE DC
Courant de sortie max
Puissance de sortie max
Puissance continue
+3,3V
+5V
+12V
20A20A 62,5A
100W 750W
+5VSB
0,3A 3A
3,6W 15W
-12V
ENTRADA DE CA
SALIDA DE CC
Corriente máx. de salida
Potencia máx. de salida
+3,3V
+5V
+12V
20A20A
62,5A
100W 750W
+5VSB
0,3A 3A
3,6W 15W
-12V
INGRESSO AC
USCITA DC
Corrente in uscita max.
Alimentazione in uscita max.
+3,3V
+5V
+12V
20A20A 62,5A
100W 750W
+5VSB
0,3A 3A
3,6W 15W
750W
-12V
ENTRADA AC
SAÍDA DC
Corrente Máx. de Saída
Potência Máx. de Saída
Potência Contínua
6
6
4
4
1
1
2
2
4
4
Wattleistung
KABEL
20+4-polig
Hauptstromversorgung
Anschluss
4+4-polig
CPU Power
Anschluss
5-polig
S-ATA
Anschluss
6+2-polig
PCI-E
Anschluss
4-polig
Periphere
Anschluss
6
6
4
4
1
1
2
2
4
4
CABEL
6
6
4
4
1
1
2
2
4
4
CABLE
Potencia
6
6
4
4
1
1
2
2
4
4
Wattaggio
CAVO
6
6
4
4
1
1
2
2
4
4
cabo
usw.
8. Atenção! Quando o sistema Smart Zero Fan estiver ativado, a ventoinha não irá funcionar até que
a alimentação atinja aproximadamente 40% da carga nominal; É normal a ventoinha não entrar em
funcionamento quando o computador estiver a funcionar com uma carga reduzida.
CB, FCC, cTUVus, CE, UKCA, ICES, TUV,
LVD, RCM, BSMI and S-mark certified.
CB, FCC, cTUVus, CE, UKCA, ICES, TUV,
LVD, RCM, BSMI :und S-mark zertifiziert.
TOUGHPOWER GT
850W / 750W
English Deutsch Français Español Italiano
If the power supply is still unable to function properly after following the above instruction, please contact
your local store or Tt branch office for after sales service. You may also refer to Thermaltake’s website for
more technical support: thermaltake.com
Wenn das Netzteil nach Überprüfung der oben angegebenen Fehlerursachen immer noch nicht richtig
funktioniert, wenden Sie sich bitte an Ihren lokalen Händler oder die Tt Niederlassung für Unterstützung.
Sie können sich auch auf der Thermaltake Web-Seite an den Kundendienst wenden: thermaltake.com
Si l’alimentation continue à mal fonctionner après avoir suivi les instructions ci-dessus, veuillez
contacter votre magasin ou le bureau Thermaltake pour le service après vente. Vous pouvez vous
référer au site Internet de Thermaltake pour plus de support technique : thermaltake.com
Precauciones y advertencias
Resolución de problemas
Si la fuente de alimentación no funcionara correctamente, siga la guía de solución de problemas antes de
solicitar asistencia técnica:
1. ¿Está el cable de alimentación correctamente enchufado en la toma eléctrica y en la toma de corriente
alterna de la fuente de alimentación?
2. Asegúrese de que el interruptor " I/O " de la fuente e alimentación se encuentra en la posición “ I ”.
3. Asegúrese de que todos los conectores de alimentación se encuentren correctamente conectados a
todos los dispositivos.
4. Si está conectado a una unidad de SAI, ¿Está el SAI encendido y enchufado?
Si tras seguir las instrucciones anteriores la fuente de alimentación continúa sin funcionar adecuadamente,
contacte con el almacén local o con una sucursal de Tt para un servicio postventa. Si desea obtener más
soporte técnico, también puede consultar la página web de Thermaltake. thermaltake.com
Avvertenze
Risoluzione dei problemi
Se l’alimentatore non funziona correttamente, consultare la guida sulla risoluzione dei problemi prima di
richiedere assistenza:
1. Il cavo di alimentazione è collegato correttamente alla presa elettrica e all’ingresso CA
dell’alimentatore?
2. Assicurarsi che l’interruttore “ I/O ” dell’alimentatore sia posizionato su “ I ”.
3. Assicurarsi che tutti i connettori di alimentazione siano collegati correttamente a tutti i dispositivi.
4. In caso di connessione a un’unità UPS, tale unità è attiva e inserita?
Se l’alimentatore continua a non funzionare correttamente dopo aver seguito le istruzioni indicate,
contattare il proprio fornitore locale o la filiale Tt per il servizio post-vendita. Inoltre, per maggiore
supporto tecnico, è possibile consultare il sito Web di Thermaltake: thermaltake.com
Ambientes
Ambienti
Português
Avisos e Precauções
Resolução de Problemas
Se a fonte de alimentação não funcionar correctamente, siga o guia de resolução de problemas
antes enviar para reparação:
1. O cabo de alimentação está devidamente ligado à tomada eléctrica e à entrada da fonte de
alimentação AC.
2. Certifique-se que o interruptor “ I/O ” da fonte de alimentação está na posição “ I ”.
3. Certifique-se que todos os conectores de alimentação estão devidamente ligados a todos os
dispositivos.
4. Se estiver ligado a um aparelho UPS, o UPS está ligado no interruptor e à corrente eléctrica?
Se a fonte de alimentação continuar a não funcionar correctamente depois de seguir as instruções
acima indicadas, contacte a sua loja local ou filial Tt para serviços pós-venda. Também pode consultar
o sítio Web da Thermaltake para obter mais apoio técnico: thermaltake.com
Ambientes
Avertissements et Mise en garde
Dépannage
Si l’alimentation ne fonctionne pas correctement, veuillez suivre le guide de dépannage avant de
faire une demande au service après vente :
1. Le cordon d’alimentation est-il branché dans la prise secteur et dans la prise d’entrée secteur de l’alimentation ?
2. Veuillez vous assurer que l’interrupteur " I/O " se trouvant sur l’alimentation soit en position " I ".
3. Veuillez vous assurer que tous les connecteurs d’alimentation soient correctement connectés à tous les
périphériques.
4. Si elle est connectée à une alimentation sans interruption (ASI), l'ASI est-elle en marche et connectée ?
Environnements
Environments
Trouble-Shooting
If the power supply fails to function properly, please follow the troubleshooting guide before application
for service:
1. Is the power cord plugged properly into electrical outlet and into the power supply AC inlet?
2. Please make sure the I/O switch on the power supply is switched to I position.
3. Please make sure all power connectors are properly connected to all the devices.
4. If connected to a UPS unit, is the UPS on and plugged in?
Warnungen und Vorsichtshinweise
Problembeseitigung
Wenn das Netzteil nicht richtig funktioniert, befolgen Sie bitte zuerst die Anleitungen der
Stbeseitigung, bevor Sie sich an den Kundendienst wenden:
Betriebsumgebung
+0°C to +40°C
+0°C bis +40°C
+0°C à + 40°C
de +0°C a +40°C
+0°C - +40°C
+0°C a +40°C
> 100,000 hours
> 100.000
> 100.000
> 100.000
> 100.000
> 100.000
5%
5%
5%
5%
5%
5%
85
85
85
85
85
85
TOUGHPOWER GT
850W / 750W
TOUGHPOWER GT
850W / 750W
TOUGHPOWER GT
850W / 750W
TOUGHPOWER GT
850W / 750W
TOUGHPOWER GT
850W / 750W
750W
Puissance
en watts
850W
750W
850W
750W
850W
750W
850W
potencia continua
750W
potencia continua
850W
750W
850W
Continuous Power
750W
Continuous Power
Wattaggio
850W
750W
- Cable straps x 4
Installation Steps
Note: Make sure that your system is turned off and unplugged.
Disconnect the AC power cord from your old power supply.
1. Open your computer chassis; please refer to the instruction manual provided with your chassis.
2. Install the PSU into the case with the four screws provided.
3. If your motherboard requires a 24pin Main Power connector, please connect the 24pin Main Power
connector to the motherboard.
4.1 For motherboard that only requires a 4pin ATX 12V(CPU) connector, please detach a 4pin connector
from the 4+4pin ATX 12V connector and connect it to the motherboard.
(Either one of the 4pin from the 4+4pin ATX 12V connector will work)
4.2 For motherboard that requires a single 8pin EPS connector, please use the 4+4pin connector from
the power supply.
5. Connect other periphreal power connectors to devices such as hard drives, optical drives, etc.
6. If your graphic card requires PCI-E power connector, please connect corresponding PCI-E connector
instructed by your graphic card's user manual. Please note the power supply utilizes an unique 6+2pin
PCI-E connector that can be effectively used as a single 8pin or 6pin PCI-E connector.
To use it a 6pim PCI-E connector, please detach the 2pin connector from the 6+2pin connector.
7. Close your computer case and connect the AC power cord to the power supply AC inlet.
8. Attention! When Smart Zero Fan System is turned on, the fan will not operate until the power supply
reaches approximately 40% of rated load; It is normal if the fan does not operate when computer is
at a low working load.
1. Do not unplug the AC power cord when the power supply is in use.
Doing so may cause damage to your components.
2. Do not place the power supply in high humidity and /or temperature
environment.
3. High voltages exist in the power supply. Do not open the power supply
case unless you are an authorized service technician or electrician.
Doing so will void the warranty.
4. The power supply should be powered by the source indicated on the
rating label.
5. Make sure all cables are plugged in properly. Loos and improper
connections would damage the power supply and your system.
6. Please use only genuine Thermaltake modular cables with Thermaltake
power supply models. Third-party cables might not be compatible and
could cause serious damage to your system and power supply.
The warranty is voided with the use of third-party cables.
7. All warranties and guarantees will be voided, if failure to comply with any
of the warnings and cautions covered in this label.
Warnings and Caution
Certifié CB, FCC, cTUVus, CE, UKCA, ICES,
TUV, LVD, RCM, BSMIet S-mark.
Certificado por CB, FCC, cTUVus, CE, UKCA,
ICES, TUV, LVD, RCM, BSMI y S-mark.
certificazione CB, FCC, cTUVus, CE, UKCA,
ICES, TUV, LVD, RCM, BSMI e S-mark.
Certificação CB, FCC, cTUVus, CE, UKCA,
ICES, TUV, LVD, RCM, BSMI e S-mark.
- Over Voltage Protection
- Over Power Protection
- Short Circuit Protection
Activated when any DC rails short circuited.
- Under Voltage Protection
+3.3V
+5V
+12V
70 ~ 112A
80 ~ 130A
+3.3V
+5V
+12V
- Over Current Protection
- Over Temperature Protection
Protection temperature is 50℃ ~ 65℃
+3.3V
+5V
+12V
3.76~4.3V 5.74~7.0V 13.4~15.6V
3.15 ~ 4.47V
8.1 ~ 10.5V
2.0 ~ 2.83V
750W
850W
Wattage
The power supply shall be shut down and
latch off, if the wattage of the power supply
is 110% ~ 170% over continuous power.
24 ~ 55A
- Unterspannungsschutz
Wattleistung
+3,3V
+5V
+12V
24 ~ 55A
70 ~ 112A
+3,3V
+5V
+3,3V
+5V
+12V
3,76~4,3V 5,74~7,0V 13,4~15,6V
750W
3,15 ~ 4,47V2,0 ~ 2,83V
+12V
8,1 ~ 10,5V
850W 80 ~ 130A
- Schutz vor Kurzschluss
Wird aktiviert, wenn eine Gleichstrom-Schiene
kurzschließt.
- Übertemperaturschut
Die Schutztemperatur beträgt 50℃ bis 65℃ bei
115V und Volllast.
Das Netzteil sollte ausgeschaltet und ausgerastet
werden, wenn die Wattleistung des Netzteils bei
110% ~ 170% über der durchgehenden
Stromversorgung liegt.
- Protection contre le court-circuit
- Protection contre les surchauffes
La température de protection se situe entre
50℃ et 65℃ en 115 V et à pleine charge.
- Protection contre les sous tensions
+3,3V
+5V
+12V
24 ~ 55A
70 ~ 112A
+3,3V
+5V
+12V
3,76~4,3V 5,74~7,0V 13,4~15,6V
750W
Puissance en watts
+3,3V
+5V
+12V
3,15 ~ 4,47V 8,1 ~ 10,5V
2,0 ~ 2,83V
80 ~ 130A850W
L'alimentation sera coupée et verrouillée,
si sa puissance en watts dépasse la
puissance continue par 110% ~ 170%.
Activada cuando se cortocircuita un raíl de circuito
de corriente continua.
- Protección contra sobretemperatura
La temperatura de protección es de 50℃ a 65℃
a 115V y carga completa.
- Protección bajo voltaje
+3,3V
+5V
+12V
24 ~ 55A
70 ~ 112A
+3,3V
+5V
+12V
3,76~4,3V 5,74~7,0V 13,4~15,6V
750W
Potencia
+3,3V
+5V
+12V
3,15 ~ 4,47V 8,1 ~ 10,5V2.0 ~ 2,83V
- Protección contra sobrevoltaje
80 ~ 130A850W
Si la tensión de la alimentación principal se
encuentra entre un 110% y un 170% por encima
de la tensión continua, el dispositivo se apagará
activando el sistema de protección.
- Protezione da Sottotensione
- Protezione da sovratemperatura
La temperatura di protezione è compresa tra
50 ℃ e 65 ℃ a 115 V e a pieno carico.
750W
+3,3V
+5V
+12V
24 ~ 55A
80 ~ 130A
70 ~ 112A
+3,3V
+5V
+12V
3,76~4,3V 5,74~7,0V 13,4~15,6V
850W
Wattaggio
+3,3V
+5V
+12V
3,15 ~ 4,47V 8,1 ~ 10,5V
2,0 ~ 2,83V
L’alimentatore verrà arrestato e staccato
se il wattaggio dell’alimentazione è del
110% ~ 170% sull’alimentazione continua.
- Protecção de Curto-Circuito
Activado quando qualquer rail DC entra em
curto-circuito.
- Proteção de sobretemperatura
A temperatura de proteção é de 50℃ até 65℃
a 115V e carga completa.
- Proteção de subtensão
+3,3V
+5V
+12V
24 ~ 55A
70 ~ 112A
80 ~ 130A
+3,3V
+5V
+12V
3,76~4,3V 5,74~7,0V 13,4~15,6V
750W
850W
Wattaggio
+3,3V
+5V
+12V
3,15 ~ 4,47V 8,1 ~ 10,5V
2,0 ~ 2,83V
A fonte de alimentação deve ser desligada no
interruptor e da corrente eléctrica se a potência
da fonte de alimentação for 110% ~ 170%
superior à potência contínua.
24 ~ 55A
24 ~ 55A
24 ~ 55A
24 ~ 55A
24 ~ 55A
24 ~ 55A
EINGANGSSPANNUNG: 100 - 240 V~ ;
Eingangsspannung: 10A max. ; Frequenz: 50Hz - 60Hz
Tension d'entrée : 100 - 240 V~ ;
Courant d'entrée : 10A Max. ; Fréquence : 50Hz - 60Hz
Tensión de entrada: 100 - 240 V~ ;
Corriente de entrada: 10A Máx. ; Frecuencia: 50 Hz - 60 Hz
Voltaggio in entrata: 100 - 240V~ ;
Corrente in entrata: 10A max. ; Frequenza: 50Hz - 60Hz
Tensão de Entrada: 100 - 240V~ ;
Corrente de Entrada: 10A máx. ; Frequência: 50Hz - 60Hz
Connecteur
d’alimentation
principal
(20+4 broches)
Conector de
alimentación
principal 20+4 pines
Connettore
Alimentazione
principale 20+4 pin
Conector da
Corrente Eléctrica
(20+4 Pinos)
1. Ist das Stromkabel richtig in den elektrischen Ausgang (Steckdose) und den elektrischen Eingang
fr Wechselstrom eingesteckt?
2. Stellen Sie bitte sicher, dass der Ein/Ausschalter (I/O) auf dem Netzteil auf der Position "I" steht.
3. Bitte stellen Sie sicher, dass alle Anschlsse richtig mit den Einheiten verbunden sind.
4. Falls Sie ein USV angeschlossen haben: Ist das USV eingeschaltet und angeschlossen?
PCIe
Connector
(12+4 Pin)
12+4-polig
PCIe
Anschluss
Connecteur
PCIe à
12+4 broches
Conector de
PCIe 12+4
Pines
Connettore
PCIe 12+4 pin
Conector
PCIe
(12+4 Pinos)
1
1
1
1
1
1
1
1
1
1
1
1
產品料號
產品名稱
印刷項目
發稿日期
版本
105
是
X
雙銅
單色
其他特殊處理效果表面處理
2
厚度(g/m )
折數 材質雙面印刷 印刷色彩單面印刷
規格樣式
單張
CHECK DESIGN
Poki
240816
X X
TOUGHPOWER GT SNOW 850W / 750W(ATX 3.1)PS-TPT-0750 / 0850FNFAGx-W
Manual
240816
A1
615 mm
360 mm
Joyce
240816
X
供應商: (TF3信偉燁 殼)
Похожие устройства
- Thermaltake Toughpower GT 750W (PS-TPT-0750FNFAGE-3) Инструкция по эксплуатации
- Thermaltake Toughpower GT 850W (PS-TPT-0850FNFAGE-3) Инструкция по эксплуатации
- Thermaltake Toughpower SFX 750W Platinum Инструкция по эксплуатации
- Thermaltake Toughpower SFX 850W Platinum Инструкция по эксплуатации
- Thermaltake Toughpower SFX 1000W Platinum Инструкция по эксплуатации
- Thermaltake Smart W3 500W (PS-SPW-0500NNFAWE-1) Инструкция по эксплуатации
- Thermaltake Smart W3 600W (PS-SPW-0600NNFAWE-1) Инструкция по эксплуатации
- Thermaltake Smart W3 700W (PS-SPW-0700NNFAWE-1) Инструкция по эксплуатации
- Thermaltake Smart BX3 550W Bronze (PS-SPD-0550NNFABE-3) Инструкция по эксплуатации
- Thermaltake Smart BX3 650W Bronze (PS-SPD-0650NNFABE-3) Инструкция по эксплуатации
- Thermaltake Smart BX3 750W Bronze (PS-SPD-0750NNFABE-3) Инструкция по эксплуатации
- Thermaltake Toughpower GF A3 Hydrangea Blue 1050W (PS-TPD-1050FNFAGE-B) Инструкция по эксплуатации
- Thermaltake Smart BM3 550W Bronze (PS-SPD-0550MNFABE-3) Инструкция по эксплуатации
- Thermaltake Smart BM3 650W Bronze (PS-SPD-0650MNFABE-3) Инструкция по эксплуатации
- Thermaltake Smart BM3 750W Bronze (PS-SPD-0750MNFABE-3) Инструкция по эксплуатации
- Thermaltake Smart BM3 850W Bronze (PS-SPD-0850MNFABE-3) Инструкция по эксплуатации
- Thermaltake Toughpower GF A3 Snow 850W (PS-TPD-0850FNFAGE-N) Инструкция по эксплуатации
- Thermaltake Toughpower GF A3 Snow 1050W (PS-TPD-1050FNFAGE-N) Инструкция по эксплуатации
- Thermaltake Toughpower GF3 Snow 1200W (PS-TPD-1200FNFAGE-N) Инструкция по эксплуатации
- Thermaltake Toughpower GF3 1200W Gold (PS-TPD-1200FNFAGE-4) Инструкция по эксплуатации