
Philips CVR700 Quick Start Guide онлайн
Short User Manual
EN
ZH-HK
ࣇᄊࠞාԊ
ZH-CN
www.philips.com/welcome
Always there to help you
CVR200/700
Register your product and get support at
Question?
Contact
Philips
ᱎᢛȵ᪄෨Ύ
All registered and unregistered trademarks are property of
their respective owners
.
.
CVR200_CVR700_93_Short User Manual_V1.0
www.philips.com/welcome
Always there to help you
Register your product and get support at
Question?
Contact
Philips
G-sensor data protection
When the G-sensor is triggered, the driving recorder will protect the
present video file and the previous file automatically to ensure they won't
be overwritten by loop recording.
Yo u can set the Protect Level in General Settings.
GPS logger
The driving recorder receives a GPS signal and records the date, time and
driving path.
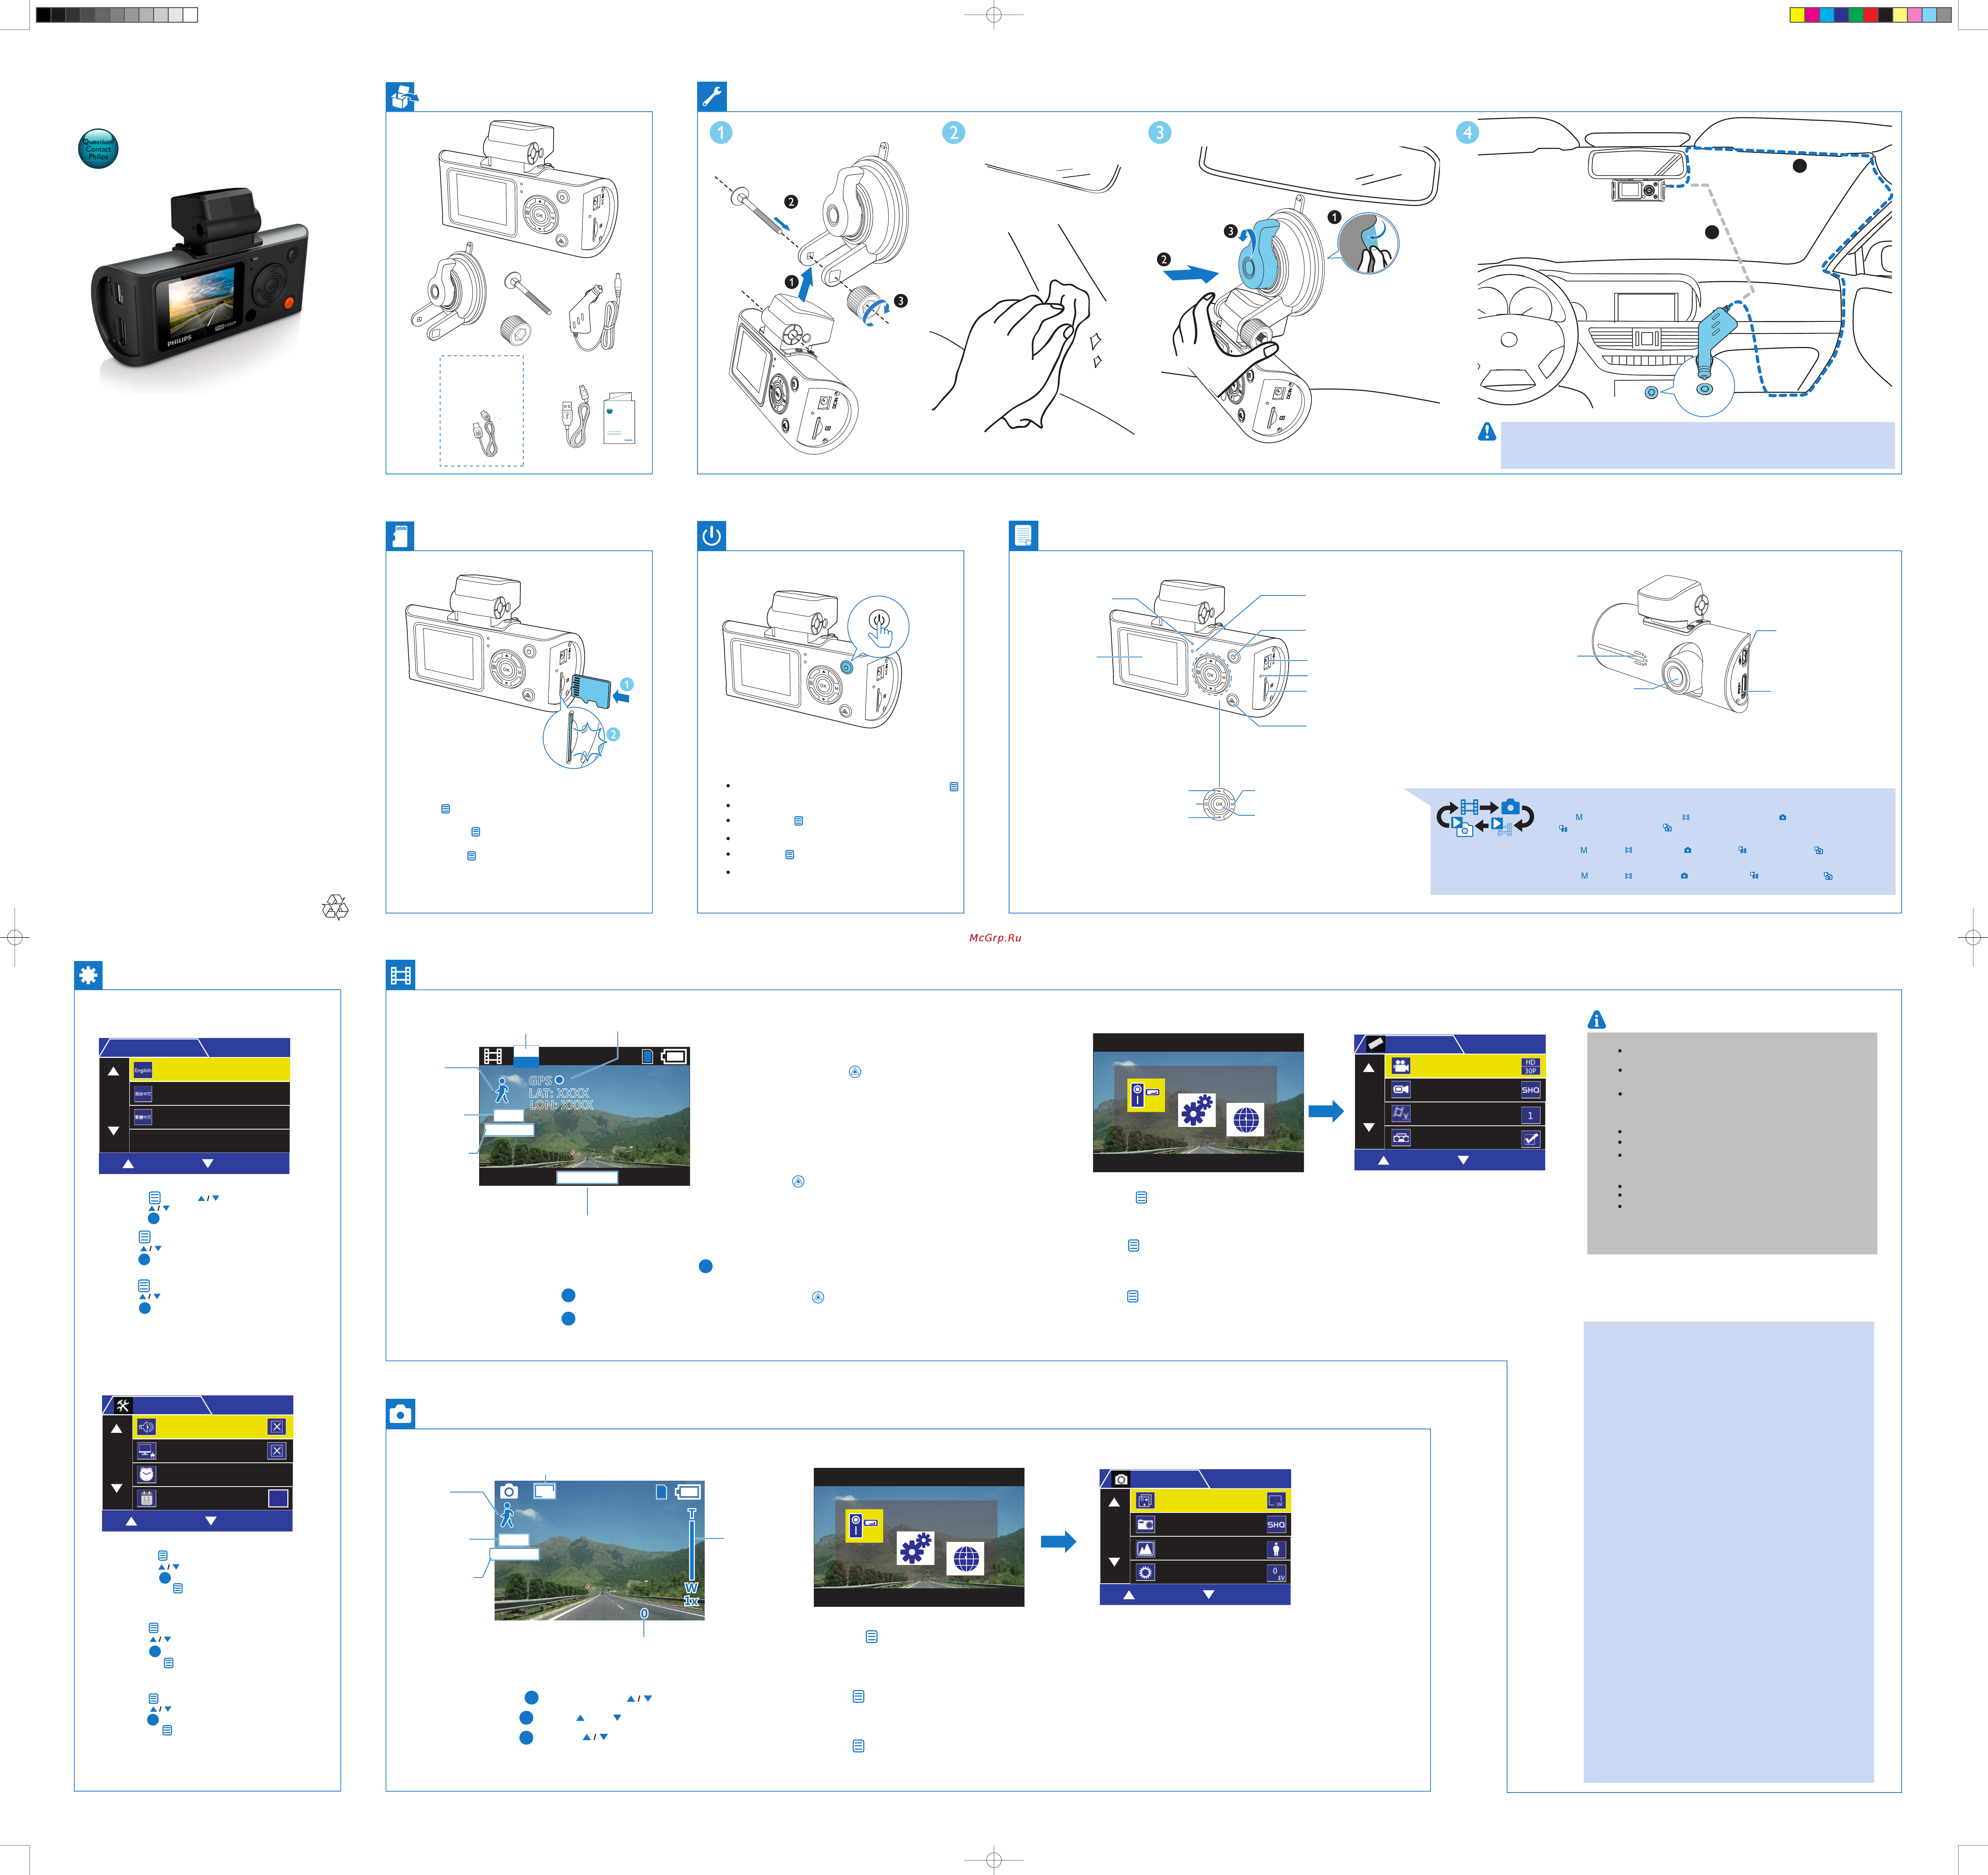
Press to access system menus, and select Movie Mode to enter video settings. Yo u can set the Movie Mode, Movie Quality,
Movie Clip Time, Sound Record, MIC Sensitivity, Scene, Exposure, and White Balance.
For more details about the menu please visit
www.philips.com/support to download the full user manual.
When using for the first time, please set the date/time by pressing
(General Settings -Clock Settings).
Please remove the protective film on camera lens before use.
Do not install in any way which may distract the driver or block their line of sight!
ᇼʜΕผʗౙቝቛࡗ؇෮ֶڂአቝቛ഼ᇃؿΔʿΪສ
ಯཡࣞඃ҃Пቯᅿەഽࢲපᅖቡੑࡩᇢኧࢲපᅖྮ؇༬ሤĞ
When the driving recorder is powered on, video recording starts automatically. Press
to stop/restart recording.
The driving recorder can record video files in a specified time frame (You can set time frame in
Movie Mode - Movie Clip Time). The number of files is dependant on the size of the memory
card. The first recorded video will be overwritten when the micro SD card is full.
During video recording, press to protect the the present file and the previous
from being overwritten.
Loop video recording
Secure Record
for CVR700 only
For CVR700 only
Power indicator
تᅙሙභ؉
_ܢ෯
ཋܞ͐
ࠖωԚ͂ᇼܘɎ>ȹঁஉց@>ࣟβʝ6'˺@ੀ0LFUR6'˺ࣟβʝwᆢړ
˿̳፣ႇᄧːy
ැֳᄊඪĩೊСr྄ໆඃሤrqඪሴඃىrĦඃሤഒඪࢹd
ᄊሏಏĩೊೞྑॆ໊൪؇Ѯࠛຮ୩d
ැֳᄊඪĩೊСq྄ໆඃሤrqݎබࠦ6'গrሱݎබࠦ0LFUR6'গĩ
ႽѮݶሀԪૅ࿀d
ࠖωԚ͂ᇼܘɎ§ȹঁஉց¨§ࣂᘸஉց¨உցˀ౨ࣂංy
Ԛ͂کwᇼɎޚዀᗂɐؿړᙶᇐy
_ลᙴ
_ඃሤ _ૅ࿀୨බ
_உց _፣ᄧᅡβ
_௧ᇘ୨බ
_ޚːࢰࢴᅡβ
Ⴃसྣභూ
/&'ۮྭ
Mode switch
LCD screen
Menu setting
Micro SD card slot
Power button
DC socket
Press repeatedly to select a mode: (Video recording mode), (photo capture mode),
(video playback mode), and (photo playback mode).
Reset
Start/pause video recording
Photo capture
Confirm a selection
Up button
Speaker
Camera lens
Mini HDMI socket
Mini USB socket
Video recording mode Settings
Photo capture mode
Press to capture photos, press to zoom in/zoom out.
EN
CN
HK
EN
EN
Press to access system menus, and select Still capture to enter photo settings.
Yo u can set the Still Image Size, Still Quality, Scene, Exposure, White Balance, ISO Sensitivity, Color and Effect.
For more details about the menu please visit www.philips.com/support to download the full user manual.
EN
CN
CN
HK
HK
EN
CN
HK
EN
EN
1. Press and press to select Language menu.
2. Press to select a language.
3. Press to confirm.
EN
OK
OK
OK
Overview
When using for first time, please format the micro SD card by
pressing (‘General Settings’ -- ‘Format SD-card’ ) to ensure videos
are recorded normally.
The driving recorder will continue running for a while after the engine
is shut down to protect last recorded file.
When recording videos, you can turn the sound record on or off in
‘Movie Mode’ - ‘Sound Record’.
A
B
CN
HK
СӋСာᆖqᄶၟrӴרd
СာᆖႤሷᄶၟd
Сഌd
ܘΰܘፕእ§ႍӰ¨ፕ௰y
ܘፕእȹိႍӰy
ܘᆢႏy
CN
HK
EN
CN
CN
CN
HK
HK
HK
EN
CN
HK
EN
CN
HK
EN
CN
HK
EN
Exposure Values
ౙޝሖ
ᕪͮ൴
The remaining recording time
ගᄧૅሧඪࢹ
Ɏ፣ᄧࣂං
The remaining photos
ගᄧᇘభ
Ɏؿޚː
Zoom in/out
ۄט์࿎
יɣᐛɩ
White balance
фా
̡͉ጫ
Scene
Ԩु
ౡ
Movie quality
ૅ࿀ራ੪
፣ᄧሔ൴
Set language
_ඃሤᄶၟ
_உցႍӰ
Video settings
_శඃሤ
_ᄧːஉց
Photo settings
_ᇘభඃሤ
_ޚːஉց
Adjust system settings
_غऍ྄ໆඃى
_ሁኬӡஉց
Photo resolution
ᇘభकཧ٩
ޚː۹
GPS information
*36ཱ
*36༅
_࿁൪࣑
_Ӵרඃሤ
_Ήɐᒄ
_˲ॶٲஉց
_୨බቩ࠲ঙޓ
ঙඵᆂຶૅ࿀
௧ᇘ
ഌာᆖ
_ᅡβʘ
_0LFUR6'গԄ
_0LFUR6'˺ైᅠ
նᅗ፣ᄧ
ࢰࢴޚː
ᆢႏፕእ
_ሒઢआ
_ሹሤ
_'&ైᅠ
_ࠇສ
௬̐
ᙘཫዀᗂ
0LQL+'0,ైᅠ
0LQL86%ైᅠ
_تᅙ࣑
৻е
ൾ࿀ࡱॆ໊
ڳܑСာᆖ୨බķĥૅ࿀୨බĦĩĥ௧ᇘ୨බĦĩĥశӎۄ୨බĦߦĥᇘభӎۄ୨බĦd
ந86%आ
ந
+'0,आ
_ཋᒄ
Microphone
_ૼۦ
_ہঢ়ࠓ
Down button
_࿁ྑ࣑
_ΉɎᒄ
Secure Record
П೨࢜ૅ
ΪͲ፣ႇ
ʦనܘፕእᅡβ}፣ᄧᅡβwޚːࢰࢴᅡβwᄧːᅌיᅡβޚːᅌיᅡβy
FHD
30P
'=(
+<
-69
2': >>>>
254 >>>>
3M
Exposure Values
ౙޝሖ
ᕪͮ൴
White balance
фా
̡͉ጫ
Scene
Ԩु
ౡ
'=(
+<
חঙԼ࢜ૅႰࠌĩૅ࿀ࣞናِঙඵdСসຶሚሹঙඵૅ࿀d
းૅ࿀
Լ࢜ૅႰসႽૅሧຍىԫ٩؇శభٯிসႽᅿq࿀ӷrqჷభࣉࢂ
ඪࢹrਁඃሤૅ࿀ඪࢹԫ٩Ħĩૅሧ؇༵࣓੪ೞইᄡ࢜Ⴭগ؇ט࿎d״0LFUR
6'গৄࢹႺଃඪࣞናِܤ؝Ⴄݓૅ࿀༵࣓dd
࣋ཏჃ&95
*VHQVRU҆֊ڡࠌĩඃ҃ࡘናِѮࠛ״ಏశ༵࣓ߦ൪Ⴄݓ༵࣓ĩ
ѮӤࡘ҆းૅ࿀ܤdிসႽᅿq྄ໆඃሤrqѮࠛઔ٩rඃ
ሤܭ౸؇ઔ٩d
Сসफന྄ໆӴרĩာᆖჷభ୨බসफനశඃሤdிসႽඃሤq࿀ӷrqૅჷራ੪rcqჷభࣉࢂඪࢹrcqඔ
ო࢜ૅrcq0,&ઔ٩rcqԨुာᆖrcqౙޝغᇾrႽࢅqфాrd
ᄗޓӴר؇ݙځྐྵೈĩೊۂ༻www.philips.com/support
ྑᅽᇾᄊࠞාԊd
ඃ҃आ*36ߞӋ࢜ૅഒcඪࢹߦࢲපીेd
*36࠾੧చ
ᇛ৳ԲۏచऐА
П೨ૅჷ
ૅ࿀ඪĩСসڿሚ״ಏ༵࣓ߦ൪Ⴄݓ༵࣓҆ܤd
ღޓҠࠌĩԼ࢜ૅႰࡘ՝ဥݟႤٯඪࢹĩႽѮࠛክࠌ؇ૅ࿀༵࣓d
ૅ࿀ඪĩிসႽᅿq࿀ӷrqඔო࢜ૅrሱחঙࡩޓҠૅოd
തԼ࢜ૅႰԫᅿܼ༳ॄྑĩ༛੶П೨ফૐĩடሤت՟ຶሚիتd
തت՟ت੪ߝलĩிပ႓ሹඃሤඪࢹߦഒd
Ϸӹত፣შઢwੀϬ৽ն፣ᄧyܘ˅ࠇณն፣ࠑy
፣ᄧ
Ϸӹত፣შ˿፣ႇܞցٽ۹ؿ፣ᄧːݒ੬˿˞ᒨፕ>፣ᄧᅡβ@>௰ݒᄧː
ࣂං@Ԟஉց፣ᄧࣂංٽ۹w፣ႇؿːݒᅕ൴ͅতኙ˺ࢀ൴ɣɩҺցwϤ
PLFUR6'˺ɰࣂผϬ৽ᔍᄘࠖɰ፣Ɏؿːݒy
ܘ˿๑wܘ˿יɣ ɩy
ඩࠉ&95
ଐ́ຆᅁֶ၇܈๗ӹࣂwສੀϬ৽ړᙶଊτؿᄧːᆢړԯɺผ
፣ᄧᔍၰy੬˿˞Ε§ȹঁஉց¨§ړᙶણ۹¨ɻ
உցᎶኂ
ᅕኣړᙶؿણ۹y
உௐઅν*36ڌ໔wԎত፣ؿˀ౨wࣂංቝቛ༏y
ܘᓒᙴӡፕ௰wԎፕእ
§፣ᄧᅡβ¨൬Ƀཋᄧᅡβஉցy੬˿˞உց§፣ᄧᅡβ¨x§፣ᄧۂሔ¨x§௰ݒᄧːࣂං¨
x§፣ࠑ¨x§0,&ણ۹¨x§ౡፕእ¨x§ᕪͮሁኬ¨ʥ§̡͉ጫ¨y
τᗐፕ௰ؿੱwᇼᓒᙴ
www.philips.com/supportɎ༗ѧኬؿ͂ʸʹ˫y
CN
HK
Сসफന྄ໆӴרĩာᆖqభ௧ൾrসफനᇘభඃሤd
ிসႽඃሤq࿀զrcq࿀ራ੪rcqԨुာᆖrcqౙޝغᇾrcqфాrcqܭޝ٩rcqၠെrႽࢅq࿔rd
ᄗޓӴר؇ݙځྐྵೈĩೊۂ༻
www.philips.com/support ྑᅽᇾᄊࠞාԊd
ܘᓒᙴӡፕ௰wԎፕእ
§๑¨൬Ƀޚːஉցy੬˿˞உց§๑ː۹¨x§๑ːۂሔ¨x§ౡፕእ¨x§ᕪͮሁኬ¨x
§̡͉ጫ¨x§ͮ۹¨x§ᔿϳ¨ʥ§ࢽ¨y
τᗐፕ௰ؿੱwᇼᓒᙴ
www.philips.com/support
Ɏ༗ѧኬؿ͂ʸʹ˫y
*36ত፣ኂ
*Ꮆኂᅕኣړᙶ
ΪͲ፣ႇ
፣ᄧ༦ೡɻwܘɎ˞ړᙶکᏌ࣐ɐȹᏌ࣐ᔍၰy
ʵᎽဋˌ܃Ϸӹত፣შผܛᙩ༜Аȹݒࣂංw˞ړᙶ܃ȹ፣ႇᏌ࣐y
፣ᄧࣂ˿Ε
§
፣ᄧᅡβ
¨
§
፣ࠑ
¨
ɻᗐஶ፣ࠑ˲ॶy
ΣϷӹত፣შٽࣂං୮כঢ়ใྊwݯȿΪͲϣ൴wʑສཋϑੀ˅
˨ཋyΣʑສཋϑཋ൴३သw੬߬ࠇณஉցࣂංˀ౨y
ܘࢰࢴޚːwܘיɣᐛɩy
࣋ཏჃ&95
ඩࠉ&95
图像参数
རԈծ
6(/(&72.
རஉഠ
རᇍ
ӊࣣ࿎ᄸ
ܿלᆠ
图像参数
རҙ
6(/(&7 2.
རҙ
੧႙ᇍ
႙ࠤൌ࡛
ശၿ࠾੧
རҙ
རஉഠ
图像参数
(QJOLVK
6(/(&7 2.
იခ࿎ᄸ
ࡩᇓ໗
ْ體ᇓ໗
图像参数
σࡳၿ
6(/(&7 2.
༦ഥᇆ
ስײܵࠓ
ൌᇖഥᇆ
۰൘
00
''
<<<<
OK
OK
OK
1. Press and select General Setting.
2. Press to select the menu.
3. Press to enter the menu.
Note: Press to exit the current menu.
OK
OK
OK
OK
СӋာᆖq྄ໆඃىrd
СာᆖӴרd
СफനӴרd
ቡķСসໞս״ಏӴרd
OK
ܘʥፕእ§ȹঁஉց¨y
ܘፕእፕ௰y
ܘ൬Ƀፕ௰y
؇෮}ܘᔴکፕ௰y
OK
© 2013 Koninklijke Philips Electronics N.V.
All rights reserved.
For safety reasons the built-in battery will stop charging if the device
remains at a high-temperature for period of time. If the built-in battery
runs out of power you will need to reset the date and time.
Содержание
- Always there to help you 1
- Camera lens mini hdmi socket 1
- Dc socket 1
- Do not install in any way which may distract the driver or block their line of sight 1
- Down butto 1
- During video recording press to protect the the present file and the previous from being overwritten 1
- Fhd 30p 1
- For cvr700 only 1
- For safety reasons the built in battery will stop charging if the device remains at a high temperature for period of time if the built in battery runs out of power you will need to reset the date and time 1
- G sensor data protection when the g sensor is triggered the driving recorder will protect the present video file and the previous file automatically to ensure they won t be overwritten by loop recording you can set the protect level in general settings 1
- Gps logger the driving recorder receives a gps signal and records the date time and driving path 1
- Lcd screen 1
- Loop video recording 1
- Menu setting 1
- Micro sd card slot 1
- Microphone 1
- Mini usb socket 1
- Mode switch 1
- Overview 1
- Photo capture mode 1
- Power button 1
- Power indicator 1
- Press and press to select language menu 2 press to select a language 3 press to confirm 1
- Press and select general setting 2 press to select the menu 3 press to enter the menu note press to exit the current menu 1
- Press repeatedly to select a mode video recording mode photo capture mode video playback mode and photo playback mode 1
- Press to access system menus and select movie mode to enter video settings you can set the movie mode movie quality movie clip time sound record mic sensitivity scene exposure and white balance for more details about the menu please visi 1
- Press to access system menus and select still capture to enter photo settings you can set the still image size still quality scene exposure white balance iso sensitivity color and effect for more details about the menu please visit 1
- Press to capture photos press to zoom in zoom out 1
- Question contact philips 1
- Secure record 1
- Speaker 1
- Start pause video recording photo capture confirm a selection 1
- The driving recorder can record video files in a specified time frame you can set time frame in movie mode movie clip time the number of files is dependant on the size of the memory card the first recorded video will be overwritten when the micro sd card is full 1
- The driving recorder will continue running for a while after the engine is shut down to protect last recorded file when recording videos you can turn the sound record on or off in movie mode sound record 1
- To download the full user manual 1
- Up button 1
- Video recording mode settings 1
- When the driving recorder is powered on video recording starts automatically press to stop restart recording 1
- When using for first time please format the micro sd card by pressing general settings format sd card to ensure videos are recorded normally 1
- When using for the first time please set the date time by pressing general settings clock settings please remove the protective film on camera lens before use 1
- Www philips com suppor 1
- Www philips com support 1
- Www philips com welcome 1
- Accessories cables 附件 电源线 连接线 2
- Adjust the volume from 0 9 2
- Battery rechargeablelithiumbattery designedfor lastdatabackuppurposeonly notfornormally videorecording 2
- Cadmium 2
- Connectionsocket usb2 minihdmi 2
- Contained in electronic information products will not leak or mutate so that the use of these substances or 2
- Delete a single file 2
- Delete all files 2
- Digitalzoom 4xdigitalzoom photocapturemode 2
- Dimensions 2
- Drivingrecorder 2
- Drivingrecorder wxhxd 2
- During playback press to fast forward fast reverse the video 2
- Elements will not result in any severe environmental pollution any bodily injury or damage to any assets 2
- Externalmemory microsdcard class6orhigher 2
- G cvr200 93 g cvr700 2
- G sensor built in cvr700only 2
- Gps built ingpsmodule cvr700only 2
- Hd 1280x720p 30 60fps 2
- Housing 外壳 2
- Important 2
- In the video picture playback mode press to access exit the file management menu 2
- Is below the limit requirement in sj t11363 2006 2
- Lcd panel 液晶面板 2
- Lcdscreen 1 inchcolortft 2
- Lens autofocus 95 wideangle 2
- Loudspeakers 喇叭单元 o o o o o o 2
- Mercury 2
- O indicates that this toxic or hazardous substance contained in all of the homogeneous materials for this part 2
- O o o o 2
- O o o o o 2
- Playback 2
- Powersupply carcharger input dc12 24v output dc 5 v 2
- Press to confirm an option 2
- Press to pause restart the playback 2
- Press to return to the photo list 2
- Press to return to the video list 2
- Press to select a photo 2
- Press to select a video file 2
- Press to select an option 2
- Press to start video playback 2
- Press to view the photo 2
- Protect a single file 2
- Protect all files 2
- Pwbs 电路板组件 2
- Remove protection from a single file 2
- Remove protection from all files 2
- Specifications 2
- Storagehumidity 20 85 2
- Storagetemperature 20 c 70 c 2
- Suctionbracket 2
- Suctionbracket diameterxheight 2
- Systemrequirement windows2000 xp vista windows7 windows 8 macosx10 orhigher 2
- This logo refers to the period 10 years 2
- This logo refers to the period 10 years during which the toxic or hazardous substances or elements 2
- Used for this part is above the limit requirement in sj t11363 2006 2
- User manual 2
- Vga 640x480 30fps 2
- Video fhd 1920x1080p 30fps 2
- Videoformat avi h 64 2
- Weight 2
- Workingtemperature 20 c 60 c 2
- X indicates that this toxic or hazardous substance contained in at least one of the homogeneous materials 2
- X45 mm 2
- X62 x36 mm 2
- 产品信息 2
- 六价铬 chromium 2
- 多溴二苯醚 2
- 多溴联苯 2
- 有毒有害物质或元素 hazardous toxic substance 2
- 注意事项 2
- 环保使用期限 environmental protection use period 2
- 產品資訊 2
- 用该电子信息产品不会对环境造成严重污染或对其人身 财产造成严重 损害的期限 2
- 电子信息产品中含有的有毒有害物质或元素在正常使用的条件下不会发生外泄或突变 电子信息产品用户使 2
- 表示该有毒有害物质在该部件所有均质材料中的含量均在sj t11363 2006 标准规定的限量要求以下 2
- 表示该有毒有害物质至少在该部件的某一均质材料中的含量超出sj t11363 2006 标准规定的限量要 2
- 部件名称 name of the parts 2
- 重要資訊 2
- 铅 pb lead 汞 hg 2
- 镉 cd 2
Похожие устройства
- Philips CVR700 User Manual
- Philips CSP251 Брошюра
- Philips CSP251 Руководство пользователя
- Philips CSP630 Брошюра
- Philips CSP630 Руководство пользователя
- Philips CSP6911 Брошюра
- Philips CSP6911 Руководство пользователя
- Philips CSP615 Брошюра
- Philips CSP615 Руководство пользователя
- Philips CSQ505 User Guide
- Philips CSQ505 Брошюра
- Philips CSP1000 Брошюра
- Philips CSP1000 Руководство пользователя
- Philips CSP515 Брошюра
- Philips CSP515 Руководство пользователя
- Philips CSP530 Брошюра
- Philips CSP530 Руководство пользователя
- Philips CSP620 Брошюра
- Philips CSP620 Руководство пользователя
- Philips CSP610 Брошюра