![Asus M5A97 R2.0 — подключение вентиляторов и внутренние разъемы материнской платы [35/152]](/img/pdf.png)
Asus M5A97 R2.0 — подключение вентиляторов и внутренние разъемы материнской платы [35/152]
Превью страниц
Страница 35 /
152
![Asus M5A97 R2.0 [35/152] Tpmconnector 20 1pintpm](/views2/1163294/page35/bg23.png)
M5A97 R2.0
1-21
Chapter 1
Chapter 1
DO NOT forget to connect the fan cables to the fan connectors. Insufcient air ow inside
the system may damage the motherboard components. These are not jumpers! DO NOT
place jumper caps on the fan connectors.
• The CPU_FAN connector supports a CPU fan of maximum 1A (12 W) fan power.
• Only the CPU_FAN and CHA_FAN1/2/3 connectors support the ASUS Fan Xpert
feature.
• If you install two VGA cards, we recommend that you plug the rear chassis fan cable
to the motherboard connector labeled CHA_FAN1/2/3 for better thermal environment.
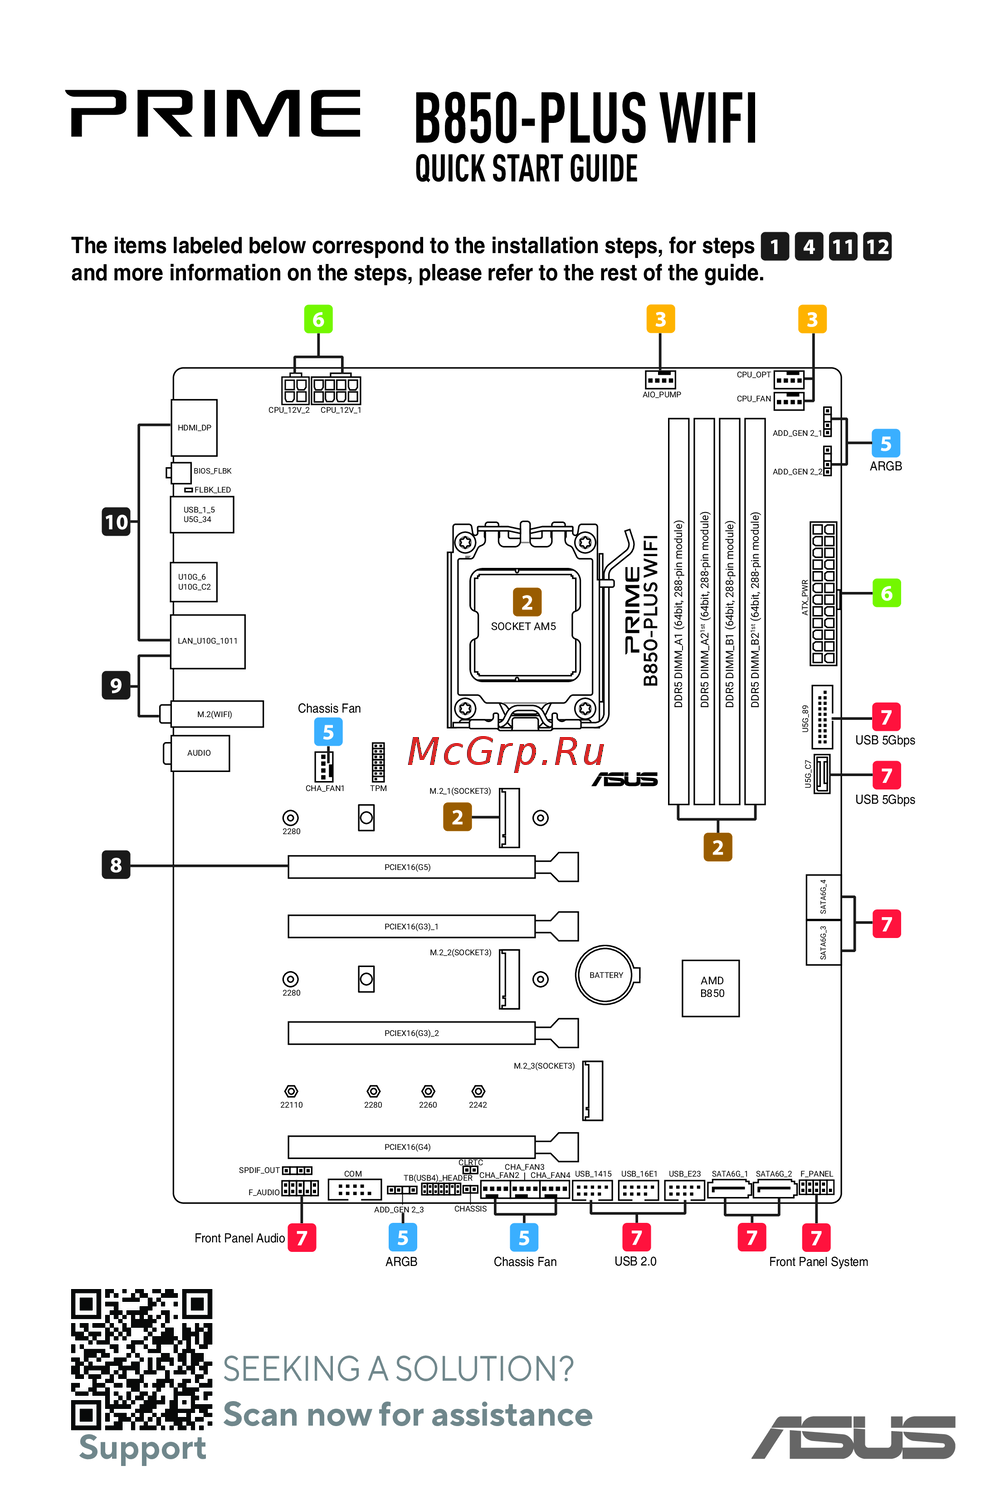
1.2.9 Internal connectors
1. CPUandchassisfanconnectors(4-pinCPU_FAN,and4-pinCHA_FAN1/2/3)
Connect the fan cables to the fan connectors on the motherboard, ensuring that the
black wire of each cable matches the ground pin of the connector.
2. TPMconnector(20-1pinTPM)
This connector supports a Trusted Platform Module (TPM) system, which can securely
store keys, digital certicates, passwords, and data. A TPM system also helps enhance
network security, protects digital identities, and ensures platform integrity.
The TPM module is purchased separately!
Содержание
639- E7438 first edition july 2012
- Basic installation
- Contents
- Product introduction
- Bios setup
- Software support
- Appendices
- Multiple gpu support
- Raid support
- Electrical safety
- Operation safety
- Safety information
- How this guide is organized
- Where to find more information
- About this guide
- Typography
- Conventions used in this guide
- M5a97 r2 specifications summary
- Usb3 controller
- Realtek 887 8 channel high definition audio codec
- X asmedi
- Sb950chipset
- M5a97 r2 specifications summary
- Asus quiet thermal solution
- Asus ez diy
- Asus dual intelligent processors
- Sfs steplessfrequencyselection
- Precision tweaker 2
- Overclockingprotection
- Asus q design
- Asus power design
- Asus exclusive features
- M5a97 r2 specifications summary
- Package contents
- Check your motherboard package for the following items
- Installation tools and components
- The tools and components in the table above are not included in the motherboard package
- Product highlights
- Product introduction
- Special features
- Network icontrol
- Usb 3 boost
- Dip dualintelligentprocessors tpu turbov processingunit epu energyprocessingunit
- Dip dual intelligent processors tpu turbov processing unit epu energy processing unit
- Chapter 1
- Asus exclusive features
- Ai suite ii
- Ai charger
- Usb bios flashback
- Asus fan xpert
- Chapter 1
- Asusuefibios ezmode
- Asus quiet thermal solution
- Asus q design
- Asus ez diy
- Asus directkey
- Fanlessdesign heatsinksolution
- Precision tweaker 2
- Other features
- Erp ready
- Chapter 1
- Asus o c profile
- Asus mylogo 2
- Asus ez flash 2
- Chapter 1
- Motherboard overview
- M5a97 r2
- Take note of the following precautions before you install motherboard components or change any motherboard settings
- Before you proceed
- Motherboard layout
- Chapter 1
- Chapter 1 product introduction
- Layout contents
- Chapter 1
- System memory
- Central processing unit cpu
- Chapter 1
- Centralprocessingunit cpu
- You may install 1gb 2gb 4gb and 8gb unbuffered ecc non ecc ddr3 dimms into the dimm sockets
- Recommended memory configurations
- Memory configurations
- M5a97 r2
- Chapter 1
- Ddr3 1800 mhz capability
- Ddr3 1866 mhz capability
- Chapter 1 product introduction
- Chapter 1
- M5a97r2 motherboardqualifiedvendorslists qvl
- Ddr3 2133 o c mhzcapability
- Ddr3 2000 o c mhzcapability
- Chapter 1
- M5a97 r2
- Ddr3 1600 mhz capability
- Chapter 1 product introduction
- Ddr3 1333 mhz capability
- Continued on the next page
- Chapter 1
- Configuration we suggest that you install the module into a2 slot
- Chapter 1
- As one pair of dual channel memory configuration we suggest that you install the modules into slots a2 and b2 for better compatibility
- 4dimms supports four 4 modules inserted into both the blue and black slots as two
- 2dimms supports two 2 modules inserted into either the blue slots or the black slots
- 1dimm supports one 1 module inserted into any slot as single channel memory
- When overclocking some amd cpu models may not support ddr3 1600 or higher frequency dimms
- Visit the asus website for the latest qvl
- Side s ss single sidedds double sided dimmsupport
- Pairs of dual channel memory configuration
- M5a97 r2
- Ddr3 1333 mhz capability
- Expansion slots
- Chapter 1
- Irq assignments for this motherboard
- Chapter 1
- Onboard switches and buttons allow you to fine tune performance when working on a bare or open case system this is ideal for overclockers and gamers who continually change settings to enhance system performance
- Onboard switches and buttons
- Key during post it allows you to turn on or turn off the system and conveniently enter the bios during bootup
- Directkey button
- Chapter 1 product introduction
- Chapter 1
- M5a97 r2
- Chapter 1
- Memok switch
- Installing dimms that are incompatible with the motherboard may cause system boot failure and the dram_led near the memok switch lights continuously press and hold the memok switch until the dram_led starts blinking to begin automatic memory compatibility tuning for successful boot
- Chapter 1
- Jumpers
- Chapter 1
- Onboard leds
- Chapter 1
- Tpmconnector 20 1pintpm
- This connector supports a trusted platform module tpm system which can securely store keys digital certificates passwords and data a tpm system also helps enhance network security protects digital identities and ensures platform integrity
- M5a97 r2
- Internal connectors
- Cpuandchassisfanconnectors 4 pincpu_fan and4 pincha_fan1 2 3
- Connect the fan cables to the fan connectors on the motherboard ensuring that the black wire of each cable matches the ground pin of the connector
- Chapter 1
- Chapter 1
- These connectors are for an atx power supply the plugs from the power supply are designed to fit these connectors in only one orientation find the proper orientation and push down firmly until the connectors completely fit
- Chapter 1 product introduction
- Atxpowerconnectors 24 pineatxpwr 8 pineatx12v
- When creating a raid set set the sata_5 6 connectors to ide mode to ensure that the system recognizes your odd device
- These connectors are for the serial ata 6 gb s signal cables for serial ata hard disk drives and optical disc drives if you installed serial ata hard disk drives you can create a raid 0 raid 1 raid 5 raid 10 or jbod configuration through the onboard controller
- Serialata6 gb sconnectors 7 pinsata6g1 6
- M5a97 r2
- Chapter 1
- This connector is for a serial com port connect the serial port module cable to this connector then install the module to a slot opening at the back of the system chassis
- This connector is for an additional sony philips digital interface s pdif port
- Serialportconnector 10 1pincom1
- Digitalaudioconnector 4 1pinspdif_out
- Chapter 1 product introduction
- Chapter 1
- Chapter 1
- This connector is for a chassis mounted front panel audio i o module that supports either high definition audio or ac 97 audio standard connect one end of the front panel audio i o module cable to this connector
- Usb3 connector 20 1pinusb3_34
- This connector is for the additional usb 3 ports connect the usb 3 bracket cable to this connector then install the usb 3 bracket to the rear side of the chassis if your chassis support customized front panel installation with asus usb 3 header you can have a front panel usb 3 solution
- Frontpanelaudioconnector 10 1pinaafp
- Chapter 1 product introduction
- Chapter 1
- Chapter 1
- Motherboard installation
- Chapter 2
- Building your pc system
- Basic installation
- Chapter 2
- Chapter 2
- Chapter 2 getting started
- Cpu installation
- Chapter 2
- Cpu heatsink and fan assembly installation
- Chapter 2
- Asus m5a97 r2
- Chapter 2
- Chapter 2
- Dimm installation
- Chapter 2
- Atx power connection
- Chapter 2
- Sata device connection
- Chapter 2
- Expansion card installation
- Chapter 2
- Press the bios flashback button for three seconds until a flashing light appears which indicates that the bios flashback function is enabled
- Chapter 2 getting started
- Insert the usb storage device to the usb flashback port
- Chapter 2
- Bios update utility
- Wait until the light goes out indicating that the bios updating process is completed
- Usb bios flashback allows you to easily update the bios without entering the existing bios or operating system simply insert a usb storage device to the usb port press the usb bios flashback button for three seconds and the bios is updated automatically
- Usb bios flashback
- Touseusbbiosflashback
- Place the bundled support dvd to the optical drive and install the usb bios flashback wizard follow the onscreen instructions to complete the installation
- Launch the usb bios flashback wizard to automatically download the latest bios version
- Rear i o connection
- Motherboard rear and audio connections
- Chapter 2
- Lan ports led indications
- Chapter 2
- Audio2 4 6 or8 channelconfiguration
- Chapter 2
- Audio i o connections
- Chapter 2
- Turning off the computer
- Starting up for the first time
- Chapter 2
- Chapter 2 getting started
- Chapter 2
- Knowing bios
- Chapter 3
- Bios setup
- Chapter 3
- Post continues with its routines
- Entering bios setup after post
- Entering bios at startup
- Chapter 3 bios setup
- Bios setup program
- Bios menu screen
- Use the bios setup to update the bios or configure its parameters the bios screen include navigation keys and brief onscreen help to guide you in using the bios setup program
- To enter bios setup at startup
- To enter bios setup after post
- The bios setup program can be used under two modes ez mode and advanced mode you can change modes from the exit menu or from the exit advanced mode screen
- Simultaneously
- Press the reset button on the system chassis
- Press the power button to turn the system off then back on do this option only if you failed to enter bios setup using the first two options
- The default screen for entering the bios setup program can be changed refer to the setup mode item in section 3 boot menu for details
- The bootmenu f8 button is available only when the boot device is installed to the system
- The boot device options vary depending on the devices you installed to the system
- Hot key for the advanced bios settings
- Ez mode
- Chapter 3
- Asus m5a97 r2
- Chapter 3
- Advanced mode
- Menu bar
- Submenu items
- Scroll bar
- Pop up window
- Navigation keys
- Menu items
- General help
- Configuration fields
- Chapter 3
- Back button
- The security menu items allow you to change the system security settings
- The main menu screen appears when you enter the advanced mode of the bios setup program the main menu provides you an overview of the basic system information and allows you to set the system date time language and security settings
- Security
- Main menu
- Chapter 3 bios setup
- Chapter 3
- User password
- Chapter 3
- Administrator password
- Chapter 3
- Ai tweaker menu
- Targetcpuspeed xxxxmhz
- Currentnbfrequency xxxxmhz
- Currentmemoryfrequency xxxxmhz
- Currenthtlinkspeed xxxxmhz
- Currentcpuspeed xxxxmhz
- Chapter 3
- Dram o c profile ddr3 1600mhz
- Cpu ratio auto
- Cpu bus frequency xxx
- Chapter 3
- Amd turbo core technology auto
- Ai overclock tuner auto
- Pcie frequency auto
- Oc tuner cancel
- Memory frequency auto
- Dram driving control
- Pcie spread spectrum auto
- Ht link speed auto
- Epu power saving mode disabled
- Dram timing control
- Cpu spread spectrum auto
- Cpu nb frequency auto
- Chapter 3
- Cpu nb load line calibration auto
- Cpu manual voltage auto
- Cpu load line calibration auto
- Chapter 3
- Offset mode sign
- Digi power control
- Cpu vdda voltage auto
- Cpu offset voltage auto
- Cpu nbvoltageoffsetmode
- Cpu nb offset voltage auto
- Cpu nb offset mode sign
- Cpu nb manual voltage auto
- Sb voltage auto
- Nb voltage auto
- Nb ht voltage auto
- Nb 1 v voltage auto
- Dram voltage auto
- Chapter 3
- C1e support disabled
- Advanced menu
- Cpu configuration
- Cool n quiet disabled
- Chapter 3
- Svm enabled
- North bridge
- Memory configuration
- Iommu disabled
- Initiate graphic adapter peg pci
- Hpc mode enabled
- Core c6 state enabled
- Chapter 3
- Apm master mode auto
- Sb sata configuration
- Sata configuration
- Hpet enabled
- Chapter 3
- South bridge
- Usb configuration
- Sb usb configuration
- Legacy usb3 support enabled
- Legacy usb support enabled
- Ehci hand off disabled
- Chapter 3
- Realtek pxe oprom disabled
- Realtek lan controller enabled
- Onboard devices configuration
- Cpu core on off function
- Cpu core activation auto
- Chapter 3
- Asmediausb3 controller rear enabled
- Asmediausb3 controller front enabled
- Asmedia usb 3 battery charging support disabled
- Serial port configuration
- Sb hd azalia configuration
- Restore ac power loss power off
- Power on by ps 2 device disabled
- Power on by pme disabled
- Erp ready enabled
- Chapter 3
- Power on by rtc disabled
- Power on by ring disabled
- Network stack disable link
- Network stack
- Ipv6 pxe support enabled
- Ipv4 pxe support enabled
- Chapter 3
- Chapter 3
- Cha_fan1 2 3 speed xxxx rpm or ignore n a cha_fan1 2 3 speed xxxx rpm or ignore n a
- Vcorevoltage 3 vvoltage 5vvoltage 12v voltage vdda2 vvoltage
- Monitor menu
- Cpu_fan speed xxxx rpm or ignore n a
- Cpu temperature mb temperature xxxºc xxxºf
- Cpu_fan speed low limit 600 rpm
- Cpu q fan control enabled
- Chapter 3
- Chassis q fan control disabled
- Chassis fan speed low limit 600 rpm
- Chapter 3
- Wait for f1 if error enabled
- Post report 5 sec
- Full screen logo enabled
- Chapter 3
- Bootup numlock state on
- Boot menu
- Setup mode ez mode
- Option rom messages force bios
- Int19 trap response immediate
- Directkey enabled go to bios
- Chapter 3
- Boot override
- Boot option priorities
- Displays the serial presence detect spd information of the dimm module installed on the selected slot configuration options slot 1 slot 2 slot 3 slot 4
- Dimm slot slot 1
- Chapter 3 bios setup
- Chapter 3
- Asus spd information
- Asus o c profile
- Asus ez flash 2 utility
- And then select yes
- Allows you to run asus ez flash 2 press enter to launch the asus ez flash 2 screen
- Tools menu
- To display the submenu
- This item allows you to store or load multiple bios settings
- Save to profile
- Load from profile
- Savechanges reset
- Load optimized defaults
- Launch efi shell from filesystem device
- Exit menu
- Discardchanges exit
- Chapter 3
- Asus ez mode
- Updating bios
- Chapter 3
- Asus update
- Chapter 3
- Updating the bios through the internet
- Launching asus update
- Updating the bios through a bios file
- Chapter 3
- Toupdatethebiosusingezflash2
- To switch to the folder info field
- To switch to the drive field
- To perform the bios update process reboot the system when the update process is done
- To enable it
- Insert the usb flash disk that contains the latest bios file to the usb port
- Chapter 3
- Before you start using this utility download the latest bios from the asus website at www asus com
- Asus m5a97 r2
- Asus ez flash 2 allows you to update the bios without having to use a bootable floppy disk or an os based utility
- Asus ez flash 2
- Chapter 3
- Chapter 3 bios setup
- Chapter 3
- Booting the system in dos environment
- Before updating bios
- Asus bios updater
- When the make disk menu appears select the freedos command prompt item by pressing the item number
- To switch the disk from drive c optical drive to drive d usb flash drive
- To backup the current bios file using the bios updater
- The filename is any user assigned filename with no more than eight alphanumeric the filename is any user assigned filename with no more than eight alphanumeric characters for the filename and three alphanumeric characters for the extension
- The bios updater backup screen appears indicating the bios backup process when bios backup is done press any key to return to the dos prompt
- Ensure that the usb flash drive is not write protected and has enough free space to save the file
- Chapter 3 bios setup
- Chapter 3
- Backing up the current bios
- Bios updater checks the selected bios file and prompts you to confirm bios update
- Asus m5a97 r2
- Updating the bios file
- Toupdatethebiosfileusingbiosupdater
- To exit bios updater restart your computer
- The bios updater screen appears as below
- For bios updater version 1 4 or later the utility automatically exits to the dos prompt after updating bios
- Ensure to load the bios default settings to ensure system compatibility and stability select the load optimized defaults item under the exit bios menu see chaper 3 of your motherboard user manual for details
- Ensure to connect all sata hard disk drives after updating the bios file if you have disconnected them
- Do not shut down or reset the system while updating the bios to prevent system boot failure
- Chapter 3
- Chapter 3 bios setup
- Chapter 3
- Support dvd information
- Software support
- Running the support dvd
- Installing an operating system
- Chapter 4
- Obtaining the software manuals
- Chapter 4
- Ai suite ii
- Using ai suite ii
- Software information
- Installing ai suite ii
- Chapter 4
- Turbov evo on the ai suite ii main menu bar
- Turbov evo
- Turbov allows you to overclock the cpu bus peg frequency cpu voltage cpu nb voltage and dram voltage in window
- Turbov
- Environment and takes effect in real time without exiting and rebooting the os
- Chapter 4 software support
- Chapter 4
- Asus turbov evo includes turbov that allows you to manually adjust the cpu frequency and related voltages such as cpu level up that offers automatic and easy overclocking and system level up
- Allows you to manually adjust the cpu ratio
- Using advanced mode
- The cpu ratio bars show the status of the cpu cores which vary with your cpu model
- Set the cpu ratio setting item in bios to auto before using the cpu ratio function in turbov refer to the bios chapter of your motherboard user manual for details
- Drag the adjustment bar upwards or downwards to the desired value
- Cpu ratio
- Click on the cpu ratio tab
- Click on the advanced mode tab to adjust the advanced voltage settings
- Click apply to save the changes made
- Chapter 4
- Asus m5a97 r2
- Using fast tuning
- Chapter 4
- Auto tuning
- Using extreme tuning
- Chapter 4
- Chapter 4
- You can also configure the system settings such as cpu frequency gpu frequency vcore voltage and fan control to customize a power saving mode
- Launching epu
- Epu on the ai suite ii main menu bar
- Epu is an energy processing utility that provides several power saving modes when set to the auto mode the system automatically changes its power saving mode based on the current system condition
- Chapter 4 software support
- Using remote go
- Remote go functions
- Remote go
- Chapter 4
- W fi go remote
- Launching w fi go remote
- Chapter 4
- W fi go remote menu
- Chapter 4
- Dlna media hub
- Chapter 4
- Using the dlna media hub
- Toplaymusic
- Toeditthemusicplaylist
- Toeditthelibrary
- Chapter 4
- Toplayavideofile
- Toeditthevideoplaylist
- Toeditthevideolibrary
- Chapter 4
- Toviewimages
- Toedittheimageplaylist
- Toedittheimagelibrary
- Chapter 4
- Using the dlna media hub via w fi go remote
- Remote desktop
- Chapter 4
- Using the remote desktop
- Using the remote desktop via w fi go remote
- Chapter 4
- Using file transfer via w fi go remote
- Using file transfer
- File transfer
- Chapter 4
- Asus m5a97 r2
- To create a password
- Tick use password and key in your password
- The w fi go remote s user interface shown above is for reference only and may vary with the mobile device s operating system
- Securing your computer for wi fi go remote functions
- Remote go settings allows you to create a password for your computer
- In the main menu
- Click apply
- Chapter 4
- Your password must contain 6 12 letters or numbers
- When you launch the wi fi go remote the application prompts you to key in the computer s password
- Usb 3 boost
- Launching usb 3 boost
- Configuring usb 3 boost
- Chapter 4
- Touseezstart
- Select a profile and click apply
- Network icontrol from ai suite ii main menu bar
- Network icontrol
- Ez start allows you to quickly activate network icontrol and set the highest bandwidth priority for your top currently running program
- Click the ez start tab
- Click on off to enable disable network icontrol
- Chapter 4
- Asus network icontrol is an intuitive one stop network control center that makes it easier for you to manage your network bandwidth and allows you to set monitor and schedule the bandwidth priorities for your network programs it also allows you to automatically connect to a pppoe for a more convenient online experience
- Asus m5a97 r2
- Using ez start
- Using quick connection
- Chapter 4
- Configuring the quick connection
- Chapter 4
- Using ez profile
- Chapter 4
- Usb bios flashback wizard
- Scheduling the latest bios download
- Downloading the updated bios
- Chapter 4
- Chapter 4
- Launching fan xpert
- Fan xpert
- Fan setting
- Chapter 4
- Using fan xpert
- This utility allows you to fast charge your portable bc 1 mobile devices on your computer s usb port three times faster than the standard usb devices
- Chapter 4 software support
- Chapter 4
- Ai charger
- Probe ii
- Launching probe ii
- Configuring probe ii
- Chapter 4
- Using sensor recorder
- Sensor recorder
- Launching sensor recorder
- Chapter 4
- Using history record
- Chapter 4
- Asus update
- Using asus update
- Launching asus update
- Chapter 4
- Using mylogo
- Mylogo2
- Launching mylogo2
- Chapter 4
- Chapter 4
- Chapter 4
- Audio configurations
- Chapter 4 software support
- Chapter 4
- Raid support
- Raid definitions
- Raid configurations
- Chapter 5
- Setting the raid item in bios
- Installing serial ata hard disks
- Chapter 5
- Option rom utility
- Chapter 5
- Amd option rom utility
- Creating a raid volume
- Chapter 5
- Displaying a raid set information
- Deleting a raid configuration
- Chapter 5
- Creating a raid driver disk without entering the os
- Creating a raid driver disk in windows
- Creating a raid driver disk in window
- Creating a raid driver disk
- Chapter 5
- Installing the raid driver during window
- Os installation
- Installing the raid driver during windows os installation
- Chapter 5
- Using a usb floppy disk drive
- Chapter 5
- Chapter 5
- Chapter 5 raid configurations
- Chapter 5
- Before you begin
- Requirements
- Multiple gpu support
- Crossfirex technology
- Chapter 6
- Amd crossfirex technology
- Chapter 6
- Installing two crossfirex graphics cards
- Installing the device drivers
- Launching the amd vision engine control center
- Enabling the amd crossfirex technology
- Enabling the am
- Crossfirex technology
- Chapter 6
- Enabling dual crossfirex technology
- Chapter 6
- Notices
- Federal communications commission statement
- Appendices
- Vcci class b statement
- Kc koreawarningstatement
- Ic canadiancompliancestatement
- Canadian department of communications statement
- Vcci japancompliancestatement
- Asus recycling takeback services
- Technical support
- Asustek computer inc
- Asuscomputerinternational america
- Asuscomputergmbh germanyandaustria
- Asus contact information
- Appendices
Похожие устройства
-
 Asus TUF GAMING B550-PROРуководство по быстрому запуску
 -
 Asus PRIME A520M-A IIКраткое руководство пользователя
 -
 Asus PRIME B250M-PLUSКраткое руководство
 -
 Asus TUF GAMING Z590-PLUSКраткое руководство
 -
 Asus ProArt B650-CREATORКраткий обзор функций
 -
 Asus TUF GAMING B650-PLUSБыстрый старт
 -
 Asus ROG STRIX X670E-I GAMING WIFIКраткое руководство пользователя
 -
Asus ROG FPS-IIРуководство по быстрому запуску
-
 Asus Pro WS W680M-ACE SEКраткая эксплуатационная инструкция
 -
 Asus PRIME B760M-A WIFI D4Инструкция в сокращённом виде
 -
 Asus PRIME H770-PLUSБыстрый старт
 -
 Asus B850-PLUS WIFIКраткое руководство
Узнайте, как правильно подключить вентиляторы к материнской плате и обеспечить оптимальное охлаждение системы. Важные советы по использованию разъемов и TPM.