
Microlab MD-122 Инструкция по эксплуатации онлайн
ZH
EN
RO
FA
AR
Instrucþiuni de folosire
80-MD122-97-0001-01 2009-04-17
1
EN
PC
Caution:
Explanation of Graphical Symbols:
WARNINGS:
TO reduce the risk of electric shock,do not dismantle the product and do not expose the apparatus to rain or moisture. No user-serviceable
parts inside. Refer servicing to qualified personnel only.
The lightning flash within an equilateral triangle is intended to alert you to the presence of uninsulated dangerous voltage within the
product's enclosure that may be of sufficient magnitude to constitute an electric shock to a person or persons.
The exclamation point within an equilateral triangle is intended to alert you to the presence of important operating and maintenance
(servicing) instructions in the literature accompanying the product.
1. Read Instructions All the safety and operating instructions must be read before the product is operated.
2. Retain Instructions The safety and operating instructions should be kept for future reference.
3. Heed warnings All warnings on the product and in the operating instructions should be adhered to.
4. Follow instructions All operating and use instructions should be followed.
5. Installation Install in accordance with the manufacturer's instructions.
6. Power sources This product should be operated only from the type of power source indicated by the marking adjacent to the power cord
entry.If you are not sure of the type of power supply to your home,consult your product dealer or local power company.
7. Grounding or polarisation the product is not required to be grounded.Ensure the plug is fully inserted into the wall outlet or extension cord
receptacle to prevent blade or pin exposure.Some versions of the product are equipped with a power cord fitted with a polarized alternating
line plug (a plug having one blade wide than the other).This plug will fit onto the power outlet only one way.This is a safety feature.If you are
unable to insert the plug fully into the outlet, try reversing the plug. If the plug should still fail to fit, contact your electrician to replace your
obsolete outlet. Do not defeat the safety purpose of the polarised plug When using an extension power-supply cord or a power-supply cord
other than that supplied with the appliance, it should be fitted with the appropriate moulded-on plugs and carry safety approval appropriate to
the country of use.
8. Power cord protection Power-supply cords should be routed so that they are not likely to be walked on, kinked or pinched by items placed
on or against them, paying particular attention to cords from plugs, receptacles and the point where they exit from the appliance.
9. Overloading Do not overload wall outlets, extension cords or multiple sockets,as this can result in a risk of fire or electric shock.
10.Ventilation The product must be properly ventilated. Do not place the product on a bed,sofa, or other similar surface.Do not cover the
product with any items such as tablecloths, newspapers, etc.
11.Heat The product should be situated away from heat sources such as radiators,heat registers, stoves, or other products) including amplifiers
that produce heat.No naked flame sources,such as lighted candles, should be placed on the apparatus.
12.Water and moisture To reduce the risk of fire or electric shock,do not expose the product to train, dripping, splashing or excessive moisture
such as in a sauna or bathroom. Do not use this product near water for example, near a bathtub, washbowl, kitchen sink,laundry tub, in a
wet basement, or near a swimming pool and the like.
13.Object and Liquid Entry Never push objects of any kind into this product through openings, as they may touch dangerous voltage points or
short-circuit parts that could result in a fire or electric shock.Never spill liquid of any kind on the product. Do not place any object containing
liquid on top of the product.
14.Cleaning Unplug the product from the wall outlet before cleaning.The cabinet of the subwoofer may be cleaned by dusting with a dry cloth. If
you wish to use an aerosol cleaning spray, do not spray directly on the cabinet; spray onto the cloth. Be careful not to damage the drive units.
15.Attachments Do not use attachments not recommended by the product manufactures,as they may cause hazards.
16.Accessories Do not place this product on an unstable cart, stand, tripod, bracket or table.The product may fall,causing serious injury to a
child or adult, and serious damage to the product.Use only with a cart, stand, tripod,bracket or table recommended by the manufacturer or
sold with the product.Any mounting of the product should follow the manufacturer's instructions and should use a mounting accessory
recommended by the manufacturer.
17.Moving the product A product and cart combination should be moved with care. Quick stops, excessive force and uneven surfaces may cause
the product and cart combination to overturn.
18.Unuse periods The power cord of the appliance should be unplugged from the outlet during lightning storms or when the apparatus is left
unused for a long period of time.
19.Servicing Do not attempt to service this product yourself, as opening or removing covers may expose you to dangerous voltage or other
hazards. Refer all servicing to qualified service personnel.
20.Please remove the power plug form the main power source or wall power source when not in use.When plugged in to a power source, the
system is in standby mode,so the power is not entirely cut off.
21.Replacement parts When replacement parts are required,ensure the service technician has used replacement parts specified by the
manufacturer or have the same characteristics as the original part. Unauthorized substitutions may result in fire,electric shock or other
hazards.
22.Mains fuses For continued protection against fire hazard, use fuses only of the correct type and rating.The correct fuse specification for each
voltage range is marked on the product.
23.Do not turn up the volume while listening to a section with very low level inputs or no audio signals. If you do, the speaker may be damaged
when a peak level section is suddenly played.
24.The only means of completely disconnecting the product from the power supply is by removing the power cord from the wall outlet or the
product.The wall outlet or the power cord entry to the product must remain freely accessible at all times while the product is in use.
25.Try to install the product near a wall socket or exetension cord and shall be easily accessible.
26.The highest environmental temperature suitable for this product is 40 C.
“”
-
-
-
-
-
-
-
-
-
-
-
-
-
-
-
-
-
-
-
-
-
-
o
Important Safety Instructions
AR
FA
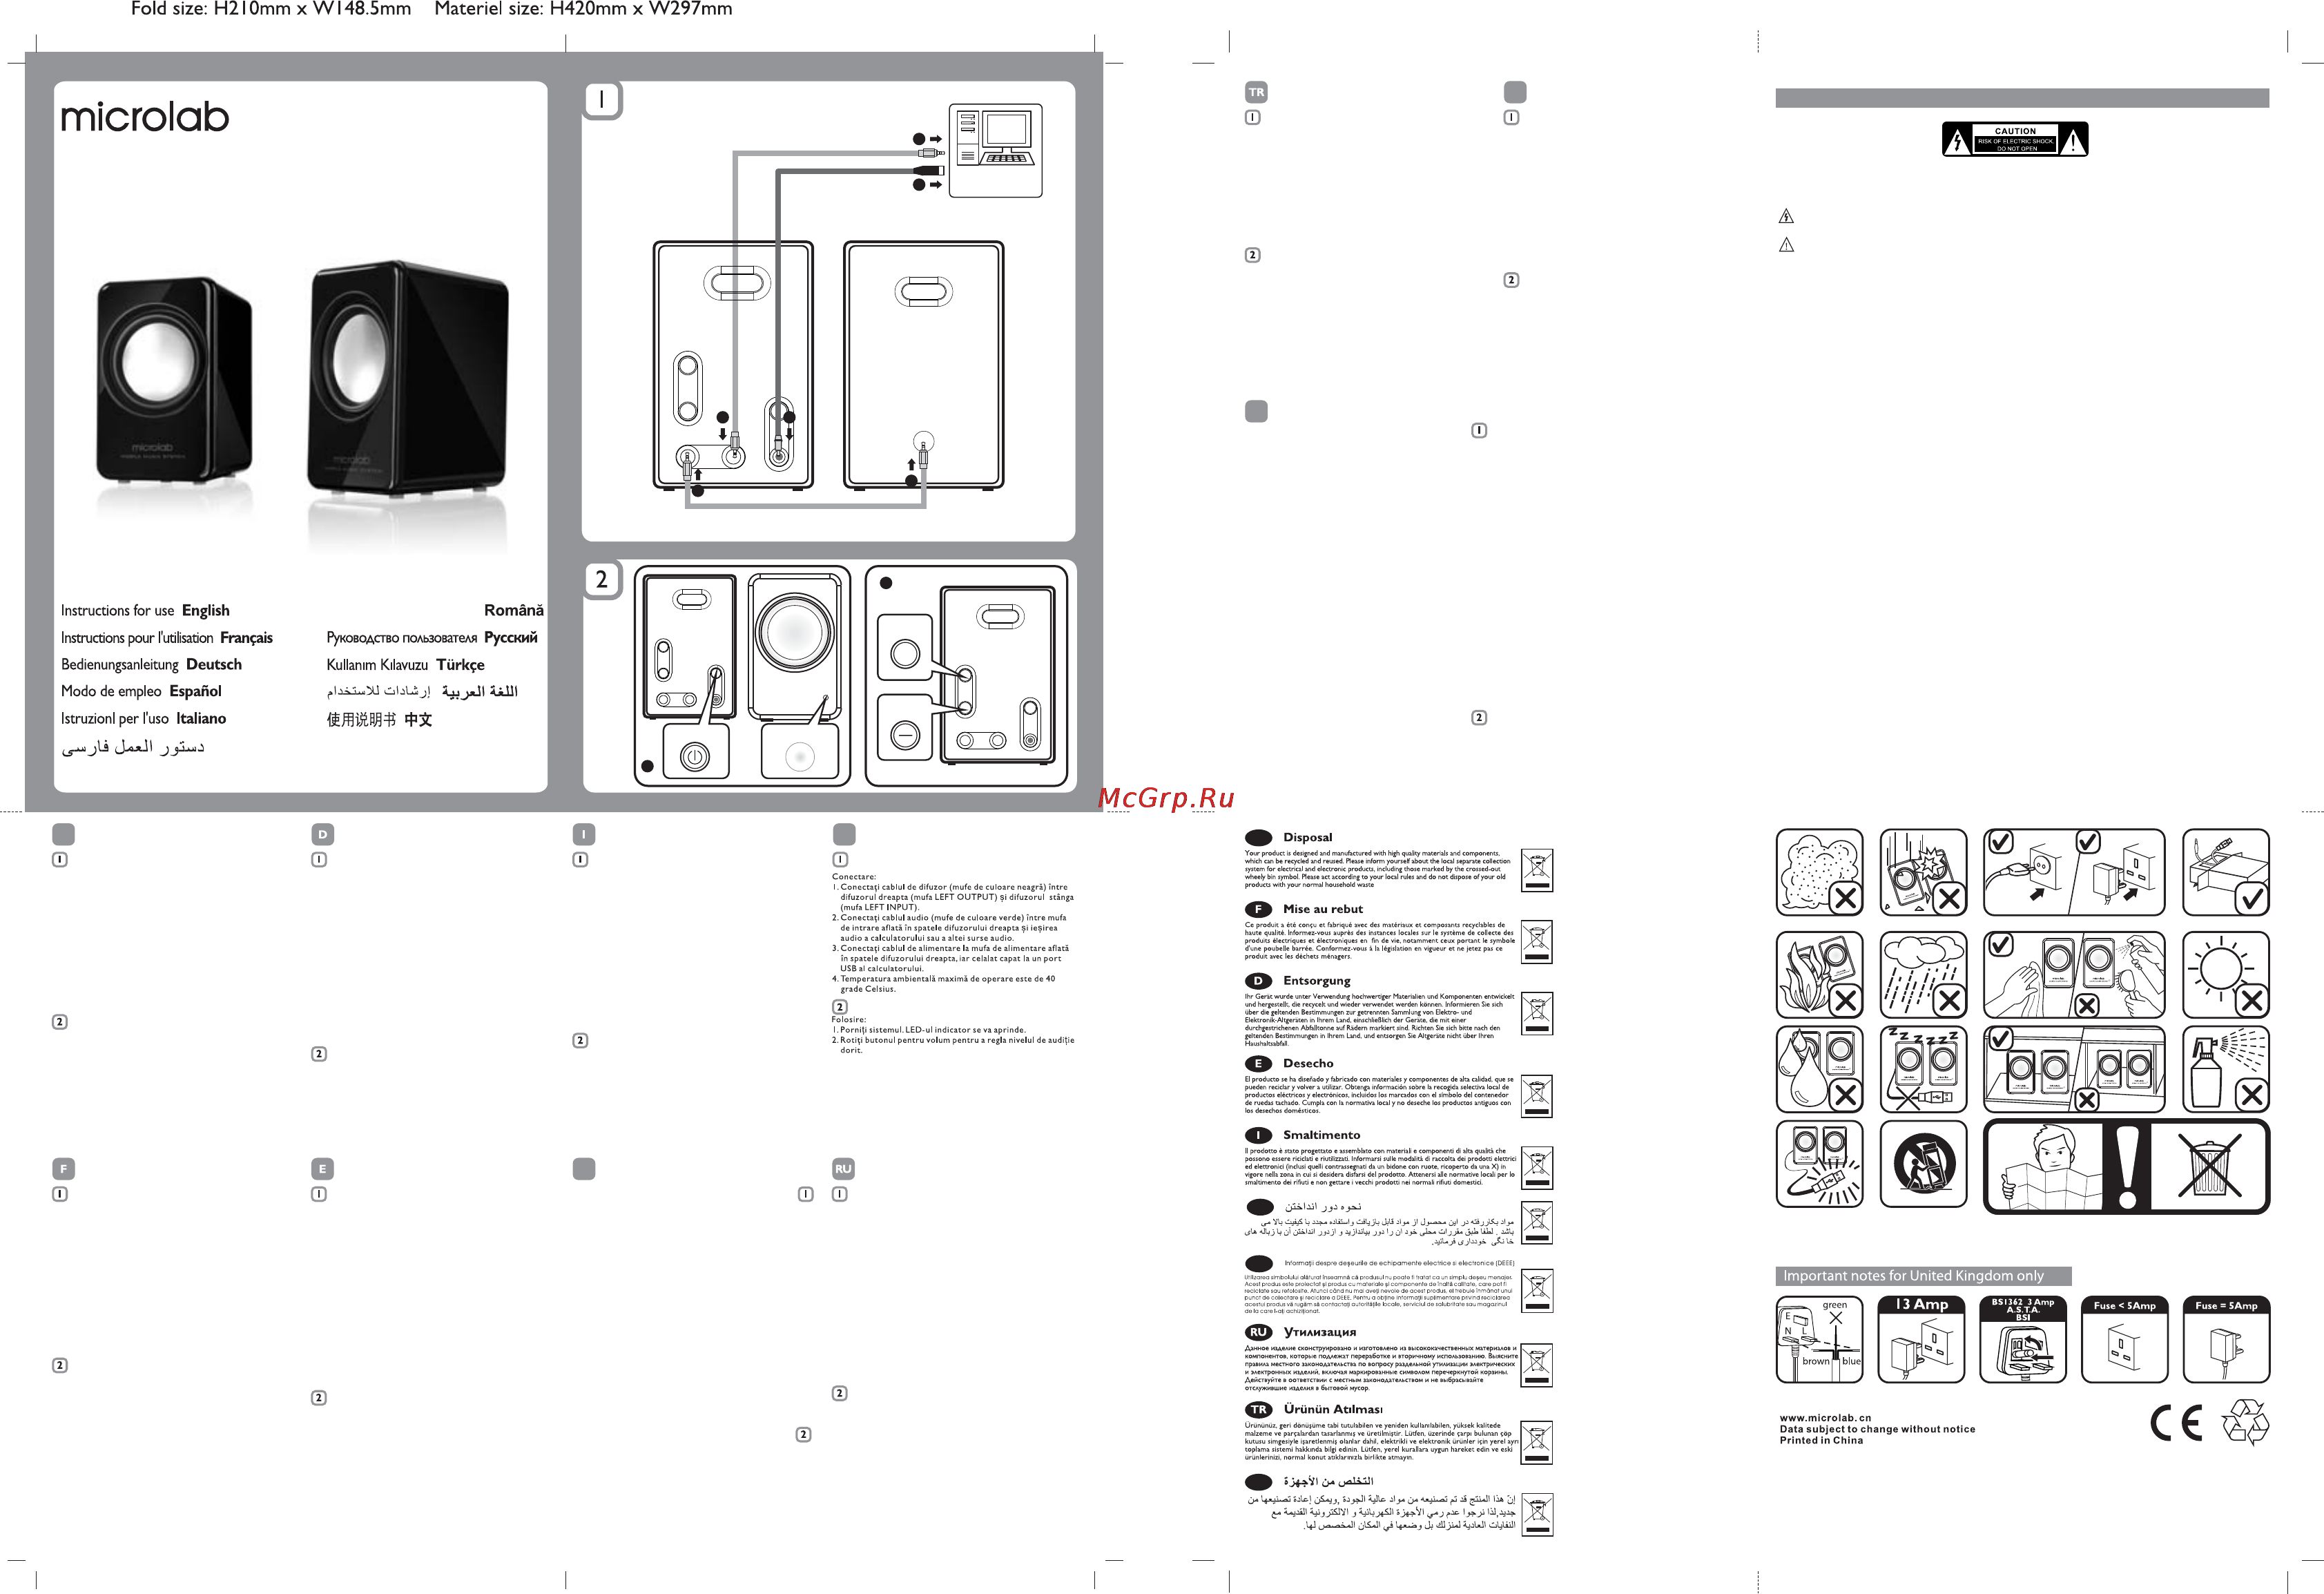
How to connect:
1. Speaker connection: connect one end(black stereo plug) of the
speaker cable to output socket(Left Output) on the back of right
speaker, the other end (black stereo plug) to the input socket
(Left Input) on the back of Left speaker.
2. Audio connection: connect one end (green stereo plug) of the
audio cable to the Input Socket on the back of Right Speaker, the
other end (green stereo plug) to the appropriate output socket
on the Media Player, such as Mp3,CD player, etc.
3. Connect the DC plug of the power cord to the Power Input
socket on the back of right speaker, and the USB plug to the USB
socket on the Computer.
4.The maximum environment temperature is 40 C.
How to use:
1. Turn on the power,and the power indicator is lighted.
2. Adjust the volume to your demanding level.
o
Connexion:
1. Connexion des enceintes : Connectez la prise noire du câble
enceinte à la prise “Left output” (sortie gauche) au dos de
l'enceinte droite. Connectez l'autre extrémité du câble (noir) à
la prise “Left input” (entrée gauche) au dos de l'enceinte gauche.
Connexion audio : connectez la prise verte du câble audio à la
prise “Input “ (entrée) au dos de l'enceinte droite. Connectez
l'autre extrémité (verte) à la sortie appropriée sur le media
player tels un MP3,lecteur CD,…
Connectez le cordon d'alimentation à l'entrée (Power input) sur
le dos de l'enceinte droite, et la prise USB à la prise USB de
votre ordinateur.
La température de la pièce d'écoute ne devrait pas dépasser 40°
pour assurer le bon fonctionnement de l'appareil.
Utilisation :
1. Mettez en marche. L'indicateur de mise en marche s'allume.
Ajustez le volume au niveau désiré.
2.
3.
4.
2.
Anschlussanleitung:
1. Anschluss der Lautsprecher:Verbinden Sie das Ende des
Lautsprecherkabels (schwarzer Stereostecker) mit der
Ausgangs-Buchse (Ausgang links) auf der Rückseite des rechten
Lautsprechers, das andere Ende (schwarzer Stereo-Stecker) mit
der Eingangsbuchse (Eingang links) auf der Rückseite der linken
Lautsprecher.
2. Audioanschluss:Verbinden Sie das Ende des Audiokabels (grüner
Stereostecker) mit der Eingangsbuchse auf der Rückseite des
rechten Lautsprechers, das andere Ende (grüner Stereostecker)
mit der anzuschließenden Ausgangsbuchse Ihres Media-Player´s,
z. B. Ihres MP´3-Player´s,Ihres CD-Spielers u.s.w.
3. Verbinden Sie den Stromstecker mit der Eingangsbuchse auf der
Rückseite des rechten Lautsprechers, den USB-Stecker mit der
USB-Buchse auf dem Computer.
4. Die maximale Umgebungstemperatur liegt bei 40Grad Celsius.
Bedienungsanleitung:
1. Schalten Sie das Gerät ein. Die Kontrolllampe leuchtet.
2. Regeln Sie den Lautstärkeregler auf die von Ihnen gewünschte
Lautstärke.
Cómo realizar las conexiones
1. Conexión del altavoz: conecte una de las terminaciones (enchufe
stereo negro) del cable del altavoz con la conexión de salida
(izquierda) situada en la parte trasera del altavoz derecho;
conecte la otra terminación (enchufe estéreo negro) a la
conexión de entrada (izquierda) situada en la parte trasera del
altavoz izquierdo.
2. Conexión de sonido: conecte una de las terminaciones del cable
de sonido (verde stereo) a la conexión de entrada situada en la
parte trasera del altavoz derecho; conecte la otra terminación en
la clavija de salida apropiada del reproductor multimedia (MP3,
reproductor de CD, etc…).
3. Conecte la conexión DC del cable de alimentación a la conexión
de entrada de energía situada en la parte trasera del altavoz
derecho y la terminación USB del cable a la conexión USB del
ordenador.
4.La temperatura máxima de ambiente es de 40ºC.
Cómo usar el producto:
1. Encienda la unidad, pulsando el botón “Power” y el indicador de
encendido se iluminará.
2. Ajuste el volumen de sonido de acuerdo a sus preferencias.
Come collegarsi:
1. Collegamento dell'altoparlante: Collegare in una estremità
(spina stereo nera) del cavo dell'altoparlante alla presa
dell'uscita (uscita di destra) sulla parte posteriore
dell'altoparlante di destra, l'altro ingresso (spina stereo nera)
alla presa d input (uscita input) sulla parte posteriore
dell'altoparlante di sinistra.
2. Audio collegamento: Collegare un'estremità (spina stereo
verde) di audio cavo alla uscita input sulla parte posteriore
dell'altoparlante di destra, l'altra estremità (spina stereo verde)
alla uscita su Media Player, quale MP3,riproduttore di CD, ecc.
3. Inserire la spina di CC del cavo di alimentazione alla uscita
input di alimentazione sulla parte posteriore dell'altoparlante di
destra e la spina del USB alla presa USB sul P.C.
4. La temperatura massima è 40
Modo d'uso :
1. Accenndere e l'indicatoreè illuminato.
2. Regolare il volume al vostro livello richiesto.
℃.
Как подготовить изделие к работе
Подсоединение колонок: Подсоедините один разъем
(черный) кабеля колонок к разъему «Выход» (
на задней стенке Правой колонки. Другой разъем кабеля
подключите к разъему «Вход» ( на задней
стенке Левой колонки.
Подсоединение звукового кабеля: Подсоедините один
разъем (зеленый) аудио кабеля к разъему «Вход» (
на задней стенке Правой колонки, другой разъем к
выходному разъему устройства источника звука
(медиаплэйр, итд).
Подсоедините силовой кабель питания во входное гнездо
Правой колонки соответствующей стороной и включите в
сеть 220 В. подсоединяйте к соответствующему
гнезду Компьютера.
Изделие разрешается использовать при температуре
воздуха не выше 40 С.
Порядок использования:
Включите питание и индикатор должен загореться.
Установите регулятором, требуемый уровень громкости.
Left output)
Left Input)
Input)
MP3, CD
USB
1.
2.
3.
1.
2.
4.
RO
ﺐﺼ
ﮓ ﺎﻴﺳ ﺖﻮﺳ ﻮﮔﺪﻨﻠﺑ ﻞﺑﺎ ﺎﻬﺘا ﺎﻫﻮﮔﺪﻨﻠﺑ ﺎﺼﺗا
ﺟﺮﺧ ﻪﺑ ا
د ﻪﺑ ﮓ ﺎﻴﺳ ﺖﻮﺳ ا ﻞﺑﺎ ﺮﮕد فﺮﻃ
ﭗ ﺖﺳ ﻮﮔﺪﻨﻠﺑ ﺖﺸﭘ
ﺶﻴﻓ اﺪﺻ ﻞﺑﺎ ﺎﻬﺘا ﺶﺨﭘ ﻊﺒﻨﻣ ﻪﺑ ﺎﺼﺗا
ﺖﺳا ﺖﺳ ﻮﮔﺪﻨﻠﺑ ﺖﺸﭘ د ﻪﺑ ا ﮓﺰﺒﺳ
ﻪﻠﺟ زا ﺶﺨﭘ ﺎﮕﺘﺳد ﺟﺮﺧ ﻪﺑ ا نا ﺮﮕد فﺮﻃ
ﺖﺳﻮﮔﺪﻨﻠﺑﺖﺸﭘدﻊﻗا6ﺮﺑدﻪﺑ6ﺮﺑﻢﻴﺳ
ﻢﻴﺳ ﺖﺳا
ددﺮﮔ
ﻂﻴﺤﻣ ﺎﻣد ﺮﺜا ﺪﺣ
ﺖﺳا ﺪﺷ ﻪﺘﻓ
دﺎﻔﺘﺳا ﻮﺤ
ﻪﻈﺣﻼﻣ ا ﻪﻃﻮﺑﺮﻣ غاﺮ دﻮ ﻦﺷ ا ﺎﮕﺘﺳد
ﺪﻴﺋﺎﻣﺮﻓ
ﺪﻴﻨﻢﻴﻈﻨﺗااﺪﺻدﻮﺧﻪﻘﻴﻠﺳﻖﺒﻃ
:
()
(
.
:
.
-1
(left output)
(left input)
-2
CD PLAYER
-3
USB
-4
-1
-2
() :
.
):
. ....
.
ﺖﺳا ﺖﺳ ﻮﮔ ﺪﻨﻠﺑ
ﺪﻴﺋﺎﻣﺮﻓ ﻞﺼﺘﻣ
ﺎ
د ﻪﺑ
ﺮﮔ ﺮﻈ د داﺮﮕﻴﺘﺎﺳ ﻪﺟد
MP3
USB
ﺪﻴﺋﺎ ﻞﺼﺘﻣ ﺮﻴﻏ
ﻞﺼﺘﻣ ﺮﺗﻮﻴﭙﻣﺎ
40
.
:
()(),()
()。
:
(),,
, , 。
,
。
,。
。
:
, 。
, ,。
:
1.
2.
MP3 CD
3. DC USB
USB
4.
5. 40 C
1.
2. VOL+ VOL-
()
()
()
o
Ba lant ekli:ğşi
1. Hoparlör ba lantisi: Siyah hoparlör kablosunun bir ucunu sa
hoparlörün arkasindaki sol çiki a (left output) takiniz. di er ucunu
soldaki hoparlöre takiniz.
2. Ses ba lantisi:Ye il stereo jaki sa hoparlörün arkasindaki giri e
(input) takiniz. Di er gri olan ucu bilgisayariniza yada MP3 DVD
oynatici gibi cihazin ses çiki ina takiniz.
3. USB güç kablosunun USB ucunu bilgisayarinizdaki herhangi bo bi
USB porta takiniz di er ucunu hoparlörün sa kolonunun
arkasindaki DC elektrik giri ine takiniz. Maksimum çali ma isisi
40 dir
Kullanma ekli:
1. Güç dü mesini açiniz güç (power) i i i yanmaya ba layacak.
2. Ses kontrol dü mesini çevirerek sesi istedi iniz seviyeye getiriniz.
ğğ
ğ
ğş ğ ş
ğ
ş
ğğ
şş
ş
ğşğş
ğğ
ş
ş
.
ﻞﻴﺻﻮﺘﻟا ﺔﻘﺮﻃ
ﺬﺧﺄﻣ ﻰﻟإ دﻮﺳﻷا ﻮﺮﻴﺘﺴﻟا ﺬﺧﺄﻣ Oﻮﺼﻟا ﺮﺒﻜﻣ
ﻮﺮﻴﺘﺴﻟا ﺬﺧﺄﻣ Rﺮﺧﻷا ﺔﺎﻬﻨﻟا ﻞﺻS ﻢﺛ ٬ ﻦﻷا
ﺬﺧﺄﻣ ﻰﻟإ دﻮﺳﻷا
.ﺮﺴﻷا Oﻮﺼﻟا ﺮﺒﻜﻣ
ﺬﺧﺄﻣ ﻰﻟإ ﺮﻀﺧﻷاﻮﺮﻴﺘﺴﻟا ﺬﺧﺄﻣ ﻲﺗﻮﺼﻟا
ﺔﺎﻬﻨﻟا ﻞﺻS ﻢﺛ ٬ ﻦﻷا Oﻮﺼﻟا ﺮﺒﻜﻣ ﻒﻠﺧ دﻮﺟﻮﻟا
ﺐﺳﺎﻨﻟا ﺬﺧﺄﻟا ﻰﻟإ ﺮﻀﺧﻷا ﻮﺮﻴﺘﺴﻟا ﺬﺧﺄﻣ Rﺮﺧﻷا
ﻞﺜﻣ ﻚﺪﻟ Oﻮﺼﻟا ﺪﺼﻟ
ﺦﻟا ﺔﺠﻣﺪﻟا
ﻞﺻS ﻢﺛ ﻦﻷا Oﻮﺼﻟا ﺮﺒﻜﻣ ﻒﻠﺧ دﻮﺟﻮﻟا ﺔﻗﺎﻄﻟا
ﺬﺧﺄﻣ
ﺎﻌﺘﺳﻻا ﺔﻴﻔﻴﻛ
بﻮﻠﻄﻟا
:
:
... ٬
٬
.
.
:
.٬
-1
-2
3
-3
USB
-4
-1
-2
( C)40
ﻞﺒﻛ Oﺎﺎﻬ Rﺪﺣإ ﻞﻴﺻﻮﺘﺑ ﻢﻗ Oﻮﺼﻟاﺮﺒﻜﻣ ﻞﻴﺻﻮﺗ
Oﻮﺼﻟا ﺮﺒﻜﻣ ﻒﻠﺧ دﻮﺟﻮﻟا ﺮﺴﻷا ﺬﺧﺄﻟا
ﻒﻠﺧ دﻮﺟﻮﻟا ﺮﺴﻷا ﺬﺧﺄﻟا
ﻞﺒﻜﻟا Oﺎﺎﻬ Rﺪﺣإ ﻞﻴﺻﻮﺘﺑ ﻢﻗ :ﻲﺗﻮﺼﻟا ﻞﻴﺻﻮﺘﻟا
صاﺮﻗﻷا ﻞﻐﺸﻣ
ﺔِﻴﺋﺎﺑﺮﻬﻜﻟا ﺔﻗﺎﻄﻟا ﻞﺒﻛ ﺬﺧﺄﻣ ﻞﺻS
fﺮﺨﻣ ﻰﻟإ
Rﻮﺼﻘﻟا ﺔﺌﻴﺒﻟا hاﺮﺣ ﺔﺟد نإ
ﻲﺋﺎﺑﺮﻬﻜﻟا ﺮﺷﺆﻟا ﺊﻴﻀﻴﺳ ﺎﻫﺪﻨﻋ ﺔﻗﺎﻄﻟا ز دS
Rﻮﺘﺴﻟا ﻰﻟإ Oﻮﺼﻟا Rﻮﺘﺴﻣ ﻞﺪﻌﺘﺑ ﻢﻗ
.
:
()
()
)
(
()
()
output
Input
)( Input
MP
DC
USB
٬
()
ﺬﺧﺄﻣ ﻰﻟإ
ﺮﺗﻮﻴﺒﻜﻟا ﻰﻠﻋ
O
MD122
RL
2
1
1
2
3
3
POWER
Power Indicator
VOLUME+
+
VOLUME-
2
Speakers for digital audio source
Enceinte pour source audio digitale
Lautsprecher für digitale Audioquellen
Altavoces para Fuentes de Sonido Digital
Altoparlante per fonte Digital Audio
ﺎﺘﻴﺠد اﺪﺻ ﻊﺒﻨﻣ اﺮﺑ ﺋﻮﮔﺪﻨﻠ
Sistem audio pentru surse digitale
Колонки для источников цифровой звукозаписи
ﺔِﻴﻗﺮﻟا ﺔِﻴﻌﺴﻟا ?ﺰﻬﺟﻸﻟ Gﻮﺻ ﺮﺒﻜﻣ
Speakers for digital audio source
80-MD122-97-0001-01 2009-04-17
Dijital Ses Cihazlari için Çali an Hoparlörş
Содержание
- 1 2 c 40 1
- 1 left output 1
- Altavoces para fuentes de sonido digital 1
- Altoparlante per fonte digitalaudio 1
- Cd player 3 usb 1
- Dijital ses cihazlari için çali an hoparlör ş 1
- Enceinte pour source audio digitale 1
- Lautsprecher für digitaleaudioquellen 1
- Left input 2 1
- Md122 97 0001 01 2009 04 17 1
- Output 1
- Power power indicator 1
- Sistem audio pentru surse digitale 1
- Speakers for digital audio source 1
- Volume 1
- Колонки для источников цифровой звукозаписи 1
- بﻮﻠﻄﭼﻤﻟا 1
- د ﻪﺑ 1
- دﺎﻔﺘﺳا ﻮﺤﻧﻬ ﻪﻈﺣﻼﻣا ﻪﻃﻮﺑﺮﻣغاﺮﭼﻤ دﻮﭼﻤﻧﻬﻦﺷ ا ﺎﮕﺘﺳد ﺪﻴﺋﺎﻣﺮﻓ ﺪﻴﻨ ﻢﻴﻈﻨﺗا اﺪﺻدﻮﺧﻪﻘﻴﻠﺳﻖﺒﻃ 1
- صاﺮﻗﻷاﻞﻐﺸﻣ 1
- ﺎرﻳﺎل 1
- ﺎﭼﻤﻌﺘﺳﻻاﺔﻴﻔﻴﻛ 1
- ﺐﺼﻧﻬ ﮓﻧﻬ ﺎﻴﺳﺖ ﻮﺳﻮﮔﺪﻨﻠﺑﻞﺑﺎ ﺎﻬﺘﻧﻬاﺎﻫﻮﮔﺪﻨﻠﺑ ﺎﺼﺗا ﺟ ﺮﺧﻪﺑا د ﻪﺑﮓﻧﻬ ﺎﻴﺳﺖ ﻮﺳا ﻞﺑﺎ ﺮﮕرﻳﺎلدفﺮﻃ ﭗﭼﻤﺖﭼﻤﺳ ﻮﮔﺪﻨﻠﺑﺖﺸﭘ ﺶﻴﻓاﺪﺻﻞﺑﺎ ﺎﻬﺘﻧﻬاﺶﺨﭘﻊﺒﻨﻣﻪﺑ ﺎﺼﺗا ﺖﺳا ﺖﭼﻤﺳ ﻮﮔﺪﻨﻠﺑﺖﺸﭘ د ﻪﺑا ﮓﻧﻬ ﺰﺒﺳ ﻪﻠﭼﻤﺟزاﺶﺨﭘ ﺎﮕﺘﺳد ﺟ ﺮﺧﻪﺑا ناﺮﮕرﻳﺎلدفﺮﻃ 1
- ﺔ ﻴﭼﻤﻗﺮﻟاﺔ ﻴﻌﭼﻤﺴﻟا ﺰﻬﺟﻸﻟ ﻮﺻﺮﺒﻜﻣ 1
- ﺔ ﻴﺋﺎﺑﺮﻬﻜﻟاﺔﻗﺎﻄﻟاﻞﺒﻛﺬﺧﺄﻣﻞﺻ 1
- ﺖﭼﻤﺳ ﻮﮔﺪﻨﻠﺑﺖﺸﭘ دﻊﻗا ﺮﺑ د ﻪﺑ ﺮﺑﻢﻴﺳ ﻢﻴﺳ ﺖﺳا ددﺮﮔ ﻂﻴﺤﻣ ﺎﻣدﺮﺜ اﺪﺣ ﺖﺳا ﺪﺷﻪﺘﻓ 1
- ﺖﺳا ﺖﭼﻤﺳ ﻮﮔﺪﻨﻠﺑ 1
- ﺪﻴﺋﺎﭼﻤﻧﻬﻞﺼﺘﻣ ﺮﻴﻏ 1
- ﺪﻴﺋﺎﻣﺮﻓﻞﺼﺘﻣ 1
- ﺬﺧﺄﻣﻰﻟإ 1
- ﺬﺧﺄﻣﻰﻟإدﻮﺳﻷاﻮرﻳﺎلﺮﻴﺘﺴﻟاﺬﺧﺄﻣ ﻮﺼﻟاﺮ ﺒﻜﻣ 1
- ﺬﺧﺄﻣﻰﻟإﺮﻀﺧﻷاﻮرﻳﺎلﺮﻴﺘﺴﻟاﺬﺧﺄﻣﻲﺗﻮﺼﻟا ﺔرﻳﺎلﺎﻬﻨﻟاﻞﺻ ﻢﺛ ﻦﭼﻤرﻳﺎلﻷا ﻮﺼﻟاﺮ ﺒﻜﻣﻒﻠﺧدﻮﺟﻮﭼﻤﻟا ﺐﺳﺎﻨﭼﻤﻟاﺬﺧﺄﭼﻤﻟاﻰﻟإﺮﻀﺧﻷاﻮرﻳﺎلﺮﻴﺘﺴﻟاﺬﺧﺄﻣ ﺮﺧﻷا ﻞﺜﻣﻚرﻳﺎلﺪﻟ ﻮﺼﻟا ﺪﺼﭼﻤﻟ ﺦﻟاﺔﺠﻣﺪﭼﻤﻟا 1
- ﺮﮔﺮﻈﻧﻬ دداﺮﮕﻴﺘﻧﻬﺎﺳﻪﺟ د 1
- ﺮﺗﻮﻴﺒﭼﻤﻜﻟاﻰﻠﻋ 1
- ﺮﺨﻣﻰﻟإ ﻮﺼﻘﻟاﺔﺌﻴﺒﻟا اﺮﺣﺔﺟ د نإ 1
- ﻒﻠﺧدﻮﺟﻮﭼﻤﻟاﺮﺴرﻳﺎلﻷاﺬﺧﺄﭼﻤﻟا 1
- ﻞﺒﻛ ﺎرﻳﺎلﺎﻬﻧﻬ ﺪﺣإﻞﻴﺻﻮﺘﺑﻢﻗ ﻮﺼﻟاﺮ ﺒﻜﻣﻞﻴﺻﻮﺗ 1
- ﻞﺒﻜﻟا ﺎرﻳﺎلﺎﻬﻧﻬ ﺪﺣإﻞﻴﺻﻮﺘﺑﻢﻗ ﻲﺗﻮﺼﻟاﻞﻴﺻﻮﺘﻟا 1
- ﻞﺻ ﻢﺛﻦﭼﻤرﻳﺎلﻷا ﻮﺼﻟاﺮ ﺒﻜﻣﻒﻠﺧدﻮﺟﻮﭼﻤﻟاﺔﻗﺎﻄﻟا ﺬﺧﺄﻣ 1
- ﻞﺼﺘﻣﺮﺗﻮﻴﭙﻣﺎ 1
- ﻞﻴﺻﻮﺘﻟاﺔﻘرﻳﺎلﺮﻃ 1
- ﻮرﻳﺎلﺮﻴﺘﺴﻟاﺬﺧﺄﻣ ﺮﺧﻷاﺔرﻳﺎلﺎﻬﻨﻟاﻞﺻ ﻢﺛ ﻦﭼﻤرﻳﺎلﻷا ﺬﺧﺄﻣﻰﻟإدﻮﺳﻷا ﺮﺴرﻳﺎلﻷا ﻮﺼﻟاﺮ ﺒﻜﻣ 1
- ﻮﺼﻟاﺮ ﺒﻜﻣﻒﻠﺧدﻮﺟﻮﭼﻤﻟاﺮﺴرﻳﺎلﻷاﺬﺧﺄﭼﻤﻟا 1
- ﻲﺋﺎﺑﺮﻬﻜﻟاﺮﺷﺆﭼﻤﻟاﺊﻴﻀﻴﺳﺎﻫﺪﻨﻋ ﺔﻗﺎﻄﻟا ز د ﻮﺘﺴﭼﻤﻟاﻰﻟإ ﻮﺼﻟا ﻮﺘﺴﻣﻞرﻳﺎلﺪﻌﺘﺑﻢﻗ 1
Похожие устройства
- Faber VALUE SL3 A60 White Инструкция по эксплуатации
- Blue Weld Plus 20/TI 823225 Инструкция по эксплуатации
- Electrolux GCB 24 Hi-Tech i Инструкция по эксплуатации
- Kaiser HGE 50508 KB Инструкция по эксплуатации
- Sony DCR-TR8100E Инструкция по эксплуатации
- Faber VALUE SL3 A60 Inox Инструкция по эксплуатации
- Telwin Digital Modular 230 Инструкция по эксплуатации
- Electrolux GCB 24 Basic X Fi Инструкция по эксплуатации
- Kaiser HGE 60508 NKB Инструкция по эксплуатации
- Sony DCR-TR8000E Инструкция по эксплуатации
- Faber STRIP PB A60 Inox Инструкция по эксплуатации
- Telwin PCP 18 Инструкция по эксплуатации
- Electrolux GCB 24 Basic X i Инструкция по эксплуатации
- Kaiser HGE 60508 NKW Инструкция по эксплуатации
- Sony DCR-TR7100E Инструкция по эксплуатации
- Faber FLEXA M6/40 AM/A50 Inox Инструкция по эксплуатации
- Patriot Garden PT 2540 Инструкция по эксплуатации
- Electrolux FSB 35 Mpi/HW Инструкция по эксплуатации
- Microlab FC-730 5.1 Black Инструкция по эксплуатации
- Kaiser HGE 50301 W Инструкция по эксплуатации
Скачать
Случайные обсуждения