
Kenwood xr400-4 Инструкция по эксплуатации онлайн
Safety precautions
WARNING
To prevent injury or fire, take the following
precautions:
• Mountingandwiringthisproductrequiresskillsand
experience.Forsafety’ssake,leavethemountingand
wiringworktoprofessionals.
• Whenextendingtheignition,battery,orgroundwires,
makesuretouseautomotive-gradewiresorotherwires
withtherangeof14mm²(AWG6)to21mm²(AWG4)
topreventwiredeteriorationanddamagetothewire
coating.
• Topreventashortcircuit,neverputorleaveanymetallic
objects(suchascoinsormetaltools)insidetheunit.
• Iftheunitstartstoemitsmokeorstrangesmells,turn
offthepowerimmediatelyandconsultyourKenwood
dealer.
• Donottouchtheunitduringusebecausethesurfaceof
theunitbecomeshotandmaycauseburnsiftouched.
CAUTION
To prevent damage to the machine, take the following
precautions:
• Besuretheunitisconnectedtoa12VDCpowersupply
withanegativegroundconnection.
• Donotopenthetoporbottomcoversoftheunit.
• Donotinstalltheunitinaspotexposedtodirect
sunlightorexcessiveheatorhumidity.Alsoavoidplaces
withtoomuchdustorthepossibilityofwatersplashing.
• Whenreplacingafuse,onlyuseanewonewiththe
prescribedrating.Usingafusewiththewrongrating
maycauseyourunittomalfunction.
• Topreventashortcircuitwhenreplacingafuse,first
disconnectthewiringharness.
NOTE
• Ifyouexperienceproblemsduringinstallation,consult
yourKenwooddealer.
• Iftheunitdoesnotseemtobeworkingright,consult
yourKenwooddealer.
Cleaning the unit
Ifthefrontpanelgetsdirty,turnoffthepowerandwipe
thepanelwithadrysiliconclothorsoftcloth.
CAUTION
Donotwipethepanelwithahardclothoracloth
dampenedbyvolatilesolventssuchaspaintthinnerand
alcohol.Theycanscratchthesurfaceofthepaneland/or
causetheindicatorletterstopeeloff.
To prevent battery rise
WhentheunitisusedintheACCONpositionwithout
turningtheengineON,itdepletesthebattery.Useitafter
startingtheengine.
Protection function
Theprotectionfunctionisactivatedinthefollowing
situations:
Thisunitisequippedwithaprotectionfunctionfor
protectingthisunitandyourspeakersfromvarious
accidentsorproblemsthatcanoccur.
Whentheprotectionfunctionistriggered,thepower
indicatorgoesoffandtheamplifierstopsoperating.
• Whenaspeakerwiremaybeshort-circuited.
• Whenaspeakeroutputcontactsground.
• WhentheunitmalfunctionsandaDCsignalissentto
thespeakeroutput.
•Whentheinternaltemperatureishighandunitwon’t
operate.
7 Wiring
• Takethebatterywireforthisunitdirectlyfromthe
battery.Ifit'sconnectedtothevehicle’swiringharness,it
cancauseblownfusesetc.
• Ifabuzzingnoiseisheardfromthespeakerswhenthe
engineisrunning,connectalinenoisefilter(optional)to
eachofthebatterywire.
• Donotallowthewiretodirectlycontacttheedgeofthe
ironplatebyusingGrommets.
• Connectthegroundwiretoametalpartofthecar
chassisthatactsasanelectricalgroundpassing
electricitytothebattery‘snegative·terminal.Donot
turnthepoweronifthegroundwireisnotconnected.
• Besuretoinstallaprotectivefuseinthepowercord
nearthebattery.Theprotectivefuseshouldbethesame
capacityastheunit’sfusecapacityorsomewhatlarger.
• Forthepowercordandground,useavehicletype
(fireproof)powerwringcord.(Useapowerwiringcord
withtherangeof14mm²(AWG6)to21mm²(AWG4).
• Whenmorethanonepoweramplifieraregoingtobe
used,useapowersupplywiringwireandprotective
fuseofgreatercurrent-handlingcapacitythanthetotal
maximumcurrentdrawnbyeachamplifier.
7 Speaker selection
• Usingspeakerswithsmallerinputratingsthanthe
amplifier’soutputpowerwouldresultinsmoke
generationorequipmentfailure.
• Theimpedanceofthespeakersthataregoingto
beconnectedshouldbe2Ωorgreater(forstereo
connections),or4Ωorgreater(forbridgedconnections).
Whenmorethanonesetofspeakersaregoingto
beused,calculatethecombinedimpedanceofthe
speakersandthenconnectsuitablespeakerstothe
amplifier.
<Example>
4Ω
4Ω
8Ω
2Ω
2Ω
4Ω
4Ω
4Ω
4Ω
4Ω
4Ω
4Ω
4Ω
4Ω
8Ω
4Ω
4Ω 4Ω
4Ω
4Ω
4Ω
4Ω
4Ω
4Ω
Combinedimpedance
Installation / 安装 Connection / 连接
7
Installation procedure
Sincetherearelargevarietyofsettingsand
connectionspossibleaccordingtoapplications,
readtheinstructionmanualwelltoselectthe
propersettingandconnection.
1. Removetheignitionkeyanddisconnectthe
negative·terminalofthebatterytoprevent
shortcircuits.
2. Settheunitaccordingtotheintendedusage.
3. RemovetheDressingcover.
4. Connecttheinputandoutputwiresofthe
units.
5. Connectthespeakerwires.
6. Connectthepowerwire,powercontrolwire
andgroundingwirefollowingthisorder.
7. Installtheinstallationfittingsintheunit.
8. Attachtheunit.
9. AttachtheDressingcover.
10.Connectthenegative·terminalofthe
battery.
CAUTION
• Donotinstallinthebelowlocations;
(Unstablelocation,Inalocationthatinterferes
withdriving,Inalocationthatgetswet,Ina
dustylocation,Inaplacethatgetshot,Inaplace
thatgetsdirectsunlight,Inalocationthatgets
hitbyhotair)
• Donotinstalltheunitunderthecarpet.
Otherwiseheatbuild-upoccursandtheunit
maybedamaged.
• Installthisunitinalocationwhichallowsheatto
easilydissipate.
Onceinstalled,donotplaceanyobjectontop
oftheunit.
• Thesurfacetemperatureoftheamplifierwill
becomehotduringuse.Installtheamplifierina
placewherepeople,resins,andothersubstances
thataresensitivetoheatwillnotcomeinto
contactwithit.
• Whenmakingaholeunderaseat,insidethe
trunk,orsomewhereelseinthevehicle,check
thatthereisnothinghazardousontheopposite
sidesuchasagasolinetank,brakepipe,orwiring
harness,andbecarefulnottocausescratchesor
otherdamage.
• Donotinstallnearthedashboard,reartray,orair
bagsafetyparts.
• Theinstallationtothevehicleshouldsecurely
fastentheunittoaplaceinwhichitwillnot
obstructdriving.Iftheunitcomesoffduetoa
shockandhitsapersonorsafetypart,itmay
causeinjuryoranaccident.
• Afterinstallingtheunit,checktomakesurethat
electricalequipmentsuchasthebrakelamps,
turnsignallampsandwindshieldwipersoperate
normally.
7 安装步骤
根据使用场合的不同,可能有多种不同的连接及设
定方式请务必仔细阅读使用说明书,选择适当的连
接和设定。
1. 拔取点火钥匙,拆掉蓄电池负极·端子,以防短
路。
2. 根据使用目的,设置本机到妥当位置。
3. 去掉装饰板。
4. 连接本机的输入和输出缆线。
5. 连接扬声器缆线。
6. 连接电源线,电源控制缆线及地线,不可违反此
顺序。
7. 向本机安装装配部件。
8. 安装本机。
9. 装上装饰板。
10.
连接蓄电池的负极·。
注意
·不得在下列位置安装;
(不稳定的位置,妨碍驾驶车辆的位置,潮湿的
位置,灰尘较多的位置,受热的位置,阳光直射
的位置,热气接触的位置)
·不可将本装置安装在绒毯底下,否则,蓄热会导
致本装置损坏。
·将本装置安装在热量容易发散的地点。
一旦安装完毕,不可在其上放置其它物品。
·机器使用过程中,机体表面会发热升温。所以其
安装地点应该是人体,树脂及其它热敏感物质不
易触及的地方。
·在车座,行李箱底部或车子其它部位打孔时,应
确认其背面有没有会受到损坏的物件,诸如油
箱、刹车用配管或线路管套等,千万不可擦伤或
损坏这些物品。
·不可安装在驾驶室仪表板,尾部底板或保险气囊
等部件之上。
·将本机安装在车内时,应确保固定牢靠,且不会
对驾车造成妨碍。如果因为冲击造成本机脱落且
撞及人体或保险部件,就会导致伤害或事故。
·在本装置安装之后,应该确认电气设备,比如刹
车灯、转向信号灯以及雨刷等操作正常。
WARNING
Remove the ignition key and disconnect the negative · terminal of the
battery to prevent short circuits.
警告
拔取点火钥匙,拆掉蓄电池负极·端子,以防短路。
WARNING
Particularattentionmustbegiventomakinggood
electricalcontactattheamplifier-outputandspeaker
terminals.
Poororlooseconnectionscancausesparkingor
burningattheterminalsbecauseoftheveryhigh
powerthattheamplifiercandeliver.
CAUTION
• Ifsoundisnotoutputnormally,immediatelyturnpower
offandcheckconnections.
• Besuretoturnthepoweroffbeforechangingthesetting
ofanyswitch.
• Ifthefuseblows,checkwiresforshorts,thenreplacethe
fusewithoneofthesamerating.
• Checkthatnounconnectedwiresorconnectorsare
touchingthecarbody.Donotremovecapsfrom
unconnectedwiresorconnectorstopreventshort
circuits.
• Connectthespeakerwirestoappropriatespeaker
connectorsseparately.Sharingthenegativewireofthe
speakerorgroundingspeakerwirestothemetalbodyof
thecarcancausethisunittofail.
• Afterinstallation,checkthatthebrakelamps,turnsignal
lampsandwindshieldwipersworkproperly.
警告
要特别注意放大器的输出口和扬声器端子处有良好的电气
接触。
因为放大器要发出非常高的功率,松弛或不良的连接可能
在端子处产生火花甚至燃烧。
注意
·如果声音输出不正常,应立即关断电源并检查连接是否正
确。
·在变更开关的设定时,必须首先切断电源。
·当保险丝熔断后,要检查缆线是否有短路,并更换上相同
规格的保险丝。
·检查是否有尚未连接的缆线或与车体相接触的端头。未
连接缆线及其端部的保护帽不可拆掉,以防短路。
·扬声器的缆线要分别连接到各自的端子。共用扬声器的
负极缆线或将扬声器端子接地到汽车的金属部分,都会导
致本机停止工作。
·安装之后,请检查汽车的刹车灯、方向指示灯、雨刷等是
否正常动作。
WARNING
Topreventfirecausedbyashortinthewiring,
connectafusiblelinkorbreakernearbythe
battery’spositiveterminal.
警告
为了防止短路所引起的火灾,在蓄电池的正极附近
连接保险丝或断电器。
7
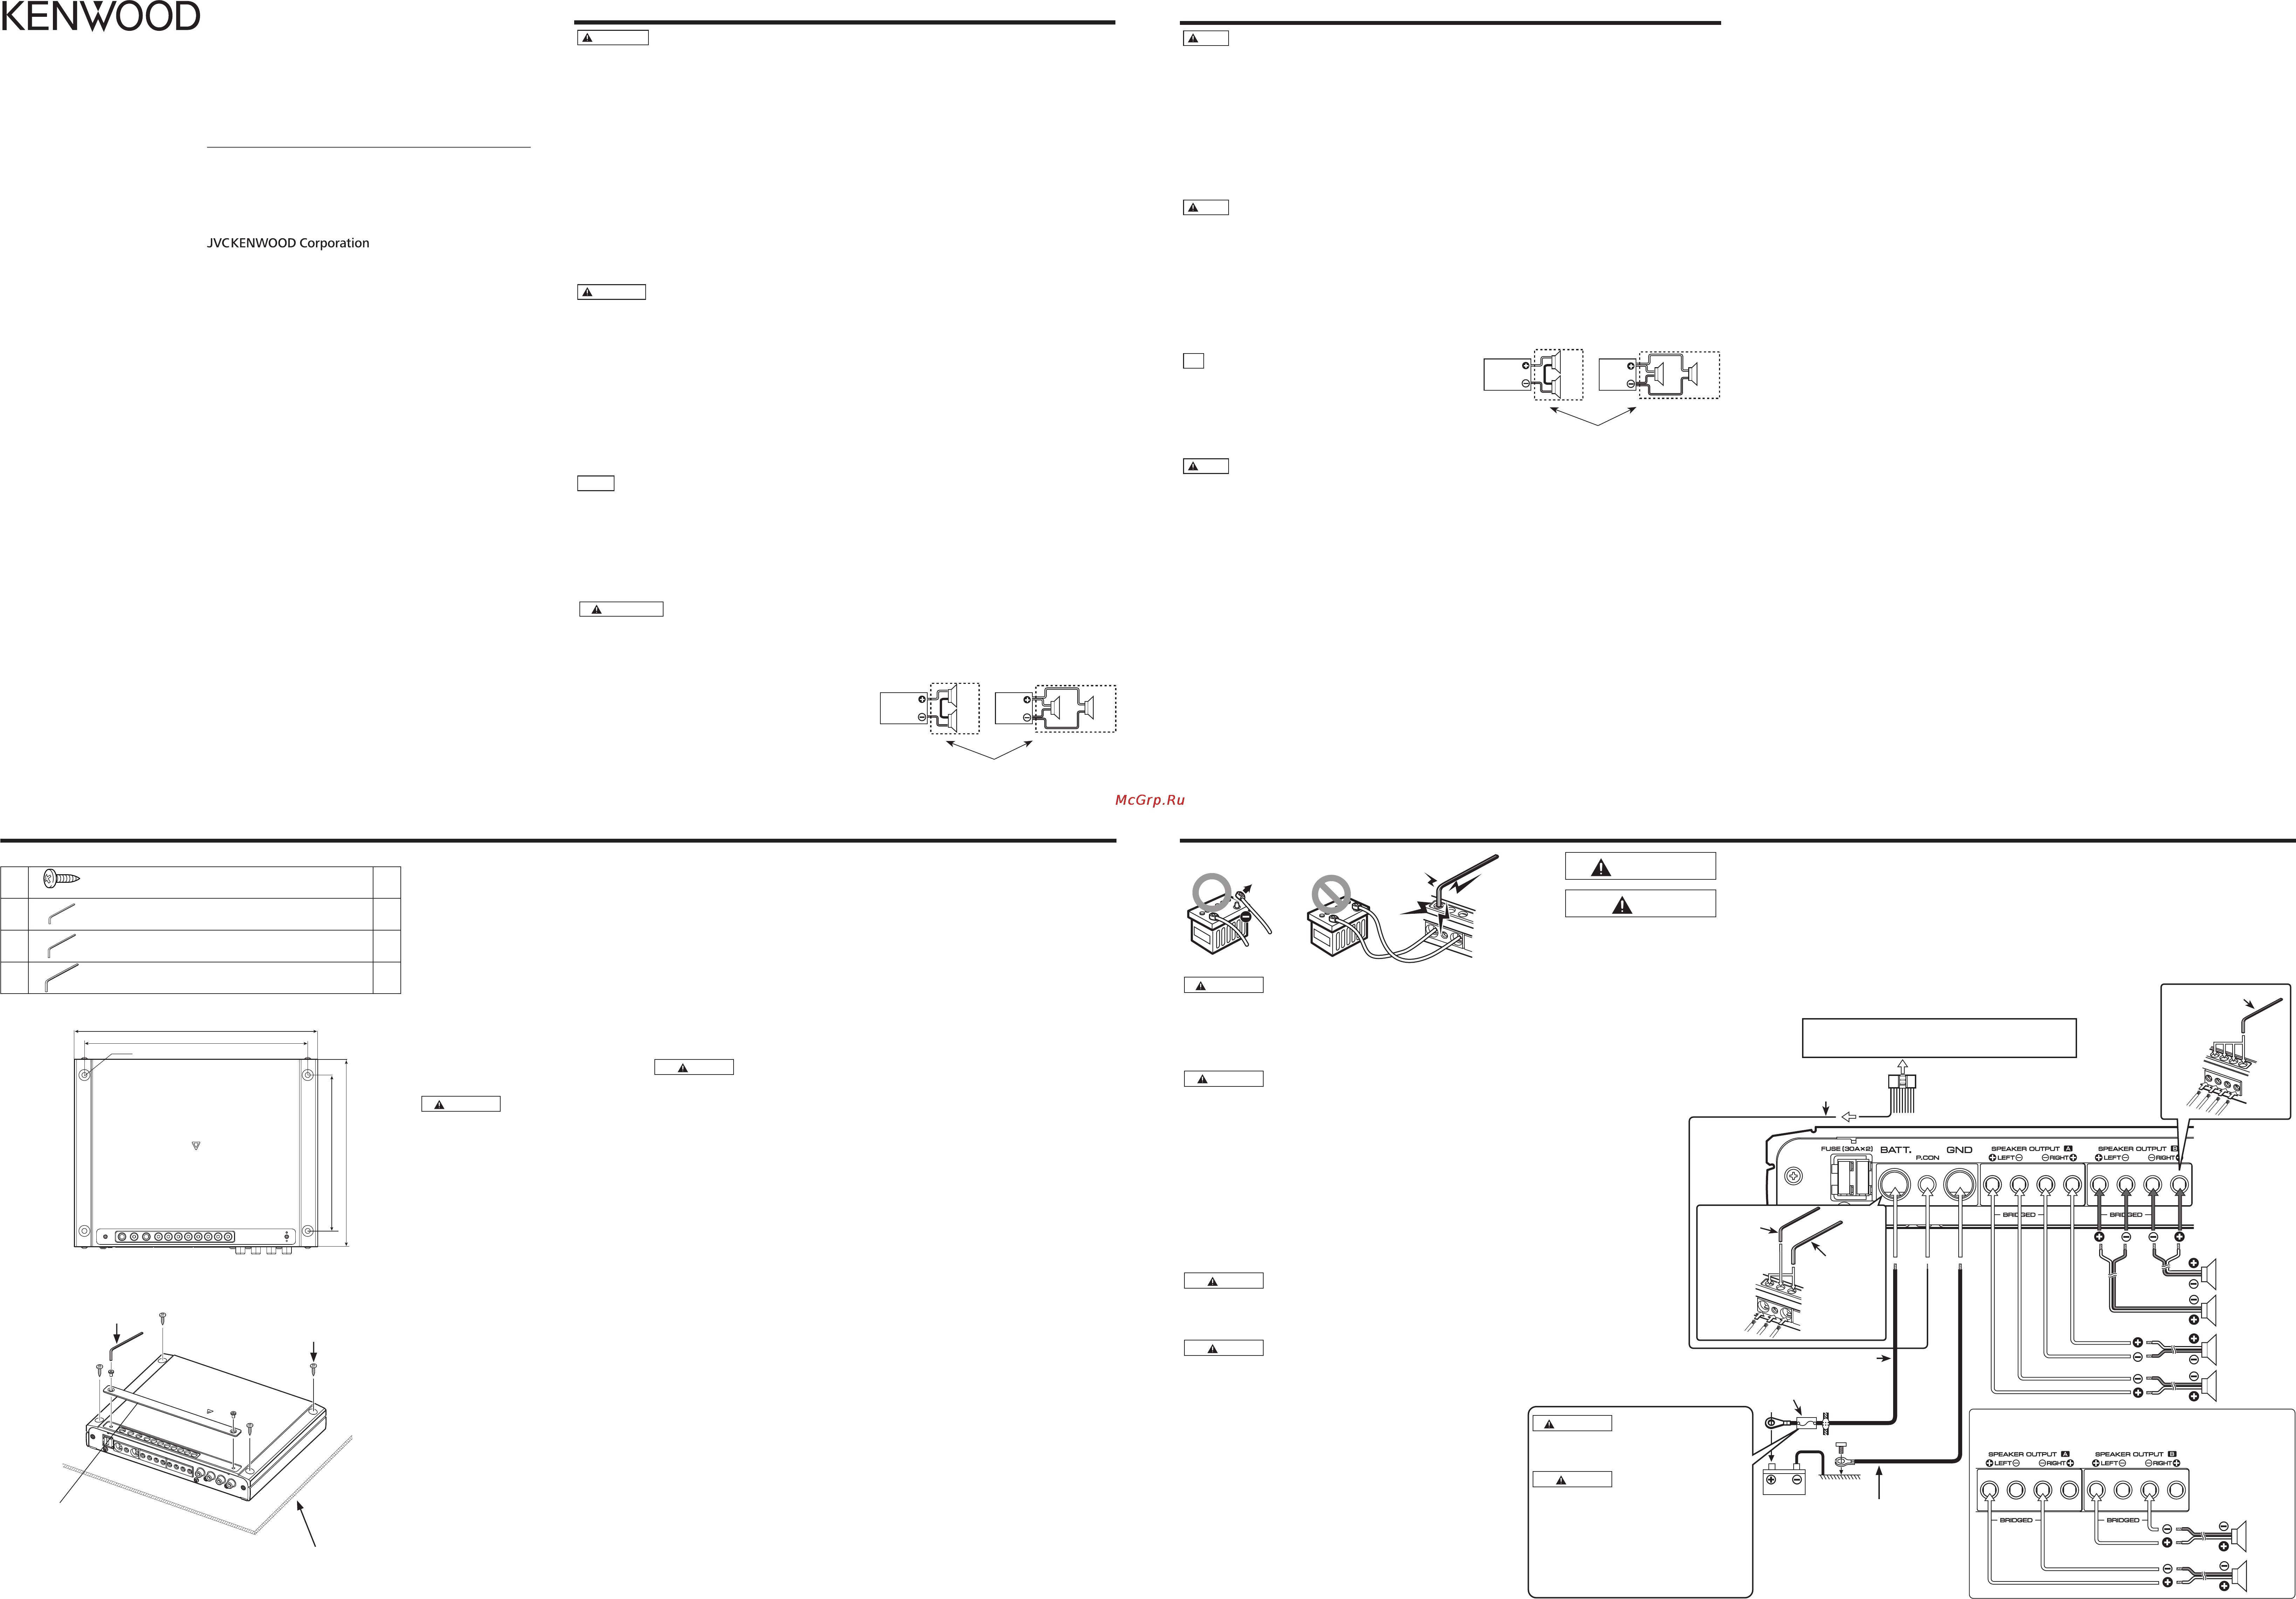
Power wire and speaker wire connection
7 电源线和扬声器线的连接
Center unit (CD receiver, etc.)
中心装置(CD 接收机等)
B64-5081-00/01 (WV)© 2012 JVC KENWOOD Corporation
XR400-4
CLASS D FOUR CHANNEL POWER AMPLIFIER
INSTRUCTION MANUAL
4声道D类功率放大器
使用说明书
安全注意事项
警告
为了防止受伤和火灾,请遵守下列注意事项。
• 安装本产品和连接导线需要一定的技能和经验。为了保证安
全,应请专业人员完成安装和连接导线作业。
• 当延长蓄电池导线和接地导线时,请使用车辆用导线
14mm2(AWG6)〜21mm2(AWG4)之间的导线,以防止
导线劣化和被覆面的损伤。
• 为了防止短路等事故,请勿将金属物品(硬币,工具等)掉
落在装置中。
• 万一装置冒烟或有异味时,请立即关闭电源,并与建伍经销
商洽谈。
• 在使用中请尽量不要接触装置表面。因为装置在使用中表面
发热会烫伤人体。
注意
为了防止装置发生故障,请遵守下列注意事项,正确操作和
使用。
• 请以负接地线的12V直流电源向本装置供电。
• 请勿打开顶部和底部的盖子。
•
请勿将本装置安装在曝露于直射阳光,高温或高湿,水可
能飞溅的或有灰尘的地方。
•
更换保险丝时,请更换规定容量相同的保险丝,如使用不
同容量的保险丝,可能会造成装置的故障。
• 更换保险丝时,为了防止短路事故,请先拔下电源线束再进
行更换。
注
• 安装有困难时,请与建伍经销商洽谈。
• 如果仍不能恢复正常时,请与建伍经销商洽谈。
装置的保养
如果外表污脏时,请关闭电源,使用干燥的硅布或柔软的布
匹擦拭。
注意
请勿使用硬布或涂料稀释剂,酒精等挥发性溶剂,以免损坏
外表面或将所附指示字符擦掉。
防止蓄电池全部放电
当本机在ACCON位置使用而不开动发动机时,将消耗蓄电池
的电量。请在开动了发动机之后使用。
保护功能
在以下场合中保护功能被激活
本机装有保护功能,可以保护本机以及扬声器不会受到可能
发生的各种意外事故的损害。
当保护功能被触发时,电源指示灯将熄灭,放大器也停止工
作。
• 当扬声器缆线短路时。
• 当扬声器的输出接地时。
•
当本机出现误动作,有DC(直流)信号传送到扬声器输出
端时。
• 内部高温不能动作时。
7 接线
• 请将本机的蓄电池连接线直接与蓄电池连接。如果与汽车
的配线束连接,将产生烧毁保险丝等故障。
• 如果发动机运转时从扬声器中发出噪音,可以在蓄电池的每
根连线上加一个线路噪音滤波器(选购件)。
• 使用保护套,以防缆线直接接触铁板的边缘。
• 将接地线连接到车架的金属部位,车架起到车辆电气接地的
作用,将电流传递到蓄电池的负极·
。如果接地线没有连
接就不要打开电源开关。
•
应务必在蓄电池附近的电源连接线上设置保险丝。保险丝
的规格应该与本机的保险丝容量相同或者略大。
• 对于电源连接线和接地线,请使用电流容量大于本机保险
丝容量的汽车用(防火)电源连接线。(请使用截面积
为14mm2(AWG6)〜21mm2(AWG4)之间的电源连接
线。)
• 当使用多个功率放大器时,电源导线的电流容量及保险丝的
容量要大于各个放大器的使用电流之和的最大值。
7 扬声器选择
• 使用输入额定值比放大器输出功率小的扬声器将会导致冒烟
或设备故障。
•
所连接的扬声器的阻抗必须为2欧姆或更高(立体声连接
时);或者4欧姆或更高(桥接连接)。当使用一组扬声
器时,必须在计算扬声器的总阻抗之后,再连接合适的扬
声器。
<例>
4Ω
4Ω
8Ω
2Ω
2Ω
4Ω
4Ω
4Ω
4Ω
4Ω
4Ω
4Ω
4Ω
4Ω
8Ω
4Ω
4Ω 4Ω
4Ω
4Ω
4Ω
4Ω
4Ω
4Ω
综合阻抗
Power control wire
电源控制缆线
Battery wire
蓄电池导线
Protective fuse
保护保险丝
Battery
蓄电池
Ground wire
接地导线
*1 Use the attached Hexagon Wrench.
使用附带的六角扳手。
*1
*1
3Parts included
配件
(4.0 mm)
(2.5 mm)
(2.5 mm)
3Parts included
配件
4Parts included
配件
7
Accessories / 附件
1
ø 4 x 16 mm
Self-tapping screws / 自攻螺钉
4
2
2.0 mm
Hexagon wrench / 六角扳手
1
3
2.5 mm
Hexagon wrench / 六角扳手
1
4
4.0 mm
Hexagon wrench / 六角扳手
1
Installation board, etc. (thickness : 15 mm or more)
安装基板,等(厚度:不小于 15 mm)
1 Parts included
配件
220 mm
202 mm
ø 4.6
169 mm
141 mm
Dressing cover
装饰板
2 Parts included
配件
(2.0 mm)
Stereo / 立体声
Bridged /
桥接
B.ch Right
右
B.ch Left
左
A.ch Right
右
A.ch Left
左
B.ch
A.ch
Содержание
Похожие устройства
- Kenwood ddx5015btr Инструкция по эксплуатации
- Kenwood dnx4150btr Инструкция по эксплуатации
- Kenwood es 020 Инструкция по эксплуатации
- Kguard ns401 Инструкция по эксплуатации
- Kguard ns401-4cw214h Инструкция по эксплуатации
- Kguard el821-4hw212b Инструкция по эксплуатации
- Kguard aurora ar421-ckt001 Инструкция по эксплуатации
- Kguard el421 Инструкция по эксплуатации
- Kicker сx300.1 Инструкция по эксплуатации
- Kicker cx300.4 Инструкция по эксплуатации
- Kitfort kt-201 Инструкция по эксплуатации
- Kitfort кт-601 Инструкция по эксплуатации
- Kitfort кт-602 Инструкция по эксплуатации
- Kitfort кт-502-1 Инструкция по эксплуатации
- Kitfort кт-907 Инструкция по эксплуатации
- Kitfort kt-1102-2 Инструкция по эксплуатации
- Kitfort кт-502-2 Инструкция по эксплуатации
- Kitfort кт-1304-3 Инструкция по эксплуатации
- Kitfort kt-1405 Инструкция по эксплуатации
- Kitfort кт-1102-1 Инструкция по эксплуатации