Kromax OFFICE-2 Инструкция по эксплуатации онлайн

Содержание
- Accessories п рин адл еж н ости step шаг 1
- Flat washer 4 05 flat washer 4 06 flat washer 4 1
- Hoeatixg manual ииструк11ил по установке 1
- M6 12screw 4 1
- Moscow 7 495 661 70 06 979 69 76 1
- S 3 inner hexagon spanner 1 1
- S 4 inner hexagon spanner 1 1
- Ste шаг 1
- Step шаг 1
- Techncicgy cf nstahetion 1
- А плоская шайба 4мм 4 плоская шайба 5мм 4 плоская шайба 6мм 4 1
- Болт м4 8 4 1
- Болт м6 8 4 1
- Болтм4 12 4 1
- Болтм5 8 4 1
- Болтм5ч2 4 1
- Болтм6 12 4 1
- Ключ 8 4 1 1
- Ключ3 3 1 1
- М4 12 screw 4 м5 8 screw 4 м5 12 screw 4 м6 8 screw 4 1
- М4 8 screw 4 1
- Страница 1 1
- Шаг 1
Похожие устройства
- Krona bella 500 Инструкция по эксплуатации
- Krona kamilla slim (pb) 500 Инструкция по эксплуатации
- Krona bella (slider) 500 inox Инструкция по эксплуатации
- Krona mini slider 600 Инструкция по эксплуатации
- Krona lina (sensor) 600 white/glass 4p-s Инструкция по эксплуатации
- Krona bella slider 600 inox Инструкция по эксплуатации
- Krona kelly (pb) 600 inox 2m Инструкция по эксплуатации
- Krona irida (sensor) 600 black/glass Инструкция по эксплуатации
- Krona lina (sensor) 600 black/glass 4p-s Инструкция по эксплуатации
- Krona irida (pb) 600 black/glass Инструкция по эксплуатации
- Krona mini 600 inox Инструкция по эксплуатации
- Krona kamilla power 600 inox 3р Инструкция по эксплуатации
- Krona kamilla (pb) 450 inox ( 1 мотор) Инструкция по эксплуатации
- Krona nikol (pb) 600 ivory/bronze, Инструкция по эксплуатации
- Kuppersberg ha 657 t Инструкция по эксплуатации
- Kuppersberg ha 663 t Инструкция по эксплуатации
- Kuppersberg sb 663 Инструкция по эксплуатации
- Kuppersberg fa6if w Инструкция по эксплуатации
- Kuppersberg fa6if01 Инструкция по эксплуатации
- Kuppersberg fa6vs01 Инструкция по эксплуатации
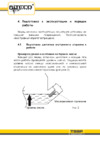
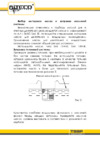
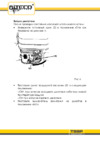
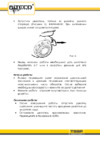
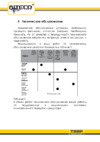
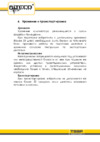
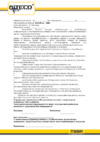
ACCESSORIES П РИН АДЛ ЕЖ Н ОСТИ STEP ШАГ Install TV plate on the TV back Select four 04 Flat washer 4 05 Flat washer 4 06 Flat washer 4 А Плоская шайба 4мм 4 Плоская шайба 5мм 4 suitable bolts from the parts bag and screw them М4 8 Screw 4 Плоская шайба 6мм 4 D into the bolt holes in the back of the TV The TV Болт М4 8 4 plate mounted on the TV back should be mounted symmetrically and evenly Установите монтажную пластину на монитор М4 12 Screw 4 М5 8 Screw 4 М5 12 Screw 4 М6 8 Screw 4 используя для этого подходящие болты и M6 12Screw 4 БолтМ4 12 4 F БолтМ5 8 4 G БолтМ5Ч2 4 H Болт М6 8 4 L шайбы из комплекта принадлежностей Не БолтМ6 12 4 перетягивайте болты чтобы не повредить монитор S 3 Inner hexagon spanner 1 J STE S 4 Inner hexagon spanner 1 Ключ3 3 1 K ШАГ Ключ 8 4 1 HOEATIXG MANUAL ИИСТРУК11ИЛ ПО УСТАНОВКЕ Lift and rotate the display plate mounted TV by two person and make sure the two orientation pins in small arm align to the orientation holes in the TV plate assembly insert the TV together STEP ШАГ with the TV plate assembly into the short arm then use the inner hexagon spanner S 3 J to firmly tighten the locking screw Please use the Inner hexagon spanner S 3 J to Вставьте монтажную пластину с монитором loosen the locking screw in order to separate the в плечо кронштейна так чтобы пазы на table fixation and TV plate пластине соединились с пазами в кронштейне после этого затяните фиксирующий болт ключом S 3 Не отпускайте монитор пока не Отделите монтажную кронштейна раскрутив пластину болт от ключом основания 5 3 убедитесь что он прочно закреплен как показано на рисунке STEP STEP ШАГ ШАГ Adjust the position and angle of the flat panel TV for convenient viewing Using the inner There is a U shaped plate and a knob at the bottom hexagon spanner S 4 K to loosen the bolt of the table fixation Make the U shaped plate align before adjusting the view angle and firmly the edge of the table then insert the U shaped plate tighten the bolt after adjustment While adjusting to the table eage absolutely tighten the knob to fix the please take care of your hand to avoid clipping table fixation and the table firmly Отрегулируйте положение монитора в соответствии со своими потребностями Приставьте кронштейн к столу и зафиксируйте его Используйте ключ S 4 чтобы сначала крутя ручку по часовой стрелке Убедитесь что ослабить а затем затянуть болты в узлах зажим достаточно затянут но не перетягивайте его регулировки ШАГ STEP tEchncicgy cf nstaHetion www kromax ru Route the cables along inside of the arm the cables should be obligated some surplus in comer With all cables in place secure the cable covers in place and pull the arm assembly in and out and check that the arm assembly moves freely The cables surplus in Designed and produced in PRC bj KROMAX CaIM SWEDEN Blekinge comer can be adjusted by pulling the cables lightly to keep lax and avoid stretching or ENG Thank you for purchasing KROM AX Company products IVe hope you will enjoy it damaging the cables Thus the cables will be in protected status inside of the arm all along The product you bought is made with using high technology be used only for such surfaces If the wall is made of other materials equipment and high quality material we recommend you not to mount it by yourself Please consult with We give 10 years guarantee for all welded and mechanical joints professional experts for proper mounting аккуратно уложить все провода Убедитесь USAGE MAINTANANCE что провода не деформируются при OFFICE 2 bracket is used for mounting of TFT LCD LED monitors Use suds for cleaning without any solvent регулировке положения экрана with screen size of 25 61 CM 10 24 inches and maximum load of 10 kg when adjusting the viewing angles of the display Shown as Fig Используйте специальные крючки чтобы The distance between mounting holes fit with VESA standard 75X75MM MOUNTING 100X100MM Proper mounting is of great importance In order not to get injury and not to damage the product please ШАГ read User s Manual first ATTENTION For mounting you must have screw driver or wrench with socket The wall plate must be mounted on concrete or brick wall with head electric drill and perforator Please mount the product to the plaster thickness not more than 3 mm All accessories of the set must wall according to the User s manual RUS БЛАГОДАРИМ ВАС за покупку изделия фирмы КВОМАХ и надеемся что оно Вам понравится tilt angle cannot be fixed properly Using the inner пластиной от кронштейна открутив at first then remove the TV together with the TV plate фиксирующий болт ключом 5 3 Закрутите Firmly tighten the fixed nut with a spanner in the гайку при помощи ключа по часовой стрелке clockwise direction Insert the TV back to the table Закрепите монитор с крепежной пластиной fixation Using the inner hexagon spanner S 3 J to обратно на кронштейн fix the locking screw tightly at last Please see our models series at www kromax ru Весь модельный ряд смотрите на сайте www kromax ru If you have some problems regarding products mounting please call Если возникнут вопросы по установке данного изделия звоните MOSCOW 7 495 661 70 06 979 69 76 в Москве тел 7 495 661 70 06 979 69 76 либо по City telephone изготовлена из других материалов мы не рекомендуем высокотехнологичном оборудовании с использованием только самостоятельно телефону Официального представителя КВОМАХ в другом городе Город телефон не устанавливать данное изделие качественных материалов Гарантийные обязательства на все проконсультируйтесь с сертифицированным специалистом или сварные и механические соединения 10 лет обратитесь к квалифицированным установщикам то отсоедините монитор с крепежной hexagon spanner S 3 J to loosen the locking screw You can contact with our official representative in other dties Изделие которое Вы приобрели изготовлено на Перед установкой крепления убедитесь в отсутствии в стене на НАЗНАЧЕНИЕ ИЗДЕЛИЯ месте Крепление 0FFICE 2 предназначено для установки сантехнических и других развязок крепления электрического кабеля газопровода TFT LCD LED монитора с диагональю 25 61 см 10 24дюймов максимальный вес которого не превышает 10 кг Отверстия на ОБСЛУЖИВАНИЕ крепежной площадке соответствуют стандарту VESA 75x75 мм Для чистки изделия необходимо использовать теплую мыльную 100x100мм воду без растворителей МОНТАЖ Большое значение имеет правильная установка изделия ВНИМАНИЕ Во Подставка закрепляется на бетонную либо кирпичную стену с внимательно избежание следуйте получения травм толщиной штукатурки не более 3 мм Входящие в комплект понадобятся отвертка крепежные изделия предназначены исключительно для электрическая дрель и сверла Закрепите кронштейн к стене крепления на вышеуказанные поверхности В случае если стена согласно инструкции инструкции либо и поломки Для гаечный изделия сборки торцовый Вам ключ


