
Omron hj-320-ru Инструкция по эксплуатации онлайн
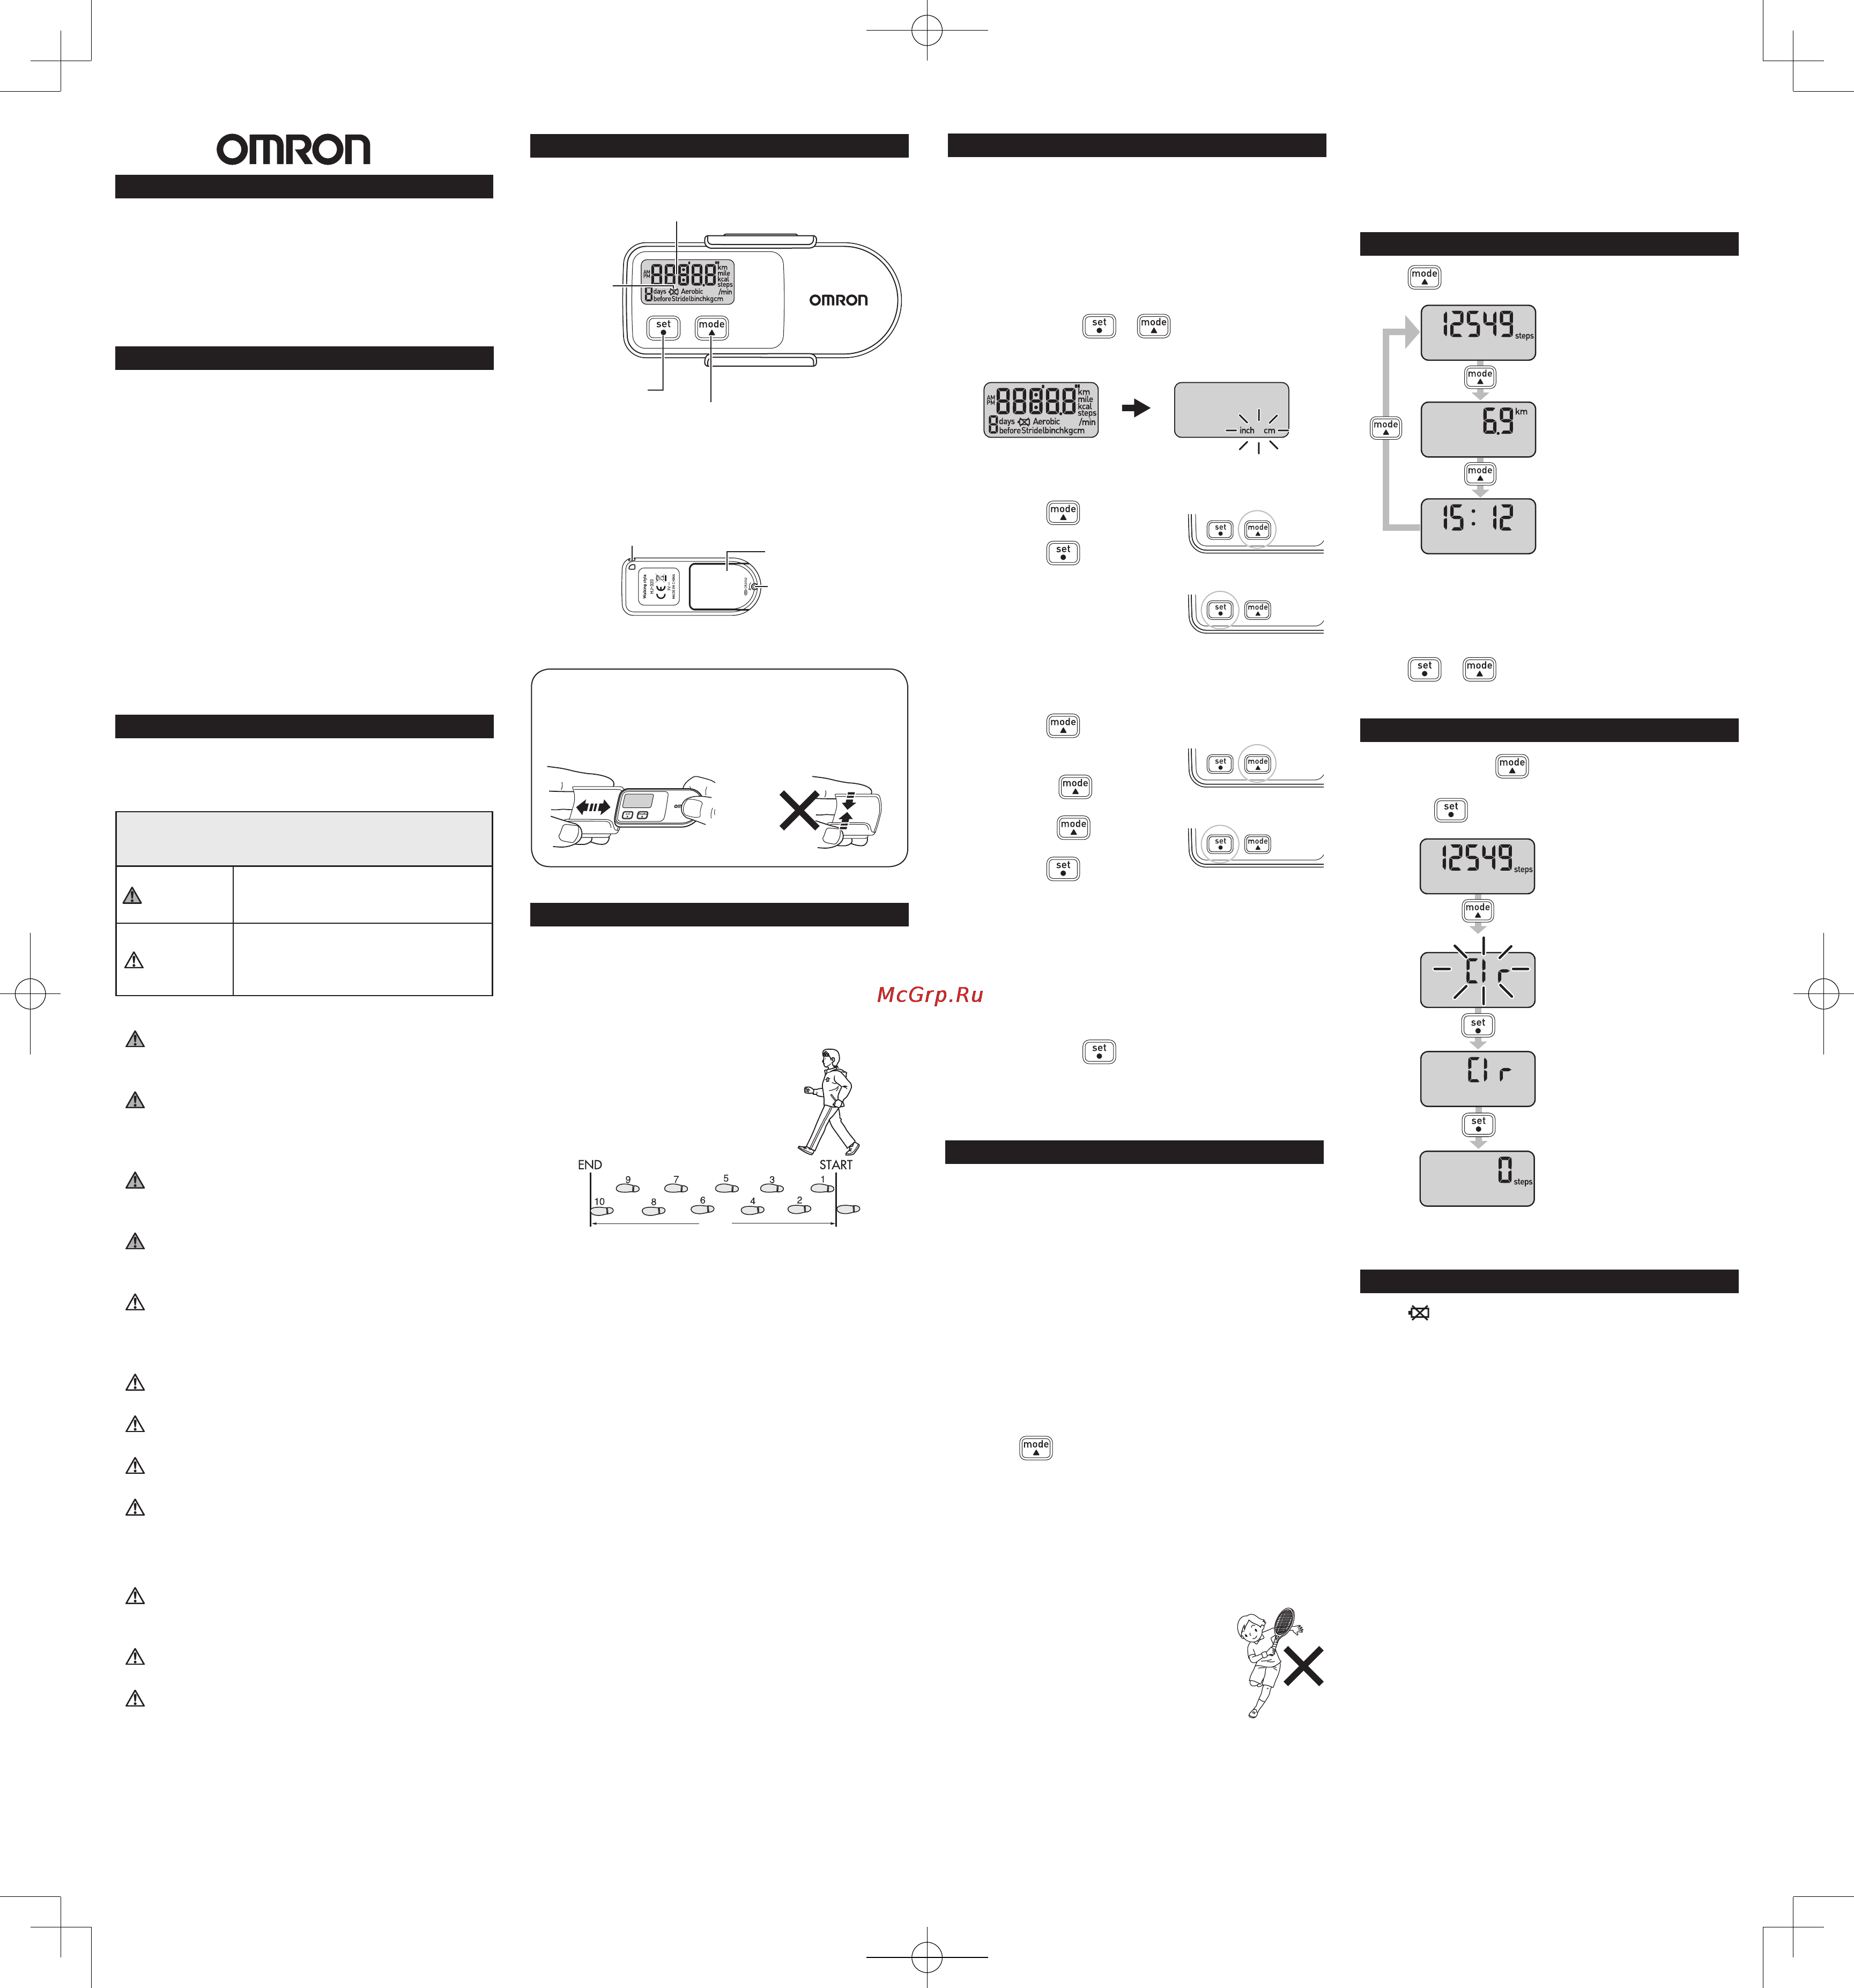
CLEAR THE CURRENT STEPS
1. Press and hold .
“Clr” ashes on the display.
2. Press
twice, the current steps will be cleared.
Then the unit will count steps from “0 steps”.
BATTERY LIFE
If the symbol blinks or appears on the display,
replace the battery with a new (CR2032) battery.
If the battery is removed, the settings and all
measurement values will be deleted. Please reset the
settings (refer to “SETTINGS”).
NOTES:
If you want to keep any of the measurement values, •
make a note of them before removing the battery.
The supplied battery is for initial use. The battery •
life may be shorter.
INTRODUCTION
Thank you for purchasing the OMRON HJ-320 Step
counter.
This Step counter features advanced 3D Smart Sensor
technology - so it knows exactly when you’re taking a
step. It’s more accurate than other step counters which
use a simple pendulum design. Use this in your pocket,
bag or on your hip for added convenience. Use this unit
everyday to monitor your tness achievements!
Your Step counter comes with the following
components:
Step counter
Battery (CR2032 installed)
Holder
Instruction Manual
Please read this instruction manual thoroughly before
using the unit. Please keep for future reference.
IMPORTANT SAFETY INFORMATION
To assure the correct use of the product basic safety
measures should always be followed including the
warnings and cautions listed in this instruction manual.
SAFETY SYMBOLS USED IN THIS
INSTRUCTION MANUAL
WARNING
Indicates a potentially hazardous situation
which, if not avoided, could result in death or
serious injury.
CAUTION
Indicates a potentially hazardous situation
which, if not avoided, may result in minor or
moderate injury to the user or patient or damage
to the equipment or other property.
OPERATING THE DEVICE
Contact your physician or healthcare provider
before beginning a weight reduction or exercise
program.
Keep the unit out of the reach of young children.
The unit contains small pieces that may be
swallowed. Immediately contact your physician if
any piece is swallowed.
Please use caution when wearing the unit around
your neck so as to avoid possible strangulation. Do
not place the unit around the neck of children.
If battery uid gets in your eyes, immediately rinse
with plenty of clean water. Contact a physician
immediately.
Read all information in the instruction manual and
any other literature included in the box before using
the unit. Operate the unit only as intended. Do not
use for any other purpose.
If battery uid gets on your skin or clothing,
immediately rinse with plenty of clean water.
Do not insert the battery with the polarities in the
wrong direction.
Do not throw the battery into re. The battery may
explode.
Dispose of the device, battery, and components
according to applicable local regulations. Unlawful
disposal may cause environmental pollution.
CARE AND MAINTENANCE
Do not disassemble or modify the unit. Changes or
modications not approved by Omron Healthcare
will void the user warranty.
Do not subject the unit to strong shocks, such as
dropping the unit on the ground.
Do not submerge the unit or any of the components
in water.
INSTRUCTION MANUAL
HJ-320
Step counter
Walking style
HJ-320-APW
5338790-4A
Back of the main unit
Front of unit
Low battery
indicator
Display
set /● button
mode /▲ button
Components
KNOW YOUR UNIT
USING THE UNIT
The unit accurately counts in a pocket, bag or anywhere
you want to put it. The unit may be placed in the upper
front pocket of your clothing, in the front pocket of your
pants, in a bag, or attached to your belt or pants, or hang
it from your neck.
1. Simply bring the unit with you wherever you go.
NOTE:
In order to avoid counting steps that are not part of a
walk, the unit does not display the step count for the
rst 4 seconds of walking. If you continue walking
for more than 4 seconds, it displays the step count
for the rst 4 seconds and then continues to count.
2. Press
to read the data.
The unit may not count steps correctly in the
following conditions:
1. The unit moves irregularly.
When the unit is placed in a bag and a bag moves
•
irregularly.
When the unit swings from your
•
belt, the top of your pants or a bag.
2. Walking at an inconsistent pace.
When you shufe or wear sandals.
•
Starting and stopping or other
•
forms of inconsistent walking.
3. Up and down movement.
Standing up and/or sitting down movement.
•
Playing sports other than walking.
•
Ascending or descending movement on stairs or
•
on a steep slope.
SETTINGS
The unit comes with the battery installed. When you
use the unit for the rst time, follow the steps below. For
setting range details refer to “SPECIFICATIONS”.
NOTE:
If the initial settings are not correct, the measurement
results may not be accurate.
1. Press and hold
or .
After the following display, “inch” and “cm” ash
on the display.
2. Setting the stride length
unit.
A) Press
to select the
mode.
B) Press
to conrm
the setting.
3. To set the distance unit,
repeat steps A) and B) in
step 2 above.
4. To set the time display,
repeat steps A) and B) in step 2 above.
5. Setting the stride length.
A) Press
to select
the desired value for a
setting.
• Press
to
advance one.
• Hold
down to
advance rapidly.
B) Press
to conrm
the setting.
6. To set the hour, repeat steps A) and B) in step 5
above.
7. To set the minute, repeat steps A) and B) in step 5
above.
All the settings are completed.
Adjust the settings
1. Press and hold .
“inch” or “cm” ash on the display.
2. Follow the procedure from step 2 of “SETTINGS”.
READING THE CURRENT DISPLAY
Press to change the display.
Step count display
Distance display
Time display
The battery saving mode
After 5 minutes with no button being pressed, the display
will automatically turn off. However, the unit continues
to count steps. This mode extends the battery life.
Press
or to activate the display again.
Holder
Attach/remove the holder
as illustrated below.
NOTE:
When attaching the
holder, do not grip it
strongly at the top and
bottom.
Strap attachment
(Strap not included)
Battery cover
Battery cover
screw
STRIDE LENGTH MEASUREMENT
Measure your stride length before setting the step
counter.
How to measure your stride length
1. Walk 10 steps with your normal stride as
illustrated below.
5.5 m
2. Measure the distance from START to END in
meters.
3. Calculate your stride length by dividing the total
distance by 10.
Example:
Total distance = 5.5 m
5.5 ÷ 10 = 0.55 m (55 cm)
A)
B)
A)
B)
NOTE:
Remove the protective lm from the face of the display.
4. Vibrations from a moving vehicle.
Such as riding a bicycle, automobile, train or bus.
•
5. Walking extremely slowly.
Current display
“Clr” ashes
“Clr” display
Содержание
- Adjust the settings 1
- Back of the main unit 1
- Battery life 1
- Care and maintenance 1
- Caution 1
- Clear the current steps 1
- Components 1
- Front of unit 1
- Hj 320 step counter walking style 1
- How to measure your stride length 1
- Important safety information 1
- Instruction manual 1
- Introduction 1
- Know your unit 1
- Operating the device 1
- Reading the current display 1
- Settings 1
- Stride length measurement 1
- Using the unit 1
- Warning 1
- Based on omron test using new battery 2
- Battery replacement 2
- Care and maintenance 2
- Caution 2
- Clean the unit with a soft dry cloth do not use any abrasive or volatile cleaners 2
- Correct disposal of this product waste electrical electronic equipment 2
- Dispose of the device battery and components according to applicable local regulations unlawful disposal may cause environmental pollution 2
- Do not disassemble or modify the unit changes or modifications not approved by omron healthcare will void the user warranty 2
- Do not immerse the unit or any of the components in water the unit is not waterproof do not wash it or touch it with wet hands be careful that water does not get into the unit 2
- Do not subject the unit to strong shock drop or step on it 2
- Do not throw the battery into fire the battery may explode 2
- Insert the battery cr2032 with the positive side face up 2
- Loosen the screw of the battery cover on the back of the unit remove the battery cover by pulling it off in the direction of the arrow use a small screwdriver to loosen the screw on the battery cover 2
- Note do not use a pair of metal tweezers or any metal object such as a small screwdriver 2
- Note if a malfuncion has occurred and you need to repair your unit all settings and measurement results are deleted we recommend that you record measurement results 2
- Problem probable cause how to correct 2
- Quality system of omron healthcare co ltd japan 2
- Remove the battery if the unit will not be used for three months or longer 2
- Remove the battery with a toothpick 2
- Replace a worn battery with a new one immediately 2
- Replace the battery cover by sliding the catch in first then tighten the screw 2
- Specifications 2
- Specifications are subject to change without notice this omron product is produced under the strict 2
- Store the unit in a safe and dry location avoid the unit being exposed to direct sunlight high temperatures high humidity water and or dust 2
- This marking shown on the product or its literature indicates that it should not be disposed of with other household wastes at the end of its working life to prevent possible harm to the environment or human health from uncontrolled waste disposal please separate this from other types of wastes and recycle it responsibly to promote the sustainable reuse of material resources household users should contact either the retailer where they purchased this product or their local government office for details of where and how they can take this item for environmentally safe recycling business users should contact their supplier and check the terms and conditions of the purchase contract this product should not be mixed with other commercial wastes for disposal this product does not contain any hazardous substances disposal of used batteries should be carried out in accordance with the national regulations for the disposal of batteries 2
- To keep the unit in the best condition and protect the unit from damage follow the directions listed below 2
- Troubleshooting tips 2
- Use of the unit must be consistent with the instructions provided in this manual 2
Похожие устройства
- ТРИД РТП 122-4В4Т1Р-485 Инструкция по эксплуатации
- ТРИД РТП 122-4В5Р-485 Инструкция по эксплуатации
- Novatrack eva champion 12" черный, (12champion.bk5) Инструкция по эксплуатации
- Novatrack eva vintage 12" розовый, (12vintage.pn5) Инструкция по эксплуатации
- Novatrack magic 12" синий, (12magic.bl5) Инструкция по эксплуатации
- Novatrack magic 12" оранжевый, (12magic.or6) Инструкция по эксплуатации
- Novatrack magic 10" синий, (10magic.bl6) Инструкция по эксплуатации
- Novatrack magic 10" розовый, (10magic.pn6) Инструкция по эксплуатации
- ТРИД РК 112-1В2Р Инструкция по эксплуатации
- Novatrack magic 12" хаки, (12magic.gn6) Инструкция по эксплуатации
- Novatrack bonvoyage 12" белый, (12bonvoyage.vl6) Инструкция по эксплуатации
- Novatrack bonvoyage 12" синий, (12bonvoyage.bl6) Инструкция по эксплуатации
- ТРИД РК 112-1В2С1Р Инструкция по эксплуатации
- Novatrack neptune 12" белый, (12neptune.bl6) Инструкция по эксплуатации
- Novatrack magic 12" фиолетовый, (12magic.vl5) Инструкция по эксплуатации
- Novatrack magic 12" белый, (12magic.wt5) Инструкция по эксплуатации
- ТРИД РК 112-1В2Т1Р Инструкция по эксплуатации
- ORAS Saga 1946F Инструкция по эксплуатации
- ORAS Saga 1960Y Инструкция по эксплуатации
- ORAS Saga 1942Y Инструкция по эксплуатации
Скачать
Случайные обсуждения