
Moxa V2616A-C5-CT-LX Руководство по быстрой установке онлайн
– 1 – – 2 – – 3 –
P/N: 1802026160021
V2616A Series
Quick Installation Guide
Second Edition, February 2015
Overview
The V2616A series of embedded computers feature Intel Ivy
Bridge processors and 2 software-selectable RS-232/422/485
serial ports, dual LAN ports, and 3 USB 2.0 hosts.
In addition, V2616A computers provide VGA and DVI-D outputs,
and are EN 50155 certified, making them robust enough for
railway and industrial applications.
Package Checklist
Before installing the computers, verify that the package contains
the following items:
• V2616A embedded computer
• 2 storage tray keys
• Power cable (CBL-M12FF5PPJ21-BK-15-IP68)
• Documentation and software CD or DVD
• Quick installation guide (printed)
• Warranty card
• 2 5-pin terminal blocks
NOTE: Please notify your sales representative if any of the above
items are missing or damaged.
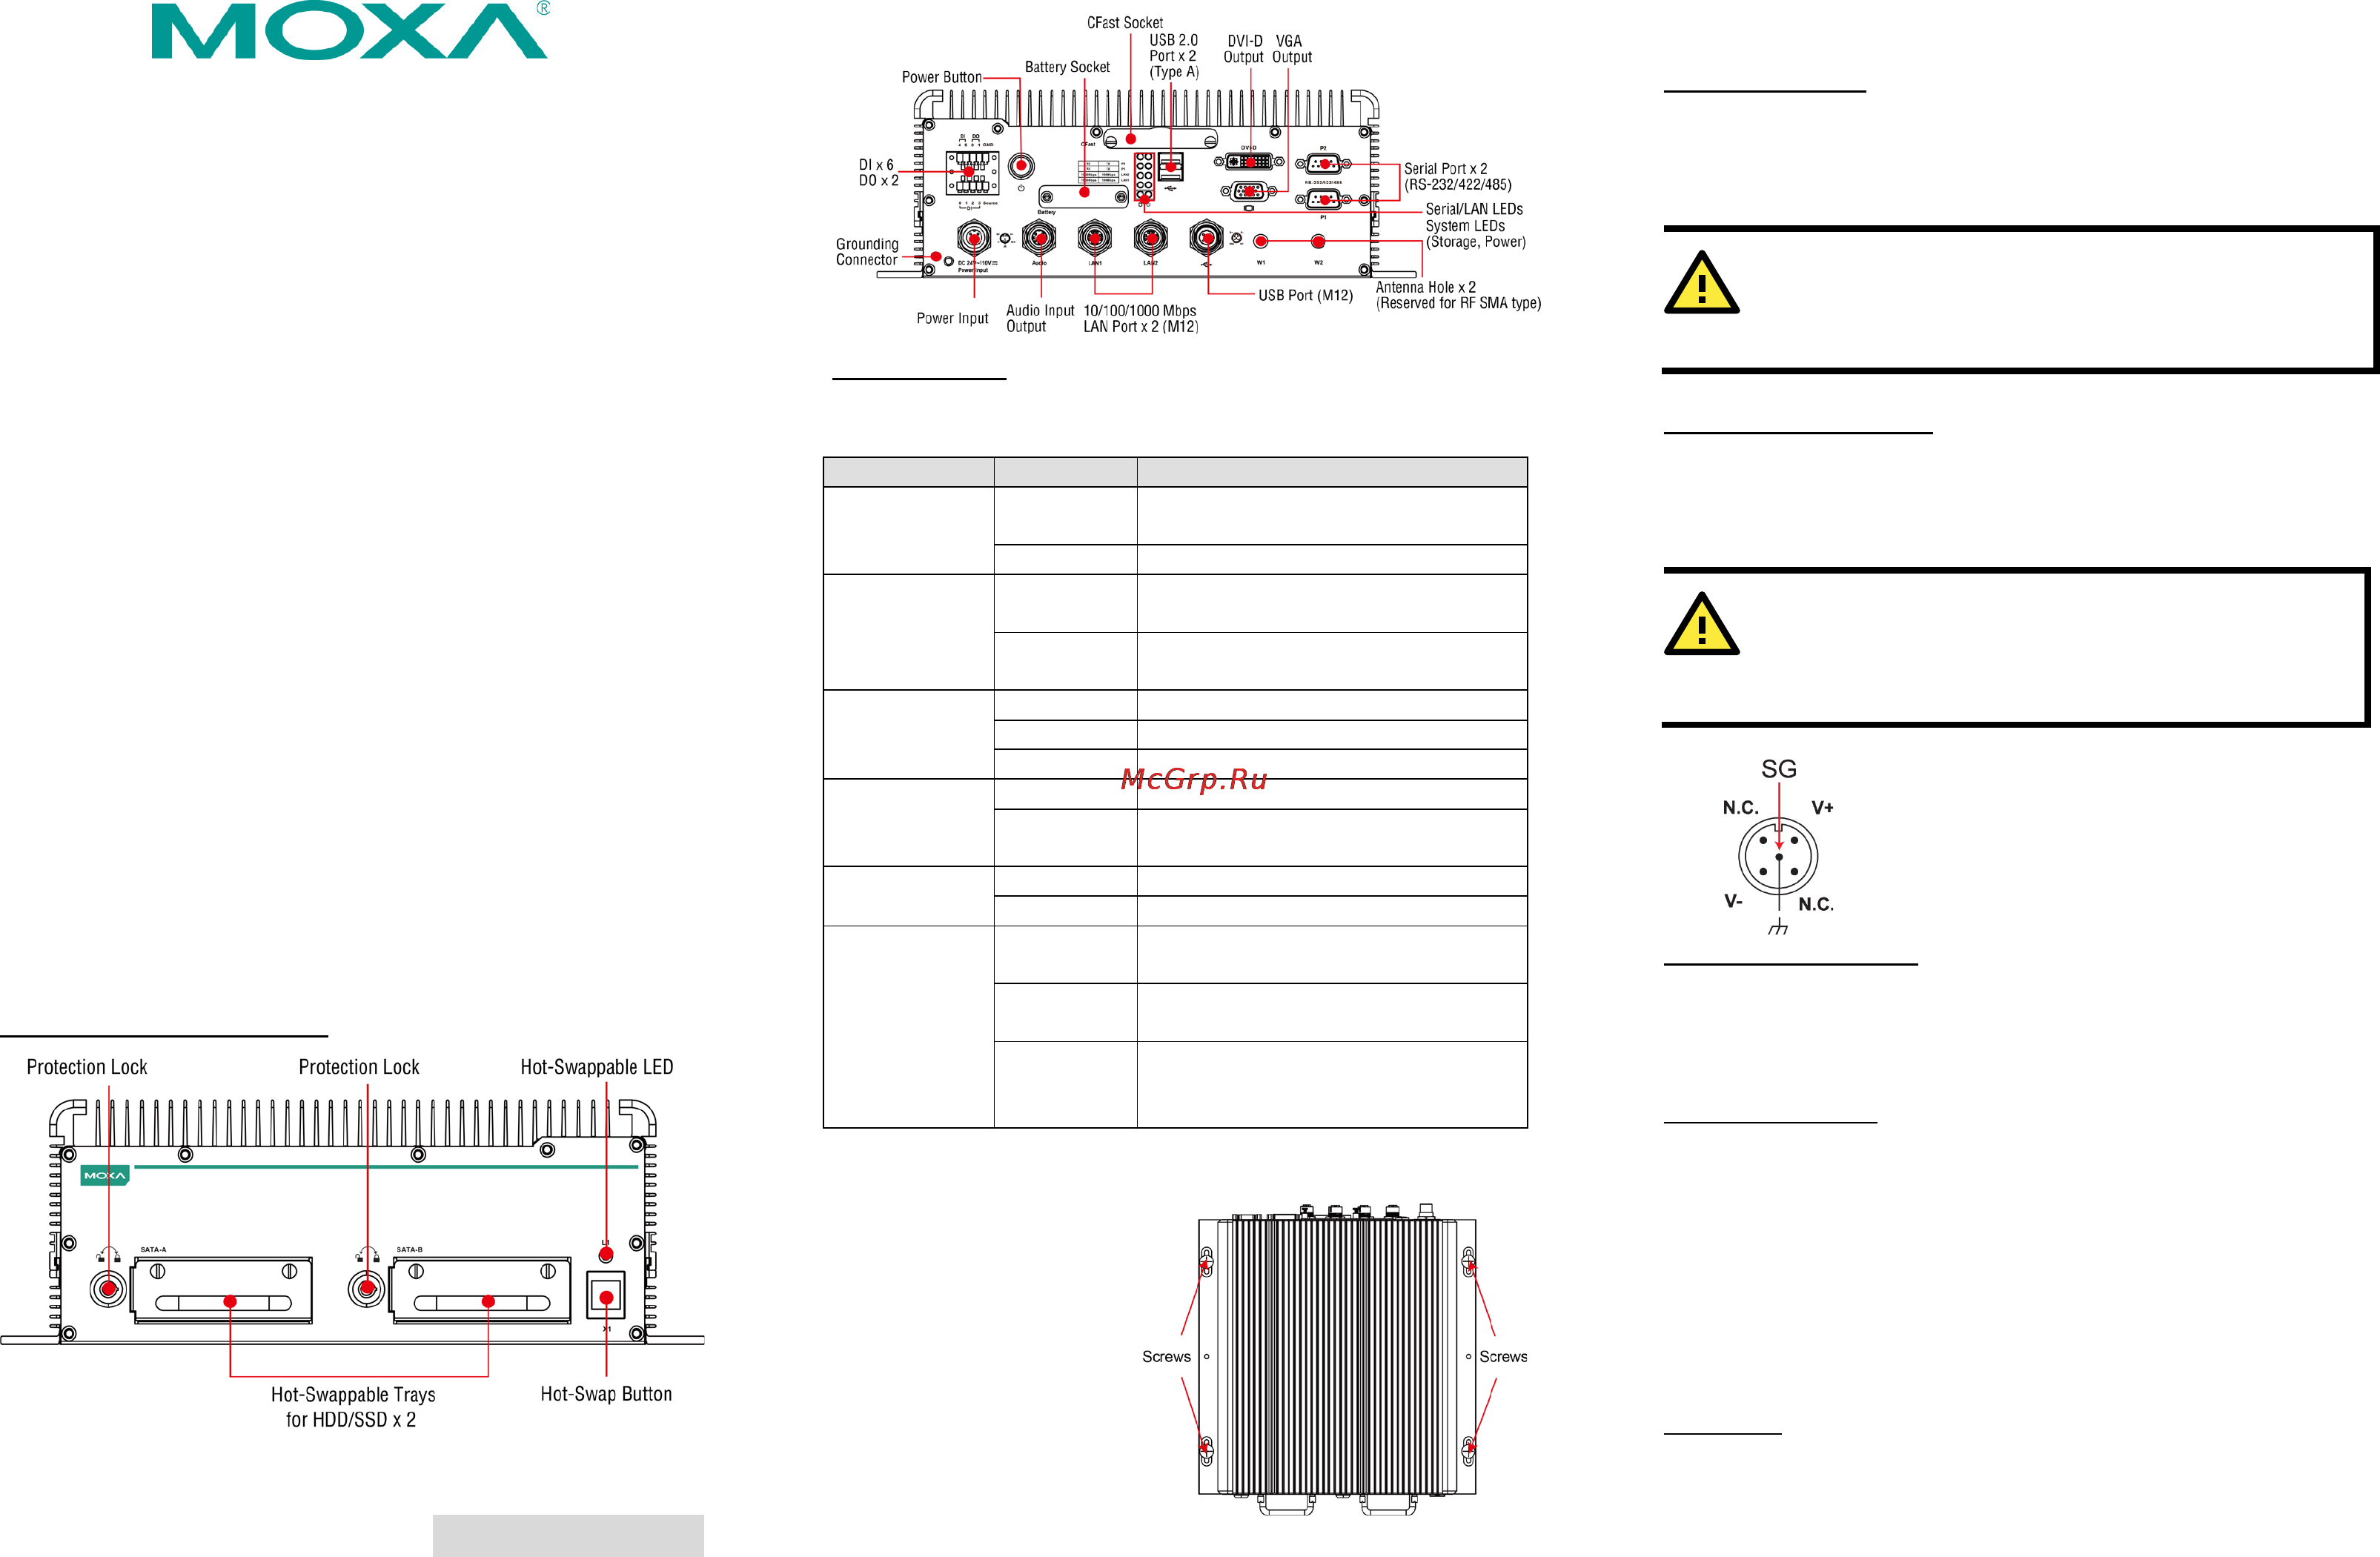
V2616A Panel Layout
V2616A Front & Rear Views
LED Indicators
The following table describes the LED indicators located on the
front and rear panels of the V2616A.
LED Name LED Color LED Function
Power Green Power is on and functioning
normally
Off Power is off, down, or has failed
Storage Yellow CFast card/HDD/SSD is
transmitting
data
Off CFast card/HDD/SSD is not
transmitting data
LAN (1, 2) Green 100 Mbps Ethernet mode
Yellow 1000 Mbps Ethernet mode
Off 10 Mbps or no activity
Tx (P1-P2) Green Serial ports P1-P2 transmitting data
Off Serial ports P1-P2 not transmitting
data
Rx (P1-P2) Yellow Serial ports P1-P2 receiving data
Off Serial ports P1-P2 not receiving data
L1 Red Programmable. By default, two
disks ready to be removed.
Blinking Programmable. By default, disks
inserted into incorrect storage tray.
Off Programmable. By default, two
disks inserted into correct storage
trays.
Installing the V2616A
The V2616A comes with
two wall-mounting
brackets. Use two screws
on each side to attach the
V2616A to a wall or
cabinet.
Connector Description
Power Connector
Connect the power line with M12 connector to the V2616A
computer. The V2616A offers the power input range from 24 to
110 VDC. If the power is supplied properly, the Power LED will light
up. The OS is ready when the Ready LED glows a solid green.
ATTENTION
Please note that the branch
circuit over current protection
must be rated maximum 10 A.
Grounding the V2616A
Grounding and wire routing help limit the effects of noise due to
electromagnetic interference (EMI). Run the ground connection
from the ground screw to the grounding surface prior to connecting
the power.
ATTENTION
This product is intended to be mounted to a well-
grounded
mounting surface, such as a metal panel.
SG: The Shielded Ground (sometimes called
Protected Ground) contact is the
central pin
of the power input connector. Connect the
SG wire to an appropriate grounded metal
surface.
VGA and DVI Outputs
The V2616A comes with a D-Sub 15-pin female connector for a
VGA monitor; it also comes with a DVI-D connector for the DVI
display. These output interfaces are all located on the rear panel.
Use the proper cable when connecting devices to the V2616A.
CFast Card Socket
The V2616A has a CFast card socket located on the rear panel for
storing the operating system. To install a CFast card, remove the
outer cover, and then insert the CFast card in the socket. When
finished, push the cover into the socket and fasten the screws.
Note that the operating system (Linux or Windows Embedded
Standard 7) has already been stored on the CFast card. If you
change the CFast card, you will need to re-install the V2616A’s
operating system. Refer to the System Recovery Section in the
Software User's Manual for details.
USB Ports
The V2616A has one USB port with an M12 X-coded connector, and
two USB ports with type A connectors on the rear panel. These USB
Содержание
- Attention 1
- Connector description 1
- Installing the v2616a 1
- Overview 1
- Package checklist 1
- Quick installation guide 1
- Second edition february 2015 1
- V2616a panel layout 1
- V2616a series 1
- V2616a seriesquick installation guide 1
- Attention 2
- Configuring the ethernet interface 2
- Iface eth0 inet static auto eth0 allow hotplug eth0 iface eth0 inet dhcp iface eth0 inet6 dhcp iface eth0 inet6 auto 2
- Iface eth1 inet static address 2
- Moxa ifdown a 2
- Moxa sync ifup a 2
- Moxa vi etc network interfaces 2
- Network 192 68 netmask 255 55 55 2
Похожие устройства
- Moxa V2616A-C5-CT-LX Руководство по программной части (Linux)
- Moxa V2616A-C5-CT-W7E Инструкция по эксплуатации
- Moxa V2616A-C5-CT-W7E Руководство по аппаратной части
- Moxa V2616A-C5-CT-W7E Руководство по быстрой установке
- Moxa V2616A-C5-CT-W7E Технические характеристики
- Moxa V2616A-C5-CT-W7E Руководство по программной части (Linux)
- Moxa V2616A-C7-T Инструкция по эксплуатации
- Moxa V2616A-C7-T Руководство по аппаратной части
- Moxa V2616A-C7-T Технические характеристики
- Moxa V2616A-C7-T Руководство по программной части (Linux)
- Moxa V2616A-C7-T Руководство по быстрой установке
- Moxa V2616A-C7-T-LX Инструкция по эксплуатации
- Moxa V2616A-C7-T-LX Руководство по аппаратной части
- Moxa V2616A-C7-T-LX Технические характеристики
- Moxa V2616A-C7-T-LX Руководство по быстрой установке
- Moxa V2616A-C7-T-LX Руководство по программной части (Linux)
- Moxa V2616A-C7-T-W7E Инструкция по эксплуатации
- Moxa V2616A-C7-T-W7E Руководство по аппаратной части
- Moxa V2616A-C7-T-W7E Технические характеристики
- Moxa V2616A-C7-T-W7E Руководство по быстрой установке