
Moxa W341-LX Руководство по аппаратной части онлайн
– 1 – – 2 – – 3 –
P/N: 1802003116015
W321/341-LX
Quick Installation Guide
Sixth Edition, April 2013
1. Overview
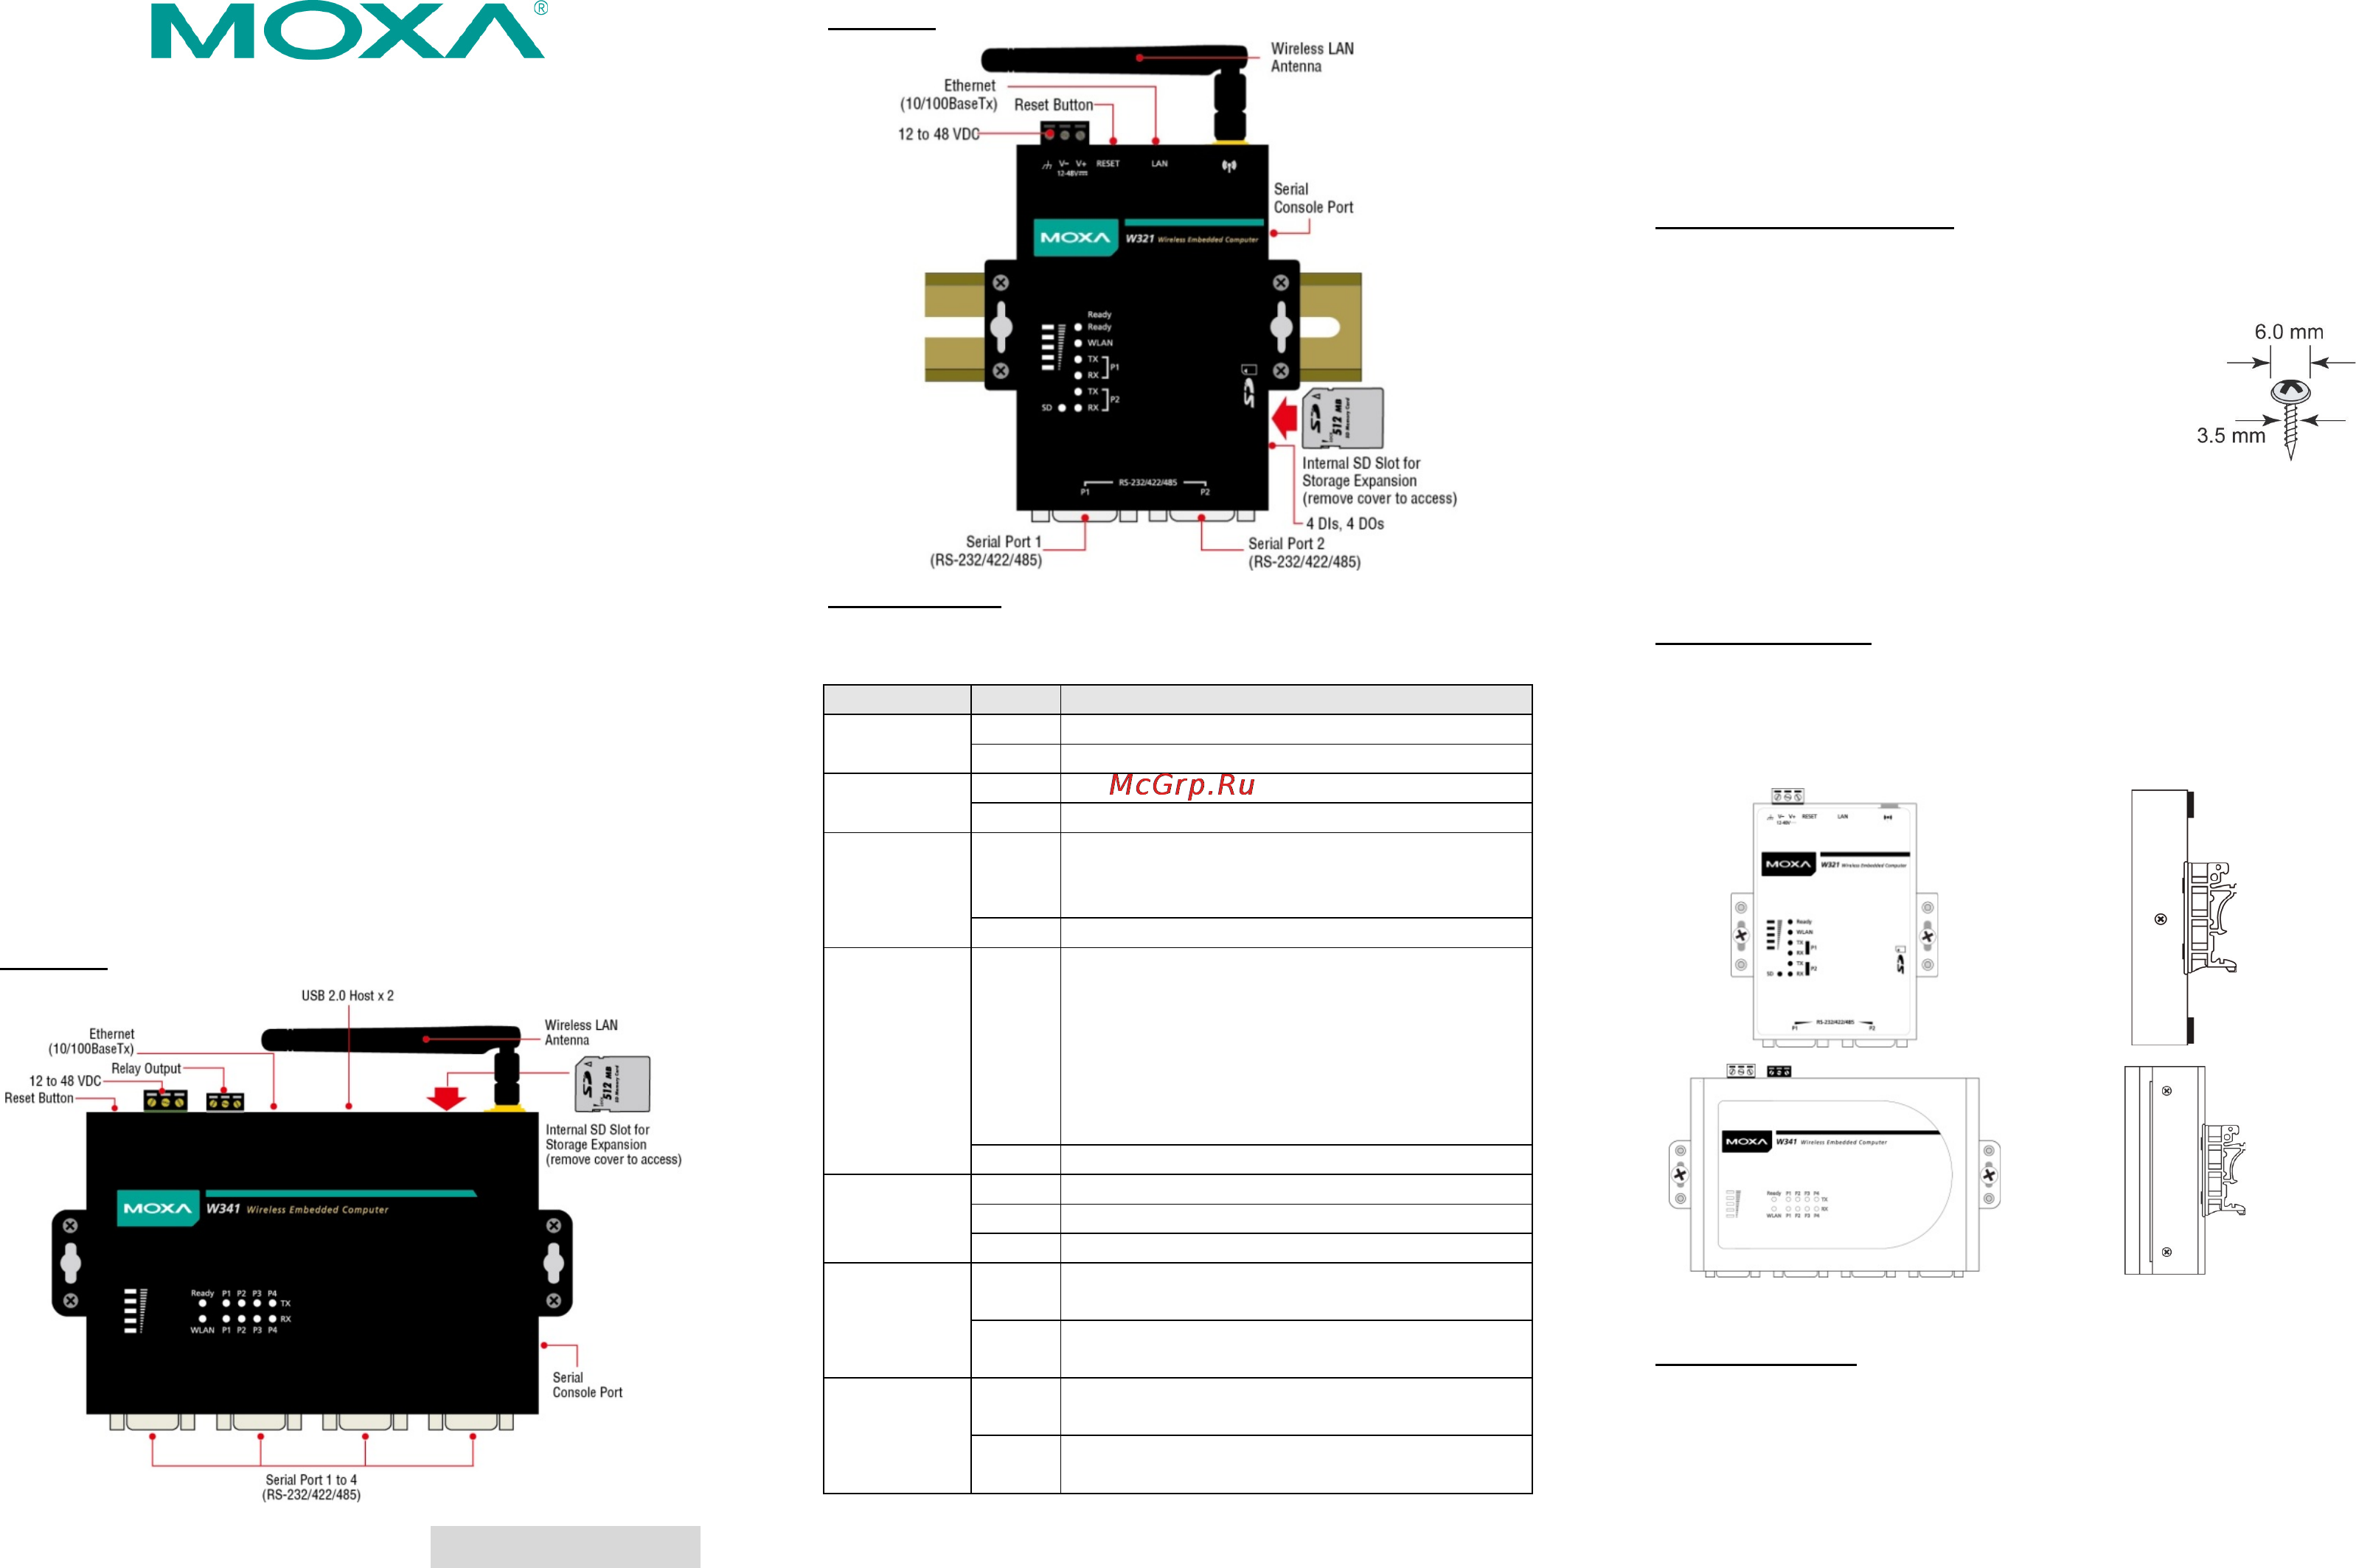
The W321/341 embedded computers feature 2 or 4
RS-232/422/485 serial ports, 1 Ethernet port, 4 DI/DO (W321
only), an embedded 802.11 b/g/n wireless LAN module, and an SD
socket interface for storage expansion, making the W321/341
ideal for compact, wireless embedded applications.
2. Package Checklist
Please verify that the package contains the following items:
• 1 W321/341 embedded computer
• Quick Installation Guide
• Document & Software CD
• Ethernet Cable: RJ45 to RJ45 cross-over cable, 100 cm
• CBL-4PINDB9F-100: 4-pin header to DB9 female console port
cable, 100 cm
• WLAN Antenna
• Universal Power Adaptor
• Product Warranty Statement
Optional Accessories
• 35 mm DIN rail Mounting Kit (DK-35A)
3. W321/341 Panel Layout
W341-LX
W321-LX
LED Indicators
The following table describes the LED indicators located on the
front panel of the W321/341.
LED Name
Color
LED Function
Ready
Green
Power is on and functioning normally
Off
Power is off or power failure
SD
Green
SD card detected
Off
No SD card detected
WLAN
Green
ON: WLAN is ready
Blinking: WLAN IP conflict or DHCP server
not responding
Off
WLAN is not enabled or connection failure
Signal
Strength
(5 LEDs)
Green
Number of glowing LEDs indicates signal
strength:
5: Excellent
4: Very good
3: Good
2: Fair
1: Bad
Off
No signal
LAN
Orange
10 Mbps Ethernet link
Green
100 Mbps Ethernet link
Off
Disconnected or short circuit
TxD
(P1-P4)
Green
Serial port (1-2 for W321, 1-4 for W341)
transmitting data
Off
Serial port(1-2 for W321, 1-4 for W341) not
transmitting data
RxD
(P1-P4)
Yellow
Serial port (1-2 for W321, 1-4 for W341)
receiving data
Off
Serial port (1-2 for W321, 1-4 for W341) not
receiving data
If you find a weak wireless communication (where the signal
strength indicates “Bad”), we suggest you install the W321/341
computers at some other place within a stronger wireless signal
range, or boost the signal by installing another wireless access
point or bridge.
4. Installing the W321/341
Wall or Cabinet Mounting
The W321 have built
-in “ears” for attaching the embedded
computers to a wall or the inside of a cabinet. We suggest using
two screws per ear to attach the W3
21/341 to a
wall or cabinet.
The
heads of the screws should be less than 6.0
mm in diameter, and the shafts should be less
than 3.5 mm in diameter, as shown by the figure
at the right.
The W341 comes with two metal attachment plates for attaching
the embedded computer to a wall or the
inside of a cabinet. First,
use two screws per bracket to attach the brackets to the rear of the
W341. Next, use two screws per bracket to attach the W341 to a
wall or cabinet.
DIN Rail Mounting
DIN rail attachments can be purchased separately to attach the
product to a DIN rail. When snapping the clips onto the DIN rail,
make sure that the stiff metal springs are at the top.
Wall or Mounting
DIN rail Mounting
5. Connector Description
Power Connector
Connect the 12 to 48 VDC LPS or Class 2 power line to the
W321/341’s terminal block. If the power is properly supplied, the
Power LED will light up. The OS is ready when the Ready LED
glows a solid green.
Содержание
- Connector description 1
- Installing the w321 341 1
- Overview 1
- Package checklist 1
- Quick installation guide 1
- Sixth edition april 2013 1
- W321 341 lx 1
- W321 341 lxquick installation guide 1
- W321 341 panel layout 1
- Attention 2
- Configuring the ethernet interface 2
- Connecting the w321 341 to a pc 2
- Powering on the w321 341 2
Похожие устройства
- Moxa W341-LX Руководство по работе с утилитой Moxa Device Manager
- Moxa W315A-LX Инструкция по эксплуатации
- Moxa W315A-LX Руководство по программной части
- Moxa W315A-LX Технические характеристики
- Moxa W315A-LX Руководство по аппаратной части
- Moxa W315A-LX Руководство по работе с утилитой Moxa Device Manager
- Moxa W325A-LX Инструкция по эксплуатации
- Moxa W325A-LX Руководство по аппаратной части
- Moxa W325A-LX Технические характеристики
- Moxa W325A-LX Руководство по программной части
- Moxa W325A-LX Руководство по работе с утилитой Moxa Device Manager
- Moxa W406-LX Инструкция по эксплуатации
- Moxa W406-LX Руководство по программной части
- Moxa W406-LX Руководство по аппаратной части
- Moxa W406-LX Технические характеристики
- Moxa W406-LX Руководство по созданию резервированных сетей
- Moxa W406-T-LX Инструкция по эксплуатации
- Moxa W406-T-LX Руководство по аппаратной части
- Moxa W406-T-LX Технические характеристики
- Moxa W406-T-LX Руководство по программной части