![Yamaha LP-255 Black [2/2] Подключите разъем кабеля педалей к инструменту](/img/pdf.png)
Yamaha LP-255 Black [2/2] Подключите разъем кабеля педалей к инструменту
![Yamaha LP-255 Black [2/2] Подключите разъем кабеля педалей к инструменту](/views2/1212169/page2/bg2.png)
2
3
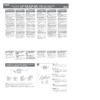
x Fix the pedal unit to the keyboard stand.
x-1 Attach the angle bracket (u) to the lower side of pre-
assembled stand part B (see Illustration
x-1), using the
short screws (r).
x-2
Fit the assembled pedal unit between stand parts
B
and into
the recesses in the stand bases (see Illustration
x
-2
), to
cover the angle brackets
(u)
attached in step
x
-1
from
above.
• If you have difficulty in fitting the pedal unit into the keyboard
stand, slightly loosen the six screws securing stand part A
(see Illustration x-2).
x-3
Fix the pedal unit from the rear, using the four thin screws (
t
).
x Prenda a unidade de pedal à mesa do
teclado.
x-1 Encaixe o suporte angular (u) na lateral inferior da peça da
mesa pré-montada B (consulte a ilustração
x-1) usando os
parafusos curtos (
r).
x-2 Coloque a unidade de pedal montada entre as peças da mesa
B e nas reentrâncias nas bases da mesa (consulte a ilustração
x-2), para cobrir os suportes angulares (u) encaixados na
etapa
x-1 de cima para baixo.
• Se tiver dificuldade para encaixar a unidade de pedal na
mesa do teclado, solte um pouco os seis parafusos que
estão prendendo a peça A da mesa (consulte a ilustração
x-2).
x-3 Prenda a unidade de pedal a partir da parte posterior usando
os quatro parafusos finos (
t).
x Fissare la pedaliera sul supporto della
tastiera.
x-1 Fissare la staffa ad angolo (u) sul lato inferiore della parte
del supporto premontata B (vedere la figura
x-1),
utilizzando le viti corte (
r).
x-2 Montare la pedaliera assemblata tra le parti del supporto B e
negli incavi nelle basi del supporto (vedere la figura
x-2), per
coprire le staffe ad angolo (
u) fissate al punto x-1 sopra.
• In caso di difficoltà quando si fissa la pedaliera sul supporto
della tastiera, allentare leggermente le sei viti di fissaggio
della parte A del supporto (vedere la figura x-2).
x-3 Fissare la pedaliera dalla parte posteriore, utilizzando le
quattro viti sottili (
t).
x Прикрепите блок педалей к подставке
для инструмента.
x-1 При помощи коротких винтов (r) установите угловую
скобу (
u) на нижнюю часть собранной стойки, деталь B
(см. рис
x-1).
x-2 Установите собранный блок педалей между стойками
(деталь В) в пазы в опорах (см. рис.
x-2) так, чтобы он
накрыл собой угловые скобы (
u), установленные на
предыдущем этапе
x-1.
• Если блок педалей не получается установить в
подставку, слегка ослабьте шесть винтов, крепящих
деталь подставки A (см. рис. x-2).
x-3 Закрепите блок педалей сзади при помощи четырех
тонких винтов (
t).
NOTE
HINWEIS
OBSERVAÇÃO
ПРИМЕЧАНИЕ
c Conecte o plugue do cabo do pedal ao
teclado.
c-1 Insira o plugue do cabo do pedal na saída [PEDAL UNIT],
na parte posterior do teclado.
c-2 Encaixe os prendedores de cabo na mesa e depois prenda
o cabo nos prendedores. Para saber quais são os locais
recomendados para os prendedores do cabo, consulte a
ilustração c.
• Para obter informações sobre a montagem do teclado, consulte o
Manual do Proprietário fornecido com o teclado ou as Instruções de
montagem fornecidas com a mesa do teclado.
c Collegare lo spinotto del cavo del pedale
alla tastiera.
c-1 Inserire lo spinotto del cavo del pedale nella presa
[PEDAL UNIT] nella parte posteriore della tastiera.
c-2 Fissare i fermacavi al supporto e agganciare il cavo ai
fermacavi. Per le posizioni dei fermacavi consigliate, fare
riferimento alla figura c.
• Per informazioni sull’assemblaggio della tastiera, fare riferimento al
Manuale di istruzioni fornito con la tastiera o alle Istruzioni per
l’assemblaggio fornite con il supporto della tastiera.
c Подключите разъем кабеля педалей к
инструменту.
c-1 Вставьте разъем кабеля блока педалей в гнездо
[PEDAL UNIT] на задней панели инструмента.
c-2 Прикрепите держатели для кабеля к стойке и
защелкните кабель в держателях. Рекомендуемые
места установки держателей показаны на рис. c.
• Информация о сборке инструмента представлена в руководстве
пользователя, поставляемом с инструментом, или в инструкциях
по сборке, поставляемых с подставкой для инструмента.
c 페달 코드 플러그를 건반에 연결합니다.
c-1 페달 코드 플러그를 건반 뒤쪽에 위치한 [PEDAL UNIT]
잭에 꽂습니다.
c-2 코드 홀더를 스탠드에 부착한 뒤 코드를 홀더에 끼웁니
다. 코드 홀더의 권장 위치는 그림
c을 참고하십시오.
•
건반
조립
방법은
건반과
함께
제공된
사용설명서
또는
건반
스탠드와
함께
제공된
조립
지침을
참고하십시오
.
HINWEIS
OBSERVAÇÃO
NOTE
ПРИМЕЧАНИЕ
c-1
c-2
c
Connect the pedal cord plug to the
keyboard.
c-1 Insert the pedal cord plug into the [PEDAL UNIT] jack on
the rear of the keyboard.
c-2 Attach the cord holders to the stand, and then clip the cord
into the holders. For the recommended locations for the
cord holders, refer to Illustration c.
• For information on keyboard assembly, refer to the Owner’s Manual
supplied with the keyboard, or the Assembly Instructions supplied with
the keyboard stand.
NOTE
• The location or the angle of the [PEDAL UNIT] jack may differ
depending on your keyboard.
• A localização ou o ângulo da saída [PEDAL UNIT] pode ser
diferente, dependendo do teclado.
• La posizione o l’angolo della presa [PEDAL UNIT] può essere
diverso a seconda della tastiera utilizzata.
• Расположение или угол установки разъема [PEDAL UNIT]
может отличаться в зависимости от модели инструмента.
•
[PEDAL UNIT] 잭의 위치나 각도는 건반에 따라 다를 수 있습니다.
r Short screws
Parafusos curtos
Viti corte
Короткие винты
짧은 나사
v Secure the pedal section.
Move the instrument to the place you intend to use it.
Then, while holding down the pedals so that the bottom of the
pedal section (w) comes in firm contact with the floor, firmly tighten
the two long screws (e) temporarily fastened in step z.
v Prenda a seção do pedal.
Coloque o instrumento onde será usado.
Em seguida, mantendo os pedais pressionados para que a parte
inferior da seção do pedal (w) fique totalmente em contato com o
chão, aperte firmemente os dois parafusos longos (e) que foram
presos temporariamente na etapa z.
v 페달 섹션을 고정시킵니다.
악기를 사용할 위치로 옮깁니다. 그런 다음 페달 섹션(w)이 바
닥과 완전히 맞닿을 만큼 페달을 누른 상태에서
z단계에서 임시로
조여두었던 긴 나사(
e) 두 개를 단단히 조입니다.
4
v Fissare la sezione del pedale.
Positionnez l'instrument à l'emplacement où vous souhaitez
l'utiliser.
Maintenez ensuite les pédales enfoncées de sorte que la partie
inférieure de la pédale (w) soit bien appuyée au sol et resserrez
fermement les deux vis longues (e) que vous aviez temporairement
fixées à l'étape z.
v Закрепите педальный узел.
Установите инструмент в то место, где он будет
использоваться.
Затем, нажав на педали так, чтобы низ педального узла
(w) был плотно прижат к полу, плотно затяните два длинных
винта (e), которые применялись для временного крепления
на этапе z.
x-1
x-2
x-3
t Thin screws
Parafusos finos
Viti sottili
Тонкие винты
가는 나사
Information for Users on Collection and Disposal of Old Equipment
This symbol on the products, packaging, and/or accompanying documents
means that used electrical and electronic products should not be mixed with
general household waste.
For proper treatment, recovery and recycling of old products, please take
them to applicable collection points, in accordance with your national
legislation and the Directives 2002/96/EC.
By disposing of these products correctly, you will help to save valuable resources and prevent
any potential negative effects on human health and the environment which could otherwise
arise from inappropriate waste handling.
For more information about collection and recycling of old products, please contact your local
municipality, your waste disposal service or the point of sale where you purchased the items.
[For business users in the European Union]
If you wish to discard electrical and electronic equipment, please contact your dealer or
supplier for further information.
[Information on Disposal in other Countries outside the European Union]
This symbol is only valid in the European Union. If you wish to discard these items, please
contact your local authorities or dealer and ask for the correct method of disposal.
(weee_eu_en_01)
Informações para usuários sobre a coleta e o descarte de equipamentos
antigos
Este símbolo, exibido em produtos, pacotes e/ou em documentos auxiliares,
significa que os produtos elétricos e eletrônicos usados não devem ser
misturados ao lixo doméstico geral.
Para tratamento, recuperação e reciclagem apropriados de produtos antigos,
leve-os até os pontos de coleta aplicáveis de acordo com a sua legislação
nacional e com as Diretivas 2002/96/EC.
Ao descartar estes produtos corretamente, você ajudará a economizar valiosos recursos e
evitará qualquer potencial efeito negativo sobre a saúde humana e sobre o ambiente que,
caso contrário, poderia ocorrer devido à manipulação inadequada do lixo.
Para obter mais informações sobre a coleta e a reciclagem de produtos antigos, entre em
contato com a sua câmara municipal, com o serviço de coleta e de tratamento de lixo ou com
o ponto de venda onde os itens foram adquiridos.
[Para usuários comerciais da União Européia]
Se você deseja descartar equipamento elétrico ou eletrônico, entre em contato com o seu
fornecedor para obter mais informações.
[Informações sobre descarte em outros países fora da União Européia]
Este símbolo só é válido na União Européia. Se você deseja descartar estes itens, entre em
contato com as autoridades locais ou com o seu fornecedor e pergunte qual é o método de
descarte correto.
(weee_eu_pt_01)
Informazioni per gli utenti sulla raccolta e lo smaltimento di vecchia
attrezzatura
Questo simbolo sui prodotti, sull’imballaggio e/o sui documenti che li
accompagnano significa che i prodotti elettrici ed elettronici non dovrebbero
essere mischiati con i rifiuti domestici generici.
Per il trattamento, recupero e riciclaggio appropriati di vecchi prodotti, li porti,
prego, ai punti di raccolta appropriati, in accordo con la Sua legislazione
nazionale e le direttive 2002/96/CE.
Smaltendo correttamente questi prodotti, Lei aiuterà a salvare risorse preziose e a prevenire
alcuni potenziali effetti negativi sulla salute umana e l'ambiente, che altrimenti potrebbero
sorgere dal trattamento improprio dei rifiuti.
Per ulteriori informazioni sulla raccolta e il riciclaggio di vecchi prodotti, prego contatti la Sua
amministrazione comunale locale, il Suo servizio di smaltimento dei rifiuti o il punto vendita
dove Lei ha acquistato gli articoli.
[Per utenti imprenditori dell'Unione europea]
Se Lei desidera disfarsi di attrezzatura elettrica ed elettronica, prego contatti il Suo rivenditore
o fornitore per ulteriori informazioni.
[Informazioni sullo smaltimento negli altri Paesi al di fuori dell'Unione europea]
Questo simbolo è valid0 solamente nell'Unione Europea. Se Lei desidera disfarsi di questi
articoli, prego contatti le Sue autorità locali o il rivenditore e richieda la corretta modalità di
smaltimento.
(weee_eu_it_01)
e
Keyboard Stand
Mesa do teclado
Supporto tastiera
Подставка для инструмента
건반 스탠드
u Angle brackets
Suportes angulares
Staffe ad angolo
Угловые скобы
앵글 브래킷
Pedal Unit
Unidade de pedal
Pedaliera
Блок педалей
페달 장치
B
B
u u
Recesses
Reentrâncias
Incavi
Пазы
홈
Stand bases
Bases da mesa
Basi del supporto
Основания
스탠드 받침대
A
Fixing screws for stand part A
Parafusos de fixação para a
peça A da mesa
Viti di fissaggio per la parte del
supporto A
Крепежные винты детали А
подставки
스탠드
부품
A
용
고정
나사
(Rear view)
(vista posterior)
(vista posteriore)
(вид сзади)
(후면)
t
A
x 페달 장치를 건반 스탠드에 고정시킵니다.
x-1 짧은 나사(r)를 사용하여 미리 조립해둔 스탠드 부분 B
(그림
x-1)의 측면 하부에 앵글 브래킷(u)을 부착합
니다.
x-2 조립한 페달 장치를 스탠드 부분 B 사이에 고정시키고 스
탠드 받침대에 있는 홈(그림
x
-2
)에 끼워 넣어 위의
x
-
1
단계에서 부착한 앵글 브래킷(u)을 가립니다.
•
페달
장치가
건반
스탠드에
잘
끼워지지
않을
때는
스탠드
부분
A(
그림
x
-2
)
를
고정하고
있는
나사
여섯
개를
살짝
느슨하게
풀어주십시오
.
x-3 가는 나사(t) 네 개를 사용하여 페달 장치를 뒤에서 고정
시킵니다.
w
Содержание
- Для сборки используются элементы показанные на рисунке детали для сборки в соответствии с инструкцией отберите необходимые компоненты p.1
- Saranno utilizzati i componenti mostrati nell illustrazione minuteria seguire le istruzioni per l assemblaggio e selezionare i componenti a seconda di quanto indicato p.1
- Montare il supporto su un pavimento duro e piatto con ampio spazio p.1
- 에 장착합니다 이때 나사 구멍 이 없는 측면이 전면을 향해야 합니다 p.1
- En pt it ru ko p.1
- Для защиты напольного покрытия положите под педали коврик при длительном использовании педали могут повредить напольное покрытие p.1
- Read these precautions carefully before you assemble or use the pedal unit p.1
- Montare il pannello di montaggio sulla sezione del pedale p.1
- 에 임시로 뒤쪽으로부터 고정시킵니다 p.1
- Cuidado para não confundir as peças verifique se todas estão instaladas na direção correta monte de acordo com a sequência descrita a seguir p.1
- Детали для сборк p.1
- Queste indicazioni servono per assicurare un utilizzo sicuro della pedaliera e per evitare lesioni o danni alle persone seguendo queste indicazioni con attenzione sarà possibile utilizzare la pedaliera in modo sicuro e a lungo tenere questo manuale in un luogo sicuro e comodo per un riferimento futuro p.1
- Make sure all screws have been securely tightened before use if not the pedal unit may come off causing damage to the unit or injury to the user p.1
- 에 끼운 뒤 페달 섹션 p.1
- Cuidado p.1
- Proteggere il pavimento posizionando una stuoia o un tappeto sotto i pedali i pedali potrebbero danneggiare il pavimento se usati per un periodo di tempo prolungato p.1
- Lp 255 p.1
- 두 개를 스페이서 p.1
- Coloque uma esteira ou um tapete embaixo dos pedais para proteger o piso os pedais podem danificar o piso após um período prolongado p.1
- Данные предостережения представлены для безопасного использования блока педалей а также для предотвращения травм и повреждений для безопасной и продолжительной эксплуатации блока педалей неукоснительно соблюдайте эти правила сохраните настоящее руководство на будущее в безопасном и удобном месте p.1
- Protect the floor by placing a mat or area rug underneath the pedals the pedals may damage the floor after an extended period of time p.1
- Leia estas precauções cuidadosamente antes de montar ou utilizar a unidade de pedal p.1
- 긴 판 p.1
- Coloque a placa longa q na seção do pedal w com o lado da placa sem furos de parafuso para frente p.1
- Вставьте два длинных винта e во втулки y и временно прикрепите этими винтами педальный узел w к панели q сзади p.1
- Procurarsi un cacciavite a croce della misura appropriata p.1
- Leggere attentamente le seguenti indicazioni prima di montare o utilizzare la pedaliera p.1
- 긴 나사 p.1
- Caution p.1
- Внимательно прочитайте эти предостережения перед сборкой или использованием блока педалей p.1
- Prestare attenzione a non confondere i componenti e assicurarsi di installarli tutti correttamente seguendo le istruzioni nell ordine indicato p.1
- Italiano p.1
- Эксплуатировать блок педалей допускается только после правильной установки на специально предназначенной для этого подставке для инструмента кроме того перед перемещением инструмента на стол необходимо отключать кабель блока педалей в противном случае этот блок может быть поврежден p.1
- Be careful not to confuse any of the parts and be sure to install all parts in the correct direction please assemble according to the sequence given below p.1
- Внимание p.1
- Posizionare il pannello q sulla sezione del pedale w con il lato del pannello senza fori delle viti rivolto in avanti p.1
- Instale a placa de montagem à seção do pedal p.1
- Установите монтажную панель на педальный узел p.1
- Attenzione p.1
- Utilizzare sempre la pedaliera installata correttamente sul supporto della tastiera specificato assicurarsi inoltre di staccare il cavo del pedale quando si colloca lo strumento su una scrivania o su un tavolo per evitare di danneggiare la pedaliera p.1
- Insira os dois parafusos longos e pelos espaçadores y e em seguida prenda temporariamente a seção do pedal w à placa q a partir da parte posterior usando esses parafusos p.1
- Установите длинную панель q на педальный узел w при этом сторона панели без отверстий под винты должна быть обращена вперед p.1
- Assembly parts peças de montagem minuteria p.1
- Use only the screws provided when assembling the pedal unit use of any other screws may result in an inadequate assembly that may cause damage to both the keyboard stand and the pedal unit p.1
- Português p.1
- 주의 p.1
- Insert the two long screws e through the spacers y and then temporarily secure the pedal section w to the board q from the rear using these screws p.1
- Собирайте стойку на твердой и плоской поверхности пола при наличии достаточного свободного места p.1
- Assembly instructions istruzioni per l assemblaggio instructions pour le montage инструкции по сборке p.1
- To disassemble reverse the assembly sequence given below p.1
- Per lo smontaggio invertire l ordine delle istruzioni riportate di seguito p.1
- 조립 지침 p.1
- Inserire le due viti lunghe e attraverso i distanziatori y quindi fissare temporaneamente la sezione del pedale w al pannello q dalla parte posteriore utilizzando queste viti p.1
- Русский p.1
- Assemble the stand on a hard and flat floor with ample space p.1
- These precautions are to promote safe use of the pedal unit and to prevent injury and damage from occurring to you and others by following these precautions carefully you will be able to get long and safe usage from your pedal unit please keep this manual in a safe and handy place for future reference p.1
- Pedal unit unidade de pedal pedaliera блок педалей 페달 장치 p.1
- 조립 부품 p.1
- Have a phillips head screwdriver of the appropriate size ready p.1
- Разборка блока выполняется в обратном порядке p.1
- Always use the pedal unit properly installed on the specified keyboard stand also make sure to unplug the pedal cord when putting the instrument on a desk or table since leaving it connected can damage the pedal unit p.1
- The parts shown in the assembly parts illustration will be used follow the assembly instructions and select the parts as needed p.1
- Pedal unit assembly p.1
- 적합한 크기의 십자 드라이버를 준비 하십시오 p.1
- Garanta que todos os parafusos estejam apertados adequadamente antes de usar do contrário a unidade de pedal pode sair causando danos à unidade ou lesão ao usuário p.1
- При сборке применяйте только винты входящие в комплект поставки блока педалей использование других винтов может привести к неправильной сборке и вызвать повреждение подставки для инструмента и блока педалей p.1
- Accertarsi che tutte le viti siano serrate saldamente prima dell uso in caso contrario la pedaliera potrebbe staccarsi danneggiando l unità e ferendo l utente p.1
- Tenha à mão uma chave phillips com cabeça em de tamanho adequado p.1
- Para montar a unidade de pedal use apenas os parafusos fornecidos usar qualquer outro parafuso pode resultar em uma montagem inadequada podendo causar danos à mesa do teclado e à unidade de pedal p.1
- Fissare la pedaliera utilizzando esclusivamente le viti fornite l uso di altre viti può comportare un assemblaggio non corretto con conseguenti danni al supporto della tastiera e alla pedaliera p.1
- Подготовьте крестовую отвертку соответствующего размера p.1
- Set the long board q onto the pedal section w with the side of the board not having screw holes facing front p.1
- Para desmontar basta inverter a sequência de montagem descrita a seguir p.1
- 장착판을 페달 섹션에 장착합니다 p.1
- Перед началом использования блока убедитесь что все винты плотно затянуты если винты ослаблены блок педалей может отсоединиться что приведет к его повреждению или травмированию пользователя p.1
- Serão usadas as peças ilustradas na imagem peças de montagem siga as instruções de montagem e selecione as peças conforme necessário p.1
- Mount the mounting board to the pedal section p.1
- 을 페달 섹션 p.1
- Estas precauções têm a finalidade de promover o uso seguro da unidade de pedal e evitar ferimentos e danos a você e a outras pessoas seguindo as precauções cuidadosamente você poderá usar a mesa do seu teclado por muito tempo e com segurança mantenha este manual em um lugar seguro e conveniente para referência futura p.1
- Не перепутайте детали блока и устанавливайте их в правильной ориентации выполняйте сборку согласно следующей инструкции p.1
- Sempre use a unidade de pedal instalada corretamente na mesa do teclado especificada lembre se também de desconectar o fio do pedal ao colocar o instrumento em uma mesa doméstica ou de escritório já que deixá lo conectado pode danificar a unidade de pedal p.1
- Monte a mesa sobre um piso de superfície dura e plana com amplo espaço p.1
- 을 장착판 p.1
- English p.1
- To cover the angle brackets p.2
- Encaixe os prendedores de cabo na mesa e depois prenda o cabo nos prendedores para saber quais são os locais recomendados para os prendedores do cabo consulte a ilustração c p.2
- Secure the pedal section p.2
- Connect the pedal cord plug to the keyboard p.2
- Prenda a unidade de pedal à mesa do teclado p.2
- Conecte o plugue do cabo do pedal ao teclado p.2
- Prenda a seção do pedal p.2
- Coloque o instrumento onde será usado em seguida mantendo os pedais pressionados para que a parte inferior da seção do pedal w fique totalmente em contato com o chão aperte firmemente os dois parafusos longos e que foram presos temporariamente na etapa z p.2
- Positionnez l instrument à l emplacement où vous souhaitez l utiliser maintenez ensuite les pédales enfoncées de sorte que la partie inférieure de la pédale w soit bien appuyée au sol et resserrez fermement les deux vis longues e que vous aviez temporairement fixées à l étape z p.2
- Collegare lo spinotto del cavo del pedale alla tastiera p.2
- Move the instrument to the place you intend to use it then while holding down the pedals so that the bottom of the pedal section w comes in firm contact with the floor firmly tighten the two long screws e temporarily fastened in step z p.2
- Attached in step p.2
- Insira o plugue do cabo do pedal na saída pedal unit na parte posterior do teclado p.2
- Attach the cord holders to the stand and then clip the cord into the holders for the recommended locations for the cord holders refer to illustration c p.2
- Insert the pedal cord plug into the pedal unit jack on the rear of the keyboard p.2
- Attach the angle bracket u to the lower side of pre assembled stand part b see illustration p.2
- And into the recesses in the stand bases see illustration p.2
- Inserire lo spinotto del cavo del pedale nella presa pedal unit nella parte posteriore della tastiera p.2
- Установите инструмент в то место где он будет использоваться затем нажав на педали так чтобы низ педального узла w был плотно прижат к полу плотно затяните два длинных винта e которые применялись для временного крепления на этапе z p.2
- From above p.2
- Прикрепите держатели для кабеля к стойке и защелкните кабель в держателях рекомендуемые места установки держателей показаны на рис c p.2
- Fix the pedal unit to the keyboard stand p.2
- Прикрепите блок педалей к подставке для инструмента p.2
- Fix the pedal unit from the rear using the four thin screws p.2
- Подключите разъем кабеля педалей к инструменту p.2
- Fit the assembled pedal unit between stand parts p.2
- Закрепите педальный узел p.2
- Fissare la sezione del pedale p.2
- Вставьте разъем кабеля блока педалей в гнездо pedal unit на задней панели инструмента p.2
- Fissare la pedaliera sul supporto della tastiera p.2
- Using the short screws r p.2
- Fissare i fermacavi al supporto e agganciare il cavo ai fermacavi per le posizioni dei fermacavi consigliate fare riferimento alla figura c p.2
Похожие устройства
-
 Yamaha LP-5A WhiteИнструкция по эксплуатации
 -
 Roland SONAR X1 Production SuiteИнструкция 2
 -
 Roland SONAR X1 Production SuiteИнструкция 1
 -
Roland SONAR X1 ProducerИнструкция 2
-
Roland SONAR X1 ProducerИнструкция 1
-
Roland SONAR X1 EssentialИнструкция 2
-
Roland SONAR X1 EssentialИнструкция 1
-
Roland SONAR X1 StudioИнструкция 2
-
Roland SONAR X1 StudioИнструкция 1
-
 Denon DN-C615Руководство пользователя
 -
 BQ PBS1000Инструкция по эксплуатации
 -
 BQ PBS1001Инструкция по эксплуатации