![DJI ronin — руководство пользователя по настройке стабилизатора и управления [19/36]](/img/pdf.png)
DJI ronin — руководство пользователя по настройке стабилизатора и управления [19/36]
![DJI ronin [19/36] Control menu](/views2/1217769/page19/bg13.png)
©
2016 DJI. All Rights Reserved.
19
Ronin
User Manual
1. Gimbal Motor Adjustment
The Auto Tune Stability button allows for automatic adjustment of each motor’s stiffness settings (as relayed
from the sensors and how the Ronin sees each axis’s interaction) to accomplish an optimized setting.
Besides tuning stiffness, there are other electronic settings being tuned. It is highly recommended that the
Auto Tune Stability button be tapped whenever there is a new camera conguration mounted, including a
lens change or accessories change. This will offer the best stability and the most optimal settings.
Each axis has its own stiffness and trim adjustment. The motor stiffness adjustment allows ne tuning of the
amount of power applied to the motors as they react to the balancing of weight on each axis. The higher
you can adjust the stiffness settings without having any vibrations or oscillations from the gimbal, the better.
A majority of the time, the Auto Tuned settings will be suitable. The Trim adjustment controls the preset
amount of trim applied to each axis off center. The default setting of 0 degrees represents center.
2. Gimbal SmoothTrack Mode
Refer to the Basic Settings section for details relating to SmoothTrack Mode (P18).
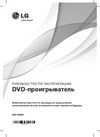
Control Menu
1. Controller Deadband
Thumb Controller and the remote operator controller can have independent pan and tilt deadbands of
movement. The larger the deadband, the more deadband there is in the stick movement prior to the
input being translated to actual movement of the gimbal.
2. Controller Maximum Speed
Maximum Speed is a function that allows the controlled stick response from being a linear response
to what is known as an increasing response curve. This means the amount of gimbal travel in the Pan
or Tilt is not directly proportional to control stick travel. Control response can be adjusted to be milder
below the initial rst half of control stick travel and be increased to a higher speed towards the last
half of control stick travel. This preset exponential curve is selected based off the input of maximum
speed. The thumb controller and the remote operator control sticks can have maximum speeds set
independently from each other.
DJI Ronin Assistant App Tuning
Gimbal Control Viewer More
N/A
Mode:
Wizard
Control
Deadband Maximum Speed
Smoothing Endpoint
Channels Settings
?
Gimbal Control Viewer More
Deadband Adjustment
Thumb
Controller
Remote
Operator
Pan
Tilt
Control
Deadband
6
6
6
6
?
Gimbal Control Viewer More
Control Speed Adjustment
Thumb
Controller
Remote
Operator
Pan
Tilt
Control
Maximum Speed
40
15
15
15
Содержание
- Searching for keywords p.2
- Printing this document p.2
- Navigating to a topic p.2
- Using this manual p.3
- Legend p.3
- Fcc compliance p.3
- Download dji ronin assistant app p.3
- Disclaimers and warnings p.3
- Dji ronin assistant app tuning p.4
- Dji pc mac assistant tuning p.4
- Disclaimers and warnings p.4
- Contents p.4
- Balancing p.4
- Using this manual p.4
- Troubleshooting p.4
- Specification p.4
- Remote control p.4
- Package instruction sheet p.4
- Operation modes p.4
- Maintenance p.4
- Introduction p.4
- In the box p.4
- Gimbal description p.4
- Getting started p.4
- Package instruction sheet p.5
- Introduction p.5
- Instruction sheet p.5
- Gimbal 1 p.6
- Charger 1 p.6
- Tuning stand 1 p.6
- Remote control 2 ghz 1 p.6
- Intelligent battery 1 p.6
- In the box p.6
- Handle bar 1 p.6
- Pin cable 1 p.7
- Micro usb cable 1 p.7
- Extension rod holder 1 p.7
- Camera mounting plate 1 p.7
- Cables 3 p.7
- Adjustable length extension rod 4 p.7
- Accessories package p.7
- Gimbal description getting started p.8
- Gimbal description p.8
- Getting started p.8
- Before you start using your ronin be sure to charge the battery first the intelligent battery is specially designed for the ronin it has a battery capacity of 4350mah voltage of 15 v and power management functionality charge the intelligent battery only with dji approved chargers when the battery is fully charged it has a maximum run time of 6 hours p.8
- Intelligent battery p.8
- Charging the intelligent battery p.9
- Using the intelligent battery p.10
- Tuning stand p.10
- Description of the intelligent battery level indicators p.10
- Installing the handle bar onto the gimbal p.11
- Mounting the camera p.12
- Intelligent battery installation p.12
- Handle bar adjustment p.14
- Balancing p.14
- Step 3 balancing the vertical tilt p.15
- Step 2 balancing the roll axis p.15
- Step 1 balancing the tilt axis p.15
- Step 4 balancing the pan axis p.16
- Advanced roll adjustment p.16
- Basic settings p.17
- Download and install p.17
- Dji ronin assistant app tuning p.17
- Gimbal menu p.18
- Advanced settings p.18
- Control menu p.19
- Roll control p.21
- Restore default settings p.21
- Motor kill p.21
- Is turned on the speed toggle presets for smoothtrack will take precedence over the app settings once the remote control is turned off the smoothtrack settings in the app will take over p.21
- Dji ronin assistant app tuning p.21
- Dji all rights reserved p.21
- Calibrate system p.21
- Calibrate center p.21
- Briefcase mode p.21
- Accounts p.21
- 2 0 0 1 p.21
- Viewer menu p.21
- The viewer provides all the essential live data for monitoring the gimbals electronics as well as feedback from the motors power is indicated for each axis the current angle of each axis is also indicated the voltage of the battery temperature of the main electronics and also current uptime can also be monitored via this menu p.21
- Silent mode p.21
- Ronin user manual p.21
- More menu p.22
- Install dji pc mac assistant p.23
- Dji pc mac assistant tuning p.23
- Will not allow access because assistant has not been reviewed by the mac app store p.24
- When launching for the first time if using launchpad to run the ronin assistant launchpad p.24
- Settings p.24
- Locate the gimbal icon in finder press control then click the icon or right click the icon using a mouse choose open from the shortcut menu then click open in the prompt dialog box to launch 5 after the first successful launch double click the gimbal icon as normal to launch using finder or launchpad p.24
- Upgrade p.28
- Ronin user manual p.29
- Remote control p.29
- Neck strap attachment 9 power switch 10 power indicator 11 battery level indicator 12 rc assistant charging port micro usb port 13 reserved port p.29
- Antenna 2 carrying handle 3 left dial reserved 4 3 position switch mode 5 3 position switch function 6 joystick 1 j1 j2 7 joystick 2 j3 j4 p.29
- Remote control power led indicator status p.30
- Connecting the remote control to ronin p.30
- Bb bb bb p.30
- Remote control features p.31
- Remote control battery level indicator status p.31
- Underslung mode p.32
- Operation modes p.32
- Adding 3rd party transmitter receiver p.32
- Upright mode p.33
- Maintenance p.33
- Briefcase mode p.33
- Troubleshooting p.34
- Specification p.35
- Peripheral p.35
- Mechanical electrical characteristics p.35
- General p.35
- Working performance p.35
- The content is subject to change p.36
- Download the latest version from http www dji com product ronin download p.36
- Dji support http www dji com support p.36
Похожие устройства
-
 DJI ronin-mРуководство по настройке
 -
 DJI ronin-mКраткое руководство пользователя
 -
 DJI ronin-mИнструкция по эксплуатации
 -
 Movie Yeah my skater dollyИнструкция по эксплуатации
 -
 Movie Yeah my steady ultraИнструкция по эксплуатации
 -
Movie Yeah my steady blackИнструкция по эксплуатации
-
 Sven SEB-B270MVИнструкция к устройству
 -
 Xiaomi Mi Bluetooth SpeakerКраткая инструкция по использованию
 -
 Panasonic tx-32csr510Инструкция пользователя
 -
 LG DKS-2000HИнструкция по применению
 -
 LG BP630KРуководство по работе с устройством
 -
 LG LAS950MИнструкция по работе
Узнайте, как оптимально настроить стабилизатор для достижения лучшей стабильности и управления. Подробные инструкции по настройке моторов и режимам работы.