![Tp-Link Archer AX11000 — настройка USB-устройств для доступа в сети [39/129]](/img/pdf.png)
Tp-Link Archer AX11000 — настройка USB-устройств для доступа в сети [39/129]
![Tp-Link Archer AX11000 [39/129] Tablet](/views2/1623876/page39/bg27.png)
35
Chapter 7
USB Settings
Computer
1 ) Open the Windows Explorer (or go to Computer, only for Windows
users) or open a web browser.
2 ) Type the server address in the address bar:
Type in ftp://<WAN IP address of the router>:<port number> (such
as ftp://59.40.2.243:21). If you have specified the domain name
of the router, you can also type in ftp://<domain name>:<port
number> (such as ftp://MyDomainName:21)
3 ) Press Enter on the keyboard.
4 ) Access with the username and password you set in To set up
authentication for data security:.
Tips: You can also access the USB disk via a third-party app for network files management,
which can resume broken file transfers.
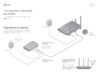
Tablet
Use a third-party app for network files management.
Tips: Click Set Up a Dynamic DNS Service Account to learn how to set up a domain name for you router.
7. 1. 3. Customize the Access Settings
By default, all the network clients can access all folders on your USB disk. You can
customize your sharing settings by setting a sharing account, sharing specific contents
and setting a new sharing address on the router’s web management page.
1. Visit http://tplinkwifi.net, and log in with your TP-Link ID or the password you set for
the router.
2. Go to Advanced > USB > USB Storage Device.
• To customize the address of the USB disk:
You can customize the server name and use the name to access your USB disk.
1. In the Access Method section, make sure Samba for Windows is ticked, and enter a
Network/Media Server Name as you like, such as MyShare, then click SAVE.
Содержание
- User guide p.1
- Contents p.2
- Chapter 7 usb settings 31 p.2
- Chapter 6 guest network 28 p.2
- Chapter 5 tp link cloud service 23 p.2
- Chapter 4 set up internet connection 13 p.2
- Chapter 3 log in to your router 11 p.2
- Chapter 2 connect the hardware p.2
- Chapter 1 get to know about your router p.2
- About this guide p.2
- Chapter 9 network security 48 p.3
- Chapter 10 nat forwarding 54 p.3
- Parental controls qos antivirus 40 p.3
- Chapter 8 homecar p.3
- Chapter 12 customize your network settings 69 p.3
- Chapter 11 vpn server 61 p.3
- Faq 108 p.4
- Chapter 14 game center 102 p.4
- Chapter 13 manage the router 85 p.4
- Use of mu mimo and 1024 qam requires clients to also support those functions p.5
- This guide is a complement of quick installation guide the quick installation guide instructs you on quick internet setup and this guide provides details of each function and shows you the way to configure these functions appropriate to your needs p.5
- Note features available in the router may vary by model and software version router availability may also vary by region or isp all images steps and descriptions in this guide are only examples and may not reflect your actual router experience p.5
- Maximum wireless signal rates are the physical rates derived from ieee standard 802 1 specifications actual wireless data throughput and wireless coverage are not guaranteed and will vary as a result of 1 environmental factors including building materials physical objects and obstacles 2 network conditions including local interference volume and density of traffic product location network complexity and network overhead and 3 client limitations including rated performance location connection quality and client condition p.5
- In this guide the following conventions are used p.5
- Conventions p.5
- Convention description p.5
- About this guide p.5
- Use of wpa3 requires clients to also support wpa3 p.5
- More info p.6
- Get to know about your router p.7
- Chapter 1 p.7
- Product overview p.8
- Panel layout p.8
- 1 top view p.8
- Name status indication p.9
- Led explanation p.9
- Chapter 1 get to know about your router p.9
- 2 the side and back panel p.9
- The following parts view from left to right are located on the rear panel p.10
- Name description p.10
- Item description p.10
- Chapter 1 get to know about your router p.10
- Button description p.10
- Connect the hardware p.11
- Chapter 2 p.11
- Position your router p.12
- Connect your router p.12
- Close to p.14
- Chapter 2 connect the hardware p.14
- Log in to your router p.15
- Set up internet connection p.17
- Chapter 4 p.17
- Use quick setup wizard p.18
- Quick setup via bluetooth with tp link tether app p.18
- Ios android p.19
- Manually set up your internet connection p.19
- Operation mode select access point mode and click p.22
- Click save p.22
- Chapter 4 set up internet connection p.22
- Visit http tplinkwifi net and log in with your tp link id or the password you set for the router p.22
- The router can work as an access point transforming your existing wired network to a wireless one p.22
- Set up the router as an access point p.22
- Save the router will reboot and switch to access point mode p.22
- Set up an ipv6 internet connection p.23
- Tp link cloud service p.27
- Chapter 5 p.27
- Register a tp link id p.28
- Change your tp link id information p.28
- Manage the user tp link ids p.30
- 2 remove tp link id s from managing the router p.30
- 1 add tp link id to manage the router p.30
- Manage the router via the tp link tether app p.31
- Guest network p.32
- Chapter 6 p.32
- Create a network for guests p.33
- Customize guest network options p.34
- Usb settings p.35
- Chapter 7 p.35
- Windows computer p.36
- Network then click the network server name tp share by default in the computer section p.36
- Insert your usb storage device into the router s usb port and then refer to the following table to access files stored on your usb storage device p.36
- Insert your usb storage device into the router s usb port and then access files stored there locally or remotely p.36
- Access the usb storage device p.36
- 1 access the usb device locally p.36
- Windows computer p.37
- Tablet p.37
- 2 access the usb device remotely p.37
- Tablet p.39
- Computer p.39
- 3 customize the access settings p.39
- Media sharing p.41
- Time machine p.42
- Parental controls qos antivirus p.44
- Homecaretm parental controls qos antivirus p.44
- Homecar p.44
- Chapter 8 p.44
- Parental controls p.45
- I want to p.45
- How can i do that p.45
- 1 scenario 1 setting up access restrictions p.45
- I want to p.47
- 2 scenario 2 monitoring internet usage p.47
- How can i do that p.48
- I want to p.49
- How can i do that p.49
- Antivirus p.50
- Chapter 9 p.52
- Network security p.52
- Protect the network from cyber attacks p.53
- I want to p.53
- How can i do that p.53
- Access control p.53
- Ip mac binding p.56
- I want to p.56
- How can i do that p.56
- Nat forwarding p.58
- Chapter 10 p.58
- Share local resources on the internet by port forwarding p.59
- I want to p.59
- How can i do that p.59
- Click view common services and select http the external port internal port and protocol will be automatically filled in p.60
- Click save p.60
- Chapter 10 nat forwarding p.60
- Users on the internet can enter http wan ip in this example http 218 8 32 54 to visit your personal website p.60
- Click view connected devices and select your home pc the device ip address will be automatically filled in or enter the pc s ip address 192 68 00 manually in the device ip address field p.60
- Open ports dynamically by port triggering p.61
- Make applications free from port restriction by dmz p.62
- I want to p.62
- How can i do that p.62
- Router p.63
- Make xbox online games run smoothly by upnp p.63
- Lan wan p.63
- Vpn server p.65
- Chapter 11 p.65
- Use openvpn to access your home network p.66
- Use pptp vpn to access your home network p.67
- Customize your network settings p.73
- Chapter 12 p.73
- Change the lan settings p.74
- Set up link aggregation p.74
- I want to p.75
- How can i do that p.75
- Configure to support iptv service p.75
- Specify dhcp server settings p.76
- Set up a dynamic dns service account p.77
- I want to p.79
- Create static routes p.79
- How can i do that p.80
- Specify wireless settings p.81
- Schedule your wireless function p.84
- Use wps for wireless connection p.85
- 2 connect via the router s pin p.85
- 1 connect via the client s pin p.85
- Use wds to extend network p.86
- 3 push the wps button p.86
- Advanced wireless settings p.87
- Manage the router p.89
- Chapter 13 p.89
- Upgrade the firmware p.90
- 1 online upgrade p.90
- Backup and restore configuration settings p.91
- 2 local upgrade p.91
- Password recovery p.93
- Change the login password p.93
- Local management p.94
- Remote management p.96
- System log p.97
- Test the network connectivity p.99
- Set up system time p.101
- Set the router to reboot regularly p.103
- Control the led p.104
- Test your internet speed p.104
- Game center p.106
- Chapter 14 p.106
- Check key parameters through dashboard p.107
- Boost game speed through game accelerator p.108
- Tp link router skill for alexa p.109
- Vpn server p.110
- Game protector p.110
- Port forwarding p.111
- Game diagnostics p.111
- Q3 what should i do if i cannot log in to the router s web management page p.112
- Q2 what should i do if i forget my web management password p.112
- Q1 what should i do if i forget my wireless password p.112
- Q5 what should i do if i cannot access the internet even though the configuration is finished p.114
- Q4 what should i do if the router can t be found via bluetooth in tether how to reset the router p.114
- Q6 what should i do if i cannot find my wireless network or i cannot connect the wireless network p.118
- Copyright trademarks p.121
- Fcc compliance information statement p.122
- Fcc rf radiation exposure statement p.123
- Fcc compliance information statement p.123
- Rf exposure information p.125
- Operating frequency the maximum transmitted power p.125
- National restrictions p.125
- Eu declaration of conformity p.125
- Ce mark warning p.125
- Canadian compliance statement p.125
- Caution p.126
- Ncc notice bsmi notice p.127
- Korea warning statements p.127
- Industry canada statement p.127
- Déclaration d exposition aux radiations p.127
- Avertissement p.127
- 注意 p.127
- Radiation exposure statement p.127
- 請使用原裝電源供應器或只能按照本產品注明的電源類型使用本產品 p.128
- 請不要私自打開機殼 不要嘗試自行維修本產品 請由授權的專業人士進 行此項工作 p.128
- 產 品 元 件 名 稱 p.128
- 清潔本產品之前請先拔掉電源線 請勿使用液體 噴霧清潔劑或濕布進行 清潔 p.128
- 注意防潮 請勿將水或其他液體潑灑到本產品上 p.128
- 插槽與開口供通風使用 以確保本產品的操作可靠並防止過熱 請勿堵塞 或覆蓋開口 p.128
- 應避免影響附近雷達系統之操作 p.128
- 安全諮詢及注意事項 p.128
- 備考3 系指該項限用物質為排除項目 p.128
- 備考2 系指該項限用物質之百分比含量未超出百分比含量基準值 p.128
- 備考1 超出0 wt 及 超出0 1 wt 系指限用物質之百分比含量超出百分 比含量基準值 p.128
- 高增益指向性天線只得應用於固定式點對點系統 p.128
- Продукт сертифіковано згідно с правилами системи укрсепро на відповідність вимогам нормативних документів та вимогам що передбачені чинними законодавчими актами україни p.128
- 電信規定作業之無線電信 低功率射頻電機需忍受合法通信或工業 科學以及醫 療用電波輻射性電機設備之干擾 p.128
- Safety information p.128
- 限用物質含有情況標示聲明書 p.128
- Keep the device away from water fire humidity or hot environments p.128
- 限用物質及其化學符號 p.128
- 請勿將本產品置放於靠近熱源的地方 除非有正常的通風 否則不可放在 密閉位置中 p.128
- Use only power supplies which are provided by manufacturer and in the original packing of this product if you have any questions please don t hesitate to contact us p.129
- Please read and follow the above safety information when operating the device we cannot guarantee that no accidents or damage will occur due to improper use of the device please use this product with care and operate at your own risk p.129
- Explanations of the symbols on the product label p.129
- Do not use the device where wireless devices are not allowed p.129
- Do not use damaged charger or usb cable to charge the device p.129
- Do not use any other chargers than those recommended p.129
- Do not attempt to disassemble repair or modify the device p.129
- Adapter shall be installed near the equipment and shall be easily accessible p.129
Похожие устройства
-
 Tp-Link Archer C50(RU)Инструкция по эксплуатации
 -
 Tp-Link Archer AX11000Руководство по быстрой установке
 -
 Tp-Link AC2300 MU-MIMO (Archer C2300)Руководство по эксплуатации
 -
 Tp-Link AC1200 (Archer C1200)Руководство по эксплуатации
 -
 Tp-Link 300Mbps 4G LTE (TL-MR6400)Руководство по эксплуатации
 -
 Tp-Link AC5400 MU-MIMO Tri-B.(Archer C5400)Инструкция по эксплуатации
 -
Tp-Link AC1200 (Archer C50)Инструкция по эксплуатации
-
 Tp-Link AC750 4G LTE (Archer MR200)Инструкция по эксплуатации
 -
 Tp-Link 450Mbps (TL-WR940N)Инструкция по эксплуатации
 -
 Tp-Link TL-WR1045NDИнструкция по эксплуатации
 -
 Tp-Link 300Mbps (TL-WR841N)Инструкция по эксплуатации
 -
 Tp-Link Archer A7Руководство по эксплуатации
Узнайте, как настроить доступ к USB-устройствам через сеть. Пошаговые инструкции по настройке и управлению файлами для безопасного обмена данными.