
SilverStone NT03 Инструкция по эксплуатации онлайн
Содержание
Похожие устройства
- SilverStone SST-NT03 Инструкция по эксплуатации
- SilverStone NT06 Инструкция по эксплуатации
- SilverStone SST-NT06 Инструкция по эксплуатации
- SilverStone SST-NT06 инструкция по установке
- SilverStone NT06-E Инструкция по эксплуатации
- SilverStone NT06-E инструкция по установке
- SilverStone SST-NT06-E Инструкция по эксплуатации
- SilverStone SST-NT06-E инструкция по установке
- SilverStone NT06-LITE Инструкция по эксплуатации
- SilverStone NT06-LITE инструкция по установке
- SilverStone SST-NT06-Lite Инструкция по эксплуатации
- SilverStone SST-NT06-Lite инструкция по установке
- SilverStone NT07 Инструкция по эксплуатации
- SilverStone SST-NT07 Инструкция по эксплуатации
- SilverStone NT07-1156 Инструкция по эксплуатации
- SilverStone SST-NT07-1156 Инструкция по эксплуатации
- Pioneer MATRIX Руководство пользователя
- Pioneer MATRIX Инструкция по эксплуатации
- SilverStone NT07-775 Инструкция по эксплуатации
- SilverStone SST-NT07-775 Инструкция по эксплуатации
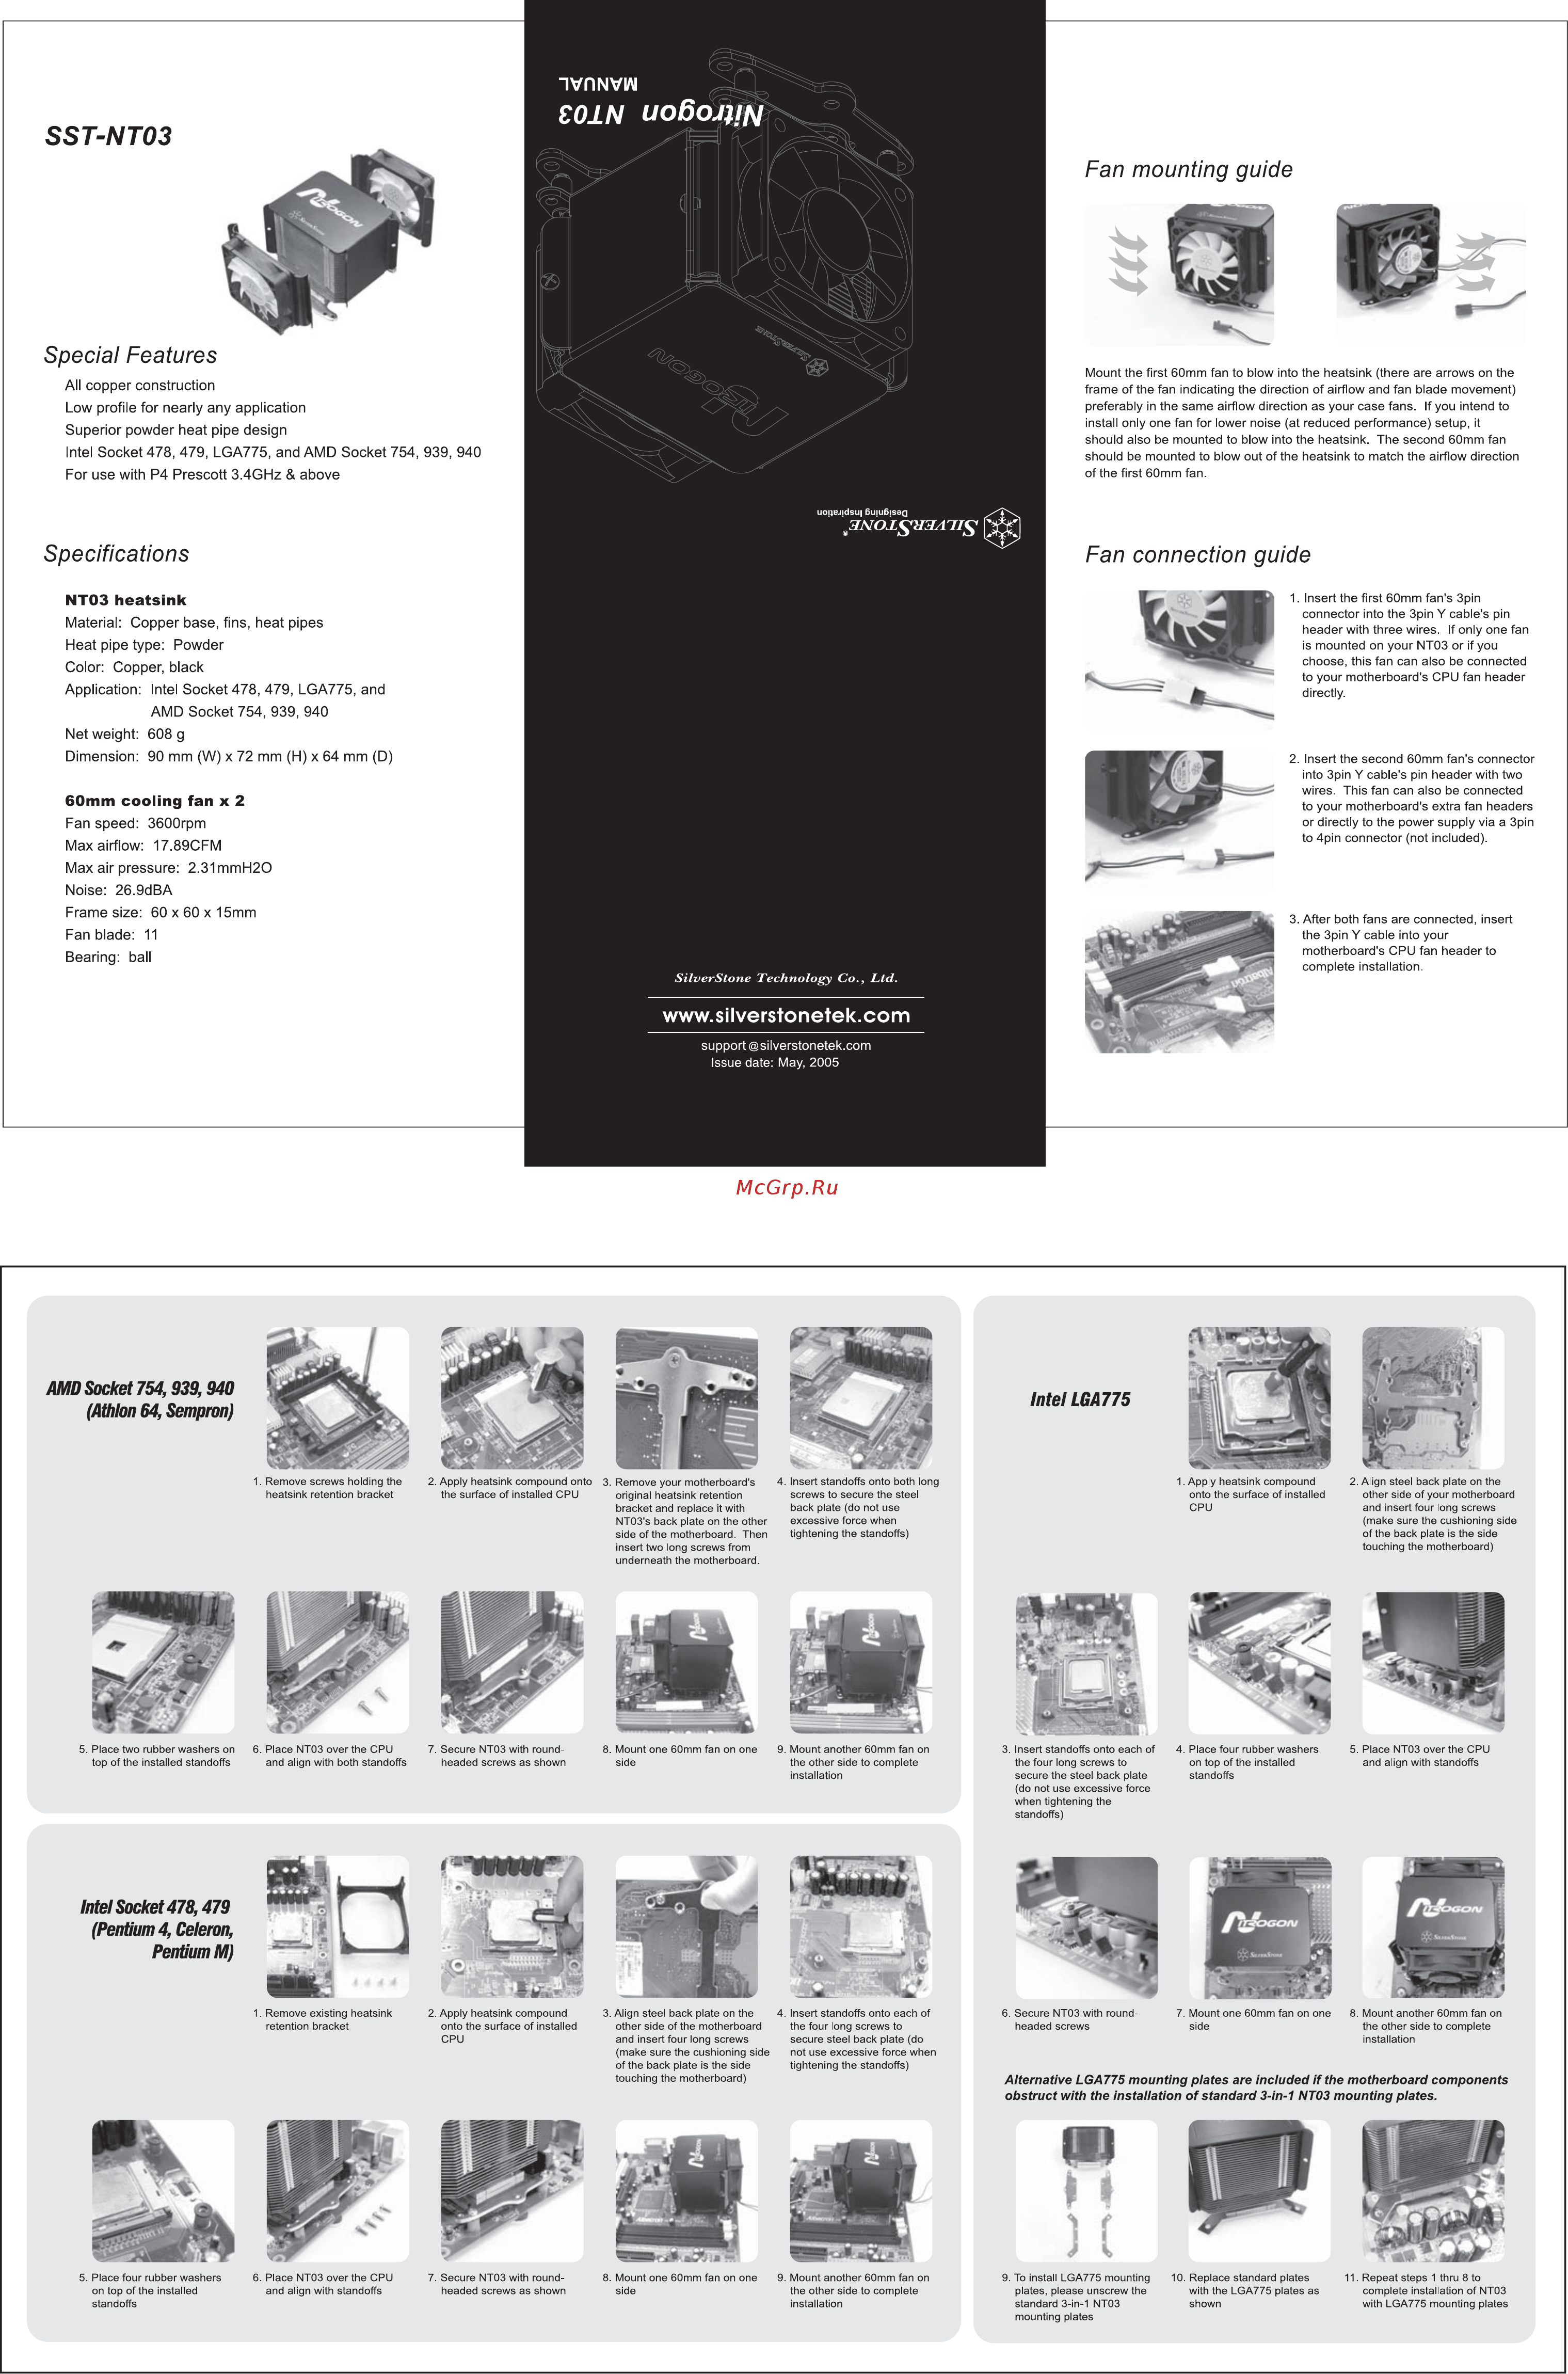
SST NT03 Fan mounting guide Special Features Mount the first 60mm fan to blow into the heatsink there are arrows on the frame of the fan indicating the direction of airflow and fan blade movement preferably in the same airflow direction as your case fans If you intend to install only one fan for lower noise at reduced performance setup it should also be mounted to blow into the heatsink The second 60mm fan should be mounted to blow out of the heatsink to match the airflow direction of the first 60mm fan All copper construction Low profile for nearly any application Superior powder heat pipe design Intel Socket 478 479 LGA775 and AMD Socket 754 939 940 For use with P4 Prescott 3 4GHz above UOUB41dSU ßulußlSBQ Specifications Fan connection guide 1 Insert the first 60mm fan s 3pin connector into the 3pin Y cable s pin header with three wires If only one fan is mounted on your NT03 or if you choose this fan can also be connected to your motherboard s CPU fan header directly NT03 heatsink Material Copper base fins heat pipes Heat pipe type Powder Color Copper black Application Intel Socket 478 479 LGA775 and AMD Socket 754 939 940 Net weight 608 g Dimension 90 mm W x 72 mm H x 64 mm D 2 Insert the second 60mm fan s connector into 3pin Y cable s pin header with two wires This fan can also be connected to your motherboard s extra fan headers or directly to the power supply via a 3pin to 4pin connector not included 60mm cooling fan x 2 Fan speed 3600rpm Max airflow 17 89CFM Max air pressure 2 31 mmH20 Noise 26 9dBA Frame size 60 x 60 x 15mm 3 After both fans are connected insert the 3pin Y cable into your motherboard s CPU fan header to complete installation Fan blade 11 Bearing ball SilverStone Technology Co Ltd www silverstonetek com support silverstonetek com Issue date May 2005 AMD Socket 754 939 940 Intel LGA775 Athlon 64 Sempron 1 Remove screws holding the heatsink retention bracket 5 Place two rubber washers on top of the installed standoffs 6 Place NT03 over the CPU and align with both standoffs 2 Apply heatsink compound onto the surface of installed CPU 7 Secure NT03 with roundheaded screws as shown 3 Remove your motherboard s original heatsink retention bracket and replace it with NT03 s back plate on the other side of the motherboard Then insert two long screws from underneath the motherboard 4 Insert standoffs onto both long screws to secure the steel back plate do not use excessive force when tightening the standoffs 1 Apply heatsink compound onto the surface of installed CPU 8 Mount one 60mm fan on one side 9 Mount another 60mm fan on the other side to complete installation 3 Insert standoffs onto each of the four long screws to secure the steel back plate do not use excessive force when tightening the standoffs 4 Place four rubber washers on top of the installed standoffs 3 Align steel back plate on the other side of the motherboard and insert four long screws make sure the cushioning side of the back plate is the side touching the motherboard 4 Insert standoffs onto each of the four long screws to secure steel back plate do not use excessive force when tightening the standoffs 6 Secure NT03 with roundheaded screws 7 Mount one 60mm fan on one side 2 Align steel back plate on the other side of your motherboard and insert four long screws make sure the cushioning side of the back plate is the side touching the motherboard 5 Place NT03 over the CPU and align with standoffs Intel Socket478 479 Pentium 4 Celeron Pentium M 1 Remove existing heatsink retention bracket 2 Apply heatsink compound onto the surface of installed CPU 8 Mount another 60mm fan on the other side to complete installation Alternative LGA775 mounting plates are included if the motherboard components obstruct with the installation of standard 3 in 1 NT03 mounting plates 5 Place four rubber washers on top of the installed standoffs 6 Place NT03 over the CPU and align with standoffs 7 Secure NT03 with roundheaded screws as shown 8 Mount one 60mm fan on one side 9 Mount another 60mm fan on the other side to complete installation 9 To install LGA775 mounting plates please unscrew the standard 3 in 1 NT03 mounting plates 10 Replace standard plates with the LGA775 plates as shown 11 Repeat steps 1 thru 8 to complete installation of NT03 with LGA775 mounting plates