![Beko RFSK215T01W — установка и подключение холодильника: важные рекомендации [7/44]](/img/pdf.png)
Beko RFSK215T01W — установка и подключение холодильника: важные рекомендации [7/44]
![Beko RFSK215T01W [7/44] Installing the plastic wedges](/views2/1730035/page7/bg7.png)
Содержание
- Морозильник p.1
- Freezer p.1
- This guide will help you use the product quickly and safely p.2
- Please read this manual before using the product p.2
- Подготовка 30 p.3
- Поиск и устранение неисправностей 34 p.3
- Безопасности и защите окружающей среды_______ 22 p.3
- Installation 7 p.3
- Указания по технике p.3
- Описание морозильник 25 p.3
- Обслуживание и очистка 33 p.3
- Your freezer 6 p.3
- Troubleshooting 14 p.3
- Technical specifications 17 p.3
- Safety and environment instructions 4 p.3
- Preparation 10 p.3
- Operating the product 11 p.3
- Maintenance and cleaning 13 p.3
- Эксплуатация морозильника 31 p.3
- Установка 26 p.3
- Технические характеристики 37 p.3
- Safety and environment instructions p.4
- Hc warning p.4
- General safety p.4
- Safety and environment instructions p.5
- Package information p.5
- Intended use p.5
- For models with water fountain p.5
- Compliance with weee directive and disposing of the waste product p.5
- Compliance with rohs directive p.5
- Child safety p.5
- En freezer user manual p.6
- Your freezer p.6
- Installing the plastic wedges p.7
- Installation p.7
- Electrical connection p.7
- Appropriate installation location p.7
- Adjusting the feet p.7
- Installation p.8
- Reversing the doors p.9
- Installation p.9
- Preparation p.10
- Operating the product p.11
- Indicator panel p.11
- High temperature indicator warning p.11
- Freezing fresh food p.11
- Fast freezing indicator p.11
- Fast freezing button p.11
- Temperature setting indicator p.11
- Temperature control button p.11
- Recommendations for preserving the frozen food p.11
- This feature is optional p.12
- Placing the food p.12
- Operating the product p.12
- Ice pack p.12
- Freezer compartment p.12
- Door open warning p.12
- Do not use pointed or sharp edged objects such as knives or forks to remove the frost p.12
- Deep freeze information p.12
- Changing the door opening direction p.12
- Protecting the plastic surfaces p.13
- Maintenance and cleaning p.13
- Avoiding bad odours p.13
- Compressor is not working p.14
- The freezer s operating noise is increasing while in use p.14
- The freezer is not working p.14
- Fl troubleshooting___________________________________ p.14
- En freezer user manual p.14
- Condensation on the side wall of the cooler compartment multi zone cool control and flexi zone p.14
- Troubleshooting p.15
- Thefreezer runs too often orfortoo long p.15
- The temperature in the cooler or the freezer is too high p.15
- The freezer temperature is very low but the cooler temperature is adequate p.15
- The food items kept in cooler compartment drawers are frozen p.15
- The cooler temperature is very low but the freezer temperature is adequate p.15
- Freezer user manual 15 en p.15
- The door is not closing p.16
- Shaking or noise p.16
- If the problem persists after following the instructions in this section contact your vendor or an authorized service do not try to repair the product p.16
- En freezer user manual p.16
- Warning p.16
- Troubleshooting p.16
- There is condensation on the product s internal walls p.16
- There is condensation on the product s exterior or between the doors p.16
- The product is making noise of liquid flowing spraying etc p.16
- The interior smells bad p.16
- Technical specifications p.17
- Rfsk215t01w rfsk215t01s p.17
- Freezer user manual 17 en p.17
- Product fiche p.19
- Freezer user manual 19 en p.19
- Уважаемый покупатель p.21
- Соблюдайте руководство по эксплуатации для быстрого и безопасного использования устройства p.21
- Символы и примечания в руководстве по эксплуатации используются следующие символы p.21
- Ене p.21
- Указания по технике безопасности и защите окружающей среды p.22
- Указания по технике безопасности и защите окружающей среды p.23
- Указания по технике безопасности и защите окружающей среды p.24
- Описание морозильника p.25
- Морозильник руководство по эксплуатации 25 ри p.25
- Установка p.26
- Установка p.27
- Установка p.28
- Установка p.29
- Подготовка p.30
- Эксплуатация морозильника p.31
- Эксплуатация устройства p.32
- Обслуживание и очистка p.33
- Поиск и устранение неисправностей p.34
- Поиск и устранение неисправностей p.35
- Поиск и устранение неисправностей p.36
- Технические характеристики p.37
- Установка и подключение p.38
- Уважаемый покупатель p.38
- Если иные условия не установлены действующим законодательством p.38
- Изделие имеющие трёх контактную вилку шнура питания обязательно должно быть заземлено p.39
- Изготовитель не принимает претензии в следующих случаях p.39
- Гарантия не распространяется на изделия недостатки в которых возникли вследствие p.39
- Внимание p.39
- Потребление электроэнергии ху квт год на основании результатов стандартных испытаний в течение 24 часов фактическое потребление электроэнергии зависит от способа использования изделия и места его расположения самая низкая температура в отделении для хранения вин которую может установить потребитель составляет 5 с в соответствии с указанным климатическим классом данное изделие предназначено для использования в следующих диапазонах температуры окружающей среды климатический класс 5м 10 с и 32 с климатический класс и 1б с и 32 с климатический класс 5т 1б с и 38 с климатический класс т 1 б с и 43 с да p.41
- Поставщик веко веко p.41
- Нет не применимо подготовлено и изложено согласно регламенту ес по энергетической маркировке бытовых холодильных приборов no 1060 2010 p.41
- Нет p.41
- Наименование модели p.41
- Морозильник i руководство по эксплуатации 41 ru p.41
- Карта изделия p.41
- Rfsk215t01w rfsk215t01s p.41
- Ене p.42
- Гарантия 2 года гарантия 2 года p.44
- Гарантия 2 года p.44
- Гарантийный талон серия rus p.44
- Www beko ru p.44
- Beko beko p.44
Похожие устройства
-
 Beko RFSK215T01SИнструкция по эксплуатации
 -
 Stinol STZ 150Инструкция по применению
 -
 Gorenje F6171CSИнструкция по эксплуатации
 -
 Gorenje F6171CWИнструкция по эксплуатации
 -
 Gorenje FN619FPXLИнструкция по эксплуатации
 -
 Gorenje FN619FPBИнструкция по эксплуатации
 -
 Stinol STZ 150Инструкция по эксплуатации
 -
 Gorenje FN4171CWИнструкция по эксплуатации
 -
 Атлант М-7606-090-N Звезд.ПыльИнструкция по эксплуатации
 -
 Атлант М-7606-080-N GreyИнструкция по эксплуатации
 -
 Liebherr GN 3235-20 001Инструкция по эксплуатации
 -
 Liebherr GNP 2756-24 001Инструкция по эксплуатации
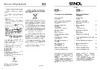
3 Installation 3 1 Appropriate installation location Contact an Authorized Service for the installation of the product In order to prepare the product for use refer the information in the user manual and ensure that electrical installation and water installation are appropriate If not call a qualified electrician and technician to have any necessary arrangements carried out WARNING Manufacturer shall not be held liable fordamages that may arise from procedures carried out by unauthorized persons WARNING Product must not be plugged in during installation Otherwise there is the risk of death orserious injury WARNING If the door clearance of the room where the product shall be place is so tight to prevent passing of the product remove the door of the room and pass the product through the door by turning it to its side if this does not work contact the authorized service Place the product on an even floor surface to prevent jolts Install the product at least 30 cm away from heat sources such as hobs heater cores and stoves and at least 5 cm away from electrical ovens Product must not be subjected to direct sun light and kept in humid places Appropriate air ventilation must be provided around your product in order to achieve an efficient operation If the product is to be placed in a recess in the wall pay attention to leave at least 5 cm distance with the ceiling and side walls 3 2 Installing the plastic wedges Plastic wedge supplied with the product are used to create the distance forthe air circulation between the product and the rear wall 1 To install the wedge remove the screws on the product and use the screws supplied together with the wedges 2 Insert the plastic wedge onto the rear ventilation cover as illustrated in the figure Freezer User Manual 3 3 Adjusting the feet If the product stands unbalanced after installation adjust the feet on the front by rotating them to the right or left 3 4 Electrical connection WARNING Do not make connections via extension cables or multi plugs WARNING Damaged power cable must be replaced by the Authorized Service Agent If two coolers are to be installed side by side there should be at Ieast4 cm distance between them Ourcompanyshall notbe liablefor any damages that will arise when the product is used withoutgrounding and electrical connection in accordance with the national regulations Power cable plug must be within easy reach after installation Connect your refrigerator to a grounded outlet rated for a voltage value of 220240V 50 Hz Outlet shall have 10 to 16A fuse Do not extension cords or cordless multiple outlets between your product and the wall outlet 7 EN
Следуйте инструкциям по установке холодильника для безопасной и эффективной работы. Узнайте о правильном размещении, подключении и настройке устройства.