
Daikin BRC54A Инструкция по эксплуатации онлайн
Operation manual
User interface
English
Operation manual
User interface BRC54A for heating only
BRC54A
Package
BRC480A54
Operation manual
Batteries
AAA.LR03
About the user interface
▪ Direct sunlight. Do NOT expose the user interface to direct sunlight.
▪ Dust. Dust on the signal transmitter or receiver will reduce sensitivity. Wipe
off dust with a soft cloth.
▪ Fluorescent lights. Signal communication might be disabled if fluorescent
lamps are in the room. In that case, contact your installer.
▪ Other appliances. If the user interface signals operate other appliances,
move the other appliances, or contact your installer.
▪ Curtains. Make sure that the signal between the unit and the user interface
is NOT blocked by curtains or other objects.
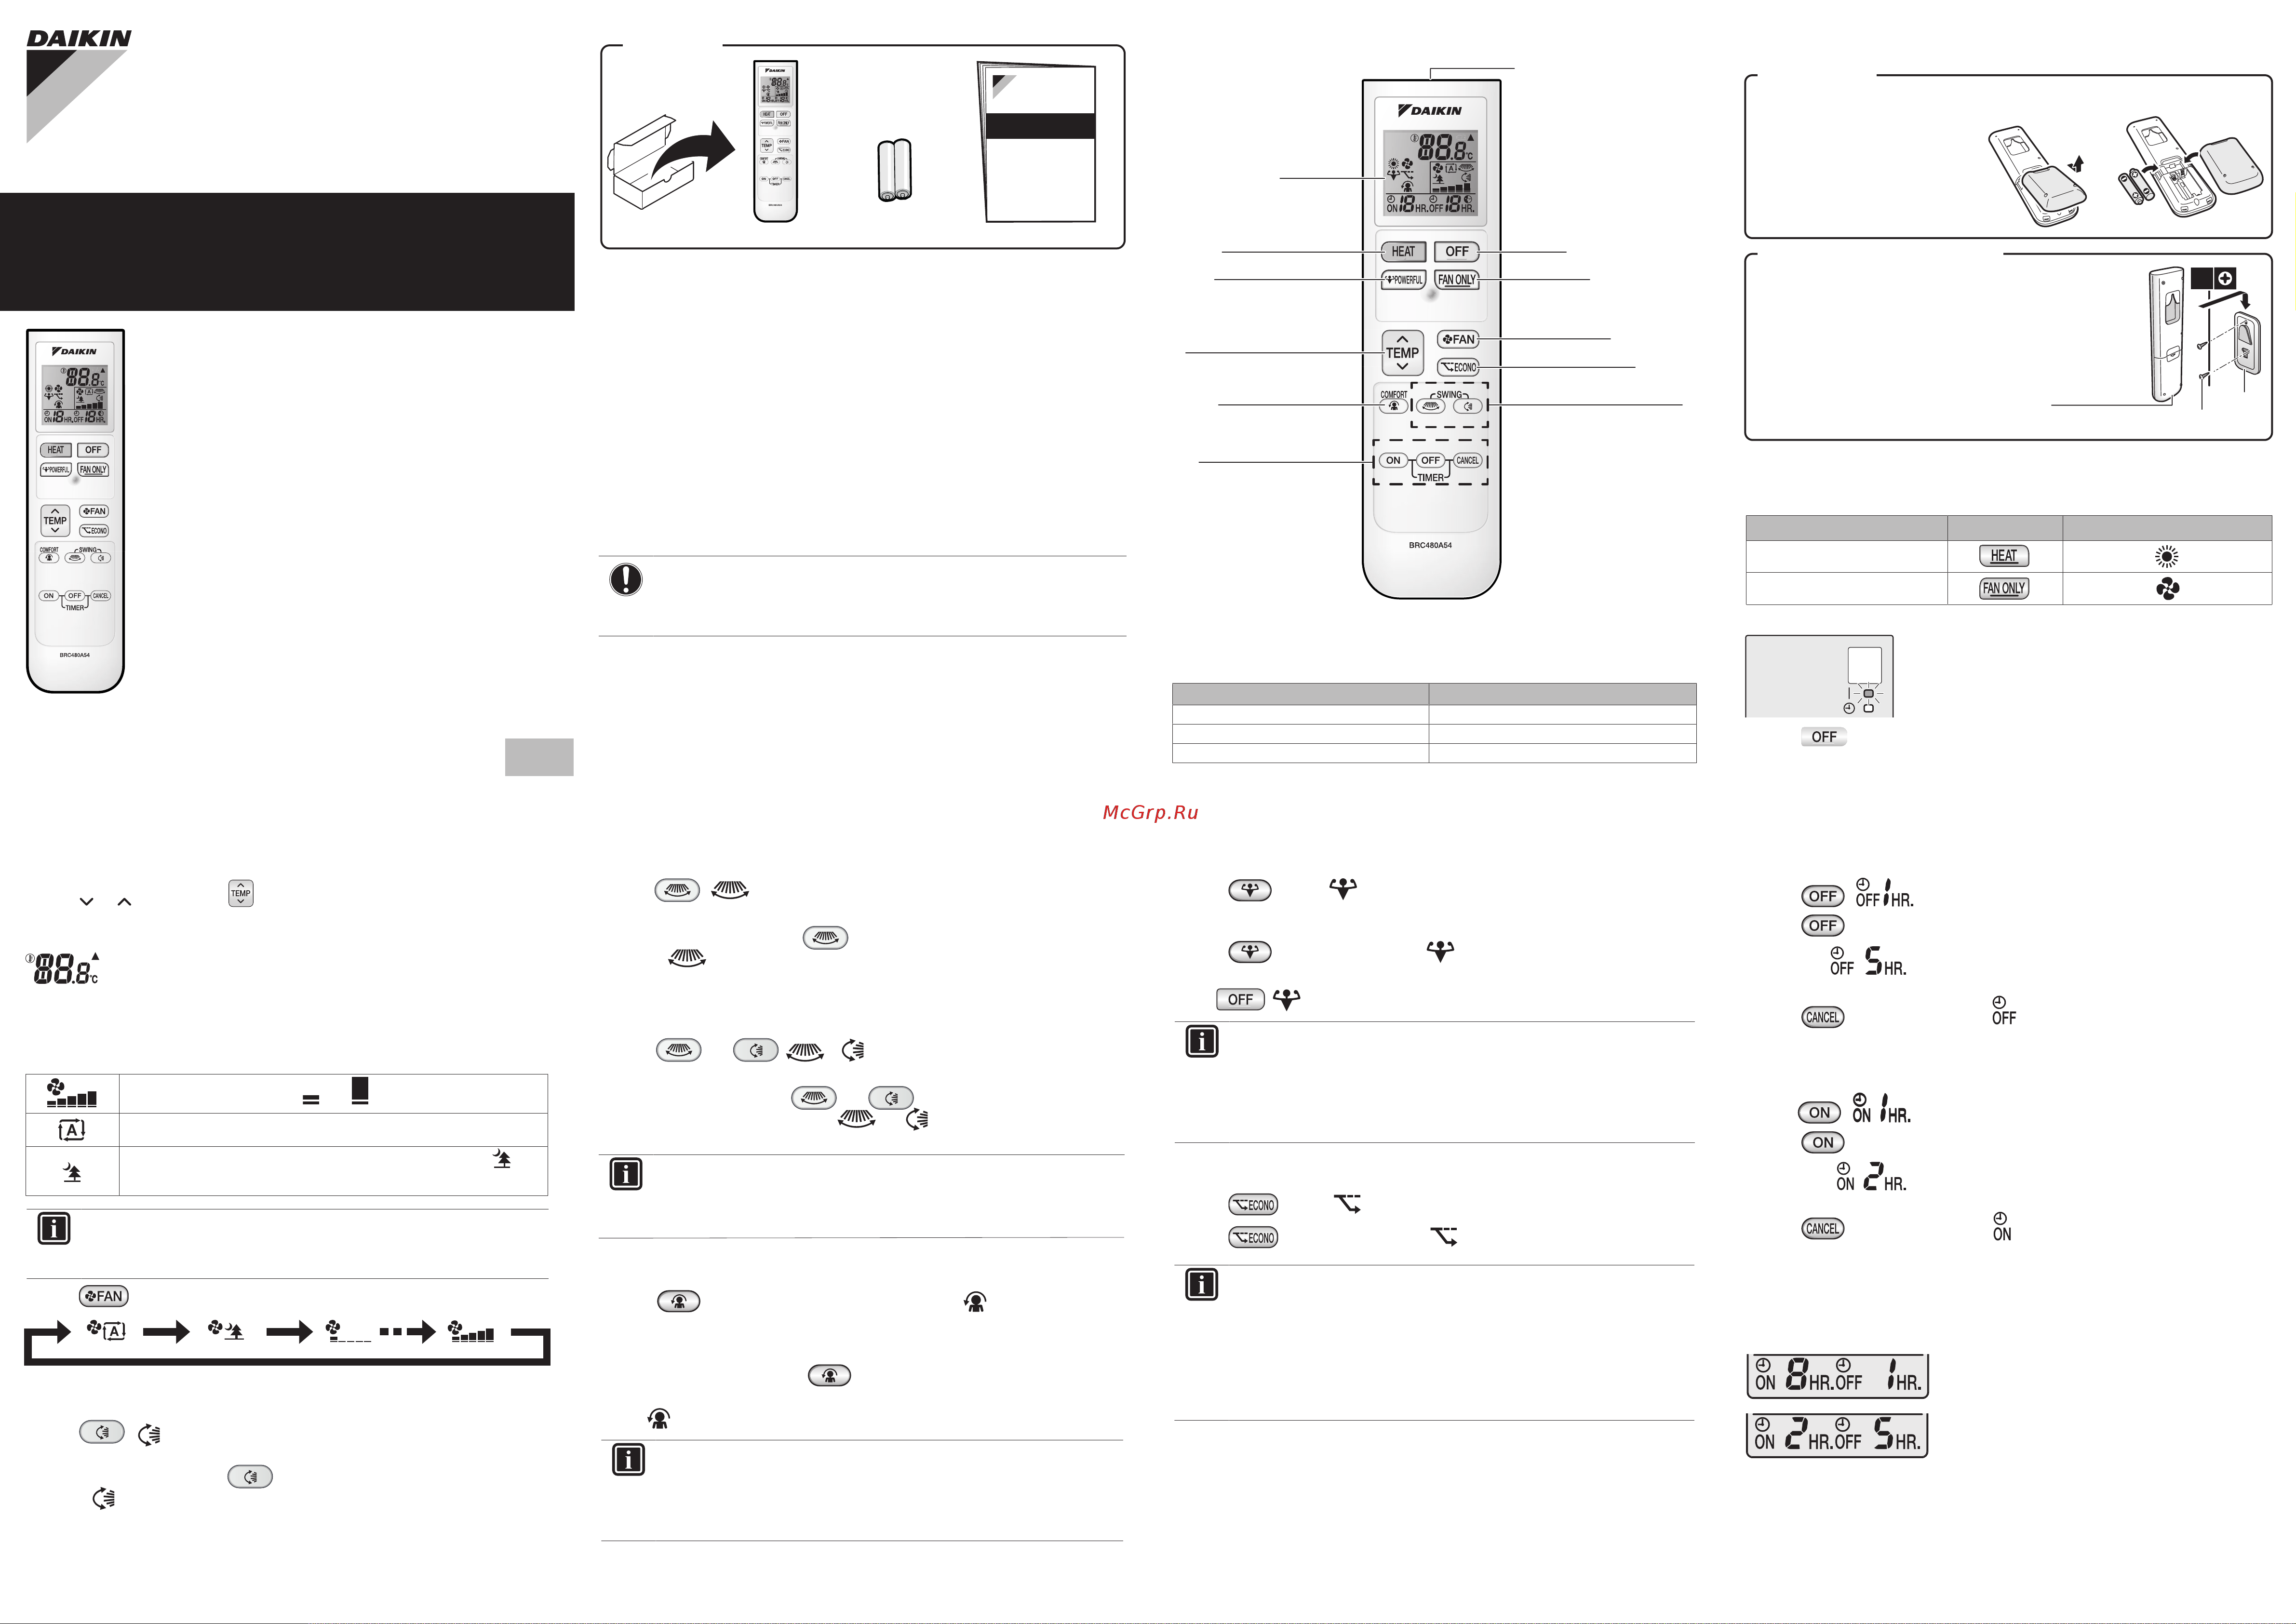
Components
Temperature setting
Before operation
Start/stop operation
To operate the user interface
NOTICE
▪ Do NOT drop the user interface.
▪ Do NOT let the user interface get wet.
Signal receiver
Heating operation button
Display (LCD)
Powerful operation button
Temperature adjustment button
Comfort operation button
ON/OFF timer setting button
OFF button
Fan only button
Airflow rate setting
Econo operation button
Vertical/horizontal swing setting
Sound Description
Beep-beep Operation starts.
Beep Setting changes.
Long beep Operation stops.
Aim the signal transmitter at the signal receiver on the indoor unit (maximum distance
for communication is 7 m). When the indoor unit receives a signal from the user
interface, you will hear a sound:
The batteries will last for about 1 year.
1 Remove the back cover.
2 Insert both batteries at once.
3 Put the cover back.
2
3
AAA.LR03
1
Insert batteries
1 Choose a place where the signals reach
the unit.
2 Attach the holder with screws (delivered
with the unit) to the wall or a similar
location.
3 Hang the user interface on the user
interface holder (delivered with the unit).
Fix the user interface to the wall
2×
User interface
Screw
Holder
Mode Press
Heating operation
Fan only operation
Symbol on the display
1 Start operation by pressing one of the following buttons.
2 Press to stop operation.
Result: The operation lamp light up.
Result: The operation lamp goes off.
1 Press or on the button one or more times to set the temperature
between 10~30°C. You CANNOT adjust the temperature in fan only
operation mode.
: Shows the set temperature.
INFORMATION
INFORMATION
Airflow rate setting
INFORMATION
▪ If the unit reach the temperature setpoint in heating mode,
fan will stop operating.
You can choose from following:
To adjust horizontal airflow direction
1 Press . appears on the LCD. The louvers (vertical blades
will begin to swing.
To use fixed position, press when the louvers reach the desired
position. disappears from the LCD. The louvers will stop
moving.
3-D airflow direction
To start/stop Comfort airflow operation
To start/stop Powerful operation
To start/stop Econo operation
Start/stop OFF timer operation
Start/stop ON timer operation
Combine OFF and ON timer operation
1 Press and . + appears on the LCD. The flaps
(horizontal blades) and louvers (vertical blades) will begin to swing.
To use fixed position, press and when the flaps and the
louvers reach the desired position. and disappears from the LCD.
The flaps and the louvers will stop moving.
To adjust vertical airflow direction
1 Press . appears on the LCD. The flaps (horizontal blades) will
begin to swing.
To use fixed position, press when the flaps reach the desired
position. disappears from the LCD. The flaps will stop moving.
1 Press to start. The flap position will change, is displayed on the
LCD, the airflow rate is set to automatic, position of the flap is down.
Note: Comfort airflow operation is NOT available in fan only mode.
1 Press to start. is displayed on the LCD. Powerful operation
runs for 20 minutes; after that, operation returns to the previously set mode.
1 Press . is displayed on the LCD and the timer lamp lights up.
2 Press again to change the time setting (between 1 to 12 hours)
1 Press to cancel the setting. and the time setting disappear
from the LCD and the timer lamp goes off.
If set when the unit is operating, Operation stops
in 1 hour and then starts 7 hours later.
If set when the unit is NOT operating. Operation
start in 2 hours and then stops 3 hours later.
1 Press to start. is displayed on the LCD.
1 Press to stop the operation. disappears from the LCD.
Note: Powerful operation can only be set when the unit is running. If you
press ; disappears from the LCD.
Example: If is set when the unit is operating, operation will stop
after 5 hours.
1 Press . is displayed on the LCD and the timer lamp lights up.
2 Press again to change the time setting (between 1 to 12 hours)
1 Press to cancel the setting. and the time setting disappear from
the LCD and the timer lamp goes off.
You can set both OFF timer and ON timer at once.
Example: If is set when the unit is NOT operating, operation
will start in 2 hours.
1 Press to stop the operation. disappears from the LCD.
1 To stop the operation press .
Result: The flap will return to the position from before the Comfort airflow
mode; disappears from the LCD.
When the unit is installed in a corner of a room, the
direction of the louvers should be facing away from the wall.
Efficiency will drop if a wall blocks the air.
INFORMATION
Powerful and Comfort airflow operation CANNOT be used at the
same time. The last selected function takes priority. If the
vertical or horizontal automatic swing is selected, Comfort
airflow operation will be cancelled.
Powerful operation CANNOT be used together with Econo and
Comfort airflow operation. The last selected function takes
priority.
Powerful operation will NOT increase the capacity of the unit if it
already operates at maximum capacity.
Econo operation reduces power consumption of the outdoor
unit by limiting the rotation speed of the compressor. If
power consumption is already low, Econo operation will
NOT further reduce power consumption.
Powerful and Econo operation CANNOT be used at the same
time. The last selected function takes priority.
INFORMATION
▪
▪
Example:
4P551307-1 2018.09
4
1 2 3
5 6 7
1 Press to change the airflow setting as follows:
5 airflow rate levels, from " " to " "
Automatic operation
Indoor unit quiet operation. When the airflow is set to " ",
the noise from the unit will be reduced.
Содержание
- About the user interface 1
- Airflow rate setting 1
- Before operation 1
- Combine off and on timer operation 1
- Components 1
- D airflow direction 1
- Operation manual 1
- Package 1
- Start stop off timer operation 1
- Start stop on timer operation 1
- Start stop operation 1
- Temperature setting 1
- To adjust horizontal airflow direction 1
- To adjust vertical airflow direction 1
- To operate the user interface 1
- To start stop comfort airflow operation 1
- To start stop econo operation 1
- To start stop powerful operation 1
Похожие устройства
- Daikin BRP069A41 Инструкция по монтажу
- Daikin BRP069A42 Инструкция по монтажу
- Daikin BRP7A51 Инструкция по монтажу
- Daikin BRYQ140B Инструкция по монтажу
- Daikin BRYQ140BB Инструкция по монтажу
- Daikin BRYQ140C Инструкция по монтажу
- Daikin BRYQ140CB Инструкция по монтажу
- Daikin BYCQ140E2P Инструкция по монтажу
- Daikin BYCQ140E2PW1 Инструкция по монтажу
- Daikin BYCQ140E2PB Инструкция по монтажу
- Daikin BYCQ140E2PW1B Инструкция по монтажу
- Asus TUF-GAMING-450B Краткое Руководство по началу работы
- Asus TUF-GAMING-750B Краткое Руководство
- Asus TUF-GAMING-550B Краткое Руководство
- Asus Xonar SE Краткое Руководство
- Asus Xonar AE Краткое Руководство
- Asus Xonar AE Руководство Пользователя
- Asus Xonar U7 MKII Руководство Пользователя
- Asus Xonar U7 MKII Краткое Руководство
- Asus Xonar U7 MKII Руководство Пользователя Sonic Studio