
Asus BW-16D1HT Краткое Руководство онлайн
Q4697
Internal Optical Drive
Quick Installation Guide
In 35 Languages
English
Français
Deutsch
Italiano
Español
Русский
Nederlands
Svenska
Türkçe
(Kurulum Kılavuzu)
Česky
Slovensky
Polski
繁體中文
簡體中文
日本語
ASUSTek COMPUTER INC.
4F, No. 150, LI-TE RD., PEITOU, TAIPEI, TAIWAN
ASUS COMPUTER GmbH
HARKORT STR. 21-23, 40880 RATINGEN, GERMANY
Fourth Edition V5 Published July 2014
Copyright @ 2014 ASUSTek Computer INC. All Rights Reserved.
Português
Magyar
Română
български
Ελληνικά
Indonesia
ไทย
Tiếng Việt
Bahasa Malaysia
Dansk
Suomi
Norsk
Українська
Eesti
Latviski
Lietuvių
Slovenščina
Қазақ
Q4697_ODD_QIG_V2.indd 1 10/15/10 1:12:21 PM
Notices
Federal Communications Commission Statement
This device complies with Part 15 of the FCC Rules. Operation is subject to the following two conditions:
• This device may not cause harmful interference, and
• This device must accept any interference received including interference that may cause undesired operation.
This equipment has been tested and found to comply with the limits for a Class B digital device, pursuant to Part 15 of
the FCC Rules. These limits are designed to provide reasonable protection against harmful interference in a residential
installation. This equipment generates, uses and can radiate radio frequency energy and, if not installed and used
in accordance with manufacturer’s instructions, may cause harmful interference to radio communications. However,
there is no guarantee that interference will not occur in a particular installation. If this equipment does cause harmful
interference to radio or television reception, which can be determined by turning the equipment off and on, the user is
encouraged to try to correct the interference by one of the following measures.
WARNING! The use of shielded cables for connection of the monitor to the graphics card is required to
assure compliance with FCC regulations. Changes or modifications to this unit not expressly approved by
the party responsible for compliance could void the user’s authority to operate this equipment.
Canadian Department of Communications Statement
This digital apparatus does not exceed the Class B limits for radio noise emissions from digital apparatus set out in the
Radio Interference Regulations of the Canadian Department of Communications.
This class B digital apparatus complies with Canadian ICES-003.
• Reorient or relocate the receiving antenna.
• Increase the separation between the equipment and receiver.
• Connect the equipment to an outlet on a circuit different from that to which the receiver is connected.
• Consult the dealer or an experienced radio/TV technician for help.
Q4697_ODD_QIG_V2.indd 2 9/28/10 9:45:34 AM
Q4697_ODD_QIG_V2.indd 3 9/28/10 9:45:40 AM
REACH
Complying with the REACH (Registration, Evaluation, Authorisation, and Restriction of Chemicals) regulatory framework, we published the chemical
substances in our products at ASUS REACH website at http://crs.asus.com/english/REACH.htm. (English)
Conforme avec le Règlement REACH (Enregistrement, Évaluation, Autorisation et Restriction des produits chimiques), nous avons publié la liste des
substances chimiques utilisées dans nos produits sur le site Web ASUS REACH à l’adresse http://crs.asus.com/english/REACH.htm. (Français)
Die rechtliche Rahmenbedingungen für REACH (Registration, Evaluation, Authorisation, and Restriction of Chemicals) erfüllend, veröffentlichen wir die
chemischen Substanzen in unseren Produkten auf unserer ASUS REACH-Webseite unter http://crs.asus.com/english/REACH.htm. (Deutsch)
Nel rispetto del regolamento REACH (Registration, Evaluation, Authorisation, and Restriction of Chemicals), le sostanze chimiche contenute nei prodotti ASUS
sono state pubblicate nel sito web ASUS, alla pagina: http://crs.asus.com/english/REACH.htm. (Italiano)
En cumplimiento del marco reglamentario REACH (registro, evaluación, autorización y restricción de productos químicos), hemos publicado las sustancias
que contienen nuestros productos a través del sitio web ASUS REACH, al que puede acceder a través de la dirección http://crs.asus.com/english/REACH.htm.
(Español)
in naleving van het REACH-regelgevingskader (Registratie, Evaluatie, Autorisatie en beperking van Chemische stoffen), hebben wij de chemische
bestanddelen van onze producten bekendgemaakt op de ASUS REACH-website op http://crs.asus.com/english/REACH.htm. (Nederlands)
Uppfyller REACH (Registration, Evaluation, Authorization, and Restriction of Chemicals (Registrering, Värdering, Behörighet och Begränsning)) reglerande
regelverk, vi publicerar de kemiska substanserna i våra produkter på ASUS REACH webbsida på http://crs.asus.com/english/REACH.htm. (Svenska)
REACH (Kimyasalların Kayıt Altına Alınması, Değerlendirilmesi, Ruhsatlandırılması ve Sınırlandırılması) düzenleyici çerçevesine uygun olarak, ürünlerimizdeki
kimyasal maddeleri http://crs.asus.com/english/REACH.htm adresindeki ASUS REACH websitesinde yayınlamaktayız.. (Türkçe)
V rámci shody s regulatorní platformou REACH (Registration, Evaluation, Authorisation, and Restriction of Chemicals (registrace, hodnocení, povolování a
omezování chemických látek)) byl zveřejněn seznam chemických látek přítomných v našich produktech na webu ASUS REACH na adrese http://crs.asus.com/
english/REACH.htm. (Čeština)
Dodržiavajúc regulačný rámec REACH (Registrácia, hodnotenie, autorizácia a obmedzovanie chemikálií) sme chemické látky používané v našich výrobkoch
uviedli na stránke ASUS REACH na adrese http://crs.asus.com/english/REACH.htm. (Slovensky)
Zgodnie z rozporządzeniem REACH (Rejestracja, ocena, autoryzacja i ograniczenie środków chemicznych), publikujemy informacje o środkach chemicznych
w naszych produktach, na stronie internetowej ASUS REACH pod adresem http://crs.asus.com/english/REACH.htm (Polski)
謹遵守REACH(Registration, Evaluation, Authorisation, and Restriction of Chemicals)管理規範,我們會將產品中的化學物質公告在華碩REACH網站,詳細請參考
http://crs.asus.com/english/REACH.htm. (繁體中文)
谨遵守REACH(Registration, Evaluation, Authorisation, and Restriction of Chemicals)管理规范,我们会将产品中的化学物质公告在华硕REACH网站,详细
请参考http://crs.asus.com/english/REACH.htm. (简体中文)
REACH(Registration,Evaluation,Authorisation,andRestrictionofChemicals)規則の基準を満たすため、ASUSはREACH専用サイトで弊社製品に含まれる化
学物質を公開しております。http://crs.asus.com/english/REACH.htm.(日本語)
Cumprindo o quadro regulamentar REACH (Registo, Avaliação, Autorização e Restrição dos Produtos Químicos), divulgamos as substâncias químicas
incluídas nos nossos produtos no Web site ASUS REACH em http://crs.asus.com/english/REACH.htm. (Português)
http://crs.asus.com/english/REACH.htm
http://crs.asus.com/english/REACH.htm
Q4697_ODD_QIG_V2.indd 5 9/28/10 9:45:43 AM
Q4697_ODD_QIG_V2.indd 6 9/28/10 9:45:43 AM
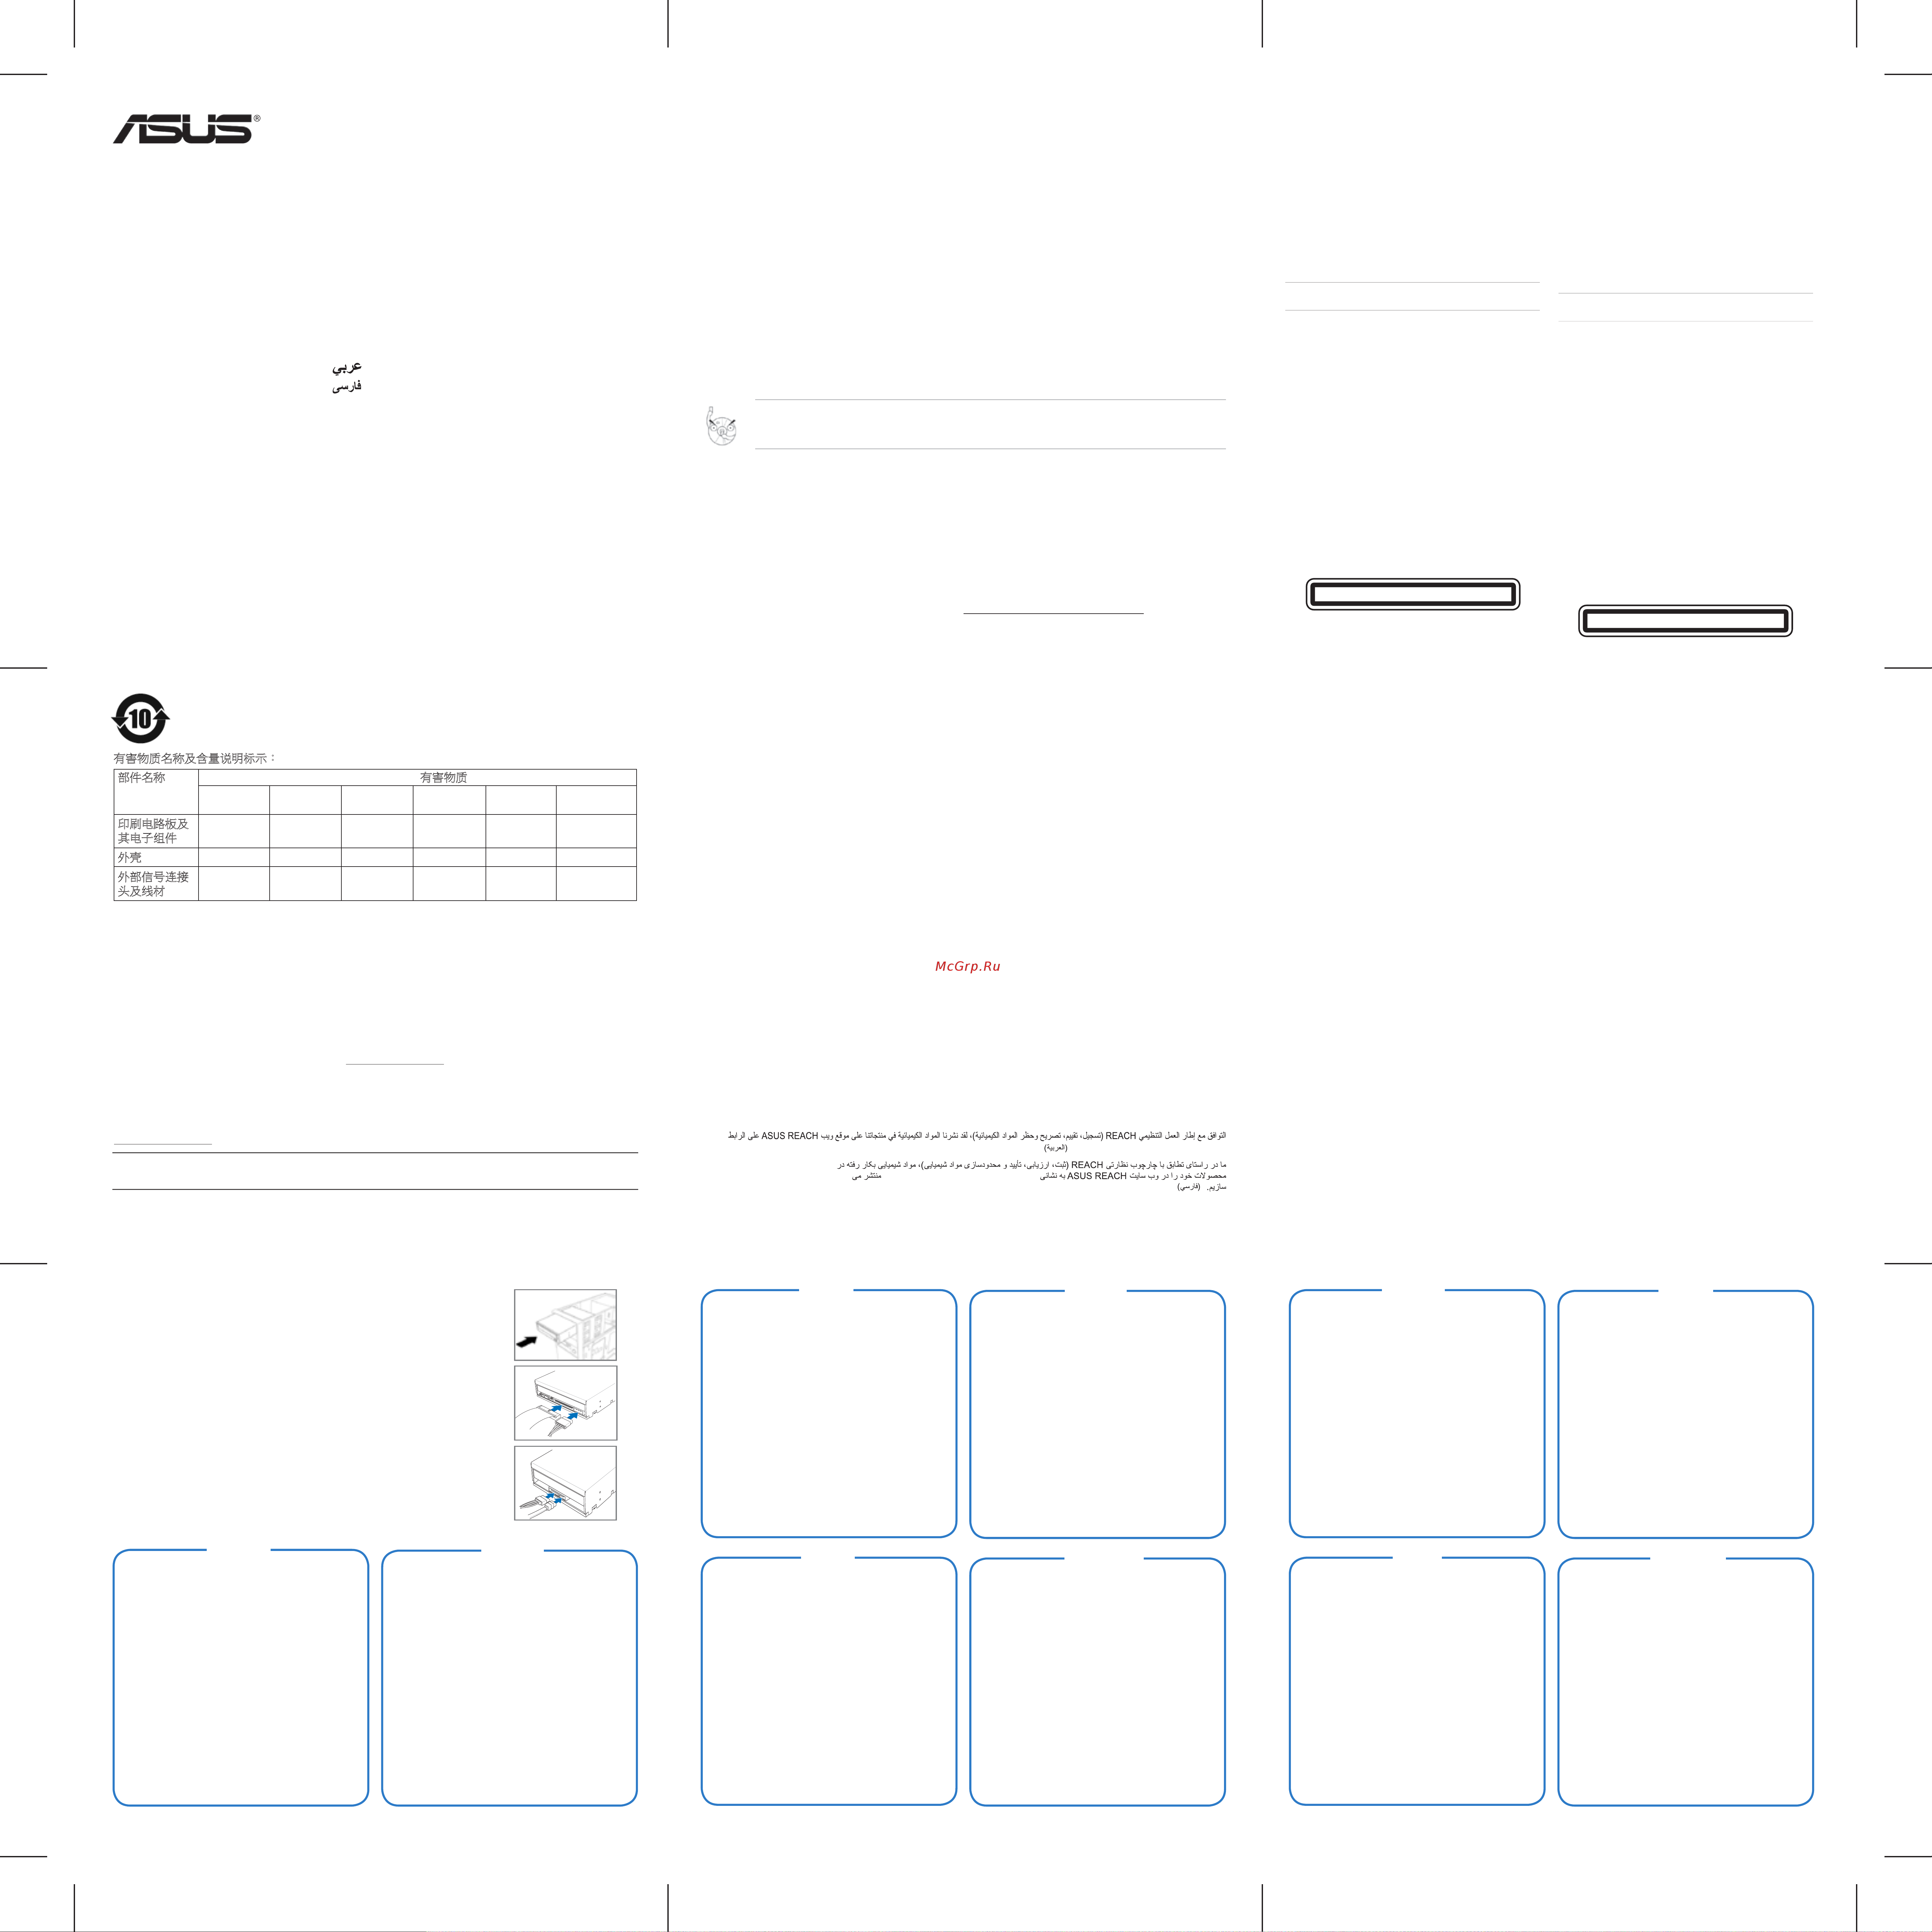
Hardware installation
Turn off your computer and any peripheral device connected to it before installing the optical drive. For avoiding
damage to the optical drive due to static electricity, use a grounded wrist strap or touch a safely grounded object or
a metal object, such as a power supply case, before installing the optical drive.
1. Remove the computer cover.
2. For IDE optical drives, configure the drive jumper to set the device to either Master, Slave, or Cable Select
mode before installing it into the chassis.
3. For SATA optical drives, there is no necessity for jumper settings.
4. Insert the optical drive into an available 5.25-inch bay (as shown in Figure 1).
5. For IDE optical drives, connect a 4-pin power supply cable to the DC input connector of the optical drive
(as shown in Figure 2). Next, connect an IDE cable to the IDE connector at the back of the optical drive,
matching the colored stripe on the cable with Pin 1 on the IDE connector (as shown in Figure 2). Connect the
other end of the IDE cable to the IDE connector on the motherboard.
6. For SATA optical drives, connect a 15-pin power supply cable to the DC input connector of the optical drive
(as shown in Figure 3). Next, connect a SATA cable to the SATA connector at the back of the optical drive (as
shown in Figure 3). Connect the other end of the SATA cable to the SATA connector on the motherboard.
7. Slide the optical drive into the bay and secure it with four screws.
8. Replace the computer cover.
9. Turn on your computer.
Installation matérielle
Eteignez votre ordinateur et tous les périphériques reliés à ce dernier avant d’installer
le disque optique. Afin d’éviter que l’électricité statique n’endommage le disque optique,
utilisez un bracelet antistatique, touchez un objet relié à la terre ou un objet en métal
tel que le bloc d’alimentation avant d’installer le disque optique.
1. Retirez le châssis de l’ordinateur.
2. Pour les disques optiques IDE, réglez le jumper pour configurer l’appareil en
mode Maitre, Esclave, ou Cable Select avant de l’installer dans le châssis.
3. Pour les disques optiques SATA, le réglage du jumper n’est pas nécessaire.
4. Insérez le disque optique dans une baie 5.25” disponible (comme illustré dans l’
image 1).
5. Pour les disques optiques IDE, branchez le câble d’alimentation quatre broches
au connecteur d’entrée d’alimentation du disque optique (comme illustré dans
l’image 2). Puis, branchez le câble IDE au connecteur IDE situé à l’arrière du
disque optique en alignant la bande colorée du câble IDE sur la broche 1 du
connecteur IDE (comme illustré dans l’image 2). Branchez l’autre extrémité du
câble IDE au connecteur IDE de la carte mère.
6. Pour les disque optiques SATA, branchez le câble d’alimentation quinze broches
au connecteur d’entrée d’alimentation du disque optique (comme illustré dans l’
image 3). Puis, branchez le câble SATA au connecteur SATA situé à l’arrière du
disque optique (comme indiqué dans l’image 3). Branchez l’autre extrémité du
câble SATA au connecteur SATA de la carte mère.
7. Glissez le disque optique dans la baie et sécurisez-le à l’aide de quatre vis.
8. Replacez le châssis dans l’ordinateur.
9. Allumez votre ordinateur.
Hardware-Installation
Schalten Sie den Computer und alle angeschlossenen Peripheriegeräte aus, bevor Sie
das optische Laufwerk installieren. Berühren Sie die Metallrückwand oder Seite des
Computers, um Schäden durch statische Entladungen zu vermeiden.
1. Entfernen Sie die Gehäuseabdeckung.
2. Stellen Sie bei optischen IDE-Laufwerken den Laufwerksjumper auf Master,
Slave, oder Cable Select-Modus ein, bevor Sie das Laufwerk installieren.
3. Bei optischen SATA-Laufwerken ist keine Jumpereinstellung notwendig.
4. Stecken Sie das Laufwerk in einen 5,25”-Schacht (siehe Abb. 1).
5. IDE-Laufwerk: Schließen Sie ein 4-pol. Netzkabel an den Netzanschluss des
optischen Laufwerks an (siehe Abb. 2). Verbinden Sie dann ein IDE-Kabel mit
dem IDE-Anschluss an der Laufwerkrückseite und richten Sie die Streifen des
Kabels auf Pol 1 des IDE-Anschlusses aus (siehe Abb. 2). Verbinden Sie das
andere Ende des IDE-Kabels mit dem IDE-Anschluss am Motherboard.
6. SATA-Laufwerk: Schließen Sie ein 15-pol. Netzkabel an den Netzanschluss des
optischen Laufwerks an (siehe Abb. 3). Verbinden Sie dann ein SATA-Kabel mit
dem SATA-Anschluss an der Laufwerkrückseite (siehe Abb. 3). Verbinden Sie
das andere Ende des SATA-Kabels mit dem SATA-Anschluss am Motherboard.
7. Stecken Sie das optische Laufwerk in den Schacht und sichern Sie es mit den
vier Schrauben.
8. Bringen Sie die Gehäuseabdeckung wieder an.
9. Schalten Sie den Computer ein.
Français Deutsch
Q4697_ODD_QIG_V2.indd 7 9/28/10 9:45:51 AM
Installazione Hardware
Prima di installare l’ unità ottica, spegnere il computer e tutte le periferiche ad esso
collegate. Quindi, per evitare danni all’ unità, dovuti ad elettricità statica, indossare
un cinturino da polso con messa a terra o toccare un oggetto con una messa a terra
sicura oppure un oggetto metallico, come una scatola di alimentazione.
1. Rimuovere la copertura del computer.
2. Per unità ottiche IDE, prima di installare l’ unità nel telaio, configurare il jumper e
impostare il dispositivo in modalità Master, Slave o Cable Select.
3. Per unità ottiche SATA, non è necessaria la configurazione del jumper.
4. Inserire l’ unità ottica in un vano libero da 5.25 pollici (come mostrato in Figura 1).
5. Per unità ottiche IDE, collegare un cavo di alimentazione da 4-pin al connettore
d’ ingresso DC dell’ unità (come mostrato in Figura 2). Quindi, collegare un cavo
IDE al connettore IDE sul retro del dispositivo, facendolo combaciare con la
striscia colorata sul cavo con Pin 1 sul connettore IDE (come mostrato in Figura
2). Collegare l’ altra estremità del cavo IDE al connettore IDE sulla scheda
madre.
6. Per unità ottiche SATA, collegare un cavo di alimentazione da 15-pin al
connettore d’ ingresso DC dell’ unità ottica (come mostrato in Figura 3). Quindi,
collegare un cavo SATA al connettore SATA sul retro del dispositivo (come
mostrato in Figura 3). Collegare l’ altra estremità del cavo SATA al connettore
SATA sulla scheda madre.
7. Far scorrere l’ unità ottica all’ interno del vano predisposto e fissarla con quattro
viti.
8. Rimontare la copertura del computer.
9. Accendere il computer.
Instalar el hardware
Apague el equipo y todos los dispositivos periféricos conectados a él antes de instalar
la unidad óptica. Para que la electricidad estática no dañe la unidad óptica, utilice una
correa para la muñeca con conexión a tierra o toque un objeto conectado a tierra de
forma segura o un objeto metálico, como por ejemplo la carcasa de una fuente de
alimentación, antes de instalar dicha unidad.
1. Retire la tapa del equipo.
2. Para unidades ópticas IDE, configure el puente de la unidad para establecer
el dispositivo en el modo Maestro, Esclavo o Selección de cable antes de
instalarlo en el chasis.
3. Para unidades ópticas SATA, no es necesario configurar ningún puente.
4. Inserte la unidad óptica en una bahía de 5,25 pulgadas disponible (como se
muestra en la figura 1).
5. Para unidades ópticas IDE, enchufe un cable de fuente de alimentación de 4
contactos en el conector de entrada de CC de la unidad óptica (como se muestra
en la figura 2). A continuación, enchufe un cable IDE en el conector IDE situado
en la parte posterior de la unidad óptica, haciendo coincidir la raya coloreada
del cable con el Contacto 1 del conector IDE (como se muestra en la figura 2).
Enchufe el otro extremo del cable IDE en el conector IDE de la placa base.
6. Para unidades ópticas SATA, enchufe un cable de fuente de alimentación de
15 contactos en el conector de entrada de CC de la unidad óptica (como se
muestra en la figura 3). A continuación, enchufe un cable SATA en el conector
SATA situado en la parte posterior de la unidad óptica (como se muestra en la
figura 3). Enchufe el otro extremo del cable SATA en el conector SATA de la
placa base.
7. Inserte la unidad óptica en la bahía y fíjela con cuatro tornillos.
8. Vuelva a colocar la tapa del equipo.
9. Encienda el equipo.
Hardware-installatie
Schakel uw computer en alle aangesloten randapparaten uit voordat u het optische
station installeert. Om schade aan het optische station door statische elektriciteit te
voorkomen, moet u een geaarde polsriem gebruiken of een veilig geaard of metalen
object, zoals de behuizing van een voeding, aanraken voordat u het optische station
installeert.
1. Verwijder de klep van de computer.
2. Voor optische IDE-stations moet u de jumper van het station configureren om
het apparaat in te stellen als master of slave of om de kabelselectiemodus te
selecteren voordat u het station in het chassis installeert.
3. Voor optische SATA-stations moeten de jumpers niet worden ingesteld.
4. Stop het optische station in een beschikbare 5,25” sleuf (zoals weergegeven in
Figuur 1).
5. Voor optische IDE-stations sluit u een 4-pins voedingskabel aan op de
gelijkstroomingang (DC) van het optische station (zoals weergegeven in Figuur
2). Sluit vervolgens een IDE-kabel aan op de IDE-aansluiting op de achterkant
van het optische station en lijn de gekleurde streep op de kabel uit op pin 1 op
de IDE-aansluiting (zoals weergegeven in Figuur 2). Sluit het andere uiteinde
van de IDE-kabel aan op de IDE-aansluiting op het moederbord.
6. Voor optische SATA-stations sluit u een 15-pins voedingskabel aan op de
gelijkstroomingang (DC) van het optische station (zoals weergegeven in Figuur
3). Sluit vervolgens een SATA-kabel aan op de SATA-aansluiting op de achterkant
van het optische station (zoals weergegeven in Figuur 3). Sluit het andere
uiteinde van de SATA-kabel aan op de SATA-aansluiting op het moederbord.
7. Schuif het optische station in de sleuf en maak het vast met de vier schroeven.
8. Plaats de klep van de computer terug.
9. Schakel uw computer in.
Italiano Español
Nederlands
Q4697_ODD_QIG_V2.indd 8 9/28/10 9:45:51 AM
Svenska
Türkçe
Česky Slovensky
Hårdvaruinstallation
Stäng av datorn och all kringutrustning som är ansluten till den innan den optiska
enheten installeras. För att undvika skador orsakade av statisk elektricitet på den
optiska enheten bör du använda en jordad handledsrem eller vidröra säkra jordade
objekt eller ett metallobjekt såsom ett spänningsaggregat innan den optiska enheten
installeras.
1. Ta bort datorns hölje.
2. IDE optiska enheter ska byglas till antingen Master, Slave eller Cabel Select
innan den monteras i chassit.
3. SATA otpiska enheter behöver inga bygelinställningar.
4. Sätt in den optiska enheten i ett tillgängligt 5,25 tumsfack (såsom visas i figur
1).
5. På IDE optiska enheter anslut strömkontakten med 4 stift till strömuttaget på
den optiska enheten (såsom visas i figur 2). Anslut sedan en IDE-kabel till IDE-
kontakten på baksidan av den optiska enheten med den färgade randen på
kabeln mot PIN 1 på IDE-kontakten (såsom visas i figur 2). Anslut den andra
änden av IDE-kabeln till IDE-kontakten på moderkortet.
6. På SATA optiska enheter anslut en 15-pinnars strömkontakt till strömuttaget
på den optiska enheten (såsom visas i figur 3).Anslut sedan en SATA-kabel till
SATA-kontakten på baksidan av den optiska enheten (såsom visas i figur 3).
Anslut den andra änden av SATA-kabeln till SATA-kontakten på moderkortet.
7. Låt den optiska enheten glida in i facket och fäst den med fyra skruvar.
8. Sätt tillbaka höljet på datorn.
9. Starta datorn.
Donanım kurulumu
Optik sürücüyü kurmadan önce bilgisayarınızı ve bağlı olan herhangi bir çevrebirim
aygıtını kapatın. Statik elektrik sebebiyle optik sürücüye hasar vermemek için optik
sürücüyü kurmadan önce topraklanan bileklik kayışını kullanın veya güç besleme
mahfazası gibi güvenilir bir şekilde topraklanan nesneye veya metal nesneye dokunun.
1. Bilgisayar kapağını çıkarın.
2. IDE optik sürücüleri için aygıtı Ana, Yardımcı veya Kablo Seçme moduna
ayarlamak için şasiye kurmadan önce sürücü atlatıcısını yapılandırın.
3. SATA optik sürücüleri için atlatıcı ayarlarının yapılmasına gerek yoktur.
4. Optik sürücüyü kullanılabilir 5.25-inç yuvaya yerleştirin (Şekil 1’de gösterildiği
gibi).
5. IDE optik sürücüleri için 4 pinli güç besleme kablosunu optik sürücünün DC giriş
konektörüne bağlayın (Şekil 2’de gösterildiği gibi). Ardından, IDE kablosunu
optik sürücünün arkasındaki IDE konektörüne bağlayın, kablodaki renkli kayışı
IDE konektöründeki Pin 1 kablosu ile eşleştirin (Şekil 2’de gösterildiği gibi). IDE
kablosunun diğer ucunu anakarttaki IDE konektörüne bağlayın.
6. SATA optik sürücüleri için 15 pinli güç besleme kablosunu optik sürücünün
DC giriş konektörüne bağlayın (Şekil 3’te gösterildiği gibi). Ardından, SATA
kablosunu optik sürücünün arkasındaki SATA konektörüne bağlayın (Şekil 3’te
gösterildiği gibi). SATA kablosunun diğer ucunu anakarttaki SATA konektörüne
bağlayın.
7. Optik sürücüyü yuvada kaydırın ve dört vida kullanarak sabitleyin.
8. Bilgisayar kapağını yerleştirin.
9. Bilgisayarı açın.
Instalace hardwaru
Před instalací optické jednotky vypněte počítač a veškerá připojená periferní zařízení.
Aby se zabránilo poškození optického disku statickou elektřinou, před instalací optické
jednotky použijte uzemněný náramek nebo se dotkněte uzemněného nebo kovového
předmětu, například skříně zdroje napájení.
1. Sejměte kryt skříně počítače.
2. Před instalací do skříně nakonfigurujte u optických jednotek s rozhraním IDE
pomocí propojek tato zařízení jako Master, Slave nebo Cable Select.
3. V případě optických jednotek s rozhraním SATA nejsou nastavení propojek
nutná.
4. Zasuňte optickou jednotku do volné šachty - 5,25 palců (viz Obrázek 1).
5. V případě optických jednotek s rozhraním IDE připojte 4kolíkový napájecí
kabel ke konektoru napájení optické jednotky (viz Obrázek 2). Potom připojte
kabel rozhraní IDE ke konektoru rozhraní IDE na zadní straně optické jednotky
tak, aby barevný proužek na kabelu odpovídal kolíku 1 na konektoru rozhraní
IDE (viz Obrázek 2). Připojte druhý konec kabelu rozhraní IDE ke konektoru
rozhraní IDE na základní desce.
6. V případě optických jednotek s rozhraním SATA připojte 15kolíkový napájecí
kabel ke konektoru napájení optické jednotky (viz Obrázek 3). Potom připojte
kabel rozhraní SATA ke konektoru rozhraní SATA na zadní straně optické
jednotky (viz Obrázek 3). Připojte druhý konec kabelu rozhraní SATA ke
konektoru rozhraní SATA na základní desce.
7. Zasuňte optickou jednotku do pozice a zajistěte šroubky.
8. Nasaďte kryt skříně počítače.
9. Zapněte počítač.
Inštalácia hardvéru
Pred inštalovaním optickej mechaniky vypnite svoj počítač a všetky periférne zariadenia.
Aby ste predišli poškodeniu optickej mechaniky statickou elektrinou, používajte
uzemnený remienok na zápästie, alebo sa pred inštaláciou optickej mechaniky dotknite
bezpečne uzemneného predmetu alebo kovového predmetu, akým je napríklad skrinka
elektrického prívodu.
1. Odmontujte kryt počítača.
2. V prípade optických mechaník IDE nakonfigurujte prepínač mechaniky a nastavte
zariadenie na režim riadiacej jednotky, podriadenej jednotky, alebo na režim voľby
kábla. Toto vykonajte pred inštaláciu mechaniky do rámu.
3. V prípade optických SATA mechaník nie je potrebné vykonať nastavenie prepínača.
4. Optickú jednotku zasuňte do dostupného 5,25 palcového výklenku (podľa Obrázka
1).
5. V prípade optických IDE mechaník pripojte 4 kolíkový prívodný kábel k vstupnému
konektoru jednosmerného prúdu na optickej mechanike (ako je to znázornené na
Obrázku 2). V ďalšom pripojte IDE kábel k IDE konektoru na zadnej strane optickej
mechaniky tak, aby bol zarovno s farebným pásom na kábli s kolíkom 1 na IDE
konektore (ako je to znázornené na Obrázku 2). Druhý koniec IDE kábla pripojte k
IDE konektoru na matičnej doske.
6. V prípade optických SATA mechaník pripojte 15 kolíkový prívodný kábel k vstupnému
konektoru jednosmerného prúdu na optickej mechanike (ako je to znázornené na
Obrázku 3). V ďalšom pripojte SATA kábel k SATA konektoru na zadnej strane
optickej mechaniky (ako je to znázornené na Obrázku 3). Druhý koniec SATA kábla
pripojte k SATA konektoru na matičnej doske.
7. Optickú mechaniku zasuňte do výklenku a zaistite štyrmi skrutkami.
8. Znovu nasaďte kryt počítača.
9. Zapnite počítač.
Q4697_ODD_QIG_V2.indd 9 9/28/10 9:45:52 AM
Cautions about replacing the front panel
For the safty of using the optical drive, please do not replace the front panel under the following circumstances:
1. Do not use a tray door with the lock tabs (as shown in the right figure) broken or worn.
2. Do not use a front panel with the lock tabs (as shown in the right figure) broken or worn.
有毒有害物質或元素的名稱及含量說明標示:
電子信息產品污染控制標示:圖中之數字為產品之環保使用期限。僅指電子信息產品中含有的
有毒有害物質或元素不致發生外洩或突變從而對環境造成污染或對人身、財產造成嚴重損害的
期限。
部件名稱
有害物質或元素
鉛(Pb) 鎘(Cd) 汞(Hg) 六價鉻
(Cr(VI))
多溴聯苯
(PBB)
多溴二苯
醚(PBDE)
印刷電路板及其電子組
件
×○○○ ○ ○
外殼 ×○○○ ○ ○
外部信號連接頭及線材 × ○ ○ ○ ○ ○
○:表示該有毒有害物質在該部件所有均質材料中的含量均在SJ/T 11363-2006標准規定的限量要求以下。
×:表示該有毒有害物質至少在該部件的某一均質材料中的含量超出SJ/T 11363-2006標准規定的限量要
求,然該部件仍符合歐盟指令2002/95/EC的規范。
備註:此產品所標示之環保使用期限,係指在一般正常使用狀況下。
AEEE Yönetmeliğine Uygundur
Q4697_ODD_QIG_V2.indd 4 9/28/10 9:45:42 AM
987
654
3
Takeback Services
ASUS recycling and takeback programs come from our commitment to the highest standards for protecting our environment.
We believe in providing solutions for our customers to be able to responsibly recycle our products, batteries and other
components as well as the packaging materials. Please go to http://csr.asus.com/english/Takeback.htm for detail recycling
information in different region.
Q4697
Internal Optical Drive
Quick Installation Guide
In 35 Languages
English
Français
Deutsch
Italiano
Español
Русский
Nederlands
Svenska
Türkçe
(Kurulum Kılavuzu)
Česky
Slovensky
Polski
繁體中文
簡體中文
日本語
ASUSTek COMPUTER INC.
4F, No. 150, LI-TE RD., PEITOU, TAIPEI, TAIWAN
ASUS COMPUTER GmbH
HARKORT STR. 21-23, 40880 RATINGEN, GERMANY
Fourth Edition V5 Published July 2014
Copyright @ 2014 ASUSTek Computer INC. All Rights Reserved.
Português
Magyar
Română
български
Ελληνικά
Indonesia
ไทย
Tiếng Việt
Bahasa Malaysia
Dansk
Suomi
Norsk
Українська
Eesti
Latviski
Lietuvių
Slovenščina
Қазақ
Q4697_ODD_QIG_V2.indd 1 10/15/10 1:12:21 PM
Notices
Federal Communications Commission Statement
This device complies with Part 15 of the FCC Rules. Operation is subject to the following two conditions:
• This device may not cause harmful interference, and
• This device must accept any interference received including interference that may cause undesired operation.
This equipment has been tested and found to comply with the limits for a Class B digital device, pursuant to Part 15 of
the FCC Rules. These limits are designed to provide reasonable protection against harmful interference in a residential
installation. This equipment generates, uses and can radiate radio frequency energy and, if not installed and used
in accordance with manufacturer’s instructions, may cause harmful interference to radio communications. However,
there is no guarantee that interference will not occur in a particular installation. If this equipment does cause harmful
interference to radio or television reception, which can be determined by turning the equipment off and on, the user is
encouraged to try to correct the interference by one of the following measures.
WARNING! The use of shielded cables for connection of the monitor to the graphics card is required to
assure compliance with FCC regulations. Changes or modifications to this unit not expressly approved by
the party responsible for compliance could void the user’s authority to operate this equipment.
Canadian Department of Communications Statement
This digital apparatus does not exceed the Class B limits for radio noise emissions from digital apparatus set out in the
Radio Interference Regulations of the Canadian Department of Communications.
This class B digital apparatus complies with Canadian ICES-003.
• Reorient or relocate the receiving antenna.
• Increase the separation between the equipment and receiver.
• Connect the equipment to an outlet on a circuit different from that to which the receiver is connected.
• Consult the dealer or an experienced radio/TV technician for help.
Q4697_ODD_QIG_V2.indd 2 9/28/10 9:45:34 AM
Q4697_ODD_QIG_V2.indd 3 9/28/10 9:45:40 AM
REACH
Complying with the REACH (Registration, Evaluation, Authorisation, and Restriction of Chemicals) regulatory framework, we published the chemical
substances in our products at ASUS REACH website at http://crs.asus.com/english/REACH.htm. (English)
Conforme avec le Règlement REACH (Enregistrement, Évaluation, Autorisation et Restriction des produits chimiques), nous avons publié la liste des
substances chimiques utilisées dans nos produits sur le site Web ASUS REACH à l’adresse http://crs.asus.com/english/REACH.htm. (Français)
Die rechtliche Rahmenbedingungen für REACH (Registration, Evaluation, Authorisation, and Restriction of Chemicals) erfüllend, veröffentlichen wir die
chemischen Substanzen in unseren Produkten auf unserer ASUS REACH-Webseite unter http://crs.asus.com/english/REACH.htm. (Deutsch)
Nel rispetto del regolamento REACH (Registration, Evaluation, Authorisation, and Restriction of Chemicals), le sostanze chimiche contenute nei prodotti ASUS
sono state pubblicate nel sito web ASUS, alla pagina: http://crs.asus.com/english/REACH.htm. (Italiano)
En cumplimiento del marco reglamentario REACH (registro, evaluación, autorización y restricción de productos químicos), hemos publicado las sustancias
que contienen nuestros productos a través del sitio web ASUS REACH, al que puede acceder a través de la dirección http://crs.asus.com/english/REACH.htm.
(Español)
in naleving van het REACH-regelgevingskader (Registratie, Evaluatie, Autorisatie en beperking van Chemische stoffen), hebben wij de chemische
bestanddelen van onze producten bekendgemaakt op de ASUS REACH-website op http://crs.asus.com/english/REACH.htm. (Nederlands)
Uppfyller REACH (Registration, Evaluation, Authorization, and Restriction of Chemicals (Registrering, Värdering, Behörighet och Begränsning)) reglerande
regelverk, vi publicerar de kemiska substanserna i våra produkter på ASUS REACH webbsida på http://crs.asus.com/english/REACH.htm. (Svenska)
REACH (Kimyasalların Kayıt Altına Alınması, Değerlendirilmesi, Ruhsatlandırılması ve Sınırlandırılması) düzenleyici çerçevesine uygun olarak, ürünlerimizdeki
kimyasal maddeleri http://crs.asus.com/english/REACH.htm adresindeki ASUS REACH websitesinde yayınlamaktayız.. (Türkçe)
V rámci shody s regulatorní platformou REACH (Registration, Evaluation, Authorisation, and Restriction of Chemicals (registrace, hodnocení, povolování a
omezování chemických látek)) byl zveřejněn seznam chemických látek přítomných v našich produktech na webu ASUS REACH na adrese http://crs.asus.com/
english/REACH.htm. (Čeština)
Dodržiavajúc regulačný rámec REACH (Registrácia, hodnotenie, autorizácia a obmedzovanie chemikálií) sme chemické látky používané v našich výrobkoch
uviedli na stránke ASUS REACH na adrese http://crs.asus.com/english/REACH.htm. (Slovensky)
Zgodnie z rozporządzeniem REACH (Rejestracja, ocena, autoryzacja i ograniczenie środków chemicznych), publikujemy informacje o środkach chemicznych
w naszych produktach, na stronie internetowej ASUS REACH pod adresem http://crs.asus.com/english/REACH.htm (Polski)
謹遵守REACH(Registration, Evaluation, Authorisation, and Restriction of Chemicals)管理規範,我們會將產品中的化學物質公告在華碩REACH網站,詳細請參考
http://crs.asus.com/english/REACH.htm. (繁體中文)
谨遵守REACH(Registration, Evaluation, Authorisation, and Restriction of Chemicals)管理规范,我们会将产品中的化学物质公告在华硕REACH网站,详细
请参考http://crs.asus.com/english/REACH.htm. (简体中文)
REACH(Registration,Evaluation,Authorisation,andRestrictionofChemicals)規則の基準を満たすため、ASUSはREACH専用サイトで弊社製品に含まれる化
学物質を公開しております。http://crs.asus.com/english/REACH.htm.(日本語)
Cumprindo o quadro regulamentar REACH (Registo, Avaliação, Autorização e Restrição dos Produtos Químicos), divulgamos as substâncias químicas
incluídas nos nossos produtos no Web site ASUS REACH em http://crs.asus.com/english/REACH.htm. (Português)
http://crs.asus.com/english/REACH.htm
http://crs.asus.com/english/REACH.htm
Q4697_ODD_QIG_V2.indd 5 9/28/10 9:45:43 AM
Q4697_ODD_QIG_V2.indd 6 9/28/10 9:45:43 AM
Hardware installation
Turn off your computer and any peripheral device connected to it before installing the optical drive. For avoiding
damage to the optical drive due to static electricity, use a grounded wrist strap or touch a safely grounded object or
a metal object, such as a power supply case, before installing the optical drive.
1. Remove the computer cover.
2. For IDE optical drives, configure the drive jumper to set the device to either Master, Slave, or Cable Select
mode before installing it into the chassis.
3. For SATA optical drives, there is no necessity for jumper settings.
4. Insert the optical drive into an available 5.25-inch bay (as shown in Figure 1).
5. For IDE optical drives, connect a 4-pin power supply cable to the DC input connector of the optical drive
(as shown in Figure 2). Next, connect an IDE cable to the IDE connector at the back of the optical drive,
matching the colored stripe on the cable with Pin 1 on the IDE connector (as shown in Figure 2). Connect the
other end of the IDE cable to the IDE connector on the motherboard.
6. For SATA optical drives, connect a 15-pin power supply cable to the DC input connector of the optical drive
(as shown in Figure 3). Next, connect a SATA cable to the SATA connector at the back of the optical drive (as
shown in Figure 3). Connect the other end of the SATA cable to the SATA connector on the motherboard.
7. Slide the optical drive into the bay and secure it with four screws.
8. Replace the computer cover.
9. Turn on your computer.
Installation matérielle
Eteignez votre ordinateur et tous les périphériques reliés à ce dernier avant d’installer
le disque optique. Afin d’éviter que l’électricité statique n’endommage le disque optique,
utilisez un bracelet antistatique, touchez un objet relié à la terre ou un objet en métal
tel que le bloc d’alimentation avant d’installer le disque optique.
1. Retirez le châssis de l’ordinateur.
2. Pour les disques optiques IDE, réglez le jumper pour configurer l’appareil en
mode Maitre, Esclave, ou Cable Select avant de l’installer dans le châssis.
3. Pour les disques optiques SATA, le réglage du jumper n’est pas nécessaire.
4. Insérez le disque optique dans une baie 5.25” disponible (comme illustré dans l’
image 1).
5. Pour les disques optiques IDE, branchez le câble d’alimentation quatre broches
au connecteur d’entrée d’alimentation du disque optique (comme illustré dans
l’image 2). Puis, branchez le câble IDE au connecteur IDE situé à l’arrière du
disque optique en alignant la bande colorée du câble IDE sur la broche 1 du
connecteur IDE (comme illustré dans l’image 2). Branchez l’autre extrémité du
câble IDE au connecteur IDE de la carte mère.
6. Pour les disque optiques SATA, branchez le câble d’alimentation quinze broches
au connecteur d’entrée d’alimentation du disque optique (comme illustré dans l’
image 3). Puis, branchez le câble SATA au connecteur SATA situé à l’arrière du
disque optique (comme indiqué dans l’image 3). Branchez l’autre extrémité du
câble SATA au connecteur SATA de la carte mère.
7. Glissez le disque optique dans la baie et sécurisez-le à l’aide de quatre vis.
8. Replacez le châssis dans l’ordinateur.
9. Allumez votre ordinateur.
Hardware-Installation
Schalten Sie den Computer und alle angeschlossenen Peripheriegeräte aus, bevor Sie
das optische Laufwerk installieren. Berühren Sie die Metallrückwand oder Seite des
Computers, um Schäden durch statische Entladungen zu vermeiden.
1. Entfernen Sie die Gehäuseabdeckung.
2. Stellen Sie bei optischen IDE-Laufwerken den Laufwerksjumper auf Master,
Slave, oder Cable Select-Modus ein, bevor Sie das Laufwerk installieren.
3. Bei optischen SATA-Laufwerken ist keine Jumpereinstellung notwendig.
4. Stecken Sie das Laufwerk in einen 5,25”-Schacht (siehe Abb. 1).
5. IDE-Laufwerk: Schließen Sie ein 4-pol. Netzkabel an den Netzanschluss des
optischen Laufwerks an (siehe Abb. 2). Verbinden Sie dann ein IDE-Kabel mit
dem IDE-Anschluss an der Laufwerkrückseite und richten Sie die Streifen des
Kabels auf Pol 1 des IDE-Anschlusses aus (siehe Abb. 2). Verbinden Sie das
andere Ende des IDE-Kabels mit dem IDE-Anschluss am Motherboard.
6. SATA-Laufwerk: Schließen Sie ein 15-pol. Netzkabel an den Netzanschluss des
optischen Laufwerks an (siehe Abb. 3). Verbinden Sie dann ein SATA-Kabel mit
dem SATA-Anschluss an der Laufwerkrückseite (siehe Abb. 3). Verbinden Sie
das andere Ende des SATA-Kabels mit dem SATA-Anschluss am Motherboard.
7. Stecken Sie das optische Laufwerk in den Schacht und sichern Sie es mit den
vier Schrauben.
8. Bringen Sie die Gehäuseabdeckung wieder an.
9. Schalten Sie den Computer ein.
Français Deutsch
Q4697_ODD_QIG_V2.indd 7 9/28/10 9:45:51 AM
Installazione Hardware
Prima di installare l’ unità ottica, spegnere il computer e tutte le periferiche ad esso
collegate. Quindi, per evitare danni all’ unità, dovuti ad elettricità statica, indossare
un cinturino da polso con messa a terra o toccare un oggetto con una messa a terra
sicura oppure un oggetto metallico, come una scatola di alimentazione.
1. Rimuovere la copertura del computer.
2. Per unità ottiche IDE, prima di installare l’ unità nel telaio, configurare il jumper e
impostare il dispositivo in modalità Master, Slave o Cable Select.
3. Per unità ottiche SATA, non è necessaria la configurazione del jumper.
4. Inserire l’ unità ottica in un vano libero da 5.25 pollici (come mostrato in Figura 1).
5. Per unità ottiche IDE, collegare un cavo di alimentazione da 4-pin al connettore
d’ ingresso DC dell’ unità (come mostrato in Figura 2). Quindi, collegare un cavo
IDE al connettore IDE sul retro del dispositivo, facendolo combaciare con la
striscia colorata sul cavo con Pin 1 sul connettore IDE (come mostrato in Figura
2). Collegare l’ altra estremità del cavo IDE al connettore IDE sulla scheda
madre.
6. Per unità ottiche SATA, collegare un cavo di alimentazione da 15-pin al
connettore d’ ingresso DC dell’ unità ottica (come mostrato in Figura 3). Quindi,
collegare un cavo SATA al connettore SATA sul retro del dispositivo (come
mostrato in Figura 3). Collegare l’ altra estremità del cavo SATA al connettore
SATA sulla scheda madre.
7. Far scorrere l’ unità ottica all’ interno del vano predisposto e fissarla con quattro
viti.
8. Rimontare la copertura del computer.
9. Accendere il computer.
Instalar el hardware
Apague el equipo y todos los dispositivos periféricos conectados a él antes de instalar
la unidad óptica. Para que la electricidad estática no dañe la unidad óptica, utilice una
correa para la muñeca con conexión a tierra o toque un objeto conectado a tierra de
forma segura o un objeto metálico, como por ejemplo la carcasa de una fuente de
alimentación, antes de instalar dicha unidad.
1. Retire la tapa del equipo.
2. Para unidades ópticas IDE, configure el puente de la unidad para establecer
el dispositivo en el modo Maestro, Esclavo o Selección de cable antes de
instalarlo en el chasis.
3. Para unidades ópticas SATA, no es necesario configurar ningún puente.
4. Inserte la unidad óptica en una bahía de 5,25 pulgadas disponible (como se
muestra en la figura 1).
5. Para unidades ópticas IDE, enchufe un cable de fuente de alimentación de 4
contactos en el conector de entrada de CC de la unidad óptica (como se muestra
en la figura 2). A continuación, enchufe un cable IDE en el conector IDE situado
en la parte posterior de la unidad óptica, haciendo coincidir la raya coloreada
del cable con el Contacto 1 del conector IDE (como se muestra en la figura 2).
Enchufe el otro extremo del cable IDE en el conector IDE de la placa base.
6. Para unidades ópticas SATA, enchufe un cable de fuente de alimentación de
15 contactos en el conector de entrada de CC de la unidad óptica (como se
muestra en la figura 3). A continuación, enchufe un cable SATA en el conector
SATA situado en la parte posterior de la unidad óptica (como se muestra en la
figura 3). Enchufe el otro extremo del cable SATA en el conector SATA de la
placa base.
7. Inserte la unidad óptica en la bahía y fíjela con cuatro tornillos.
8. Vuelva a colocar la tapa del equipo.
9. Encienda el equipo.
Hardware-installatie
Schakel uw computer en alle aangesloten randapparaten uit voordat u het optische
station installeert. Om schade aan het optische station door statische elektriciteit te
voorkomen, moet u een geaarde polsriem gebruiken of een veilig geaard of metalen
object, zoals de behuizing van een voeding, aanraken voordat u het optische station
installeert.
1. Verwijder de klep van de computer.
2. Voor optische IDE-stations moet u de jumper van het station configureren om
het apparaat in te stellen als master of slave of om de kabelselectiemodus te
selecteren voordat u het station in het chassis installeert.
3. Voor optische SATA-stations moeten de jumpers niet worden ingesteld.
4. Stop het optische station in een beschikbare 5,25” sleuf (zoals weergegeven in
Figuur 1).
5. Voor optische IDE-stations sluit u een 4-pins voedingskabel aan op de
gelijkstroomingang (DC) van het optische station (zoals weergegeven in Figuur
2). Sluit vervolgens een IDE-kabel aan op de IDE-aansluiting op de achterkant
van het optische station en lijn de gekleurde streep op de kabel uit op pin 1 op
de IDE-aansluiting (zoals weergegeven in Figuur 2). Sluit het andere uiteinde
van de IDE-kabel aan op de IDE-aansluiting op het moederbord.
6. Voor optische SATA-stations sluit u een 15-pins voedingskabel aan op de
gelijkstroomingang (DC) van het optische station (zoals weergegeven in Figuur
3). Sluit vervolgens een SATA-kabel aan op de SATA-aansluiting op de achterkant
van het optische station (zoals weergegeven in Figuur 3). Sluit het andere
uiteinde van de SATA-kabel aan op de SATA-aansluiting op het moederbord.
7. Schuif het optische station in de sleuf en maak het vast met de vier schroeven.
8. Plaats de klep van de computer terug.
9. Schakel uw computer in.
Italiano Español
Nederlands
Q4697_ODD_QIG_V2.indd 8 9/28/10 9:45:51 AM
Svenska
Türkçe
Česky Slovensky
Hårdvaruinstallation
Stäng av datorn och all kringutrustning som är ansluten till den innan den optiska
enheten installeras. För att undvika skador orsakade av statisk elektricitet på den
optiska enheten bör du använda en jordad handledsrem eller vidröra säkra jordade
objekt eller ett metallobjekt såsom ett spänningsaggregat innan den optiska enheten
installeras.
1. Ta bort datorns hölje.
2. IDE optiska enheter ska byglas till antingen Master, Slave eller Cabel Select
innan den monteras i chassit.
3. SATA otpiska enheter behöver inga bygelinställningar.
4. Sätt in den optiska enheten i ett tillgängligt 5,25 tumsfack (såsom visas i figur
1).
5. På IDE optiska enheter anslut strömkontakten med 4 stift till strömuttaget på
den optiska enheten (såsom visas i figur 2). Anslut sedan en IDE-kabel till IDE-
kontakten på baksidan av den optiska enheten med den färgade randen på
kabeln mot PIN 1 på IDE-kontakten (såsom visas i figur 2). Anslut den andra
änden av IDE-kabeln till IDE-kontakten på moderkortet.
6. På SATA optiska enheter anslut en 15-pinnars strömkontakt till strömuttaget
på den optiska enheten (såsom visas i figur 3).Anslut sedan en SATA-kabel till
SATA-kontakten på baksidan av den optiska enheten (såsom visas i figur 3).
Anslut den andra änden av SATA-kabeln till SATA-kontakten på moderkortet.
7. Låt den optiska enheten glida in i facket och fäst den med fyra skruvar.
8. Sätt tillbaka höljet på datorn.
9. Starta datorn.
Donanım kurulumu
Optik sürücüyü kurmadan önce bilgisayarınızı ve bağlı olan herhangi bir çevrebirim
aygıtını kapatın. Statik elektrik sebebiyle optik sürücüye hasar vermemek için optik
sürücüyü kurmadan önce topraklanan bileklik kayışını kullanın veya güç besleme
mahfazası gibi güvenilir bir şekilde topraklanan nesneye veya metal nesneye dokunun.
1. Bilgisayar kapağını çıkarın.
2. IDE optik sürücüleri için aygıtı Ana, Yardımcı veya Kablo Seçme moduna
ayarlamak için şasiye kurmadan önce sürücü atlatıcısını yapılandırın.
3. SATA optik sürücüleri için atlatıcı ayarlarının yapılmasına gerek yoktur.
4. Optik sürücüyü kullanılabilir 5.25-inç yuvaya yerleştirin (Şekil 1’de gösterildiği
gibi).
5. IDE optik sürücüleri için 4 pinli güç besleme kablosunu optik sürücünün DC giriş
konektörüne bağlayın (Şekil 2’de gösterildiği gibi). Ardından, IDE kablosunu
optik sürücünün arkasındaki IDE konektörüne bağlayın, kablodaki renkli kayışı
IDE konektöründeki Pin 1 kablosu ile eşleştirin (Şekil 2’de gösterildiği gibi). IDE
kablosunun diğer ucunu anakarttaki IDE konektörüne bağlayın.
6. SATA optik sürücüleri için 15 pinli güç besleme kablosunu optik sürücünün
DC giriş konektörüne bağlayın (Şekil 3’te gösterildiği gibi). Ardından, SATA
kablosunu optik sürücünün arkasındaki SATA konektörüne bağlayın (Şekil 3’te
gösterildiği gibi). SATA kablosunun diğer ucunu anakarttaki SATA konektörüne
bağlayın.
7. Optik sürücüyü yuvada kaydırın ve dört vida kullanarak sabitleyin.
8. Bilgisayar kapağını yerleştirin.
9. Bilgisayarı açın.
Instalace hardwaru
Před instalací optické jednotky vypněte počítač a veškerá připojená periferní zařízení.
Aby se zabránilo poškození optického disku statickou elektřinou, před instalací optické
jednotky použijte uzemněný náramek nebo se dotkněte uzemněného nebo kovového
předmětu, například skříně zdroje napájení.
1. Sejměte kryt skříně počítače.
2. Před instalací do skříně nakonfigurujte u optických jednotek s rozhraním IDE
pomocí propojek tato zařízení jako Master, Slave nebo Cable Select.
3. V případě optických jednotek s rozhraním SATA nejsou nastavení propojek
nutná.
4. Zasuňte optickou jednotku do volné šachty - 5,25 palců (viz Obrázek 1).
5. V případě optických jednotek s rozhraním IDE připojte 4kolíkový napájecí
kabel ke konektoru napájení optické jednotky (viz Obrázek 2). Potom připojte
kabel rozhraní IDE ke konektoru rozhraní IDE na zadní straně optické jednotky
tak, aby barevný proužek na kabelu odpovídal kolíku 1 na konektoru rozhraní
IDE (viz Obrázek 2). Připojte druhý konec kabelu rozhraní IDE ke konektoru
rozhraní IDE na základní desce.
6. V případě optických jednotek s rozhraním SATA připojte 15kolíkový napájecí
kabel ke konektoru napájení optické jednotky (viz Obrázek 3). Potom připojte
kabel rozhraní SATA ke konektoru rozhraní SATA na zadní straně optické
jednotky (viz Obrázek 3). Připojte druhý konec kabelu rozhraní SATA ke
konektoru rozhraní SATA na základní desce.
7. Zasuňte optickou jednotku do pozice a zajistěte šroubky.
8. Nasaďte kryt skříně počítače.
9. Zapněte počítač.
Inštalácia hardvéru
Pred inštalovaním optickej mechaniky vypnite svoj počítač a všetky periférne zariadenia.
Aby ste predišli poškodeniu optickej mechaniky statickou elektrinou, používajte
uzemnený remienok na zápästie, alebo sa pred inštaláciou optickej mechaniky dotknite
bezpečne uzemneného predmetu alebo kovového predmetu, akým je napríklad skrinka
elektrického prívodu.
1. Odmontujte kryt počítača.
2. V prípade optických mechaník IDE nakonfigurujte prepínač mechaniky a nastavte
zariadenie na režim riadiacej jednotky, podriadenej jednotky, alebo na režim voľby
kábla. Toto vykonajte pred inštaláciu mechaniky do rámu.
3. V prípade optických SATA mechaník nie je potrebné vykonať nastavenie prepínača.
4. Optickú jednotku zasuňte do dostupného 5,25 palcového výklenku (podľa Obrázka
1).
5. V prípade optických IDE mechaník pripojte 4 kolíkový prívodný kábel k vstupnému
konektoru jednosmerného prúdu na optickej mechanike (ako je to znázornené na
Obrázku 2). V ďalšom pripojte IDE kábel k IDE konektoru na zadnej strane optickej
mechaniky tak, aby bol zarovno s farebným pásom na kábli s kolíkom 1 na IDE
konektore (ako je to znázornené na Obrázku 2). Druhý koniec IDE kábla pripojte k
IDE konektoru na matičnej doske.
6. V prípade optických SATA mechaník pripojte 15 kolíkový prívodný kábel k vstupnému
konektoru jednosmerného prúdu na optickej mechanike (ako je to znázornené na
Obrázku 3). V ďalšom pripojte SATA kábel k SATA konektoru na zadnej strane
optickej mechaniky (ako je to znázornené na Obrázku 3). Druhý koniec SATA kábla
pripojte k SATA konektoru na matičnej doske.
7. Optickú mechaniku zasuňte do výklenku a zaistite štyrmi skrutkami.
8. Znovu nasaďte kryt počítača.
9. Zapnite počítač.
Q4697_ODD_QIG_V2.indd 9 9/28/10 9:45:52 AM
Cautions about replacing the front panel
For the safty of using the optical drive, please do not replace the front panel under the following circumstances:
1. Do not use a tray door with the lock tabs (as shown in the right figure) broken or worn.
2. Do not use a front panel with the lock tabs (as shown in the right figure) broken or worn.
有毒有害物質或元素的名稱及含量說明標示:
電子信息產品污染控制標示:圖中之數字為產品之環保使用期限。僅指電子信息產品中含有的
有毒有害物質或元素不致發生外洩或突變從而對環境造成污染或對人身、財產造成嚴重損害的
期限。
部件名稱
有害物質或元素
鉛(Pb) 鎘(Cd) 汞(Hg) 六價鉻
(Cr(VI))
多溴聯苯
(PBB)
多溴二苯
醚(PBDE)
印刷電路板及其電子組
件
×○○○ ○ ○
外殼 ×○○○ ○ ○
外部信號連接頭及線材 × ○ ○ ○ ○ ○
○:表示該有毒有害物質在該部件所有均質材料中的含量均在SJ/T 11363-2006標准規定的限量要求以下。
×:表示該有毒有害物質至少在該部件的某一均質材料中的含量超出SJ/T 11363-2006標准規定的限量要
求,然該部件仍符合歐盟指令2002/95/EC的規范。
備註:此產品所標示之環保使用期限,係指在一般正常使用狀況下。
AEEE Yönetmeliğine Uygundur
Q4697_ODD_QIG_V2.indd 4 9/28/10 9:45:42 AM
98
7
65
4
3
Takeback Services
ASUS recycling and takeback programs come from our commitment to the highest standards for protecting our environment.
We believe in providing solutions for our customers to be able to responsibly recycle our products, batteries and other
components as well as the packaging materials. Please go to http://csr.asus.com/english/Takeback.htm for detail recycling
information in different region.
2
Australia statement notice
From 1 January 2012 updated warranties apply to all ASUS products, consistent with the Australian Consumer
Law. For the latest product warranty details please visit http://support.asus.com. Our goods come with
guarantees that cannot be excluded under the Australian Consumer Law. You are entitled to a replacement or
refund for a major failure and compensation for any other reasonably foreseeable loss or damage. You are also
entitled to have the goods repaired or replaced if the goods fail to be of acceptable quality and the failure does
not amount to a major failure.
If you require assistance please call ASUS Customer Service 1300 2787 88 or visit us at
http://support.asus.com
Bienvenue ! / ようこそ ! / 환영합니다! / ยินดีต้อนรับ! /
Selamat datang!
/ Chào mừng! / / /
Hoş Geldiniz!
ntient les informations essentielles à la conguration de votre système. Suivez les étapes
numérotées apparaissant dans le diagramme de la carte mère pour garantir le bon
fonctionnement du système. Reportez-vous au manuel de l’utilisateur pour plus de détails sur
les composants, le BIOS ainsi que l’installation et la conguration des logiciels.
本クイックスタートガイドは、新しいシステムのセットアップに最も必要な情報をお届けします。次
のマザーボードのレイアウトにある手順に従い、新しいシステムをセットアップしてください。ハー
ドウェア、BIOS、ソフトウエアのインストール、設定などの詳細につきましては、マザーボードユー
ザーマニュアルをご参照ください。
이 빠른 시작 안내 설명서는 새로운 시스템을 설정하기 위한 가장 중요한 정보를 제공합니다.
아래 마더보드 구조에 표시된 지시 순서에 따라 설치를 수행해 주십시오. 하드웨어, BIOS,
소프트웨어 설치 및 구성에 관한 추가 정보는 마더보드에 포함된 사용 설명서를 참고해 주십
시오
*이 기기는 가정용 기기입니다.
คู่มือเริ่มต้นอย่างเร็ว ให้ข้อมูลที่คุณจำเป็นมากที่สุดเพื่อตั้งค่าระบบใหม่ของคุณ ปฏิบัติตาม
ขั้นตอนที่ทำเครื่องหมายไว้บนเลย์เอาต์ของเมนบอร์ดด้านล่าง เพื่อตั้งค่าระบบใหม่ของคุณ ดูคู่มือ
ผู้ใช้เมนบอร์ดของคุณสำหรับรายละเอียดเพิ่มเติมเกี่ยวกับการติดตั้งและการกำหนดค่าฮาร์ดแวร์,
BIOS และซอฟต์แวร
Panduan ringkas ini berisi informasi yang paling diperlukan untuk menyiapkan sistem baru
Anda. Ikuti langkah-langkah yang ditandai pada tata letak motherboard di bawah ini untuk
menyiapkan sistem baru Anda. Untuk info lebih rinci tentang perangkat keras, BIOS, serta
penginstalan dan kongurasi perangkat lunak, lihat panduan pengguna motherboard Anda.
Hướng dẫn khởi động nhanh này cung cấp thông tin cần thiết nhất để lắp đặt hệ thống mới
của bạn. Thực hiện theo các bước được đánh dấu trong cách bố trí bo mạch chủ dưới đây
để lắp đặt hệ thống mới của bạn. Tham khảo hướng dẫn sử dụng bo mạch chủ của bạn để
biết thêm chi tiết về phần cứng, BIOS và cài đặt phần mềm cũng như cấu hình.
Bu hızlı başlangıç kılavuzu yeni sisteminizi kurmak için en gerekli bilgileri sağlamaktadır. Yeni
sisteminizi kurmak için aşağıdaki anakart düzeninde işaretli olan adımları izleyin. Donanım,
BIOS ve yazılım kurulumu ve yapılandırması hakkında daha fazla bilgi için ana kart kullanım
kılavuzunuza başvurun.
Safety information
Observe the following precautions before installing and using the
drive.
Installation notices
y
Do not place this device in an unstable position, or on vibrating
surfaces.
y
Do not place this device under direct sunlight, or in humid or
damp places.
y
Do not use or place this device near magnetic elds, televisions,
or radios to avoid electronic interference that aects drive
performance.
y
Do not attempt to disassemble or repair the drive. Opening the
drive may result to exposure to laser radiation.
WARNING! Do not remove the front panel and/or tray door to avoid
the y-out of the rotating disc.
Using the device
y
Do not place damaged discs inside the device. A damaged disc
may break while in use and damage the device.
y
Use of any controls, adjustments, or procedures other than
those specied in this manual may result to hazardous radiation
exposure.
y
Do not attempt to disassemble the drive.
y
Do not move the device from a cold to a warm or hot
environment. Drastic change in temperature is harmful to the
device.
y
Before moving or uninstalling the drive, remove any disc in it.
y
Prevent liquids or any metal from getting into the device, If this
situation occurs, contact your retailer for help.
y
Do not use any evaporating solvents to clean the device. If you
accidentally sprayed any solvent on the device, use a clean
cloth to wipe it. You may also use a neutral cleaner to dilute the
solvent to easily wipe it from the device.
y
Do not turn o the computer while the device is in reading or
writing mode.
y
Do not place discs into the device immediately if they came
from a cold environment, specially during cold seasons. Wait
until the discs have reached room temperature.
Sicherheitsinformationen
Beachten Sie vor Installation und Nutzung des Laufwerks die nach-
stehenden Sicherheitsmaßnahmen.
Installationshinweise
y
Legen Sie dieses Gerät nicht in einer instabilen Position oder auf
vibrierenden Oberächen ab.
y
Legen Sie dieses Gerät nicht ins direkte Sonnenlicht oder an
feuchte oder nasse Orte.
y
Zur Vermeidung elektronischer Störungen, die sich auf die
Leistung des Laufwerks auswirken, verwenden und lagern
Sie dieses Gerät nicht in der Nähe von magnetischen Feldern,
Fernsehern oder Radios.
y
Versuchen Sie nicht, das Laufwerk zu demontieren oder zu
reparieren. Durch Önen des Laufwerks können Laserstrahlen
freigesetzt werden.
Warnung! Entfernen Sie nicht die Frontblende und/oder die Klappe der
Schublade; andernfalls könnte das rotierende Medium herausiegen.
Gerät nutzen
y
Legen Sie keine beschädigten Medien in das Gerät ein. Ein defektes
Medium kann bei der Benutzung brechen und das Gerät beschädigen.
y
Die Nutzung von Reglern, Einstellungen und Verfahren, die
nicht in dieser Anleitung angegeben sind, kann zu gefährlicher
Strahlenbelastung führen.
y
Versuchen Sie nicht, das Laufwerk zu demontieren.
y
Bringen Sie das Gerät nicht von einem kalten an einen warmen
oder heißen Ort. Drastische Temperaturunterschiede sind
schädlich für das Gerät.
y
Entnehmen Sie jegliche Medien, bevor Sie das Laufwerk
transportieren oder ausbauen.
y
Achten Sie darauf, dass keine Flüssigkeiten oder Metallteile in das
Gerät gelangen; falls dies dennoch passiert, wenden Sie sich an
Ihren Händler.
y
Verwenden Sie zur Reinigung des Gerätes keine verdunstenden
Lösungsmittel. Falls Sie versehentlich Lösungsmittel auf das
Gerät sprühen, wischen Sie es mit einem sauberen Tuch ab. Sie
können das Lösungsmittel auch mit einem neutralen Reiniger
verdünnen und so leichter vom Gerät entfernen.
y
Schalten Sie den Computer nicht ab, während sich das Gerät im
Lese- oder Schreibmodus bendet.
y
Legen Sie Medien nicht sofort ein, wenn sie aus einer kalten
Umgebung kommen, insbesondere während der kalten Jahreszeit.
Warten Sie, bis das Medium Zimmertemperatur erreicht hat.
CLASS 1 LASER PRODUCT
Laserprodukt der Klasse 1
Norsk
Українська
Eesti
Latviski
Lietuvių
Slovenščina
Қазақ
한국어
in 36 Languages
Q4697
Internal Optical Drive
Quick Installation Guide
In 35 Languages
English
Français
Deutsch
Italiano
Español
Русский
Nederlands
Svenska
Türkçe
(Kurulum Kılavuzu)
Česky
Slovensky
Polski
繁體中文
簡體中文
日本語
ASUSTek COMPUTER INC.
4F, No. 150, LI-TE RD., PEITOU, TAIPEI, TAIWAN
ASUS COMPUTER GmbH
HARKORT STR. 21-23, 40880 RATINGEN, GERMANY
Fourth Edition V4 Published July 2013
Copyright @ 2013 ASUSTek Computer INC. All Rights Reserved.
Português
Magyar
Română
български
Ελληνικά
Indonesia
ไทย
Tiếng Việt
Bahasa Malaysia
Dansk
Suomi
Norsk
Українська
Eesti
Latviski
Lietuvių
Slovenščina
Қазақ
Q4697_ODD_QIG_V2.indd 1 10/15/10 1:12:21 PM
Notices
Federal Communications Commission Statement
This device complies with Part 15 of the FCC Rules. Operation is subject to the following two conditions:
• This device may not cause harmful interference, and
• This device must accept any interference received including interference that may cause undesired operation.
This equipment has been tested and found to comply with the limits for a Class B digital device, pursuant to Part 15 of
the FCC Rules. These limits are designed to provide reasonable protection against harmful interference in a residential
installation. This equipment generates, uses and can radiate radio frequency energy and, if not installed and used
in accordance with manufacturer’s instructions, may cause harmful interference to radio communications. However,
there is no guarantee that interference will not occur in a particular installation. If this equipment does cause harmful
interference to radio or television reception, which can be determined by turning the equipment off and on, the user is
encouraged to try to correct the interference by one of the following measures.
WARNING! The use of shielded cables for connection of the monitor to the graphics card is required to
assure compliance with FCC regulations. Changes or modifications to this unit not expressly approved by
the party responsible for compliance could void the user’s authority to operate this equipment.
Canadian Department of Communications Statement
This digital apparatus does not exceed the Class B limits for radio noise emissions from digital apparatus set out in the
Radio Interference Regulations of the Canadian Department of Communications.
This class B digital apparatus complies with Canadian ICES-003.
• Reorient or relocate the receiving antenna.
• Increase the separation between the equipment and receiver.
• Connect the equipment to an outlet on a circuit different from that to which the receiver is connected.
• Consult the dealer or an experienced radio/TV technician for help.
Q4697_ODD_QIG_V2.indd 2 9/28/10 9:45:34 AM
Q4697_ODD_QIG_V2.indd 3 9/28/10 9:45:40 AM
REACH
Complying with the REACH (Registration, Evaluation, Authorisation, and Restriction of Chemicals) regulatory framework, we published the chemical
substances in our products at ASUS REACH website at http://crs.asus.com/english/REACH.htm. (English)
Conforme avec le Règlement REACH (Enregistrement, Évaluation, Autorisation et Restriction des produits chimiques), nous avons publié la liste des
substances chimiques utilisées dans nos produits sur le site Web ASUS REACH à l’adresse http://crs.asus.com/english/REACH.htm. (Français)
Die rechtliche Rahmenbedingungen für REACH (Registration, Evaluation, Authorisation, and Restriction of Chemicals) erfüllend, veröffentlichen wir die
chemischen Substanzen in unseren Produkten auf unserer ASUS REACH-Webseite unter http://crs.asus.com/english/REACH.htm. (Deutsch)
Nel rispetto del regolamento REACH (Registration, Evaluation, Authorisation, and Restriction of Chemicals), le sostanze chimiche contenute nei prodotti ASUS
sono state pubblicate nel sito web ASUS, alla pagina: http://crs.asus.com/english/REACH.htm. (Italiano)
En cumplimiento del marco reglamentario REACH (registro, evaluación, autorización y restricción de productos químicos), hemos publicado las sustancias
que contienen nuestros productos a través del sitio web ASUS REACH, al que puede acceder a través de la dirección http://crs.asus.com/english/REACH.htm.
(Español)
in naleving van het REACH-regelgevingskader (Registratie, Evaluatie, Autorisatie en beperking van Chemische stoffen), hebben wij de chemische
bestanddelen van onze producten bekendgemaakt op de ASUS REACH-website op http://crs.asus.com/english/REACH.htm. (Nederlands)
Uppfyller REACH (Registration, Evaluation, Authorization, and Restriction of Chemicals (Registrering, Värdering, Behörighet och Begränsning)) reglerande
regelverk, vi publicerar de kemiska substanserna i våra produkter på ASUS REACH webbsida på http://crs.asus.com/english/REACH.htm. (Svenska)
REACH (Kimyasalların Kayıt Altına Alınması, Değerlendirilmesi, Ruhsatlandırılması ve Sınırlandırılması) düzenleyici çerçevesine uygun olarak, ürünlerimizdeki
kimyasal maddeleri http://crs.asus.com/english/REACH.htm adresindeki ASUS REACH websitesinde yayınlamaktayız.. (Türkçe)
V rámci shody s regulatorní platformou REACH (Registration, Evaluation, Authorisation, and Restriction of Chemicals (registrace, hodnocení, povolování a
omezování chemických látek)) byl zveřejněn seznam chemických látek přítomných v našich produktech na webu ASUS REACH na adrese http://crs.asus.com/
english/REACH.htm. (Čeština)
Dodržiavajúc regulačný rámec REACH (Registrácia, hodnotenie, autorizácia a obmedzovanie chemikálií) sme chemické látky používané v našich výrobkoch
uviedli na stránke ASUS REACH na adrese http://crs.asus.com/english/REACH.htm. (Slovensky)
Zgodnie z rozporządzeniem REACH (Rejestracja, ocena, autoryzacja i ograniczenie środków chemicznych), publikujemy informacje o środkach chemicznych
w naszych produktach, na stronie internetowej ASUS REACH pod adresem http://crs.asus.com/english/REACH.htm (Polski)
謹遵守REACH(Registration, Evaluation, Authorisation, and Restriction of Chemicals)管理規範,我們會將產品中的化學物質公告在華碩REACH網站,詳細請參考
http://crs.asus.com/english/REACH.htm. (繁體中文)
谨遵守REACH(Registration, Evaluation, Authorisation, and Restriction of Chemicals)管理规范,我们会将产品中的化学物质公告在华硕REACH网站,详细
请参考http://crs.asus.com/english/REACH.htm. (简体中文)
REACH(Registration,Evaluation,Authorisation,andRestrictionofChemicals)規則の基準を満たすため、ASUSはREACH専用サイトで弊社製品に含まれる化
学物質を公開しております。http://crs.asus.com/english/REACH.htm.(日本語)
Cumprindo o quadro regulamentar REACH (Registo, Avaliação, Autorização e Restrição dos Produtos Químicos), divulgamos as substâncias químicas
incluídas nos nossos produtos no Web site ASUS REACH em http://crs.asus.com/english/REACH.htm. (Português)
http://crs.asus.com/english/REACH.htm
http://crs.asus.com/english/REACH.htm
Q4697_ODD_QIG_V2.indd 5 9/28/10 9:45:43 AM
A vegyi anyagok nyilvántartásba vételéről, értékeléséről, engedélyezéséről és korlátozásáról szóló REACH (Registration, Evaluation, Authorisation, and
Restriction of Chemicals) szabályozási kerettervvel összhangban közzétettük a termékeinkben lévő vegyi anyagokat az ASUS REACH webhelyén: http://crs.
asus.com/english/REACH.htm. (Magyar)
În conformitate cu cadrul regulator REACH (Înregistrarea, Evaluarea, Autorizarea şi Restricţionarea substanţelor chimice), publicăm substanţele chimice din
produsele noastre la pagina web a ASUS REACH http://crs.asus.com/english/REACH.htm. (Română)
Παρέχουμε συμβατότητα με τους κανονισμούς REACH (Registration, Evaluation, Authorization, and Restriction of Chemicals (Καταχώρηση, Αξιολόγηση,
Έγκριση και Απαγόρευση χημικών ουσιών)) και ως εκ τούτου δημοσιεύουμε τις χημικές ουσίες που χρησιμοποιούνται στα προϊόντα μας στον
ιστότοπο της ASUS REACH στη διεύθυνση http://crs.asus.com/english/REACH.htm. (Ελληνικά)
Guna mematuhi kerangka kerja peraturan hukum REACH (Registration, Evaluation, Authorisation, and Restriction of Chemicals), kami mempublikasikan zat
kimia dalam produk kami di situs Web ASUS REACH http://crsn.asus.com/english/REACH.htm. (Bahasa Indonesia)
เราเผยแพร่สารเคมีที่ใช้ในผลิตภัณฑ์ของเราซึ่งสอดคล้องกับเฟรมเวิร์กของข้อบังคับ REACH (การ ลงทะเบียน, การประเมิน, การอนุมัติ และข้อจำกัดของสารเคมี) ไว้ที่เว็
บไซต์ ASUS REACH ที่ http://crs.asus.com/english/REACH.htm ิ (ไทย)
Tuân thủ khuôn khổ quy định về REACH (Đăng ký, Đánh giá, Cấp phép và Giới hạn về Hóa chất), chúng tôi đã công bố các hóa chất trong sản
phẩm của công ty tại trang web REACH của ASUS http://crs.asus.com/english/REACH.htm. (Tiếng Việt)
Idet vi overholder REACH (registrering, vurdering og godkendelse af samt begrænsninger for kemikalier) bestemmelserne, offentliggør vi vores produkters
kemiske stoffer på ASUS REACH webstedet http://crs.asus.com/english/REACH.htm. (Dansk)
REACH (Registration, Evaluation, Authorization, and Restriction of Chemicals (kemikaalien rekisteröinti, arviointi ja lupamenettely)) -sääntelykehysten
mukaisesti julkaisemme tuotteidemme kemialliset ainesosat ASUS REACH -verkkosivustolla osoitteessa http://crs.asus.com/english/REACH.htm. (Suomi)
I samsvar med REACH (Registration, Evaluation, Authorization, and Restriction of Chemicals)-regelverket, publiserer vi de kjemiske stoffene i våre produkter
på ASUS REACH-nettstedet på http://crs.asus.com/english/REACH.htm. (Norsk)
Regulatiivse raamistiku REACH (Registration, Evaluation, Authorisation, and Restriction of Chemicals (Kemikaalide registreerimine, hindamine, legaliseerimine
ja kohaldatavad piirangud)) nõuetele vastamiseks oleme avaldanud andmed keemiliste ainete sisalduse kohta meie toodetes ASUS REACH veebisaidil
http://crs.asus.com/english/REACH.htm. (Eesti)
Saskaņā ar REACH (ķīmisko vielu reģistrēšanas, vērtēšanas, atļaujas sistēmas un ierobežojumu) regulu, mēs esam publicējuši ķīmiskās vielas, ko satur mūsu
produkti, ASUS REACH tīmekļa vietnē http://crs.asus.com/english/REACH.htm. (Latviski)
Vadovaudamiesi REACH (cheminių medžiagų registracijos, įvertinimo, autorizacijos ir apribojimų) reglamento koncepcija, mes ASUS REACH tiklavietėje http://
crs.asus.com/english/REACH.htm nurodėme į mūsų gaminių struktūrą įeinančias chemines medžiagas. (Lietuvių)
Bagi mematuhi rangka kerja peraturan REACH (Pendaftaran, Penilaian, Pemberian Kebenaran dan Pengehadan Bahan Kimia), kami telah menyiarkan bahan
kimia dalam produk kami di tapak web ASUS REACH di http://crs.asus.com/english/REACH.htm. (Bahasa Malaysia)
V skladu z določili direktive REACH (Registracija, ocenjevanje, odobritev in omejitev kemikalij) smo objavili kemične snovi v izdelkih na spletni strani ASUS
REACH na http://crs.asus.com/english/REACH.htm. (Slovenščina)
REACH (химиялық заттарды тіркеу, бағалау, рұқсат ету және шектеу) нормативтік-құқықтық базасына сәйкес біз өнімдеріміздегі химиялық
заттардың тізімін ASUS REACH веб-торабында http://crs.asus.com/english/REACH.htm мекенжайы бойынша жарияладық. (қазақша)
Q4697_ODD_QIG_V2.indd 6 9/28/10 9:45:43 AM
Hardware installation
Turn off your computer and any peripheral device connected to it before installing the optical drive. For avoiding
damage to the optical drive due to static electricity, use a grounded wrist strap or touch a safely grounded object or
a metal object, such as a power supply case, before installing the optical drive.
1. Remove the computer cover.
2. For IDE optical drives, configure the drive jumper to set the device to either Master, Slave, or Cable Select
mode before installing it into the chassis.
3. For SATA optical drives, there is no necessity for jumper settings.
4. Insert the optical drive into an available 5.25-inch bay (as shown in Figure 1).
5. For IDE optical drives, connect a 4-pin power supply cable to the DC input connector of the optical drive
(as shown in Figure 2). Next, connect an IDE cable to the IDE connector at the back of the optical drive,
matching the colored stripe on the cable with Pin 1 on the IDE connector (as shown in Figure 2). Connect the
other end of the IDE cable to the IDE connector on the motherboard.
6. For SATA optical drives, connect a 15-pin power supply cable to the DC input connector of the optical drive
(as shown in Figure 3). Next, connect a SATA cable to the SATA connector at the back of the optical drive (as
shown in Figure 3). Connect the other end of the SATA cable to the SATA connector on the motherboard.
7. Slide the optical drive into the bay and secure it with four screws.
8. Replace the computer cover.
9. Turn on your computer.
Installation matérielle
Eteignez votre ordinateur et tous les périphériques reliés à ce dernier avant d’installer
le disque optique. Afin d’éviter que l’électricité statique n’endommage le disque optique,
utilisez un bracelet antistatique, touchez un objet relié à la terre ou un objet en métal
tel que le bloc d’alimentation avant d’installer le disque optique.
1. Retirez le châssis de l’ordinateur.
2. Pour les disques optiques IDE, réglez le jumper pour configurer l’appareil en
mode Maitre, Esclave, ou Cable Select avant de l’installer dans le châssis.
3. Pour les disques optiques SATA, le réglage du jumper n’est pas nécessaire.
4. Insérez le disque optique dans une baie 5.25” disponible (comme illustré dans l’
image 1).
5. Pour les disques optiques IDE, branchez le câble d’alimentation quatre broches
au connecteur d’entrée d’alimentation du disque optique (comme illustré dans
l’image 2). Puis, branchez le câble IDE au connecteur IDE situé à l’arrière du
disque optique en alignant la bande colorée du câble IDE sur la broche 1 du
connecteur IDE (comme illustré dans l’image 2). Branchez l’autre extrémité du
câble IDE au connecteur IDE de la carte mère.
6. Pour les disque optiques SATA, branchez le câble d’alimentation quinze broches
au connecteur d’entrée d’alimentation du disque optique (comme illustré dans l’
image 3). Puis, branchez le câble SATA au connecteur SATA situé à l’arrière du
disque optique (comme indiqué dans l’image 3). Branchez l’autre extrémité du
câble SATA au connecteur SATA de la carte mère.
7. Glissez le disque optique dans la baie et sécurisez-le à l’aide de quatre vis.
8. Replacez le châssis dans l’ordinateur.
9. Allumez votre ordinateur.
Hardware-Installation
Schalten Sie den Computer und alle angeschlossenen Peripheriegeräte aus, bevor Sie
das optische Laufwerk installieren. Berühren Sie die Metallrückwand oder Seite des
Computers, um Schäden durch statische Entladungen zu vermeiden.
1. Entfernen Sie die Gehäuseabdeckung.
2. Stellen Sie bei optischen IDE-Laufwerken den Laufwerksjumper auf Master,
Slave, oder Cable Select-Modus ein, bevor Sie das Laufwerk installieren.
3. Bei optischen SATA-Laufwerken ist keine Jumpereinstellung notwendig.
4. Stecken Sie das Laufwerk in einen 5,25”-Schacht (siehe Abb. 1).
5. IDE-Laufwerk: Schließen Sie ein 4-pol. Netzkabel an den Netzanschluss des
optischen Laufwerks an (siehe Abb. 2). Verbinden Sie dann ein IDE-Kabel mit
dem IDE-Anschluss an der Laufwerkrückseite und richten Sie die Streifen des
Kabels auf Pol 1 des IDE-Anschlusses aus (siehe Abb. 2). Verbinden Sie das
andere Ende des IDE-Kabels mit dem IDE-Anschluss am Motherboard.
6. SATA-Laufwerk: Schließen Sie ein 15-pol. Netzkabel an den Netzanschluss des
optischen Laufwerks an (siehe Abb. 3). Verbinden Sie dann ein SATA-Kabel mit
dem SATA-Anschluss an der Laufwerkrückseite (siehe Abb. 3). Verbinden Sie
das andere Ende des SATA-Kabels mit dem SATA-Anschluss am Motherboard.
7. Stecken Sie das optische Laufwerk in den Schacht und sichern Sie es mit den
vier Schrauben.
8. Bringen Sie die Gehäuseabdeckung wieder an.
9. Schalten Sie den Computer ein.
Français Deutsch
Q4697_ODD_QIG_V2.indd 7 9/28/10 9:45:51 AM
Installazione Hardware
Prima di installare l’ unità ottica, spegnere il computer e tutte le periferiche ad esso
collegate. Quindi, per evitare danni all’ unità, dovuti ad elettricità statica, indossare
un cinturino da polso con messa a terra o toccare un oggetto con una messa a terra
sicura oppure un oggetto metallico, come una scatola di alimentazione.
1. Rimuovere la copertura del computer.
2. Per unità ottiche IDE, prima di installare l’ unità nel telaio, configurare il jumper e
impostare il dispositivo in modalità Master, Slave o Cable Select.
3. Per unità ottiche SATA, non è necessaria la configurazione del jumper.
4. Inserire l’ unità ottica in un vano libero da 5.25 pollici (come mostrato in Figura 1).
5. Per unità ottiche IDE, collegare un cavo di alimentazione da 4-pin al connettore
d’ ingresso DC dell’ unità (come mostrato in Figura 2). Quindi, collegare un cavo
IDE al connettore IDE sul retro del dispositivo, facendolo combaciare con la
striscia colorata sul cavo con Pin 1 sul connettore IDE (come mostrato in Figura
2). Collegare l’ altra estremità del cavo IDE al connettore IDE sulla scheda
madre.
6. Per unità ottiche SATA, collegare un cavo di alimentazione da 15-pin al
connettore d’ ingresso DC dell’ unità ottica (come mostrato in Figura 3). Quindi,
collegare un cavo SATA al connettore SATA sul retro del dispositivo (come
mostrato in Figura 3). Collegare l’ altra estremità del cavo SATA al connettore
SATA sulla scheda madre.
7. Far scorrere l’ unità ottica all’ interno del vano predisposto e fissarla con quattro
viti.
8. Rimontare la copertura del computer.
9. Accendere il computer.
Instalar el hardware
Apague el equipo y todos los dispositivos periféricos conectados a él antes de instalar
la unidad óptica. Para que la electricidad estática no dañe la unidad óptica, utilice una
correa para la muñeca con conexión a tierra o toque un objeto conectado a tierra de
forma segura o un objeto metálico, como por ejemplo la carcasa de una fuente de
alimentación, antes de instalar dicha unidad.
1. Retire la tapa del equipo.
2. Para unidades ópticas IDE, configure el puente de la unidad para establecer
el dispositivo en el modo Maestro, Esclavo o Selección de cable antes de
instalarlo en el chasis.
3. Para unidades ópticas SATA, no es necesario configurar ningún puente.
4. Inserte la unidad óptica en una bahía de 5,25 pulgadas disponible (como se
muestra en la figura 1).
5. Para unidades ópticas IDE, enchufe un cable de fuente de alimentación de 4
contactos en el conector de entrada de CC de la unidad óptica (como se muestra
en la figura 2). A continuación, enchufe un cable IDE en el conector IDE situado
en la parte posterior de la unidad óptica, haciendo coincidir la raya coloreada
del cable con el Contacto 1 del conector IDE (como se muestra en la figura 2).
Enchufe el otro extremo del cable IDE en el conector IDE de la placa base.
6. Para unidades ópticas SATA, enchufe un cable de fuente de alimentación de
15 contactos en el conector de entrada de CC de la unidad óptica (como se
muestra en la figura 3). A continuación, enchufe un cable SATA en el conector
SATA situado en la parte posterior de la unidad óptica (como se muestra en la
figura 3). Enchufe el otro extremo del cable SATA en el conector SATA de la
placa base.
7. Inserte la unidad óptica en la bahía y fíjela con cuatro tornillos.
8. Vuelva a colocar la tapa del equipo.
9. Encienda el equipo.
Hardware-installatie
Schakel uw computer en alle aangesloten randapparaten uit voordat u het optische
station installeert. Om schade aan het optische station door statische elektriciteit te
voorkomen, moet u een geaarde polsriem gebruiken of een veilig geaard of metalen
object, zoals de behuizing van een voeding, aanraken voordat u het optische station
installeert.
1. Verwijder de klep van de computer.
2. Voor optische IDE-stations moet u de jumper van het station configureren om
het apparaat in te stellen als master of slave of om de kabelselectiemodus te
selecteren voordat u het station in het chassis installeert.
3. Voor optische SATA-stations moeten de jumpers niet worden ingesteld.
4. Stop het optische station in een beschikbare 5,25” sleuf (zoals weergegeven in
Figuur 1).
5. Voor optische IDE-stations sluit u een 4-pins voedingskabel aan op de
gelijkstroomingang (DC) van het optische station (zoals weergegeven in Figuur
2). Sluit vervolgens een IDE-kabel aan op de IDE-aansluiting op de achterkant
van het optische station en lijn de gekleurde streep op de kabel uit op pin 1 op
de IDE-aansluiting (zoals weergegeven in Figuur 2). Sluit het andere uiteinde
van de IDE-kabel aan op de IDE-aansluiting op het moederbord.
6. Voor optische SATA-stations sluit u een 15-pins voedingskabel aan op de
gelijkstroomingang (DC) van het optische station (zoals weergegeven in Figuur
3). Sluit vervolgens een SATA-kabel aan op de SATA-aansluiting op de achterkant
van het optische station (zoals weergegeven in Figuur 3). Sluit het andere
uiteinde van de SATA-kabel aan op de SATA-aansluiting op het moederbord.
7. Schuif het optische station in de sleuf en maak het vast met de vier schroeven.
8. Plaats de klep van de computer terug.
9. Schakel uw computer in.
Italiano Español
Nederlands
Q4697_ODD_QIG_V2.indd 8 9/28/10 9:45:51 AM
Svenska
Türkçe
Česky Slovensky
Hårdvaruinstallation
Stäng av datorn och all kringutrustning som är ansluten till den innan den optiska
enheten installeras. För att undvika skador orsakade av statisk elektricitet på den
optiska enheten bör du använda en jordad handledsrem eller vidröra säkra jordade
objekt eller ett metallobjekt såsom ett spänningsaggregat innan den optiska enheten
installeras.
1. Ta bort datorns hölje.
2. IDE optiska enheter ska byglas till antingen Master, Slave eller Cabel Select
innan den monteras i chassit.
3. SATA otpiska enheter behöver inga bygelinställningar.
4. Sätt in den optiska enheten i ett tillgängligt 5,25 tumsfack (såsom visas i figur
1).
5. På IDE optiska enheter anslut strömkontakten med 4 stift till strömuttaget på
den optiska enheten (såsom visas i figur 2). Anslut sedan en IDE-kabel till IDE-
kontakten på baksidan av den optiska enheten med den färgade randen på
kabeln mot PIN 1 på IDE-kontakten (såsom visas i figur 2). Anslut den andra
änden av IDE-kabeln till IDE-kontakten på moderkortet.
6. På SATA optiska enheter anslut en 15-pinnars strömkontakt till strömuttaget
på den optiska enheten (såsom visas i figur 3).Anslut sedan en SATA-kabel till
SATA-kontakten på baksidan av den optiska enheten (såsom visas i figur 3).
Anslut den andra änden av SATA-kabeln till SATA-kontakten på moderkortet.
7. Låt den optiska enheten glida in i facket och fäst den med fyra skruvar.
8. Sätt tillbaka höljet på datorn.
9. Starta datorn.
Donanım kurulumu
Optik sürücüyü kurmadan önce bilgisayarınızı ve bağlı olan herhangi bir çevrebirim
aygıtını kapatın. Statik elektrik sebebiyle optik sürücüye hasar vermemek için optik
sürücüyü kurmadan önce topraklanan bileklik kayışını kullanın veya güç besleme
mahfazası gibi güvenilir bir şekilde topraklanan nesneye veya metal nesneye dokunun.
1. Bilgisayar kapağını çıkarın.
2. IDE optik sürücüleri için aygıtı Ana, Yardımcı veya Kablo Seçme moduna
ayarlamak için şasiye kurmadan önce sürücü atlatıcısını yapılandırın.
3. SATA optik sürücüleri için atlatıcı ayarlarının yapılmasına gerek yoktur.
4. Optik sürücüyü kullanılabilir 5.25-inç yuvaya yerleştirin (Şekil 1’de gösterildiği
gibi).
5. IDE optik sürücüleri için 4 pinli güç besleme kablosunu optik sürücünün DC giriş
konektörüne bağlayın (Şekil 2’de gösterildiği gibi). Ardından, IDE kablosunu
optik sürücünün arkasındaki IDE konektörüne bağlayın, kablodaki renkli kayışı
IDE konektöründeki Pin 1 kablosu ile eşleştirin (Şekil 2’de gösterildiği gibi). IDE
kablosunun diğer ucunu anakarttaki IDE konektörüne bağlayın.
6. SATA optik sürücüleri için 15 pinli güç besleme kablosunu optik sürücünün
DC giriş konektörüne bağlayın (Şekil 3’te gösterildiği gibi). Ardından, SATA
kablosunu optik sürücünün arkasındaki SATA konektörüne bağlayın (Şekil 3’te
gösterildiği gibi). SATA kablosunun diğer ucunu anakarttaki SATA konektörüne
bağlayın.
7. Optik sürücüyü yuvada kaydırın ve dört vida kullanarak sabitleyin.
8. Bilgisayar kapağını yerleştirin.
9. Bilgisayarı açın.
Instalace hardwaru
Před instalací optické jednotky vypněte počítač a veškerá připojená periferní zařízení.
Aby se zabránilo poškození optického disku statickou elektřinou, před instalací optické
jednotky použijte uzemněný náramek nebo se dotkněte uzemněného nebo kovového
předmětu, například skříně zdroje napájení.
1. Sejměte kryt skříně počítače.
2. Před instalací do skříně nakonfigurujte u optických jednotek s rozhraním IDE
pomocí propojek tato zařízení jako Master, Slave nebo Cable Select.
3. V případě optických jednotek s rozhraním SATA nejsou nastavení propojek
nutná.
4. Zasuňte optickou jednotku do volné šachty - 5,25 palců (viz Obrázek 1).
5. V případě optických jednotek s rozhraním IDE připojte 4kolíkový napájecí
kabel ke konektoru napájení optické jednotky (viz Obrázek 2). Potom připojte
kabel rozhraní IDE ke konektoru rozhraní IDE na zadní straně optické jednotky
tak, aby barevný proužek na kabelu odpovídal kolíku 1 na konektoru rozhraní
IDE (viz Obrázek 2). Připojte druhý konec kabelu rozhraní IDE ke konektoru
rozhraní IDE na základní desce.
6. V případě optických jednotek s rozhraním SATA připojte 15kolíkový napájecí
kabel ke konektoru napájení optické jednotky (viz Obrázek 3). Potom připojte
kabel rozhraní SATA ke konektoru rozhraní SATA na zadní straně optické
jednotky (viz Obrázek 3). Připojte druhý konec kabelu rozhraní SATA ke
konektoru rozhraní SATA na základní desce.
7. Zasuňte optickou jednotku do pozice a zajistěte šroubky.
8. Nasaďte kryt skříně počítače.
9. Zapněte počítač.
Inštalácia hardvéru
Pred inštalovaním optickej mechaniky vypnite svoj počítač a všetky periférne zariadenia.
Aby ste predišli poškodeniu optickej mechaniky statickou elektrinou, používajte
uzemnený remienok na zápästie, alebo sa pred inštaláciou optickej mechaniky dotknite
bezpečne uzemneného predmetu alebo kovového predmetu, akým je napríklad skrinka
elektrického prívodu.
1. Odmontujte kryt počítača.
2. V prípade optických mechaník IDE nakonfigurujte prepínač mechaniky a nastavte
zariadenie na režim riadiacej jednotky, podriadenej jednotky, alebo na režim voľby
kábla. Toto vykonajte pred inštaláciu mechaniky do rámu.
3. V prípade optických SATA mechaník nie je potrebné vykonať nastavenie prepínača.
4. Optickú jednotku zasuňte do dostupného 5,25 palcového výklenku (podľa Obrázka
1).
5. V prípade optických IDE mechaník pripojte 4 kolíkový prívodný kábel k vstupnému
konektoru jednosmerného prúdu na optickej mechanike (ako je to znázornené na
Obrázku 2). V ďalšom pripojte IDE kábel k IDE konektoru na zadnej strane optickej
mechaniky tak, aby bol zarovno s farebným pásom na kábli s kolíkom 1 na IDE
konektore (ako je to znázornené na Obrázku 2). Druhý koniec IDE kábla pripojte k
IDE konektoru na matičnej doske.
6. V prípade optických SATA mechaník pripojte 15 kolíkový prívodný kábel k vstupnému
konektoru jednosmerného prúdu na optickej mechanike (ako je to znázornené na
Obrázku 3). V ďalšom pripojte SATA kábel k SATA konektoru na zadnej strane
optickej mechaniky (ako je to znázornené na Obrázku 3). Druhý koniec SATA kábla
pripojte k SATA konektoru na matičnej doske.
7. Optickú mechaniku zasuňte do výklenku a zaistite štyrmi skrutkami.
8. Znovu nasaďte kryt počítača.
9. Zapnite počítač.
Q4697_ODD_QIG_V2.indd 9 9/28/10 9:45:52 AM
Cautions about replacing the front panel
For the safty of using the optical drive, please do not replace the front panel under the following circumstances:
1. Do not use a tray door with the lock tabs (as shown in the right figure) broken or worn.
2. Do not use a front panel with the lock tabs (as shown in the right figure) broken or worn.
有毒有害物質或元素的名稱及含量說明標示:
電子信息產品污染控制標示:圖中之數字為產品之環保使用期限。僅指電子信息產品中含有的
有毒有害物質或元素不致發生外洩或突變從而對環境造成污染或對人身、財產造成嚴重損害的
期限。
部件名稱
有害物質或元素
鉛(Pb) 鎘(Cd) 汞(Hg) 六價鉻
(Cr(VI))
多溴聯苯
(PBB)
多溴二苯
醚(PBDE)
印刷電路板及其電子組
件
×○○○ ○ ○
外殼 ×○○○ ○ ○
外部信號連接頭及線材 × ○ ○ ○ ○ ○
○:表示該有毒有害物質在該部件所有均質材料中的含量均在SJ/T 11363-2006標准規定的限量要求以下。
×:表示該有毒有害物質至少在該部件的某一均質材料中的含量超出SJ/T 11363-2006標准規定的限量要
求,然該部件仍符合歐盟指令2002/95/EC的規范。
備註:此產品所標示之環保使用期限,係指在一般正常使用狀況下。
AEEE Yönetmeliğine Uygundur
Q4697_ODD_QIG_V2.indd 4 9/28/10 9:45:42 AM
987
654
3
Takeback Services
ASUS recycling and takeback programs come from our commitment to the highest standards for protecting our environment.
We believe in providing solutions for our customers to be able to responsibly recycle our products, batteries and other
components as well as the packaging materials. Please go to http://csr.asus.com/english/Takeback.htm for detail recycling
information in different region.
Q4697
Internal Optical Drive
Quick Installation Guide
In 35 Languages
English
Français
Deutsch
Italiano
Español
Русский
Nederlands
Svenska
Türkçe
(Kurulum Kılavuzu)
Česky
Slovensky
Polski
繁體中文
簡體中文
日本語
ASUSTek COMPUTER INC.
4F, No. 150, LI-TE RD., PEITOU, TAIPEI, TAIWAN
ASUS COMPUTER GmbH
HARKORT STR. 21-23, 40880 RATINGEN, GERMANY
Fourth Edition V4 Published July 2013
Copyright @ 2013 ASUSTek Computer INC. All Rights Reserved.
Português
Magyar
Română
български
Ελληνικά
Indonesia
ไทย
Tiếng Việt
Bahasa Malaysia
Dansk
Suomi
Norsk
Українська
Eesti
Latviski
Lietuvių
Slovenščina
Қазақ
Q4697_ODD_QIG_V2.indd 1 10/15/10 1:12:21 PM
Notices
Federal Communications Commission Statement
This device complies with Part 15 of the FCC Rules. Operation is subject to the following two conditions:
• This device may not cause harmful interference, and
• This device must accept any interference received including interference that may cause undesired operation.
This equipment has been tested and found to comply with the limits for a Class B digital device, pursuant to Part 15 of
the FCC Rules. These limits are designed to provide reasonable protection against harmful interference in a residential
installation. This equipment generates, uses and can radiate radio frequency energy and, if not installed and used
in accordance with manufacturer’s instructions, may cause harmful interference to radio communications. However,
there is no guarantee that interference will not occur in a particular installation. If this equipment does cause harmful
interference to radio or television reception, which can be determined by turning the equipment off and on, the user is
encouraged to try to correct the interference by one of the following measures.
WARNING! The use of shielded cables for connection of the monitor to the graphics card is required to
assure compliance with FCC regulations. Changes or modifications to this unit not expressly approved by
the party responsible for compliance could void the user’s authority to operate this equipment.
Canadian Department of Communications Statement
This digital apparatus does not exceed the Class B limits for radio noise emissions from digital apparatus set out in the
Radio Interference Regulations of the Canadian Department of Communications.
This class B digital apparatus complies with Canadian ICES-003.
• Reorient or relocate the receiving antenna.
• Increase the separation between the equipment and receiver.
• Connect the equipment to an outlet on a circuit different from that to which the receiver is connected.
• Consult the dealer or an experienced radio/TV technician for help.
Q4697_ODD_QIG_V2.indd 2 9/28/10 9:45:34 AM
Q4697_ODD_QIG_V2.indd 3 9/28/10 9:45:40 AM
REACH
Complying with the REACH (Registration, Evaluation, Authorisation, and Restriction of Chemicals) regulatory framework, we published the chemical
substances in our products at ASUS REACH website at http://crs.asus.com/english/REACH.htm. (English)
Conforme avec le Règlement REACH (Enregistrement, Évaluation, Autorisation et Restriction des produits chimiques), nous avons publié la liste des
substances chimiques utilisées dans nos produits sur le site Web ASUS REACH à l’adresse http://crs.asus.com/english/REACH.htm. (Français)
Die rechtliche Rahmenbedingungen für REACH (Registration, Evaluation, Authorisation, and Restriction of Chemicals) erfüllend, veröffentlichen wir die
chemischen Substanzen in unseren Produkten auf unserer ASUS REACH-Webseite unter http://crs.asus.com/english/REACH.htm. (Deutsch)
Nel rispetto del regolamento REACH (Registration, Evaluation, Authorisation, and Restriction of Chemicals), le sostanze chimiche contenute nei prodotti ASUS
sono state pubblicate nel sito web ASUS, alla pagina: http://crs.asus.com/english/REACH.htm. (Italiano)
En cumplimiento del marco reglamentario REACH (registro, evaluación, autorización y restricción de productos químicos), hemos publicado las sustancias
que contienen nuestros productos a través del sitio web ASUS REACH, al que puede acceder a través de la dirección http://crs.asus.com/english/REACH.htm.
(Español)
in naleving van het REACH-regelgevingskader (Registratie, Evaluatie, Autorisatie en beperking van Chemische stoffen), hebben wij de chemische
bestanddelen van onze producten bekendgemaakt op de ASUS REACH-website op http://crs.asus.com/english/REACH.htm. (Nederlands)
Uppfyller REACH (Registration, Evaluation, Authorization, and Restriction of Chemicals (Registrering, Värdering, Behörighet och Begränsning)) reglerande
regelverk, vi publicerar de kemiska substanserna i våra produkter på ASUS REACH webbsida på http://crs.asus.com/english/REACH.htm. (Svenska)
REACH (Kimyasalların Kayıt Altına Alınması, Değerlendirilmesi, Ruhsatlandırılması ve Sınırlandırılması) düzenleyici çerçevesine uygun olarak, ürünlerimizdeki
kimyasal maddeleri http://crs.asus.com/english/REACH.htm adresindeki ASUS REACH websitesinde yayınlamaktayız.. (Türkçe)
V rámci shody s regulatorní platformou REACH (Registration, Evaluation, Authorisation, and Restriction of Chemicals (registrace, hodnocení, povolování a
omezování chemických látek)) byl zveřejněn seznam chemických látek přítomných v našich produktech na webu ASUS REACH na adrese http://crs.asus.com/
english/REACH.htm. (Čeština)
Dodržiavajúc regulačný rámec REACH (Registrácia, hodnotenie, autorizácia a obmedzovanie chemikálií) sme chemické látky používané v našich výrobkoch
uviedli na stránke ASUS REACH na adrese http://crs.asus.com/english/REACH.htm. (Slovensky)
Zgodnie z rozporządzeniem REACH (Rejestracja, ocena, autoryzacja i ograniczenie środków chemicznych), publikujemy informacje o środkach chemicznych
w naszych produktach, na stronie internetowej ASUS REACH pod adresem http://crs.asus.com/english/REACH.htm (Polski)
謹遵守REACH(Registration, Evaluation, Authorisation, and Restriction of Chemicals)管理規範,我們會將產品中的化學物質公告在華碩REACH網站,詳細請參考
http://crs.asus.com/english/REACH.htm. (繁體中文)
谨遵守REACH(Registration, Evaluation, Authorisation, and Restriction of Chemicals)管理规范,我们会将产品中的化学物质公告在华硕REACH网站,详细
请参考http://crs.asus.com/english/REACH.htm. (简体中文)
REACH(Registration,Evaluation,Authorisation,andRestrictionofChemicals)規則の基準を満たすため、ASUSはREACH専用サイトで弊社製品に含まれる化
学物質を公開しております。http://crs.asus.com/english/REACH.htm.(日本語)
Cumprindo o quadro regulamentar REACH (Registo, Avaliação, Autorização e Restrição dos Produtos Químicos), divulgamos as substâncias químicas
incluídas nos nossos produtos no Web site ASUS REACH em http://crs.asus.com/english/REACH.htm. (Português)
http://crs.asus.com/english/REACH.htm
http://crs.asus.com/english/REACH.htm
Q4697_ODD_QIG_V2.indd 5 9/28/10 9:45:43 AM
A vegyi anyagok nyilvántartásba vételéről, értékeléséről, engedélyezéséről és korlátozásáról szóló REACH (Registration, Evaluation, Authorisation, and
Restriction of Chemicals) szabályozási kerettervvel összhangban közzétettük a termékeinkben lévő vegyi anyagokat az ASUS REACH webhelyén: http://crs.
asus.com/english/REACH.htm. (Magyar)
În conformitate cu cadrul regulator REACH (Înregistrarea, Evaluarea, Autorizarea şi Restricţionarea substanţelor chimice), publicăm substanţele chimice din
produsele noastre la pagina web a ASUS REACH http://crs.asus.com/english/REACH.htm. (Română)
Παρέχουμε συμβατότητα με τους κανονισμούς REACH (Registration, Evaluation, Authorization, and Restriction of Chemicals (Καταχώρηση, Αξιολόγηση,
Έγκριση και Απαγόρευση χημικών ουσιών)) και ως εκ τούτου δημοσιεύουμε τις χημικές ουσίες που χρησιμοποιούνται στα προϊόντα μας στον
ιστότοπο της ASUS REACH στη διεύθυνση http://crs.asus.com/english/REACH.htm. (Ελληνικά)
Guna mematuhi kerangka kerja peraturan hukum REACH (Registration, Evaluation, Authorisation, and Restriction of Chemicals), kami mempublikasikan zat
kimia dalam produk kami di situs Web ASUS REACH http://crsn.asus.com/english/REACH.htm. (Bahasa Indonesia)
เราเผยแพร่สารเคมีที่ใช้ในผลิตภัณฑ์ของเราซึ่งสอดคล้องกับเฟรมเวิร์กของข้อบังคับ REACH (การ ลงทะเบียน, การประเมิน, การอนุมัติ และข้อจำกัดของสารเคมี) ไว้ที่เว็
บไซต์ ASUS REACH ที่ http://crs.asus.com/english/REACH.htm ิ (ไทย)
Tuân thủ khuôn khổ quy định về REACH (Đăng ký, Đánh giá, Cấp phép và Giới hạn về Hóa chất), chúng tôi đã công bố các hóa chất trong sản
phẩm của công ty tại trang web REACH của ASUS http://crs.asus.com/english/REACH.htm. (Tiếng Việt)
Idet vi overholder REACH (registrering, vurdering og godkendelse af samt begrænsninger for kemikalier) bestemmelserne, offentliggør vi vores produkters
kemiske stoffer på ASUS REACH webstedet http://crs.asus.com/english/REACH.htm. (Dansk)
REACH (Registration, Evaluation, Authorization, and Restriction of Chemicals (kemikaalien rekisteröinti, arviointi ja lupamenettely)) -sääntelykehysten
mukaisesti julkaisemme tuotteidemme kemialliset ainesosat ASUS REACH -verkkosivustolla osoitteessa http://crs.asus.com/english/REACH.htm. (Suomi)
I samsvar med REACH (Registration, Evaluation, Authorization, and Restriction of Chemicals)-regelverket, publiserer vi de kjemiske stoffene i våre produkter
på ASUS REACH-nettstedet på http://crs.asus.com/english/REACH.htm. (Norsk)
Regulatiivse raamistiku REACH (Registration, Evaluation, Authorisation, and Restriction of Chemicals (Kemikaalide registreerimine, hindamine, legaliseerimine
ja kohaldatavad piirangud)) nõuetele vastamiseks oleme avaldanud andmed keemiliste ainete sisalduse kohta meie toodetes ASUS REACH veebisaidil
http://crs.asus.com/english/REACH.htm. (Eesti)
Saskaņā ar REACH (ķīmisko vielu reģistrēšanas, vērtēšanas, atļaujas sistēmas un ierobežojumu) regulu, mēs esam publicējuši ķīmiskās vielas, ko satur mūsu
produkti, ASUS REACH tīmekļa vietnē http://crs.asus.com/english/REACH.htm. (Latviski)
Vadovaudamiesi REACH (cheminių medžiagų registracijos, įvertinimo, autorizacijos ir apribojimų) reglamento koncepcija, mes ASUS REACH tiklavietėje http://
crs.asus.com/english/REACH.htm nurodėme į mūsų gaminių struktūrą įeinančias chemines medžiagas. (Lietuvių)
Bagi mematuhi rangka kerja peraturan REACH (Pendaftaran, Penilaian, Pemberian Kebenaran dan Pengehadan Bahan Kimia), kami telah menyiarkan bahan
kimia dalam produk kami di tapak web ASUS REACH di http://crs.asus.com/english/REACH.htm. (Bahasa Malaysia)
V skladu z določili direktive REACH (Registracija, ocenjevanje, odobritev in omejitev kemikalij) smo objavili kemične snovi v izdelkih na spletni strani ASUS
REACH na http://crs.asus.com/english/REACH.htm. (Slovenščina)
REACH (химиялық заттарды тіркеу, бағалау, рұқсат ету және шектеу) нормативтік-құқықтық базасына сәйкес біз өнімдеріміздегі химиялық
заттардың тізімін ASUS REACH веб-торабында http://crs.asus.com/english/REACH.htm мекенжайы бойынша жарияладық. (қазақша)
Q4697_ODD_QIG_V2.indd 6 9/28/10 9:45:43 AM
Hardware installation
Turn off your computer and any peripheral device connected to it before installing the optical drive. For avoiding
damage to the optical drive due to static electricity, use a grounded wrist strap or touch a safely grounded object or
a metal object, such as a power supply case, before installing the optical drive.
1. Remove the computer cover.
2. For IDE optical drives, configure the drive jumper to set the device to either Master, Slave, or Cable Select
mode before installing it into the chassis.
3. For SATA optical drives, there is no necessity for jumper settings.
4. Insert the optical drive into an available 5.25-inch bay (as shown in Figure 1).
5. For IDE optical drives, connect a 4-pin power supply cable to the DC input connector of the optical drive
(as shown in Figure 2). Next, connect an IDE cable to the IDE connector at the back of the optical drive,
matching the colored stripe on the cable with Pin 1 on the IDE connector (as shown in Figure 2). Connect the
other end of the IDE cable to the IDE connector on the motherboard.
6. For SATA optical drives, connect a 15-pin power supply cable to the DC input connector of the optical drive
(as shown in Figure 3). Next, connect a SATA cable to the SATA connector at the back of the optical drive (as
shown in Figure 3). Connect the other end of the SATA cable to the SATA connector on the motherboard.
7. Slide the optical drive into the bay and secure it with four screws.
8. Replace the computer cover.
9. Turn on your computer.
Installation matérielle
Eteignez votre ordinateur et tous les périphériques reliés à ce dernier avant d’installer
le disque optique. Afin d’éviter que l’électricité statique n’endommage le disque optique,
utilisez un bracelet antistatique, touchez un objet relié à la terre ou un objet en métal
tel que le bloc d’alimentation avant d’installer le disque optique.
1. Retirez le châssis de l’ordinateur.
2. Pour les disques optiques IDE, réglez le jumper pour configurer l’appareil en
mode Maitre, Esclave, ou Cable Select avant de l’installer dans le châssis.
3. Pour les disques optiques SATA, le réglage du jumper n’est pas nécessaire.
4. Insérez le disque optique dans une baie 5.25” disponible (comme illustré dans l’
image 1).
5. Pour les disques optiques IDE, branchez le câble d’alimentation quatre broches
au connecteur d’entrée d’alimentation du disque optique (comme illustré dans
l’image 2). Puis, branchez le câble IDE au connecteur IDE situé à l’arrière du
disque optique en alignant la bande colorée du câble IDE sur la broche 1 du
connecteur IDE (comme illustré dans l’image 2). Branchez l’autre extrémité du
câble IDE au connecteur IDE de la carte mère.
6. Pour les disque optiques SATA, branchez le câble d’alimentation quinze broches
au connecteur d’entrée d’alimentation du disque optique (comme illustré dans l’
image 3). Puis, branchez le câble SATA au connecteur SATA situé à l’arrière du
disque optique (comme indiqué dans l’image 3). Branchez l’autre extrémité du
câble SATA au connecteur SATA de la carte mère.
7. Glissez le disque optique dans la baie et sécurisez-le à l’aide de quatre vis.
8. Replacez le châssis dans l’ordinateur.
9. Allumez votre ordinateur.
Hardware-Installation
Schalten Sie den Computer und alle angeschlossenen Peripheriegeräte aus, bevor Sie
das optische Laufwerk installieren. Berühren Sie die Metallrückwand oder Seite des
Computers, um Schäden durch statische Entladungen zu vermeiden.
1. Entfernen Sie die Gehäuseabdeckung.
2. Stellen Sie bei optischen IDE-Laufwerken den Laufwerksjumper auf Master,
Slave, oder Cable Select-Modus ein, bevor Sie das Laufwerk installieren.
3. Bei optischen SATA-Laufwerken ist keine Jumpereinstellung notwendig.
4. Stecken Sie das Laufwerk in einen 5,25”-Schacht (siehe Abb. 1).
5. IDE-Laufwerk: Schließen Sie ein 4-pol. Netzkabel an den Netzanschluss des
optischen Laufwerks an (siehe Abb. 2). Verbinden Sie dann ein IDE-Kabel mit
dem IDE-Anschluss an der Laufwerkrückseite und richten Sie die Streifen des
Kabels auf Pol 1 des IDE-Anschlusses aus (siehe Abb. 2). Verbinden Sie das
andere Ende des IDE-Kabels mit dem IDE-Anschluss am Motherboard.
6. SATA-Laufwerk: Schließen Sie ein 15-pol. Netzkabel an den Netzanschluss des
optischen Laufwerks an (siehe Abb. 3). Verbinden Sie dann ein SATA-Kabel mit
dem SATA-Anschluss an der Laufwerkrückseite (siehe Abb. 3). Verbinden Sie
das andere Ende des SATA-Kabels mit dem SATA-Anschluss am Motherboard.
7. Stecken Sie das optische Laufwerk in den Schacht und sichern Sie es mit den
vier Schrauben.
8. Bringen Sie die Gehäuseabdeckung wieder an.
9. Schalten Sie den Computer ein.
Français Deutsch
Q4697_ODD_QIG_V2.indd 7 9/28/10 9:45:51 AM
Installazione Hardware
Prima di installare l’ unità ottica, spegnere il computer e tutte le periferiche ad esso
collegate. Quindi, per evitare danni all’ unità, dovuti ad elettricità statica, indossare
un cinturino da polso con messa a terra o toccare un oggetto con una messa a terra
sicura oppure un oggetto metallico, come una scatola di alimentazione.
1. Rimuovere la copertura del computer.
2. Per unità ottiche IDE, prima di installare l’ unità nel telaio, configurare il jumper e
impostare il dispositivo in modalità Master, Slave o Cable Select.
3. Per unità ottiche SATA, non è necessaria la configurazione del jumper.
4. Inserire l’ unità ottica in un vano libero da 5.25 pollici (come mostrato in Figura 1).
5. Per unità ottiche IDE, collegare un cavo di alimentazione da 4-pin al connettore
d’ ingresso DC dell’ unità (come mostrato in Figura 2). Quindi, collegare un cavo
IDE al connettore IDE sul retro del dispositivo, facendolo combaciare con la
striscia colorata sul cavo con Pin 1 sul connettore IDE (come mostrato in Figura
2). Collegare l’ altra estremità del cavo IDE al connettore IDE sulla scheda
madre.
6. Per unità ottiche SATA, collegare un cavo di alimentazione da 15-pin al
connettore d’ ingresso DC dell’ unità ottica (come mostrato in Figura 3). Quindi,
collegare un cavo SATA al connettore SATA sul retro del dispositivo (come
mostrato in Figura 3). Collegare l’ altra estremità del cavo SATA al connettore
SATA sulla scheda madre.
7. Far scorrere l’ unità ottica all’ interno del vano predisposto e fissarla con quattro
viti.
8. Rimontare la copertura del computer.
9. Accendere il computer.
Instalar el hardware
Apague el equipo y todos los dispositivos periféricos conectados a él antes de instalar
la unidad óptica. Para que la electricidad estática no dañe la unidad óptica, utilice una
correa para la muñeca con conexión a tierra o toque un objeto conectado a tierra de
forma segura o un objeto metálico, como por ejemplo la carcasa de una fuente de
alimentación, antes de instalar dicha unidad.
1. Retire la tapa del equipo.
2. Para unidades ópticas IDE, configure el puente de la unidad para establecer
el dispositivo en el modo Maestro, Esclavo o Selección de cable antes de
instalarlo en el chasis.
3. Para unidades ópticas SATA, no es necesario configurar ningún puente.
4. Inserte la unidad óptica en una bahía de 5,25 pulgadas disponible (como se
muestra en la figura 1).
5. Para unidades ópticas IDE, enchufe un cable de fuente de alimentación de 4
contactos en el conector de entrada de CC de la unidad óptica (como se muestra
en la figura 2). A continuación, enchufe un cable IDE en el conector IDE situado
en la parte posterior de la unidad óptica, haciendo coincidir la raya coloreada
del cable con el Contacto 1 del conector IDE (como se muestra en la figura 2).
Enchufe el otro extremo del cable IDE en el conector IDE de la placa base.
6. Para unidades ópticas SATA, enchufe un cable de fuente de alimentación de
15 contactos en el conector de entrada de CC de la unidad óptica (como se
muestra en la figura 3). A continuación, enchufe un cable SATA en el conector
SATA situado en la parte posterior de la unidad óptica (como se muestra en la
figura 3). Enchufe el otro extremo del cable SATA en el conector SATA de la
placa base.
7. Inserte la unidad óptica en la bahía y fíjela con cuatro tornillos.
8. Vuelva a colocar la tapa del equipo.
9. Encienda el equipo.
Hardware-installatie
Schakel uw computer en alle aangesloten randapparaten uit voordat u het optische
station installeert. Om schade aan het optische station door statische elektriciteit te
voorkomen, moet u een geaarde polsriem gebruiken of een veilig geaard of metalen
object, zoals de behuizing van een voeding, aanraken voordat u het optische station
installeert.
1. Verwijder de klep van de computer.
2. Voor optische IDE-stations moet u de jumper van het station configureren om
het apparaat in te stellen als master of slave of om de kabelselectiemodus te
selecteren voordat u het station in het chassis installeert.
3. Voor optische SATA-stations moeten de jumpers niet worden ingesteld.
4. Stop het optische station in een beschikbare 5,25” sleuf (zoals weergegeven in
Figuur 1).
5. Voor optische IDE-stations sluit u een 4-pins voedingskabel aan op de
gelijkstroomingang (DC) van het optische station (zoals weergegeven in Figuur
2). Sluit vervolgens een IDE-kabel aan op de IDE-aansluiting op de achterkant
van het optische station en lijn de gekleurde streep op de kabel uit op pin 1 op
de IDE-aansluiting (zoals weergegeven in Figuur 2). Sluit het andere uiteinde
van de IDE-kabel aan op de IDE-aansluiting op het moederbord.
6. Voor optische SATA-stations sluit u een 15-pins voedingskabel aan op de
gelijkstroomingang (DC) van het optische station (zoals weergegeven in Figuur
3). Sluit vervolgens een SATA-kabel aan op de SATA-aansluiting op de achterkant
van het optische station (zoals weergegeven in Figuur 3). Sluit het andere
uiteinde van de SATA-kabel aan op de SATA-aansluiting op het moederbord.
7. Schuif het optische station in de sleuf en maak het vast met de vier schroeven.
8. Plaats de klep van de computer terug.
9. Schakel uw computer in.
Italiano Español
Nederlands
Q4697_ODD_QIG_V2.indd 8 9/28/10 9:45:51 AM
Svenska
Türkçe
Česky Slovensky
Hårdvaruinstallation
Stäng av datorn och all kringutrustning som är ansluten till den innan den optiska
enheten installeras. För att undvika skador orsakade av statisk elektricitet på den
optiska enheten bör du använda en jordad handledsrem eller vidröra säkra jordade
objekt eller ett metallobjekt såsom ett spänningsaggregat innan den optiska enheten
installeras.
1. Ta bort datorns hölje.
2. IDE optiska enheter ska byglas till antingen Master, Slave eller Cabel Select
innan den monteras i chassit.
3. SATA otpiska enheter behöver inga bygelinställningar.
4. Sätt in den optiska enheten i ett tillgängligt 5,25 tumsfack (såsom visas i figur
1).
5. På IDE optiska enheter anslut strömkontakten med 4 stift till strömuttaget på
den optiska enheten (såsom visas i figur 2). Anslut sedan en IDE-kabel till IDE-
kontakten på baksidan av den optiska enheten med den färgade randen på
kabeln mot PIN 1 på IDE-kontakten (såsom visas i figur 2). Anslut den andra
änden av IDE-kabeln till IDE-kontakten på moderkortet.
6. På SATA optiska enheter anslut en 15-pinnars strömkontakt till strömuttaget
på den optiska enheten (såsom visas i figur 3).Anslut sedan en SATA-kabel till
SATA-kontakten på baksidan av den optiska enheten (såsom visas i figur 3).
Anslut den andra änden av SATA-kabeln till SATA-kontakten på moderkortet.
7. Låt den optiska enheten glida in i facket och fäst den med fyra skruvar.
8. Sätt tillbaka höljet på datorn.
9. Starta datorn.
Donanım kurulumu
Optik sürücüyü kurmadan önce bilgisayarınızı ve bağlı olan herhangi bir çevrebirim
aygıtını kapatın. Statik elektrik sebebiyle optik sürücüye hasar vermemek için optik
sürücüyü kurmadan önce topraklanan bileklik kayışını kullanın veya güç besleme
mahfazası gibi güvenilir bir şekilde topraklanan nesneye veya metal nesneye dokunun.
1. Bilgisayar kapağını çıkarın.
2. IDE optik sürücüleri için aygıtı Ana, Yardımcı veya Kablo Seçme moduna
ayarlamak için şasiye kurmadan önce sürücü atlatıcısını yapılandırın.
3. SATA optik sürücüleri için atlatıcı ayarlarının yapılmasına gerek yoktur.
4. Optik sürücüyü kullanılabilir 5.25-inç yuvaya yerleştirin (Şekil 1’de gösterildiği
gibi).
5. IDE optik sürücüleri için 4 pinli güç besleme kablosunu optik sürücünün DC giriş
konektörüne bağlayın (Şekil 2’de gösterildiği gibi). Ardından, IDE kablosunu
optik sürücünün arkasındaki IDE konektörüne bağlayın, kablodaki renkli kayışı
IDE konektöründeki Pin 1 kablosu ile eşleştirin (Şekil 2’de gösterildiği gibi). IDE
kablosunun diğer ucunu anakarttaki IDE konektörüne bağlayın.
6. SATA optik sürücüleri için 15 pinli güç besleme kablosunu optik sürücünün
DC giriş konektörüne bağlayın (Şekil 3’te gösterildiği gibi). Ardından, SATA
kablosunu optik sürücünün arkasındaki SATA konektörüne bağlayın (Şekil 3’te
gösterildiği gibi). SATA kablosunun diğer ucunu anakarttaki SATA konektörüne
bağlayın.
7. Optik sürücüyü yuvada kaydırın ve dört vida kullanarak sabitleyin.
8. Bilgisayar kapağını yerleştirin.
9. Bilgisayarı açın.
Instalace hardwaru
Před instalací optické jednotky vypněte počítač a veškerá připojená periferní zařízení.
Aby se zabránilo poškození optického disku statickou elektřinou, před instalací optické
jednotky použijte uzemněný náramek nebo se dotkněte uzemněného nebo kovového
předmětu, například skříně zdroje napájení.
1. Sejměte kryt skříně počítače.
2. Před instalací do skříně nakonfigurujte u optických jednotek s rozhraním IDE
pomocí propojek tato zařízení jako Master, Slave nebo Cable Select.
3. V případě optických jednotek s rozhraním SATA nejsou nastavení propojek
nutná.
4. Zasuňte optickou jednotku do volné šachty - 5,25 palců (viz Obrázek 1).
5. V případě optických jednotek s rozhraním IDE připojte 4kolíkový napájecí
kabel ke konektoru napájení optické jednotky (viz Obrázek 2). Potom připojte
kabel rozhraní IDE ke konektoru rozhraní IDE na zadní straně optické jednotky
tak, aby barevný proužek na kabelu odpovídal kolíku 1 na konektoru rozhraní
IDE (viz Obrázek 2). Připojte druhý konec kabelu rozhraní IDE ke konektoru
rozhraní IDE na základní desce.
6. V případě optických jednotek s rozhraním SATA připojte 15kolíkový napájecí
kabel ke konektoru napájení optické jednotky (viz Obrázek 3). Potom připojte
kabel rozhraní SATA ke konektoru rozhraní SATA na zadní straně optické
jednotky (viz Obrázek 3). Připojte druhý konec kabelu rozhraní SATA ke
konektoru rozhraní SATA na základní desce.
7. Zasuňte optickou jednotku do pozice a zajistěte šroubky.
8. Nasaďte kryt skříně počítače.
9. Zapněte počítač.
Inštalácia hardvéru
Pred inštalovaním optickej mechaniky vypnite svoj počítač a všetky periférne zariadenia.
Aby ste predišli poškodeniu optickej mechaniky statickou elektrinou, používajte
uzemnený remienok na zápästie, alebo sa pred inštaláciou optickej mechaniky dotknite
bezpečne uzemneného predmetu alebo kovového predmetu, akým je napríklad skrinka
elektrického prívodu.
1. Odmontujte kryt počítača.
2. V prípade optických mechaník IDE nakonfigurujte prepínač mechaniky a nastavte
zariadenie na režim riadiacej jednotky, podriadenej jednotky, alebo na režim voľby
kábla. Toto vykonajte pred inštaláciu mechaniky do rámu.
3. V prípade optických SATA mechaník nie je potrebné vykonať nastavenie prepínača.
4. Optickú jednotku zasuňte do dostupného 5,25 palcového výklenku (podľa Obrázka
1).
5. V prípade optických IDE mechaník pripojte 4 kolíkový prívodný kábel k vstupnému
konektoru jednosmerného prúdu na optickej mechanike (ako je to znázornené na
Obrázku 2). V ďalšom pripojte IDE kábel k IDE konektoru na zadnej strane optickej
mechaniky tak, aby bol zarovno s farebným pásom na kábli s kolíkom 1 na IDE
konektore (ako je to znázornené na Obrázku 2). Druhý koniec IDE kábla pripojte k
IDE konektoru na matičnej doske.
6. V prípade optických SATA mechaník pripojte 15 kolíkový prívodný kábel k vstupnému
konektoru jednosmerného prúdu na optickej mechanike (ako je to znázornené na
Obrázku 3). V ďalšom pripojte SATA kábel k SATA konektoru na zadnej strane
optickej mechaniky (ako je to znázornené na Obrázku 3). Druhý koniec SATA kábla
pripojte k SATA konektoru na matičnej doske.
7. Optickú mechaniku zasuňte do výklenku a zaistite štyrmi skrutkami.
8. Znovu nasaďte kryt počítača.
9. Zapnite počítač.
Q4697_ODD_QIG_V2.indd 9 9/28/10 9:45:52 AM
Cautions about replacing the front panel
For the safty of using the optical drive, please do not replace the front panel under the following circumstances:
1. Do not use a tray door with the lock tabs (as shown in the right figure) broken or worn.
2. Do not use a front panel with the lock tabs (as shown in the right figure) broken or worn.
有毒有害物質或元素的名稱及含量說明標示:
電子信息產品污染控制標示:圖中之數字為產品之環保使用期限。僅指電子信息產品中含有的
有毒有害物質或元素不致發生外洩或突變從而對環境造成污染或對人身、財產造成嚴重損害的
期限。
部件名稱
有害物質或元素
鉛(Pb) 鎘(Cd) 汞(Hg) 六價鉻
(Cr(VI))
多溴聯苯
(PBB)
多溴二苯
醚(PBDE)
印刷電路板及其電子組
件
×○○○ ○ ○
外殼 ×○○○ ○ ○
外部信號連接頭及線材 × ○ ○ ○ ○ ○
○:表示該有毒有害物質在該部件所有均質材料中的含量均在SJ/T 11363-2006標准規定的限量要求以下。
×:表示該有毒有害物質至少在該部件的某一均質材料中的含量超出SJ/T 11363-2006標准規定的限量要
求,然該部件仍符合歐盟指令2002/95/EC的規范。
備註:此產品所標示之環保使用期限,係指在一般正常使用狀況下。
AEEE Yönetmeliğine Uygundur
Q4697_ODD_QIG_V2.indd 4 9/28/10 9:45:42 AM
987
654
3
Takeback Services
ASUS recycling and takeback programs come from our commitment to the highest standards for protecting our environment.
We believe in providing solutions for our customers to be able to responsibly recycle our products, batteries and other
components as well as the packaging materials. Please go to http://csr.asus.com/english/Takeback.htm for detail recycling
information in different region.
REACH (등록, 평가. 허가 및 화학물질의 제한) 규제 의 기준을 충족하며, ASUS는 REACH 전용사이트 http://crs.asus.com/english/REACH.htm
에서 제품에 포함된 화학물질을 공개하고 있습니다.(한국어)
WARNING :
This product contains chemicals known to the State of California to cause cancer, and birth defects or other reproductive harm.
Wash hands after handling.
B급 기기
이 기기는 가정용(B급) 전자파적합기기로서 주로 가정에서 사용하는 것을 목적으로 하며, 모든 지역에서 사용할 수 있습니다.
电子电器产品有害物质限制使用标识要求:图中之数字为产品之环保使用期限。仅指电
子电器产品中含有的有害物质不致发生外泄或突变从而对环境造成污染或对人身、财产
造成严重损害的期限。
本表格依据SJ/T 11364的规定编制。
○
: 表示该有害物质在该部件所有均质材料中的含量均在GB/T 26572规定的限量要求以下。
×
: 表示该有害物质至少在该部件的某一均质材料中的含量超出GB/T 26572规定的限量要求,然该部
件仍符合欧盟指令2011/65/EU的规范。
备注:此产品所标示之环保使用期限,系指在一般正常使用状况下。
有害物质名称及含量说明标示:
部件名称
印刷电路板及
其电子组件
外部信号连接
头及线材
外壳
有害物质
铅 (Pb) 六价铬
(Cr(VI))
汞 (Hg) 多溴联苯
(PBB)
镉 (Cd) 多溴二苯醚
(PDBE)
×
○ ○ ○ ○ ○
○ ○ ○ ○ ○ ○
×
○ ○ ○ ○ ○
Содержание
- 1 2 ide master slave cable select 3 sata 4 5 5 1 5 ide 4 2 ide ide 1 ide 2 ide ide 6 sata 15 3 sata sata 3 sata sata 7 8 9 1
- A vegyi anyagok nyilvántartásba vételéről értékeléséről engedélyezéséről és korlátozásáról szóló reach registration evaluation authorisation and restriction of chemicals szabályozási kerettervvel összhangban közzétettük a termékeinkben lévő vegyi anyagokat az asus reach webhelyén http crs asus com english reach htm magyar 1
- Accidentally sprayed any solvent on the device use a clean cloth to wipe it you may also use a neutral cleaner to dilute the solvent to easily wipe it from the device 1
- Aeee yönetmeliğine uygundur 1
- Asus computer gmbh harkort str 21 23 40880 ratingen germany 1
- Asus recycling and takeback programs come from our commitment to the highest standards for protecting our environment 1
- Asustek computer inc 4f no 150 li te rd peitou taipei taiwan 1
- Australia statement notice 1
- Bagi mematuhi rangka kerja peraturan reach pendaftaran penilaian pemberian kebenaran dan pengehadan bahan kimia kami telah menyiarkan bahan kimia dalam produk kami di tapak web asus reach di http crs asus com english reach htm bahasa malaysia 1
- Beachten sie vor installation und nutzung des laufwerks die nach stehenden sicherheitsmaßnahmen 1
- Bu hızlı başlangıç kılavuzu yeni sisteminizi kurmak için en gerekli bilgileri sağlamaktadır yeni sisteminizi kurmak için aşağıdaki anakart düzeninde işaretli olan adımları izleyin donanım bios ve yazılım kurulumu ve yapılandırması hakkında daha fazla bilgi için ana kart kullanım kılavuzunuza başvurun 1
- B급 기기 이 기기는 가정용 b급 전자파적합기기로서 주로 가정에서 사용하는 것을 목적으로 하며 모든 지역에서 사용할 수 있습니다 1
- Canadian department of communications statement 1
- Cautions about replacing the front panel 1
- Class 1 laser product 1
- Complying with the reach registration evaluation authorisation and restriction of chemicals regulatory framework we published the chemical substances in our products at asus reach website at http crs asus com english reach htm english 1
- Components as well as the packaging materials please go to http csr asus com english takeback htm for detail recycling 1
- Conforme avec le règlement reach enregistrement évaluation autorisation et restriction des produits chimiques nous avons publié la liste des substances chimiques utilisées dans nos produits sur le site web asus reach à l adresse http crs asus com english reach htm français 1
- Connect the equipment to an outlet on a circuit different from that to which the receiver is connected 1
- Consult the dealer or an experienced radio tv technician for help 1
- Cumprindo o quadro regulamentar reach registo avaliação autorização e restrição dos produtos químicos divulgamos as substâncias químicas incluídas nos nossos produtos no web site asus reach em http crs asus com english reach htm português 1
- Damp places 1
- Die rechtliche rahmenbedingungen für reach registration evaluation authorisation and restriction of chemicals erfüllend veröffentlichen wir die chemischen substanzen in unseren produkten auf unserer asus reach webseite unter http crs asus com english reach htm deutsch 1
- Do not use a front panel with the lock tabs as shown in the right figure broken or worn 1
- Do not use a tray door with the lock tabs as shown in the right figure broken or worn 1
- Dodržiavajúc regulačný rámec reach registrácia hodnotenie autorizácia a obmedzovanie chemikálií sme chemické látky používané v našich výrobkoch uviedli na stránke asus reach na adrese http crs asus com english reach htm slovensky 1
- Donanım kurulumu 1
- Drive may result to exposure to laser radiation 1
- En cumplimiento del marco reglamentario reach registro evaluación autorización y restricción de productos químicos hemos publicado las sustancias que contienen nuestros productos a través del sitio web asus reach al que puede acceder a través de la dirección http crs asus com english reach htm español 1
- English français deutsch italiano español русский nederlands 1
- Environment drastic change in temperature is harmful to the device 1
- Federal communications commission statement 1
- Feuchte oder nasse orte 1
- For ide optical drives connect a 4 pin power supply cable to the dc input connector of the optical drive as shown in figure 2 next connect an ide cable to the ide connector at the back of the optical drive matching the colored stripe on the cable with pin 1 on the ide connector as shown in figure 2 connect the other end of the ide cable to the ide connector on the motherboard 1
- For ide optical drives configure the drive jumper to set the device to either master slave or cable select mode before installing it into the chassis 1
- For sata optical drives connect a 15 pin power supply cable to the dc input connector of the optical drive as shown in figure 3 next connect a sata cable to the sata connector at the back of the optical drive as shown in figure 3 connect the other end of the sata cable to the sata connector on the motherboard 1
- For sata optical drives there is no necessity for jumper settings 1
- For the safty of using the optical drive please do not replace the front panel under the following circumstances 1
- Fourth edition v4 published july 2013 copyright 2013 asustek computer inc all rights reserved 1
- Fourth edition v5 published july 2014 copyright 2014 asustek computer inc all rights reserved 1
- From 1 january 01 updated warranties apply to all asus products consistent with the australian consumer law for the latest product warranty details please visit http support asus com our goods come with guarantees that cannot be excluded under the australian consumer law you are entitled to a replacement or refund for a major failure and compensation for any other reasonably foreseeable loss or damage you are also entitled to have the goods repaired or replaced if the goods fail to be of acceptable quality and the failure does not amount to a major failure 1
- From a cold environment specially during cold seasons wait until the discs have reached room temperature 1
- Gerät gelangen falls dies dennoch passiert wenden sie sich an ihren händler 1
- Gerät nutzen 1
- Guna mematuhi kerangka kerja peraturan hukum reach registration evaluation authorisation and restriction of chemicals kami mempublikasikan zat kimia dalam produk kami di situs web asus reach http crsn asus com english reach htm bahasa indonesia 1
- Hardware installatie 1
- Hardware installation 1
- Hoş geldiniz 1
- Http crs asus com english reach htm 1
- Hårdvaruinstallation 1
- Hướng dẫn khởi động nhanh này cung cấp thông tin cần thiết nhất để lắp đặt hệ thống mới của bạn thực hiện theo các bước được đánh dấu trong cách bố trí bo mạch chủ dưới đây để lắp đặt hệ thống mới của bạn tham khảo hướng dẫn sử dụng bo mạch chủ của bạn để biết thêm chi tiết về phần cứng bios và cài đặt phần mềm cũng như cấu hình 1
- I samsvar med reach registration evaluation authorization and restriction of chemicals regelverket publiserer vi de kjemiske stoffene i våre produkter på asus reach nettstedet på http crs asus com english reach htm norsk 1
- Idet vi overholder reach registrering vurdering og godkendelse af samt begrænsninger for kemikalier bestemmelserne offentliggør vi vores produkters kemiske stoffer på asus reach webstedet http crs asus com english reach htm dansk 1
- If you require assistance please call asus customer service 1300 787 88 or visit us at http support asus com 1
- In 36 languages 1
- In naleving van het reach regelgevingskader registratie evaluatie autorisatie en beperking van chemische stoffen hebben wij de chemische bestanddelen van onze producten bekendgemaakt op de asus reach website op http crs asus com english reach htm nederlands 1
- Increase the separation between the equipment and receiver 1
- Information in different region 1
- Insert the optical drive into an available 5 5 inch bay as shown in figure 1 1
- Instalace hardwaru 1
- Instalar el hardware 1
- Installation matérielle 1
- Installation notices 1
- Installationshinweise 1
- Installazione hardware 1
- Internal optical drive 1
- Inštalácia hardvéru 1
- Kurulum kılavuzu 1
- Laserprodukt der klasse 1 1
- Leistung des laufwerks auswirken verwenden und lagern sie dieses gerät nicht in der nähe von magnetischen feldern fernsehern oder radios 1
- Lese oder schreibmodus befindet 1
- Lösungsmittel falls sie versehentlich lösungsmittel auf das gerät sprühen wischen sie es mit einem sauberen tuch ab sie können das lösungsmittel auch mit einem neutralen reiniger verdünnen und so leichter vom gerät entfernen 1
- May break while in use and damage the device 1
- Medium kann bei der benutzung brechen und das gerät beschädigen 1
- Nel rispetto del regolamento reach registration evaluation authorisation and restriction of chemicals le sostanze chimiche contenute nei prodotti asus sono state pubblicate nel sito web asus alla pagina http crs asus com english reach htm italiano 1
- Nicht in dieser anleitung angegeben sind kann zu gefährlicher strahlenbelastung führen 1
- Norsk українська eesti latviski lietuvių slovenščina қазақ 1
- Norsk українська eesti latviski lietuvių slovenščina қазақ 한국어 1
- Notices 1
- Ntient les informations essentielles à la configuration de votre système suivez les étapes numérotées apparaissant dans le diagramme de la carte mère pour garantir le bon fonctionnement du système reportez vous au manuel de l utilisateur pour plus de détails sur les composants le bios ainsi que l installation et la configuration des logiciels 1
- Observe the following precautions before installing and using the drive 1
- Oder heißen ort drastische temperaturunterschiede sind schädlich für das gerät 1
- Or radios to avoid electronic interference that affects drive performance 1
- Panduan ringkas ini berisi informasi yang paling diperlukan untuk menyiapkan sistem baru anda ikuti langkah langkah yang ditandai pada tata letak motherboard di bawah ini untuk menyiapkan sistem baru anda untuk info lebih rinci tentang perangkat keras bios serta penginstalan dan konfigurasi perangkat lunak lihat panduan pengguna motherboard anda 1
- Português magyar română 1
- Q4697_odd_qig_v2 indd 1 10 15 10 1 12 21 pm 1
- Q4697_odd_qig_v2 indd 2 9 28 10 9 45 34 am q4697_odd_qig_v2 indd 3 9 28 10 9 45 40 am 1
- Q4697_odd_qig_v2 indd 4 9 28 10 9 45 42 am 1
- Q4697_odd_qig_v2 indd 5 9 28 10 9 45 43 am 1
- Q4697_odd_qig_v2 indd 5 9 28 10 9 45 43 am q4697_odd_qig_v2 indd 6 9 28 10 9 45 43 am 1
- Q4697_odd_qig_v2 indd 6 9 28 10 9 45 43 am 1
- Q4697_odd_qig_v2 indd 7 9 28 10 9 45 51 am 1
- Q4697_odd_qig_v2 indd 8 9 28 10 9 45 51 am 1
- Q4697_odd_qig_v2 indd 9 9 28 10 9 45 52 am 1
- Quick installation guide 1
- Reach asus reach http crs asus com english reach htm 1
- Reach kimyasalların kayıt altına alınması değerlendirilmesi ruhsatlandırılması ve sınırlandırılması düzenleyici çerçevesine uygun olarak ürünlerimizdeki kimyasal maddeleri http crs asus com english reach htm adresindeki asus reach websitesinde yayınlamaktayız türkçe 1
- Reach registration evaluation authorisation and restriction of chemicals 規則の基準を満たすため asusはreach専用サイトで弊社製品に含まれる化 学物質を公開しております http crs asus com english reach htm 日本語 1
- Reach registration evaluation authorization and restriction of chemicals asus reach http crs asus com english reach htm 1
- Reach registration evaluation authorization and restriction of chemicals kemikaalien rekisteröinti arviointi ja lupamenettely sääntelykehysten mukaisesti julkaisemme tuotteidemme kemialliset ainesosat asus reach verkkosivustolla osoitteessa http crs asus com english reach htm suomi 1
- Reach химиялық заттарды тіркеу бағалау рұқсат ету және шектеу нормативтік құқықтық базасына сәйкес біз өнімдеріміздегі химиялық заттардың тізімін asus reach веб торабында http crs asus com english reach htm мекенжайы бойынша жарияладық қазақша 1
- Reach 등록 평가 허가 및 화학물질의 제한 규제 의 기준을 충족하며 asus는 reach 전용사이트 http crs asus com english reach htm 에서 제품에 포함된 화학물질을 공개하고 있습니다 한국어 1
- Regulatiivse raamistiku reach registration evaluation authorisation and restriction of chemicals kemikaalide registreerimine hindamine legaliseerimine ja kohaldatavad piirangud nõuetele vastamiseks oleme avaldanud andmed keemiliste ainete sisalduse kohta meie toodetes asus reach veebisaidil http crs asus com english reach htm eesti 1
- Remove the computer cover 1
- Reorient or relocate the receiving antenna 1
- Reparieren durch öffnen des laufwerks können laserstrahlen freigesetzt werden 1
- Replace the computer cover 1
- Saskaņā ar reach ķīmisko vielu reģistrēšanas vērtēšanas atļaujas sistēmas un ierobežojumu regulu mēs esam publicējuši ķīmiskās vielas ko satur mūsu produkti asus reach tīmekļa vietnē http crs asus com english reach htm latviski 1
- Situation occurs contact your retailer for help 1
- Slide the optical drive into the bay and secure it with four screws 1
- Surfaces 1
- Svenska türkçe 1
- Takeback services 1
- This class b digital apparatus complies with canadian ices 003 1
- This device complies with part 15 of the fcc rules operation is subject to the following two conditions 1
- This device may not cause harmful interference and 1
- This device must accept any interference received including interference that may cause undesired operation 1
- This digital apparatus does not exceed the class b limits for radio noise emissions from digital apparatus set out in the radio interference regulations of the canadian department of communications 1
- This equipment has been tested and found to comply with the limits for a class b digital device pursuant to part 15 of the fcc rules these limits are designed to provide reasonable protection against harmful interference in a residential installation this equipment generates uses and can radiate radio frequency energy and if not installed and used in accordance with manufacturer s instructions may cause harmful interference to radio communications however there is no guarantee that interference will not occur in a particular installation if this equipment does cause harmful interference to radio or television reception which can be determined by turning the equipment off and on the user is encouraged to try to correct the interference by one of the following measures 1
- This product contains chemicals known to the state of california to cause cancer and birth defects or other reproductive harm wash hands after handling 1
- Those specified in this manual may result to hazardous radiation exposure 1
- Transportieren oder ausbauen 1
- Turn off your computer and any peripheral device connected to it before installing the optical drive for avoiding damage to the optical drive due to static electricity use a grounded wrist strap or touch a safely grounded object or a metal object such as a power supply case before installing the optical drive 1
- Turn on your computer 1
- Tuân thủ khuôn khổ quy định về reach đăng ký đánh giá cấp phép và giới hạn về hóa chất chúng tôi đã công bố các hóa chất trong sản phẩm của công ty tại trang web reach của asus http crs asus com english reach htm tiếng việt 1
- Umgebung kommen insbesondere während der kalten jahreszeit warten sie bis das medium zimmertemperatur erreicht hat 1
- Uppfyller reach registration evaluation authorization and restriction of chemicals registrering värdering behörighet och begränsning reglerande regelverk vi publicerar de kemiska substanserna i våra produkter på asus reach webbsida på http crs asus com english reach htm svenska 1
- Using the device 1
- V rámci shody s regulatorní platformou reach registration evaluation authorisation and restriction of chemicals registrace hodnocení povolování a omezování chemických látek byl zveřejněn seznam chemických látek přítomných v našich produktech na webu asus reach na adrese http crs asus com english reach htm čeština 1
- V skladu z določili direktive reach registracija ocenjevanje odobritev in omejitev kemikalij smo objavili kemične snovi v izdelkih na spletni strani asus reach na http crs asus com english reach htm slovenščina 1
- Vadovaudamiesi reach cheminių medžiagų registracijos įvertinimo autorizacijos ir apribojimų reglamento koncepcija mes asus reach tiklavietėje http crs asus com english reach htm nurodėme į mūsų gaminių struktūrą įeinančias chemines medžiagas lietuvių 1
- Vibrierenden oberflächen ab 1
- Warning 1
- Warning do not remove the front panel and or tray door to avoid the fly out of the rotating disc 1
- Warning the use of shielded cables for connection of the monitor to the graphics card is required to assure compliance with fcc regulations changes or modifications to this unit not expressly approved by the party responsible for compliance could void the user s authority to operate this equipment 1
- Warnung entfernen sie nicht die frontblende und oder die klappe der schublade andernfalls könnte das rotierende medium herausfliegen 1
- We believe in providing solutions for our customers to be able to responsibly recycle our products batteries and other 1
- Writing mode 1
- Y achten sie darauf dass keine flüssigkeiten oder metallteile in das 1
- Y before moving or uninstalling the drive remove any disc in it y prevent liquids or any metal from getting into the device if this 1
- Y die nutzung von reglern einstellungen und verfahren die 1
- Y do not attempt to disassemble or repair the drive opening the 1
- Y do not attempt to disassemble the drive y do not move the device from a cold to a warm or hot 1
- Y do not place damaged discs inside the device a damaged disc 1
- Y do not place discs into the device immediately if they came 1
- Y do not place this device in an unstable position or on vibrating 1
- Y do not place this device under direct sunlight or in humid or 1
- Y do not turn off the computer while the device is in reading or 1
- Y do not use any evaporating solvents to clean the device if you 1
- Y do not use or place this device near magnetic fields televisions 1
- Y entnehmen sie jegliche medien bevor sie das laufwerk 1
- Y legen sie dieses gerät nicht in einer instabilen position oder auf 1
- Y legen sie dieses gerät nicht ins direkte sonnenlicht oder an 1
- Y legen sie keine beschädigten medien in das gerät ein ein defektes 1
- Y legen sie medien nicht sofort ein wenn sie aus einer kalten 1
- Y schalten sie den computer nicht ab während sich das gerät im 1
- Y use of any controls adjustments or procedures other than 1
- Y versuchen sie nicht das laufwerk zu demontieren oder zu 1
- Y versuchen sie nicht das laufwerk zu demontieren y bringen sie das gerät nicht von einem kalten an einen warmen 1
- Y verwenden sie zur reinigung des gerätes keine verdunstenden 1
- Y zur vermeidung elektronischer störungen die sich auf die 1
- Zgodnie z rozporządzeniem reach rejestracja ocena autoryzacja i ograniczenie środków chemicznych publikujemy informacje o środkach chemicznych w naszych produktach na stronie internetowej asus reach pod adresem http crs asus com english reach htm polski 1
- În conformitate cu cadrul regulator reach înregistrarea evaluarea autorizarea şi restricţionarea substanţelor chimice publicăm substanţele chimice din produsele noastre la pagina web a asus reach http crs asus com english reach htm română 1
- Česky slovensky polski 繁體中文 1
- Ελληνικά indonesia ไทย tiếng việt bahasa malaysia dansk 1
- Παρέχουμε συμβατότητα με τους κανονισμούς reach registration evaluation authorization and restriction of chemicals καταχώρηση αξιολόγηση έγκριση και απαγόρευση χημικών ουσιών και ως εκ τούτου δημοσιεύουμε τις χημικές ουσίες που χρησιμοποιούνται στα προϊόντα μας στον ιστότοπο της asus reach στη διεύθυνση http crs asus com english reach htm ελληνικά 1
- ค ม อเร มต นอย างเร ว ให ข อม ลท ค ณจำเป นมากท ส ดเพ อต งค าระบบใหม ของค ณ ปฏ บ ต ตาม ข นตอนท ทำเคร องหมายไว บนเลย เอาต ของเมนบอร ดด านล าง เพ อต งค าระบบใหม ของค ณ ด ค ม อ ผ ใช เมนบอร ดของค ณสำหร บรายละเอ ยดเพ มเต มเก ยวก บการต ดต งและการกำหนดค าฮาร ดแวร bios และซอฟต แวร 1
- เราเผยแพร สารเคม ท ใช ในผล ตภ ณฑ ของเราซ งสอดคล องก บเฟรมเว ร กของข อบ งค บ reach การ ลงทะเบ ยน การประเม น การอน ม ต และข อจำก ดของสารเคม ไว ท เว บไซต asus reach ท http crs asus com english reach htm ไทย 1
- 件仍符合欧盟指令2011 65 eu的规范 1
- 備註 此產品所標示之環保使用期限 係指在一般正常使用狀況下 1
- 印刷电路板及 其电子组件 1
- 印刷電路板及其電子組 件 1
- 备注 此产品所标示之环保使用期限 系指在一般正常使用状况下 1
- 外壳 1
- 外殼 1
- 外部信号连接 头及线材 1
- 外部信號連接頭及線材 1
- 日本語 1
- 有害物質或元素 1
- 有害物质 1
- 有害物质名称及含量说明标示 1
- 有毒有害物質或元素的名稱及含量說明標示 1
- 本クイックスタートガイドは 新しいシステムのセットアップに最も必要な情報をお届けします 次 のマザーボードのレイアウトにある手順に従い 新しいシステムをセットアップしてください ハー ドウェア bios ソフトウエアのインストール 設定などの詳細につきましては マザーボードユー ザーマニュアルをご参照ください 1
- 本表格依据sj t 11364的规定编制 1
- 汞 hg 多溴联苯 pbb 1
- 电子电器产品有害物质限制使用标识要求 图中之数字为产品之环保使用期限 仅指电 子电器产品中含有的有害物质不致发生外泄或突变从而对环境造成污染或对人身 财产 造成严重损害的期限 1
- 表示該有毒有害物質在該部件所有均質材料中的含量均在sj t 11363 2006標准規定的限量要求以下 1
- 表示該有毒有害物質至少在該部件的某一均質材料中的含量超出sj t 11363 2006標准規定的限量要 求 然該部件仍符合歐盟指令2002 95 ec的規范 1
- 表示该有害物质在该部件所有均质材料中的含量均在gb t 26572规定的限量要求以下 表示该有害物质至少在该部件的某一均质材料中的含量超出gb t 26572规定的限量要求 然该部 1
- 謹遵守reach registration evaluation authorisation and restriction of chemicals 管理規範 我們會將產品中的化學物質公告在華碩reach網站 詳細請參考 http crs asus com english reach htm 繁體中文 1
- 谨遵守reach registration evaluation authorisation and restriction of chemicals 管理规范 我们会将产品中的化学物质公告在华硕reach网站 详细 请参考http crs asus com english reach htm 简体中文 1
- 部件名称 1
- 部件名稱 1
- 鉛 pb 鎘 cd 汞 hg 六 價 鉻 cr vi 多 溴 聯 苯 pbb 多 溴 二 苯 醚 pbde 1
- 铅 pb 六价铬 cr vi 1
- 镉 cd 多溴二苯醚 pdbe 1
- 電子信息產品污染控制標示 圖中之數字為產品之環保使用期限 僅指電子信息產品中含有的 有毒有害物質或元素不致發生外洩或突變從而對環境造成污染或對人身 財產造成嚴重損害的 期限 1
- 이 기기는 가정용 기기입니다 1
- 이 빠른 시작 안내 설명서는 새로운 시스템을 설정하기 위한 가장 중요한 정보를 제공합니다 아래 마더보드 구조에 표시된 지시 순서에 따라 설치를 수행해 주십시오 하드웨어 bios 소프트웨어 설치 및 구성에 관한 추가 정보는 마더보드에 포함된 사용 설명서를 참고해 주십 시오 1
- 1 2 ide master slave cable select 3 sata 4 5 25 1 5 2 ide 1 ide 2 ide ide 6 sata 15 3 sata 3 sata sata 7 8 9 2
- 2 ide master slave cable select 3 sata 4 5 5 1 5 ide 4 dc 2 ide ide 1 ide 2 ide ide 6 sata 15 dc 3 sata sata 3 sata sata 7 8 9 2
- A window 2
- A windows 2
- Aparatūros įrengimas 2
- Bahasa malaysia dansk 2
- Bật máy 2
- Cable select 모드 중 하나 에 장치를 설정하는 드라이브 점퍼를 구성합니다 2
- Cài đặt phần mềm 2
- Các ổ đĩa quang sata không cần cài đặt cầu nối nhảy cóc 2
- Desligue o computador e qualquer periférico a ele ligado antes de instalar a unidade óptica antes de instalar a unidade óptica e para evitar danificá la devido a descargas de electricidade estática utilize uma pulseira com ligação à terra ou toque num objecto com uma ligação segura à terra como por exemplo uma fonte de alimentação 1 remova a tampa do computador 2 no caso das unidades ópticas ide deve configurar os jumpers da unidade para definir o dispositivo como dispositivo principal ou secundário ou deve seleccionar o modo cable select selecção do cabo antes de instalar a unidade óptica no chassis 3 no caso das unidades ópticas sata não é necessário proceder a qualquer configuração dos jumpers 4 introduza a unidade óptica num compartimento de 5 25 disponível como mostra a figura 1 5 no caso das unidades ópticas de ide ligue o cabo de 4 pinos da fonte de alimentação ao conector de entrada d c da unidade óptica como mostra a figura 2 de seguida ligue um cabo ide ao conector ide existente na 2
- Eemaldage arvuti kaas 2 ide optiliste draivide puhul konfigureerige draivi sillus et määrata seade ülemaks master alluvaks slave või valida konfigureerimisrežiim cs cable select kaablivalik 3 sata optiliste draivide puhul ei ole vaja sillust seadistada 4 sisestage optiline draiv vabasse 5 25 tollisesse draivi avasse vt joon 1 5 ide optiliste draivide puhul ühendage 4 kontaktiga toitekaabel optilise draivi alalisvoolu sisendpistikuga vt joon 2 järgmisena ühendage ide kaabel ide pistikuga optilise draivi tagaküljel ühitades kaablil oleva värvilise triibu ide pistiku kontaktiga 1 vt joon 2 ühendage ide kaabli teine ots ide pistikuga emaplaadil 6 sata optiliste draivide puhul ühendage 15 kontaktiga toitekaabel optilise draivi alalisvoolu sisendpistikuga vt joon 3 järgmisena ühendage sata kaabel sata pistikuga optilise draivi tagaküljel vt joon 3 ühendage sata kaabli teine ots sata pistikuga emaplaadil 7 lükake optiline draiv avasse ja kinnitage see nelja kruviga 8 paigaldage tagasi arvuti k 2
- Enne optilise draivi installimist lülitage arvuti ja kõik sellega ühendatud välisseadmed välja vältimaks optilise draivi kahjustamist staatilise elektri tõttu kasutage maandatud randmerihma või puudutage turvaliselt maandatud eset või metallobjekti nagu nt toiteploki korpust enne kui optilise draivi installite 2
- Fjern computerdækslet 2 for ide optiske drev skal du konfigurere drevjumperen for at indstille enheden på enten master slave eller kabelvalg inden du anbringer den i rammen 3 jumperindstillinger er ikke nødvendige for sata optiske drev 4 anbring det optiske drev i en ledig 5 5 bås se fig 1 5 ved ide optiske drev skal du forbinde et 4 stikben strømkabel til det optiske drevs dc indgangsstik se fig 2 derefter skal du forbinde ide kablet til ide stikket bag på det optiske drev idet du matcher den farvede stribe på kablet med pin 1 ide stikket se fig 2 forbind ide kablets anden ende til ide stikket på systemkortet motherboard 6 ved sata optiske drev skal du forbinde et 15 stikben strømkabel til det optiske drevs indgangsstik se fig 3 derefter skal du forbinde sata kablet til sata stikket bag på det optiske drev se fig 3 forbind sata kablets anden ende til sata stikket på systemkortet motherboard 7 skub det optiske drev ind i båsen og skru fast med fire skruer 8 sæt computerdækslet på plads igen 2
- Fjern dekselet på datamaskinen 2 for ide enheter konfigurer jumperen til enten master slave eller kabelvalgmodus før du installerer den i chassiset 3 for sata enheter er det ikke nødvendig å stille inn jumperen 4 sett inn den optiske enheten i en ledig 5 25 tommers nisje se figur 1 5 for ide enheter koble en 4 pins strømforsyning til likestrømskontakten på den optiske enheten se figur 2 koble deretter en ide kabel til ide kontakten bak på den optiske enheten slik at den fargede stripen på kontakten passer til pin 1 på ide kontakten se figur 2 koble den andre enden av ide kabelen til ide kontakten på hovedkortet 6 for sata enheter koble en 15 pins strømforsyning til likestrømskontakten på den optiske enheten se figur 3 koble deretter en sata kabel til sata kontakten bak på den optiske enheten se figur 3 koble den andre enden av sata kabelen til sata kontakten på hovedkortet 7 sett den optiske enheten inn i brønnen og fest den med fire skruer 8 sett på dekselet på datamaskinen 9 skru på datama 2
- Hardver telepítése 2
- Hardwareinstallation 2
- Ide 光学ドライブの場合 ケースに取り付ける前にドライブジャンパの設定を行 い デバイスをマスターモード スレーブモード cable select モードのいずれ かに設定します 2
- Ide 光学ドライブの場合 4ピン電源用ケーブルを光学ドライブ後部のdc 入力コ ネクタに接続します 図② 参照 次に ide ケーブルを 光学ドライブ後部のide コネクタに接続します ケーブルの色付けされた端の部分が ide コネクタの pin 1と一致するように接続します 図② 参照 ide ケーブルのもう一方の端をマザ ーボード側のideコネクタに接続します 2
- Ierīces uzstādīšana 2
- Inden du installerer det optiske drev skal du slukke for computeren og alt perifert udstyr forbundet til den for at undgå skade på det optiske drev på grund af statisk elektricitet skal du bruge en jordforbundet håndledsrem eller røre ved en jordforbundet genstand eller metalting som f eks en strømforsyningboks inden du installerer det optiske drev 2
- Instalace softwaru 2
- Instalacja oprogramowania 2
- Instalacja sprzętu 2
- Instalar el software 2
- Instalare hardware 2
- Instalarea software ului 2
- Instalação do hardware 2
- Instalação do software 2
- Installasjon av maskinvare 2
- Installasjon av programvare 2
- Installatie software 2
- Installation logicielle 2
- Installazione software 2
- Inštalácia programového vybavenia 2
- Izklopite računalnik in vse dodatne naprave ki so morda priključene nanj preden namestite optični pogon da bi se izognili škodi optičnega pogona zaradi statične elektrike uporabite ozemljitven zapestni trak ali pa se dotaknite ozemljenega predmeta ali kovinskega predmeta kot je ohišje napajalnika preden namestite optični pogon 2
- Kapcsolja ki a számítógépet és az esetleg hozzácsatlakoztatott perifériákat is mielőtt hozzáfogna az optikai meghajtó telepítéséhez használjon földelt csuklópántot vagy érintsen meg egy megfelelően földelt tárgyat illetve fémtárgyat mint például a tápegység burkolatát mielőtt a kezébe venné az optikai meghajtót nehogy elektrosztatikus kisüléssel károsítsa 1 távolítsa el a számítógép burkolatát 2 ide csatolóval rendelkező optikai meghajtók esetében állítsa be az optikai meghajtó jumpereit master slave vagy cable select üzemmódra mielőtt a házba szerelné 3 sata optikai meghajtók esetében nincs szükség jumper beállításra 4 helyezze be az optikai meghajtót egy szabad 5 25 hüvelykes bővítőhelyre az 1 ábra szerinti módon 5 ide optikai meghajtó esetében csatlakoztassa a 4 lábú tápkábelt az optikai meghajtó egyenfeszültségű bemeneti tápcsatlakozójához a 2 ábra szerinti módon ezt követően csatlakoztassa az ide szalagkábel egyik végét az optikai meghajtó hátulján lévő ide csatlakozóhoz ügyelve a 2
- Laita tietokoneesi ja siihen liitetyt oheislaitteet pois päältä ennen kuin asennat optisen levyaseman välttääksesi staattisesta sähköstä johtuvaa optisen levyaseman vahingoittumisen käytä maadoitettua rannehihnaa tai kosketa turvallisesti maadoitettua esinettä tai metalliesinettä kuten virtalähteen koteloa ennen kuin asennat optisen levyaseman 1 poista tietokoneen suoja 2 ide optisille levyasemille konfiguroi levyaseman hyppylanka asettaaksesi laitteen joko master isäntä slave orja tai cable select kaapelin valinta tilaan ennen kuin asennat sen laiterunkoon 3 optiset sata levyasemat eivät tarvitse hyppylanka asetuksia 4 laita optinen levyasema käytettävissä olevaan 5 5 tuuman syvennykseen kuten esitetty kuvassa 1 5 optisille ide levyasemille yhdistä 4 nastainen virtalähdekaapeli optisen levyaseman dc sisääntulon yhdistimeen kuten esitetty kuvassa 2 yhdistä seuraavaksi ide kaapeli ide liittimeen optisen levyaseman takana sovittamalla yhteen kaapelissa olevan värillisen raidan ja nastan 2
- Laitteiston asennus 2
- Los sistemas operativos window 2
- Los sistemas operativos windows 2
- Lắp đặt phần cứng 2
- Lắp ổ đĩa quang vào khoang 5 25 inch có sẵn như minh họa ở hình 1 2
- Matikan komputer anda dan perangkat tambahan lainnya yang tersambung ke komputer sebelum memasang drive optik agar tidak terjadi kerusakan pada drive optik akibat listrik statis kenakan karet gelang yang di ground atau sentuh logam yang di ground secara aman seperti kotak power supply sebelum memasang drive optik 1 lepaskan penutup komputer 2 untuk drive optik ide konfigurasikan jumper drive untuk mengatur perangkat ke master slave atau mode cable select sebelum memasangnya ke chassis 3 untuk drive optik sata tidak diperlukan pengaturan jumper 4 masukkan drive optik ke tempat drive 5 25 inci yang tersedia seperti ditunjukkan pada gambar 1 5 untuk drive optik ide pasang kabel power 4 pin ke konektor input dc pada drive optik seperti ditunjukkan pada gambar 2 selanjutnya pasang kabel ide ke konektor ide di bagian belakang drive optik sesuaikan strip warna kabel dengan pin 1 pada konektor ide seperti ditunjukkan pada gambar 2 pasang ujung kabel ide lainnya ke konektor ide pada motherboard 2
- Matikan komputer anda dan sebarang peranti persisian yang disambungkan kepadanya sebelum memasang pemacu optik untuk mengelakkan kerosakan pada pemacu optik yang disebabkan oleh elektrik statik gunakan tali pergelangan tangan yang dibumikan atau sentuh objek atau objek logam yang telah dibumikan dengan selamat seperti bekas bekalan kuasa sebelum memasang pemacu optical 1 tanggalkan penutup komputer 2 untuk pemacu optik ide konfigurasi pelompat pemacu untuk menetapkan peranti kepada sama ada mod induk hamba atau pilih kabel master slave or cable select sebelum memasangnya ke dalam cesi 3 untuk pemacu optik sata tidak memerlukan tetapan pelompat 4 masukkan pemacu optik ke dalam ruang 5 5 inci yang tersedia seperti yang ditunjukkan dalam rajah 1 5 untuk pemacu optik ide sambungkan kabel bekalan kuasa 4 pin ke penyambung input dc bagi pemacu optik seperti yang ditunjukkan dalam rajah 2 seterusnya sambungkan kabel ide ke penyambung ide di belakang pemacu optik dengan warna jalur yang sepadan 2
- Namestitev programske opreme 2
- Namestitev strojne opreme 2
- Noņemiet datora vāku 2 pirms ide optisko diskdziņu ievietošanas šasijā konfigurējiet dziņa tiltslēgus lai iestatītu ierīci vedēja master sekotāja slave vai ar atsevišķu maģistrāli pievienotā cable select režīmā 3 sata optiskajiem diskdziņiem tiltslēgi nav jāiestata 4 ievietojiet optisko diskdzini pieejamā 5 25 collu nišā skat 1 attēlu 5 pievienojiet ide optiskā diskdziņa līdzstrāvas konektoram 4 kontaktu barošanas kabeli skat 2 attēlu pēc tam pievienojiet ide kabeli ide konektoram optiskā diskdziņa aizmugurē salāgojot krāsaino svītru uz kabeļa ar ide konektora 1 kontaktu pin 1 skat 2 attēlu pievienojiet otru ide kabeļa galu ide konektoram uz mātesplates 6 pievienojiet sata optiskā diskdziņa līdzstrāvas konektoram 15 kontaktu barošanas kabeli skat 3 attēlu pēc tam pievienojiet sata konektoram optiskā diskdziņa aizmugurē sata kabeli skat 3 attēlu pievienojiet otru sata kabeļa galu sata konektoram uz mātesplates 7 iebīdiet optisko diskdzini nišā un nostipriniet ar četrām skrūvēm 8 uzliecie 2
- Nuimkite kompiuterio gaubtą 2 prieš montuodami į korpusą ide optinio diskasukio trumpiklį sukonfigūruokite taip kad būtų galima nustatyti įtaiso master slave arba cable select režimą 3 sata optiniams diskų įtaisams trumpiklį nustatyti nebūtina 4 optinį diskų įtaisą įkiškite į 13 34 cm pločio nišą kaip parodyta 1 pav 5 ide optiniams diskų įtaisams maitinimo šaltinio kabelio 4 kontaktų kištuką prijunkite prie diskų įtaiso dc įvesties jungties kaip parodyta 2 pav paskui ide kabelį prijunkite prie optinio diskų įtaiso galinėje pusėje esančios ide jungties kabelio spalvotą juostelę sutaptindami su ide jungties 1 mu kontaktu kaip parodyta 2 pav kitą ide kabelio galą prijunkite prie pagrindinės plokštės ide jungties 6 sata optinių diskų įtaisams maitinimo šaltinio kabelio 15 kontaktų kištuką prijunkite prie įtaiso dc įvesties jungties kaip parodyta 3 pav paskui sata kabelį prijunkite prie optinio diskų įtaiso galinėje pusėje esančios sata jungties kaip parodyta 3 pav kitą sata kabelio galą pri 2
- Odstranite pokrov računalnika 2 za optične pogone ide nastavite mostiček pogona in ga nastavite bodisi na način master glavni slave podrejeni ali cable select izbira prek kabla preden ga namestite v ohišje 3 za optične pogone sata nastavitve mostička niso potrebne 4 vstavite optični pogon v razpoložljivo 5 25 palčno ležišče kot prikazuje slika 1 5 za optične pogone ide priključite 4 pinski napajalni kabel v napajalni priključek za enosmerni tok optičnega pogona kot prikazuje slika 2 nato priključite kabel ide v priključek ide na hrbtni strani optičnega pogona in pazite da se barva traku na kablu ujema s pinom 1 na priključku ide kot prikazuje slika 2 drug konec kabla ide priključite v priključek ide na matični plošči 6 za optične pogone sata priključite 15 pinski napajalni kabel v napajalni priključek za enosmerni tok optičnega pogona kot prikazuje slika 3 nato priključite 15 pinski kabel sata v napajalni priključek sata na hrbtni strani optičnega pogona kot prikazuje slika 3 drug kone 2
- Ohjelmiston asennus 2
- Operacinė sistema window 2
- Operacinė sistema windows 2
- Operační systém window 2
- Operační systém windows 2
- Opriţi calculatorul şi orice dispozitiv periferic conectat la acesta înainte de a instala unitatea optică pentru evitarea deteriorării unităţii optice datorită electricităţii statice utilizaţi o bandă colier împământată sau atingeţi un obiect împământat în siguranţă sau un obiect metalic ca de exemplu carcasa unei surse de alimentare cu electricitate înainte de a instala unitatea optică 1 îndepărtaţi capacul calculatorului 2 pentru unităţile optice ide configuraţi jumperul unităţii pentru a seta dispozitivul într unul din modurile master slave sau cable select înainte de a îl instala în carcasă 3 pentru unităţile optice sata nu sunt necesare setările jumperului 4 introduceţi unitatea optică într o nişă disponibilă de 5 25 inci aşa cum este prezentat în figura 1 5 pentru unităţile optice ide conectaţi un cablu cu 4 pini de alimentare cu energie electrică la conectorul de intrare cc al unităţii optice aşa cum este prezentat în figura 2 în continuare conectaţi un cablu ide la conectorul id 2
- Os sistemas operativos window 2
- Os sistemas operativos windows 2
- Pcケースのカバーを元に戻します 2
- Pcケースのカバーを外します 2
- Pemasangan perangkat keras 2
- Pemasangan perisian 2
- Pemasangan perkakasan 2
- Penginstalan perangkat lunak 2
- Pirms optiskā diskdziņa uzstādīšanas izslēdziet datoru un visas tam pieslēgtās perifērās ierīces lai izvairītos no optiskā diskdziņa sabojāšanas ar statisko elektrību izmantojiet iezemētu aproci vai pirms optiskā diskdziņa uzstādīšanas pieskarieties kārtīgi iezemētam vai metāla priekšmetam piemēram barošanas bloka korpusam 2
- Polski 繁體中文 2
- Português magyar 2
- Prieš montuodami optinį diskų įtaisą išjunkite kompiuterį ir visus prie jo prijungtus išorinius įtaisus kad įtaisas nesugestų dėl statinės elektros prieš jį montuodami naudokite įžemintą riešo dirželį arba palieskite saugiai įžemintą objektą arba metalinį daiktą pavyzdžiui maitinimo šaltinio korpusą 2
- Programinstallation 2
- Programinės įrangos įdiegimas 2
- Programmatūras instalācija 2
- Przed instalacją napędu optycznego należy wyłączyć komputer i wszystkie podłączone do niego urządzenia peryferyjne aby uniknąć uszkodzenia napędu optycznego spowodowanego elektrycznością statyczną przed instalacją napędu optycznego należy stosować uziemioną taśmę nadgarstkową lub dotknąć uziemionego obiektu lub metalowego obiektu takiego jak obudowa zasilacza 1 odłącz pokrywę komputera 2 przed instalacją w obudowie napędów optycznych ide należy skonfigurować zworkę napędu w celu ustawienia urządzenia do pracy w trybie master slave lub cable select 3 dla napędów optycznych sata nie ma potrzeby wykonywania ustawień zworki 4 wstaw napęd optyczny do wolnej wnęki 5 25 cala zgodnie z rysunkiem 1 5 dla napędów optycznych ide podłącz 4 pinowy kabel zasilający do złącza wejścia prądu stałego napędu optycznego jak pokazuje rysunek 2 następnie podłącz kabel ide do złącza ide z tyłu napędu optycznego dopasowując kolorowy pasek na kablu do pinu 1 złącza ide jak pokazuje rysunek 2 podłącz drugi konie 2
- Q4697_odd_qig_v2 indd 10 9 28 10 9 45 53 am 2
- Q4697_odd_qig_v2 indd 11 9 28 10 9 45 54 am 2
- Q4697_odd_qig_v2 indd 12 9 28 10 9 45 55 am 2
- Q4697_odd_qig_v2 indd 13 9 28 10 9 45 55 am 2
- Q4697_odd_qig_v2 indd 14 9 28 10 9 45 56 am 2
- Q4697_odd_qig_v2 indd 15 9 28 10 9 45 56 am 2
- Q4697_odd_qig_v2 indd 16 9 28 10 9 45 57 am 2
- Q4697_odd_qig_v2 indd 16 9 28 10 9 45 57 am q4697_odd_qig_v2 indd 17 9 28 10 9 45 57 am 2
- Q4697_odd_qig_v2 indd 17 9 28 10 9 45 57 am 2
- Q4697_odd_qig_v2 indd 18 9 28 10 9 45 57 am 2
- Riistvara installimine 2
- Română 2
- Sata 光学ドライブの場合 15ピン電源用ケーブルを光学ドライブ後部のdc 入 力コネクタに接続します 図③参照 次に sataケーブルを光学ドライブ後部の sata コネクタに接続します 図③参照 sata ケーブルのもう一方の端をマザー ボード側の sata コネクタに接続します 2
- Sata 光学ドライブの場合 ジャンパを設定する必要はありません 2
- Sata 광 드라이브의 경우 광 드라이브의 dc 입력 커넥터에 15 핀 전원 2
- Sata 광 드라이브의 경우 점퍼 설치는 필요 없습니다 4 비어 있는 5 5 인치 드라이브 베이에 광 드라이브를 삽입합니다 그림 1 참조 5 ide 광 드라이브의 경우 광 드라이브의 dc 입력 커넥터에 4 핀 전원 케이블을 2
- Skru av datamaskinen og eventuelle eksterne enheter før du installerer den optiske enheten for å unngå skader på den optiske enheten på grunn av statisk elektrisitet bruk et jordet antistatisk armbånd eller berør et trygt jordet objekt gjerne av metall eksempelvis en strømforsyningsboks før du installerer den optiske enheten 2
- Software installation 2
- Suomi norsk 2
- Szoftvertelepítés 2
- Tarkvara installimine 2
- Tháo nă p hông máy 2
- Trượt ổ đĩa quang vào khung giữ và siết chặt nó bằng 4 vít 2
- Tænd for computeren 2
- Tắt máy tính của bạn và mọi thiết bị ngoại vi được kết nối với máy tính trước khi lắp đặt ổ đĩa quang để tránh làm hỏng ổ đĩa quang do hiện tượng tĩnh điện hãy sử dụng dây quấn cổ tay tiếp đất hoặc chạm vào một vật tiếp đất an toàn hay vật dụng kim loại như vỏ bô nguồn trước khi lắp ổ đĩa quang 2
- Window 2
- Windows 2
- Windows xp vista 7 8 osでは ご使用の光学ドライブの設定を自動的に検出し 適切なドライバをインストール します 日本語 2
- Windows xp vista 7 8 автоматично визначає поточні настройки для вашого дисководу та встановлює потрібний драйвер українська 2
- Windows xp vista 7 8 автоматично разпознават текущите настройки на диска и инсталират съответния драйвер български 2
- Windows xp vista 7 8 作業系統皆可自行偵測本裝置正確的設定值與所需的驅動程式 繁體中文 2
- Windows xp vista 7 osでは ご使用の光学ドライブの設定を自動的に検出し 適切なドライバをインストール します 日本語 2
- Windows xp vista samodejno zazna trenutne nastavitve za pogon in namesti ustrezen gonilnik slovenščina 2
- Windows xp vista жүйелері енгізгінің ағымдағы параметрлерін автоматты түрде анықтайды және тиісті драйверді орнатады қазақша 2
- Xp vista 7 2
- Xp vista 7 8 akan secara otomatis mendeteksi setting drive anda kemudian menginstal driver yang tepat bahasa indonesia 2
- Xp vista 7 8 automatically detects the current settings for your drive and installs the appropriate driver english 2
- Xp vista 7 8 automaticky rozpozná aktuální nastavení jednotky a nainstaluje vhodný ovladač čeština 2
- Xp vista 7 8 automaticky zistí aktuálne nastavenia vašej mechaniky a nainštaluje správny ovládač slovensky 2
- Xp vista 7 8 automatikusan érzékeli a meghajtó aktuális beállításait és automatikusan telepíti a megfelelő illesztőprogramot magyar 2
- Xp vista 7 8 automatiškai aptinka esamas diskų įrenginio nuostatas ir įdiegia atitinkamą tvarkyklę lietuvių 2
- Xp vista 7 8 automatycznie wykrywa bieżące ustawienia dla napędu i instaluje odpowiedni sterownik polski 2
- Xp vista 7 8 automātiski nosaka pašreizējos diskdziņa iestatījumus un instalē atbilstošu dzini latviski 2
- Xp vista 7 8 detectam automaticamente as definições actuais da unidade e instalam o controlador apro priado português 2
- Xp vista 7 8 detectează automat setările curente pentru unitatea dumneavoastră şi instalează driverul corespunzător română 2
- Xp vista 7 8 detecteert automatisch de huidige instellingen voor uw station en installeert het geschikte stuurprogramma nederlands 2
- Xp vista 7 8 détecte automatiquement les paramètres actuels de votre disque et installe le pilote approprié français 2
- Xp vista 7 8 erkennt automatisch die einstellungen für das laufwerk und installiert den jeweils passenden treiber deutsch 2
- Xp vista 7 8 havaitsee automaattisesti levyaseman nykyiset asetukset ja asentaa sopivan laiteohjaimen suomi 2
- Xp vista 7 8 hittar automatiskt aktuella inställningar för enheten och installerar drivrutinerna som krävs svenska 2
- Xp vista 7 8 identifiserer automatisk de gjeldende innstillingene for enheten og installerer de nødvendige driverne norsk 2
- Xp vista 7 8 mengesan tetapan terkini untuk peranti anda dan memasang pemacu yang sesuai secara automatik bahasa malaysia 2
- Xp vista 7 8 rileva automaticamente le impostazioni dell unità e installa il driver appropriato italiano 2
- Xp vista 7 8 samodejno zazna trenutne nastavitve za pogon in namesti ustrezen gonilnik slovenščina 2
- Xp vista 7 8 sporer automatisk de eksisterende drevindstillinger og installerer den korrekte driver dansk 2
- Xp vista 7 8 sürücü için mevcut ayarları kendiliğinden algılar ve uygun sürücüyü kurar türkçe 2
- Xp vista 7 8 sẽ tự động phát hiện các cài đặt hiện hành cho ổ đĩa của bạn và cài đặt driver thích hợp tiếng việt 2
- Xp vista 7 8 tuvastab automaatselt olemasolevad draivi sätted ja installib vastava draiveri eesti 2
- Xp vista 7 8 ανιχνεύει αυτόματα τις τρέχουσες ρυθμίσεις για τη μονάδα σας και εγκαθιστά τον κατάλληλο οδηγό ελληνικά 2
- Xp vista 7 8 автоматически обнаружит ваш привод и установить необходимые драйвера русский 2
- Xp vista 7 8 жүйелері енгізгінің ағымдағы параметрлерін автоматты түрде анықтайды және тиісті драйверді орнатады қазақша 2
- Xp vista 7 8 จะตรวจพบการต งค าป จจ บ นสำาหร บไดรฟ ของค ณ และต ดต งไดรเวอร ท เหมาะสมโดยอ ตโนม ต ไทย 2
- Xp vista 7 8 操作系统皆可自行侦测本设备正确的设置值与所需的驱动程序 简体中文 2
- Xp vista 7 8 은 자동으로 드라이브의 현재 설정을 감지하여 적절한 드라이버를 설치합니다 한국어 2
- Xp vista 7 akan secara otomatis mendeteksi setting drive anda kemudian menginstal driver yang tepat bahasa indonesia 2
- Xp vista 7 automatically detects the current settings for your drive and installs the appropriate driver english 2
- Xp vista 7 automaticky rozpozná aktuální nastavení jednotky a nainstaluje vhodný ovladač čeština 2
- Xp vista 7 automaticky zistí aktuálne nastavenia vašej mechaniky a nainštaluje správny ovládač slovensky 2
- Xp vista 7 automatikusan érzékeli a meghajtó aktuális beállításait és automatikusan telepíti a megfelelő illesztőprogramot magyar 2
- Xp vista 7 automatiškai aptinka esamas diskų įrenginio nuostatas ir įdiegia atitinkamą tvarkyklę lietuvių 2
- Xp vista 7 automatycznie wykrywa bieżące ustawienia dla napędu i instaluje odpowiedni sterownik polski 2
- Xp vista 7 automātiski nosaka pašreizējos diskdziņa iestatījumus un instalē atbilstošu dzini latviski 2
- Xp vista 7 detectam automaticamente as definições actuais da unidade e instalam o controlador apropriado português 2
- Xp vista 7 detectează automat setările curente pentru unitatea dumneavoastră şi instalează driverul corespunzător română 2
- Xp vista 7 detecteert automatisch de huidige instellingen voor uw station en installeert het geschikte stuurprogramma nederlands 2
- Xp vista 7 détecte automatiquement les paramètres actuels de votre disque et installe le pilote approprié français 2
- Xp vista 7 erkennt automatisch die einstellungen für das laufwerk und installiert den jeweils passenden treiber deutsch 2
- Xp vista 7 havaitsee automaattisesti levyaseman nykyiset asetukset ja asentaa sopivan laiteohjaimen suomi 2
- Xp vista 7 hittar automatiskt aktuella inställningar för enheten och installerar drivrutinerna som krävs svenska 2
- Xp vista 7 identifiserer automatisk de gjeldende innstillingene for enheten og installerer de nødvendige driverne norsk 2
- Xp vista 7 mengesan tetapan terkini untuk peranti anda dan memasang pemacu yang sesuai secara automatik bahasa malaysia 2
- Xp vista 7 rileva automaticamente le impostazioni dell unità e installa il driver appropriato italiano 2
- Xp vista 7 sporer automatisk de eksisterende drevindstillinger og installerer den korrekte driver dansk 2
- Xp vista 7 sürücü için mevcut ayarları kendiliğinden algılar ve uygun sürücüyü kurar türkçe 2
- Xp vista 7 sẽ tự động phát hiện các cài đặt hiện hành cho ổ đĩa của bạn và cài đặt driver thích hợp tiếng việt 2
- Xp vista 7 tuvastab automaatselt olemasolevad draivi sätted ja installib vastava draiveri eesti 2
- Xp vista 7 ανιχνεύει αυτόματα τις τρέχουσες ρυθμίσεις για τη μονάδα σας και εγκαθιστά τον κατάλληλο οδηγό ελληνικά 2
- Xp vista 7 จะตรวจพบการต งค าป จจ บ นสำหร บไดรฟ ของค ณ และต ดต งไดรเวอร ท เหมาะสมโดยอ ตโนม ต ไทย 2
- Xp vista 7 作業系統皆可自行偵測本裝置正確的設定值與所需的驅動程式 繁體中文 2
- Xp vista 7 操作系统皆可自行侦测本设备正确的设置值与所需的驱动程序 简体中文 2
- Xp y vista y 7 detectan automáticamente la configuración actual de la unidad e instalan el controlador adecuado español 2
- Xp y vista y 7 y 8 detectan automáticamente la configuración actual de la unidad e instalan el controlador adecuado español 2
- Yazılım kurulumu 2
- Đậy nă p hông máy la i 2
- Đối với các ổ đĩa quang ide hãy cấu hình cầu nối nhảy cóc trên ổ đĩa để cài đặt chế độ chi nh phu hoặc ca p chọn trước khi lắp nó vào thùng máy 2
- Đối với các ổ đĩa quang ide hãy cắm cáp nguồn 4 chân với đầu vào dòng điện mô t chiê u của ổ đĩa quang như minh họa ở hình 2 tiếp theo cắm cáp ide vào đầu cắm ide ở mặt sau ổ đĩa quang sao cho vạch màu trên cáp tru ng với chân 1 trên đầu cắm ide như minh họa ở hình 2 cắm đầu còn lại của cáp ide va o cô ng ide trên bo mạch chủ 2
- Đối với các ổ đĩa quang sata hãy cắm cáp nguồn 15 chân với đầu vào dòng điện mô t chiê u của ổ đĩa quang như minh họa ở hình 3 tiếp theo cắm cáp sata vào đầu cắm sata ở mặt sau ổ đĩa quang như minh họa ở hình 3 cắm đầu còn lại của cáp sata vào đầu cắm sata trên bo mạch chủ 2
- Εγκατάσταση λογισμικού 2
- Εγκατάσταση υλικού 2
- Ελληνικά indonesia 2
- Κλείστε τον υπολογιστή και οποιαδήποτε άλλη περιφερειακή συσκευή είναι συνδεδεμένη σε αυτόν πριν εγκαταστήσετε την οπτική μονάδα για να αποφύγετε βλάβες της οπτικής μονάδας λόγω στατικού ηλεκτρισμού χρησιμοποιήστε γειωμένο λουράκι καρπού ή αγγίξτε ένα καλά γειωμένο αντικείμενο ή ένα μεταλλικό αντικείμενο όπως το περίβλημα του τροφοδοτικού προτού εγκαταστήσετε την οπτική μονάδα 1 αφαιρέστε το κάλυμμα του υπολογιστή 2 για οπτικές μονάδες ide ρυθμίστε το βραχυκυκλωτήρα jumper της μονάδας ώστε να θέσει τη συσκευή σε κατάσταση master slave ή cable επιλέξτε προτού την εγκαταστήσετε στο περίβλημα 3 για οπτικές μονάδες sata δεν υπάρχει ανάγκη ρυθμίσεων των βραχυκυκλωτήρων 4 εισάγετε την οπτική μονάδα σε διαθέσιμο φατνίο 5 25 ιντσών όπως φαίνεται στο σχήμα 1 5 για οπτικές μονάδες ide συνδέστε ένα καλώδιο τροφοδοσίας ρεύματος 4 ακίδων στην υποδοχή εισόδου dc της οπτικής μονάδας όπως φαίνεται στο σχήμα 2 στη συνέχεια συνδέστε ένα καλώδιο ide στην υποδοχή ide στο πίσω μέρος της οπτικής μονάδας ται 2
- Το λογισμικό window 2
- Το λογισμικό windows 2
- Інсталяція програмного забезпечення 2
- Бағдарламалық жасақтаманы орнату 2
- Жабдықты орнату 2
- Компьютер қақпағын алыңыз 2 ide оптикалық енгізгілерді рамаға орнату алдында енгізгі тұтқасын теңшеп master slave немесе cable select режиміне орнату керек 3 sata оптикалық енгізгілерінде перемычканы баптау қажеттілігі жоқ 4 оптикалық енгізгіні бар 5 25 дюймдық бос орынға салыңыз 1 суретте көрсетілгендей 5 ide оптикалық енгізгілерде 4 істікті қуат сымын оптикалық енгізгінің тұрақты ток кіріс қосқышына қосыңыз 2 суретте көрсетілгендей содан кейін ide кабельді оптикалық енгізгінің артындағы ide қосқышқа қосыңыз кабельдегі түсті таспа ide қосқыштағы 1 істікпен сәйкес болуы керек 2 суретте көрсетілгендей ide кабельдің басқа шетін аналық тақтадағы ide қосқышқа қосыңыз 6 sata оптикалық енгізгілерінде 15 істікті қуат сымын оптикалық енгізгінің тұрақты ток кіріс қосқышына қосыңыз 3 суретте көрсетілгендей содан кейін sata кабелін оптикалық енгізгінің артындағы sata қосқышына қосыңыз 3 суретте көрсетілгендей sata кабелінің екінші шетін аналық тақтадағы sata қосқышына қосыңыз 7 оптикалық енгізгін 2
- Оптикалық енгізгі орнату алдында компьютерді өшіріңіз және оған қосылған барлық сыртқы құрылғыларды өшіріңіз статикалық электрден оптикалық енгізгі зақымдалмауы үшін оптикалық енгізгіні орнату алдында жерге қосылған бауды пайдаланыңыз немесе қуат көзі блогы сияқты қауіпсіз жерге қосылған нысанға немесе металл нысанға тиіңіз 2
- Софтуерна инсталация 2
- Установка программного обеспечения 2
- การต ดต งซอฟต แวร 2
- การต ดต งฮาร ดแวร 2
- ถอดฝาคอมพ วเตอร ออก 2
- ป ดคอมพ วเตอร และอ ปกรณ ต อพ วงใดๆ ท ต ออย ก อนท จะต ดต งออปต ค ลไดรฟ เพ อหล ก เล ยงความเส ยหายต อออปต ค ลไดรฟ เน องจากไฟฟ าสถ ตย ให ใช สายร อยข อม อท ต อลงด น หร อ แตะว ตถ ท ม การต อลงด นอย างปลอดภ ย หร อว ตถ โลหะ เช น ต วเคร องเพาเวอร ซ พพลาย ก อนท จะต ดต งออปต ค ลไดรฟ 2
- สำหร บออปต ค ลไดรฟ แบบ ide เช อมต อสายเคเบ ลเพาเวอร 4 พ นเข าก บข วต อ dc เ ข าของออปต ค ลไดรฟ ด งแสดงในร ปท 2 ถ ดไป เช อมต อสายเคเบ ล ide ไปย งข วต อ ide ท ด านหล งของออปต ค ลไดรฟ โดยจ ดให แถบด านท ม ส บนสายเคเบ ล ตรงก บพ น 1 บนข วต อ ide ด งแสดงในร ปท 2 เช อมต อปลายอ กด านหน งของสายเคเบ ล ide ไปย งข วต อ ide บนเมนบอร ด 2
- สำหร บออปต ค ลไดรฟ แบบ ide ให ต งค าคอนฟ กจ มเปอร ของไดรฟ เพ อต งค าอ ปกรณ ใ ห เป นโหมด master slave หร อ cable select ก อนท จะต ดต งไดรฟ ลงในต วเคร อง 2
- สำหร บออปต ค ลไดรฟ แบบ sata เช อมต อสายเคเบ ลเพาเวอร 15 พ นเข าก บข วต อ dc เข าของออปต ค ลไดรฟ ด งแสดงในร ปท 3 ถ ดไป เช อมต อสายเคเบ ล sata เข าก บข ว ต อ sata ท ด านหล งของออปต ค ลไดรฟ ด งแสดงในร ปท 3 เช อมต อปลาย อ กด านหน งของสายเคเบ ล sata ไปย งข วต อ sata บนเมนบอร ด 2
- สำหร บออปต ค ลไดรฟ แบบ sata ไม ม ความจำเป นต องต งค าจ มเปอร 2
- เป ดคอมพ วเตอร ของค ณ 2
- เล อนออปต ค ลไดรฟ เข าไปในช องใส และย ดให แน นด วยสกร 4 ต ว 2
- ใส ฝาคอมพ วเตอร กล บค น 2
- ใส ออปต ค ลไดรฟ ลงในช องใส ไดรฟ 5 5 น ว ด งแสดงในร ปท 1 2
- ไทย tiếng việt 2
- コンピュータの電源をオンにします 2
- ソフトウェアをインストールする 2
- ハードウェアを取り付ける 2
- 光学ドライブを5 5 インチベイに挿入します 図①参照 2
- 光学ドライブをベイに挿入し 4本のネジで固定します 2
- 光学ドライブを取り付ける前に コンピュータと 接続している周辺デバイスの電源を 切ります また 静電気による損傷を防ぐために 光学ドライブを取り付ける前に 静 電気除去装置に触れるなど 静電気対策をしてください 2
- 在您进行光驱 刻录机的安装前 关闭您的电脑与其他外围设备的电源 而为了避免静电 的产生 您可使用防静电手环 碰触有接地线的物品或是金属物品 例如 电源供应器 外壳 做好上述准备后 请依照下列步骤来安装您的光驱 刻录机 2
- 在您進行光碟機 燒錄機的安裝前 關閉您的電腦與其它周邊設備的電源 而為了避免靜 電的產生 您可使用防靜電手環 碰觸有接地線的物品或是金屬物品 例如 電源供應 器外殼 做好上述準備後 請依照下列步驟來安裝您的光碟機 燒錄機 2
- 打开电脑外壳 2 若是使用ide接口的光驱 请用机身背面的跳线帽调整光驱主从模式为master模 式 slave模式或是cable select模式 3 如是使用sata接口的光驱 则无需进行跳线帽的设置 4 将光驱放入电脑机箱中可用的5 5英寸设备空间 如右图1 5 若是ide接口光驱 请连接电源供应器的4 pin电源输出接头到光驱电源插座上 如右图2 接着请连接ide数据线到光驱背后的ide插座 如右图2 至于 ide数据线的另一端则请连接至主板上的ide插座上 请确认ide数据线上红色边 缘对准了插座上的pin1脚位 6 若是sata接口光驱则请连接sata电源输出接头至光驱的电源插座上 如右图 3 接着请连接sata数据线至光驱背后的sata插座 如右图3 并将sata 数据线的另一端连接至主板上的sata插座上 7 沿着光驱的两侧 将配件组附上的螺丝锁上 8 将机箱重新装上 9 重新启动电脑 2
- 打開電腦外殼 2 若是使用ide介面的光碟機 請使用機身背面的跳線帽調整光碟機主副模式為 master 模式 slave模式或是cable select模式 3 若是使用sata介面的光碟機 則無需進行跳線帽的設定 4 將光碟機放入電腦機殼中可用的5 5 英寸磁碟機空間 如右圖1 5 若是ide介面光碟機 請連接電源供應器的4 pin電源輸出接頭到光碟機電源插座 上 如右圖2 接著請連接ide排線到光碟機背後的ide插座 如右圖2 至於 ide排線的另一端則請連接至主機板上的ide插座上 請確認ide排線上紅色邊緣 對準了插座上的pin1腳位 6 若是sata介面光碟機則請連接sata電源輸出接頭至光碟機的電源插座上 如右 圖3 接著請連接sata排線至光碟機背後的sata插座 如右圖3 並將sata 排線的另一端連接至主機板上的sata插座上 7 沿著光碟機的兩側 將配件組附上的螺絲鎖上 8 將機殼重新裝上 9 重新啟動電腦 2
- 硬件安装步骤 2
- 硬體安裝程式 2
- 簡体中文 日本語 2
- 軟體安裝程式 2
- 软件安装步骤 2
- 광 드라이브를 베이에 밀어 넣은 다음 4개의 나사를 이용하여 고정합니다 8 컴퓨터 커버를 조립합니다 9 컴퓨터를 켭니다 2
- 소프트웨어 설치 2
- 연결합니다 그림2 참조 다음 광 드라이브의 뒷면에 있는 ide 커넥터에 ide 케이블을 연결합니다 이 때 ide 커넥터 의 1 번 핀과 케이블의 색칠 된 선을 일치하여 연결합니다 그림 2 참조 ide 케이블의 다른 한 쪽을 머더보드의 ide 커넥터에 연결합니다 2
- 이 기기는 가정용 b급 전자파 적합기기 로서 주로 가정에서 사용하는 것을 목적으로 하며 모든 지역에서 사용할 수 있습니다 2
- 정전기에 의한 광 드라이브의 손상을 피하기 위해 손목 접지 대를 사용하거나 광 드라이브를 설치하기 전에 전원 공급 장치 케이스와 같은 안전하게 접지된 물체 또는 금속 물체를 만지십시오 1 컴퓨터 커버를 분리합니다 2 ide 광 드라이브의 경우 컴퓨터 본체에 설치하기 전에 master slave 또는 2
- 컴퓨터와 광 드라이브를 설치하기 전에 연결된 모든 주변 장치의 전원을 꺼 주십시오 2
- 케이블을 연결합니다 그림 3 참조 다음 광 드라이브 의 뒷면의 sata 커넥터에 sata 케이블을 연결합니다 그림 3 참조 sata 케이블의 다른 쪽 끝을 머더보드의 sata 커넥터에 연결합니다 2
- 하드웨어 설치방법 2
Похожие устройства
- ONKRON NP24 Инструкция по эксплуатации
- ONKRON NN16 Инструкция по эксплуатации
- Asus DRW-24D5MT Краткое Руководство
- Asus ROG Strix Arion Руководство Пользователя
- Asus ROG Strix Arion Краткое Руководство
- ONKRON SN12 Инструкция по эксплуатации
- Asus RT-AX82U Краткое Руководство
- Asus RT-AX82U Руководство Пользователя
- Asus RT-AX86U Краткое Руководство
- Asus RT-AX86U Руководство Пользователя
- Asus RP-AX56 Краткое Руководство
- Asus PCE-AX3000 Краткое Руководство
- Asus PCE-AX58BT Краткое Руководство
- ONKRON NP13 Инструкция по эксплуатации
- Asus ZenWiFi AX Mini (XD4) Руководство Пользователя
- Asus ZenWiFi AX Mini (XD4) Краткое Руководство
- Asus ZenWiFi AX (XT8) Руководство Пользователя
- Asus ZenWiFi AX (XT8) Краткое Руководство
- Asus AiMesh AX6100 WiFi System RT-AX92U 2 Pack Краткое Руководство
- Asus AiMesh AX6100 WiFi System RT-AX92U 2 Pack Руководство Пользователя