![Zotek ZT-550B+ — обзор инфракрасного термометра для бесконтактного измерения температуры [1/2]](/img/pdf.png)
Zotek ZT-550B+ — обзор инфракрасного термометра для бесконтактного измерения температуры [1/2]

* Emissivity describes the energy-emitting characteristics of materials.
Most organic materials and painted or oxidized surfaces have an
emissivity of approximately 0.95, the default setting for the product. To
enhance accuracy of measurements, set emissivity based on the
Appendix: “Emissivity of Common Objects”.
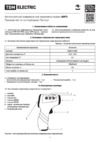
(2) Buttons
User Manual
A. Introduction
This product is an infrared thermometer for non-contact temperature
measurement, which determines the surface temperature of an object by
measuring the amount of infrared energy radiated by the object surface.
B. Safety Information
To avoid possible hazards, please read all safety information before you use
the product.
(1) Do NOT use the product around explosive gas, vapor, or in damp or wet
environments.
(2) Do NOT look directly into the laser or point laser indirectly at persons' eyes.
(3) Do NOT look directly into the laser with optical tools (e.g.: binoculars,
microscopes).
(4) Do NOT put the product near heat or fire.
C. How the Product Works
Any object whose temperature is higher than absolute zero radiates infrared
energy. The radiated infrared energy is proportionate to the temperature of the
object itself. This product optics sense emitted, reflected, and transmitted
energy, which is collected and focused onto a detector. Then the product
translates the signal into a temperature measurement and shows the
measurement on the display.
D. Genearl Maintenance
Do not open the product. Have the product repaired only through an
approved technical site.
(1) Do not operate the product around hot, wet, flammable, explosive or
magnetic environments.
(2) Clean the product with damp cloth and mild detergent; do not use
abrasives or solvents.
(3) Remove the batteries if you will not use the product for a long time to
prevent possible battery leak.
(5) When “ ” is shown on the display, batteries shall be replaced as below:
1. Remove the battery cover through the depression area on the side of the
product;
2. Replace the used batteries with new batteries of the same type;
3. Place the battery cover back.
E. Instruction
(1) How to Measure
1. Target the object you want to measure and push the trigger, the product
will be turned on automatically;
2. Use the laser light to help aiming the right point;
3. Loose the trigger when a temperature is shown on the display, the product
will beep once, the measurement on the display will be locked and a
“HOLD” will show at the lower left corner;
4. Repeat the above steps to measure another object;
Button Instruction
1.
Press EMIT , then press this button to increase the emissivity.
2. Push the trigger, then press this button to turn on/off backlight.
1.
Press EMIT , then press this button to decrease the emissivity.
2. Push the trigger, then press this button to turn on/off laser light.
3. Press this button to make
℃/℉ selection.
SELECT
Press this button will toggle between the following functions:
1.
MAX
: the maximum value. Due to the uneven temperature of an
object's surface, the measurement you get in the middle of the
display will fluctuate because the laser target is pointing to
different points; by entering MAX Function, the lower right
corner of the display will show the maximum value you get
during the whole measuring process.
2. AVG: the average value; measure the same way as above.
3. MIN:
the minimum value; measure the same way as above.
4. DIF:
the difference between the maximum value and the
minimum value; measure the same way as above.
5. LAL: low temperature alarm; press
△ or ▽ after entering this
function to set the alarm value; once the temperature you are
measuring is lower than the alarm value, the top left corner will
show “LOW” and the built-in beeper will beep continuously.
6. HAL: high temperature alarm; set the same way as above and
the top left corner will show “LOW”。
7. offset: calibrate temperature; when you are measuring a known
temperature and find the result you get through the product is
not the same as what you know, you can enter this function and
press △ or ▽ to calibrate the product.
8. E: current emissivity.
EMIT
Press this button to set the
emissivity.
- 1 -
- 2 -
Содержание
- C how the product works p.1
- User manual p.1
- Magnetic environments p.1
- Emissivity of approximately 0 5 the default setting for the product to p.1
- Corner of the display will show the maximum value you get p.1
- Limited warranty p.2
- Customers enjoy one year warranty from the date of purchase this warranty does not cover fuses disposable batteries or damage from accident neglect misuse alternation contamination or abnormal conditions of operation or handling p.2
- Carbon paste 0 0 paper all colors 0 4 p.2
- And limitation of liability p.2
- All rights reserved specifications are subject to change without notice p.2
Похожие устройства
-
 Zotek GM-320Инструкция по эксплуатации
 -
Zotek GM-550Инструкция по эксплуатации
-
Zotek ZT-320B+Инструкция по эксплуатации
-
 TDM Electric БИТ SQ4022-0001Руководство пользователя
 -
 Jet DEF TD133Инструкция по эксплуатации
 -
 Garin IT-1Инструкция
 -
 Garin IT-1V2Инструкция
 -
 Garin IT-2Инструкция
 -
 Fluke -62 maxТаблицы коэффициентов в термографии для различных материалов
 -
 B.Well WF-5000Инструкция по эксплуатации
 -
 Ridgid micro IR-100Брошюра
 -
 Ridgid micro IR-100Инструкция по эксплуатации
Узнайте, как работает инфракрасный термометр для бесконтактного измерения температуры. Важные советы по безопасности и настройке эмиссии для точных измерений.