
Sencor SWS 200 RD Инструкция по эксплуатации онлайн
Содержание
Похожие устройства
- LG MS2343BAR Инструкция по эксплуатации
- Philips SPF4308 Инструкция по эксплуатации
- Sencor SWS 200 GN Инструкция по эксплуатации
- LG MS2043HAR Инструкция по эксплуатации
- Philips SPF2327 Инструкция по эксплуатации
- Sencor SWS 180 USB Инструкция по эксплуатации
- Supra KES-1709 White Инструкция по эксплуатации
- Philips SPF7010 Инструкция по эксплуатации
- Sencor SWS 130 Инструкция по эксплуатации
- Philips Daily Collection HD 9310/14 Инструкция по эксплуатации
- Philips SPF7208 Инструкция по эксплуатации
- Sencor SWS 120 Инструкция по эксплуатации
- Tefal Express II KI170D30 Инструкция по эксплуатации
- Philips SPF7008 Инструкция по эксплуатации
- Sencor SWS 65 Инструкция по эксплуатации
- Bork B702 Инструкция по эксплуатации
- LG GR-V292SC Инструкция по эксплуатации
- Philips SPF4208 Инструкция по эксплуатации
- Maxwell MW-1960 ST Инструкция по эксплуатации
- Philips SPF2027 Инструкция по эксплуатации
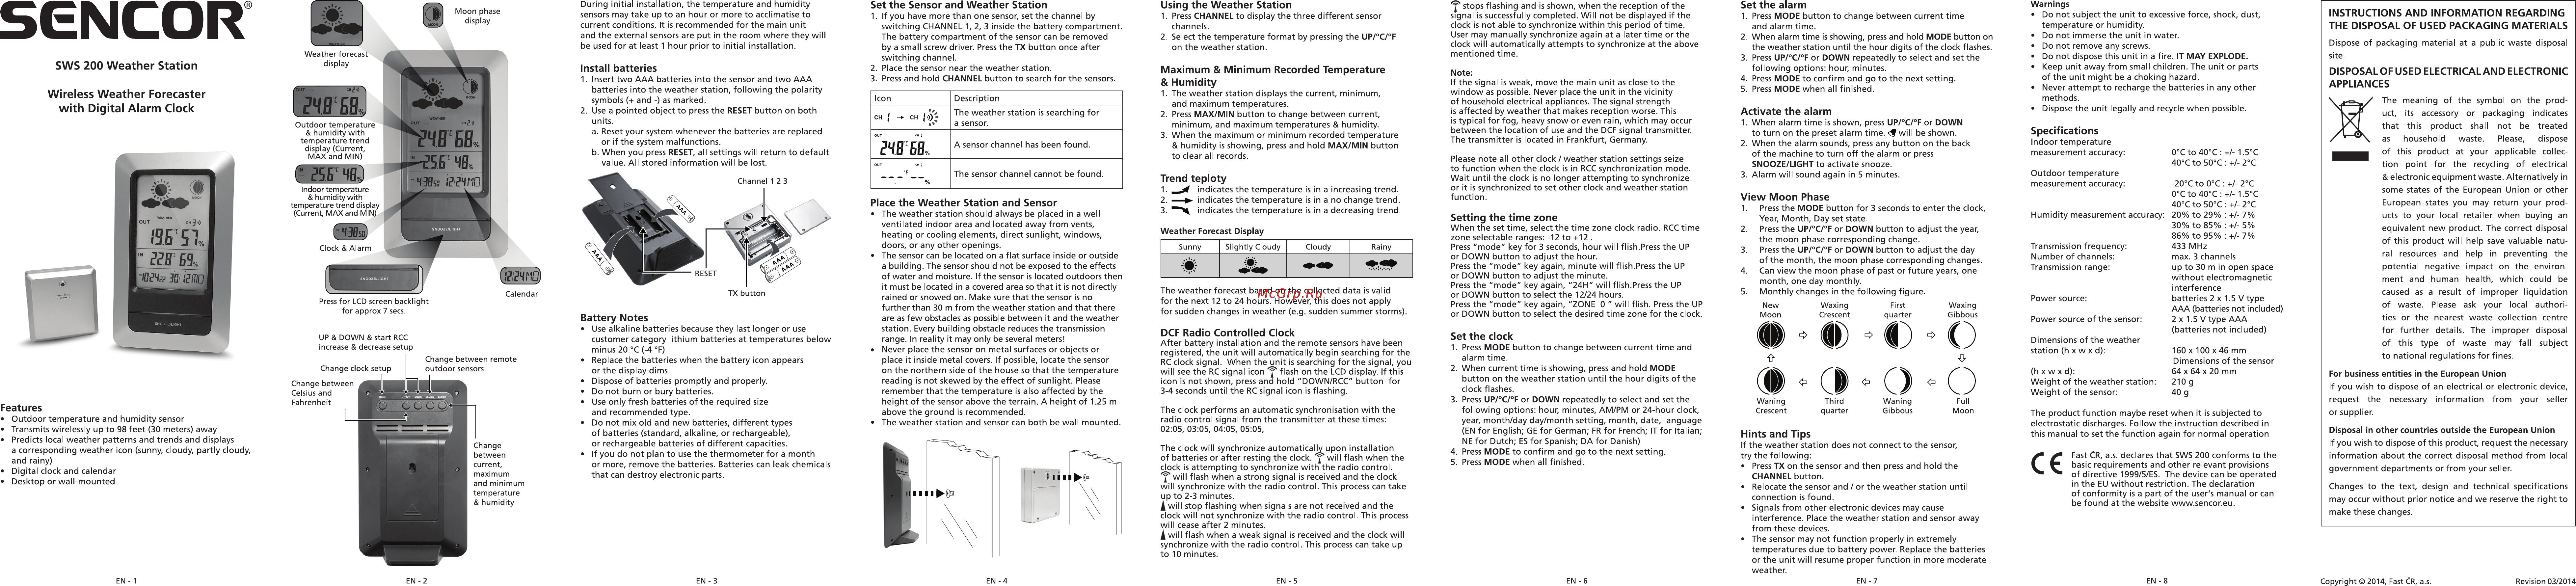
During initial installation the temperature and humidity sensors may take up to an hour or more to acclimatise to current conditions It is recommended for the main unit and the external sensors are put in the room where they will be used for at least 1 hour prior to initial installation SGNCOR Weather forecast display SWS 200 Weather Station Wireless Weather Forecaster with Digital Alarm Clock UT Install batteries 1 Insert two AAA batteries into the sensor and two AAA batteries into the weather station following the polarity symbols and as marked 2 Use a pointed object to press the RESET button on both units a Reset your system whenever the batteries are replaced or if the system malfunctions b When you press RESET all settings will return to default value All stored information will be lost CH Outdoor temperature humidity with temperature trend display Current MAX and MIN Using the Weather Station 1 If you have more than one sensor set the channel by switching CHANNEL 1 2 3 inside the battery compartment The battery compartment of the sensor can be removed by a small screw driver Press the TX button once after switching channel 2 Place the sensor near the weather station 3 Press and hold CHANNEL button to search for the sensors 1 Press CHANNEL to display the three different sensor channels 2 Select the temperature format by pressing the UP C F on the weather station Icon Description CH 1 CH The weather station is searching for a sensor OUT 1 CH гчвев A sensor channel has been found OUT The sensor channel cannot be found Indoor temperature humidity with temperature trend display Current MAX and MIN Place the Weather Station and Sensor Clock Alarm Ш TX button Calendar Press for LCD screen backlight for approx 7 secs Battery Notes Use alkaline batteries because they last longer or use customer category lithium batteries at temperatures below minus 20 C 4 F Replace the batteries when the battery icon appears or the display dims Dispose of batteries promptly and properly Do not burn or bury batteries Use only fresh batteries of the required size and recommended type Do not mix old and new batteries different types of batteries standard alkaline or rechargeable or rechargeable batteries of different capacities If you do not plan to use the thermometer for a month or more remove the batteries Batteries can leak chemicals that can destroy electronic parts UP DOWN start RCC increase decrease setup Features Outdoor temperature and humidity sensor Transmits wirelessly up to 98 feet 30 meters away Predicts local weather patterns and trends and displays a corresponding weather icon sunny cloudy partly cloudy and rainy Digital clock and calendar Desktop or wall mounted The weather station should always be placed in a well ventilated indoor area and located away from vents heating or cooling elements direct sunlight windows doors or any other openings The sensor can be located on a flat surface inside or outside a building The sensor should not be exposed to the effects of water and moisture If the sensor is located outdoors then it must be located in a covered area so that it is not directly rained or snowed on Make sure that the sensor is no further than 30 m from the weather station and that there are as few obstacles as possible between it and the weather station Every building obstacle reduces the transmission range In reality it may only be several meters Never place the sensor on metal surfaces or objects or place it inside metal covers If possible locate the sensor on the northern side of the house so that the temperature reading is not skewed by the effect of sunlight Please remember that the temperature is also affected by the height of the sensor above the terrain A height of 1 25 m above the ground is recommended The weather station and sensor can both be wall mounted EN 3 1 The weather station displays the current minimum and maximum temperatures 2 Press MAX MIN button to change between current minimum and maximum temperatures humidity 3 When the maximum or minimum recorded temperature humidity is showing press and hold MAX MIN button to clear all records Trend teploty 1 2 3 X indicatesthe temperature is in a increasing trend indicatesthe temperature is in a no change trend indicatesthe temperature is in a decreasing trend EN 4 stops flashing and is shown when the reception of the signal is successfully completed Will not be displayed if the clock is not able to synchronize within this period of time User may manually synchronize again at a later time or the clock will automatically attempts to synchronize at the above mentioned time Note If the signal is weak move the main unit as close to the window as possible Never place the unit in the vicinity of household electrical appliances The signal strength is affected by weather that makes reception worse This is typical for fog heavy snow or even rain which may occur between the location of use and the DCF signal transmitter The transmitter is located in Frankfurt Germany Please note all other clock weather station settings seize to function when the clock is in RCC synchronization mode Wait until the clock is no longer attempting to synchronize or it is synchronized to set other clock and weather station function Setting the time zone The weather forecast based on the collected data is valid for the next 12 to 24 hours However this does not apply for sudden changes in weather e g sudden summer storms When the set time select the time zone clock radio RCC time zone selectable ranges 12 to 12 Press mode key for 3 seconds hour will flish Press the UP or DOWN button to adjust the hour Press the mode key again minute will flish Press the UP or DOWN button to adjust the minute Press the mode key again 24H will flish Press the UP or DOWN button to select the 12 24 hours Press the mode key again ZONE 0 will flish Press the UP or DOWN button to select the desired time zone for the clock DCF Radio Controlled Clock Set the clock Weather Forecast Display Sunny Slightly Cloudy Cloudy Rainy 4 After battery installation and the remote sensors have been registered the unit will automatically begin searching for the RC clock signal When the unit is searching for the signal you will see the RC signal icon flash on the LCD display If this icon is not shown press and hold DOWN RCC button for 3 4 seconds until the RC signal icon is flashing The clock performs an automatic synchronisation with the radio control signal from the transmitter at these times 02 05 03 05 04 05 05 05 The clock will synchronize automatically upon installation of batteries or after resting the clock will flash when the clock is attempting to synchronize with the radio control will flash when a strong signal is received and the clock will synchronize with the radio control This process can take up to 2 3 minutes I will stop flashing when signals are not received and the clock will not synchronize with the radio control This process will cease after 2 minutes X will flash when a weak signal is received and the clock will synchronize with the radio control This process can take up to 10 minutes and minimum temperature humidity EN 2 Maximum Minimum Recorded Temperature Humidity CH e EN 1 Set the Sensor and Weather Station EN 5 1 Press MODE button to change between current time and alarm time 2 When current time is showing press and hold MODE button on the weather station until the hour digits of the clock flashes 3 Press UP C F or DOWN repeatedly to select and set the following options hour minutes AM PM or 24 hour clock year month day day month setting month date language EN for English GE for German FR for French IT for Italian NE for Dutch ES for Spanish DA for Danish 4 Press MODE to confirm and go to the next setting 5 Press MODE when all finished EN 6 Set the alarm 1 Press MODE button to change between current time and alarm time 2 When alarm time is showing press and hold MODE button on the weather station until the hour digits of the clock flashes 3 Press UP C F or DOWN repeatedly to select and set the following options hour minutes 4 Press MODE to confirm and go to the next setting 5 Press MODE when all finished Activate the alarm 1 When alarm time is shown press UP C F or DOWN to turn on the preset alarm time rf will be shown 2 When the alarm sounds press any button on the back of the machine to turn off the alarm or press SNOOZE LIGHT to activate snooze 3 Alarm will sound again in 5 minutes Warnings Do not subject the unit to excessive force shock dust temperature or humidity Do not immerse the unit in water Do not remove any screws Do not dispose this unit in a fire IT MAY EXPLODE Keep unit away from small children The unit or parts of the unit might be a choking hazard Never attempt to recharge the batteries in any other methods Dispose the unit legally and recycle when possible Specifications Indoor temperature measurement accuracy 0 C to 40 C 1 5 C 40 C to 50 C 2 C Outdoor temperature measurement accuracy View Moon Phase 1 Press the MODE button for 3 seconds to enter the clock Year Month Day set state 2 Press the UP C F or DOWN button to adjust the year the moon phase corresponding change 3 Press the UP C F or DOWN button to adjust the day of the month the moon phase corresponding changes 4 Can view the moon phase of past or future years one month one day monthly 5 Monthly changes in the following figure New Moon Waxing Crescent First quarter Waxing Gibbous Humidity measurement accuracy Transmission frequency Number of channels Transmission range Power source Power source of the sensor Dimensions of the weather station h x w x d ce h x w x d Weight of the weather station Weight of the sensor Waning Crescent Third quarter Waning Gibbous Full Moon Hints and Tips If the weather station does not connect to the sensor try the following Press TX on the sensor and then press and hold the CHANNEL button Relocate the sensor and or the weather station until connection is found Signals from other electronic devices may cause interference Place the weather station and sensor away from these devices The sensor may not function properly in extremely temperatures due to battery power Replace the batteries or the unit will resume proper function in more moderate weather EN 7 20 C to 0 C 2 C 0 C to 40 C 1 5 C 40 C to 50 C 2 C 20 to 29 7 30 to 85 5 86 to 95 7 433 MHz max 3 channels up to 30 m in open space without electromagnetic interference batteries 2 x 1 5 V type AAA batteries not included 2 x 1 5 V type AAA batteries not included 160 x 100 x 46 mm Dimensions of the sensor 64 x 64 x 20 mm 210g 40 g The product function maybe reset when it is subjected to electrostatic discharges Follow the instruction described in this manual to set the function again for normal operation Fast CR a s declares that SWS 200 conforms to the i basic requirements and other relevant provisions of directive 1999 5 ES The device can be operated in the EU without restriction The declaration of conformity is a part of the user s manual or can be found at the website www sencor eu EN 8 INSTRUCTIONS AND INFORMATION REGARDING THE DISPOSAL OF USED PACKAGING MATERIALS Dispose of packaging material at a public waste disposal site DISPOSALOF USED ELECTRICAL AND ELECTRONIC APPLIANCES The meaning of the symbol on the prod uct its accessory or packaging indicates that this product shall not be treated as household waste Please dispose of this product at your applicable collec tion point for the recycling of electrical electronic equipment waste Alternatively in some states of the European Union or other European states you may return your prod ucts to your local retailer when buying an equivalent new product The correct disposal of this product will help save valuable natu ral resources and help in preventing the potential negative impact on the environ ment and human health which could be caused as a result of improper liquidation of waste Please ask your local authori ties or the nearest waste collection centre for further details The improper disposal of this type of waste may fall subject to national regulations for fines For business entities in the European Union If you wish to dispose of an electrical or electronic device request the necessary information from your seller or supplier Disposal in other countries outside the European Union If you wish to dispose of this product request the necessary information about the correct disposal method from local government departments or from your seller Changes to the text design and technical specifications may occur without prior notice and we reserve the right to make these changes Copyright 2014 Fast CR a s Revision 03 2014