
Aten CN9600 Краткое руководство по установке онлайн
B
Installation
© Copyright 2022 ATEN
®
International Co. Ltd.
ATEN and the ATEN logo are registered trademarks of ATEN International Co., Ltd.
All rights reserved. All other trademarks are the property of their respective owners.
Part No. PAPE-1223-S21G Released: 06/2022
1-Local / Remote Share Access Single Port
DVI KVM over IP Switch
Quick Start Guide
CN9600
www.aten.com
www.aten.com
www.aten.com
www.aten.com
www.aten.com
www.aten.com
A
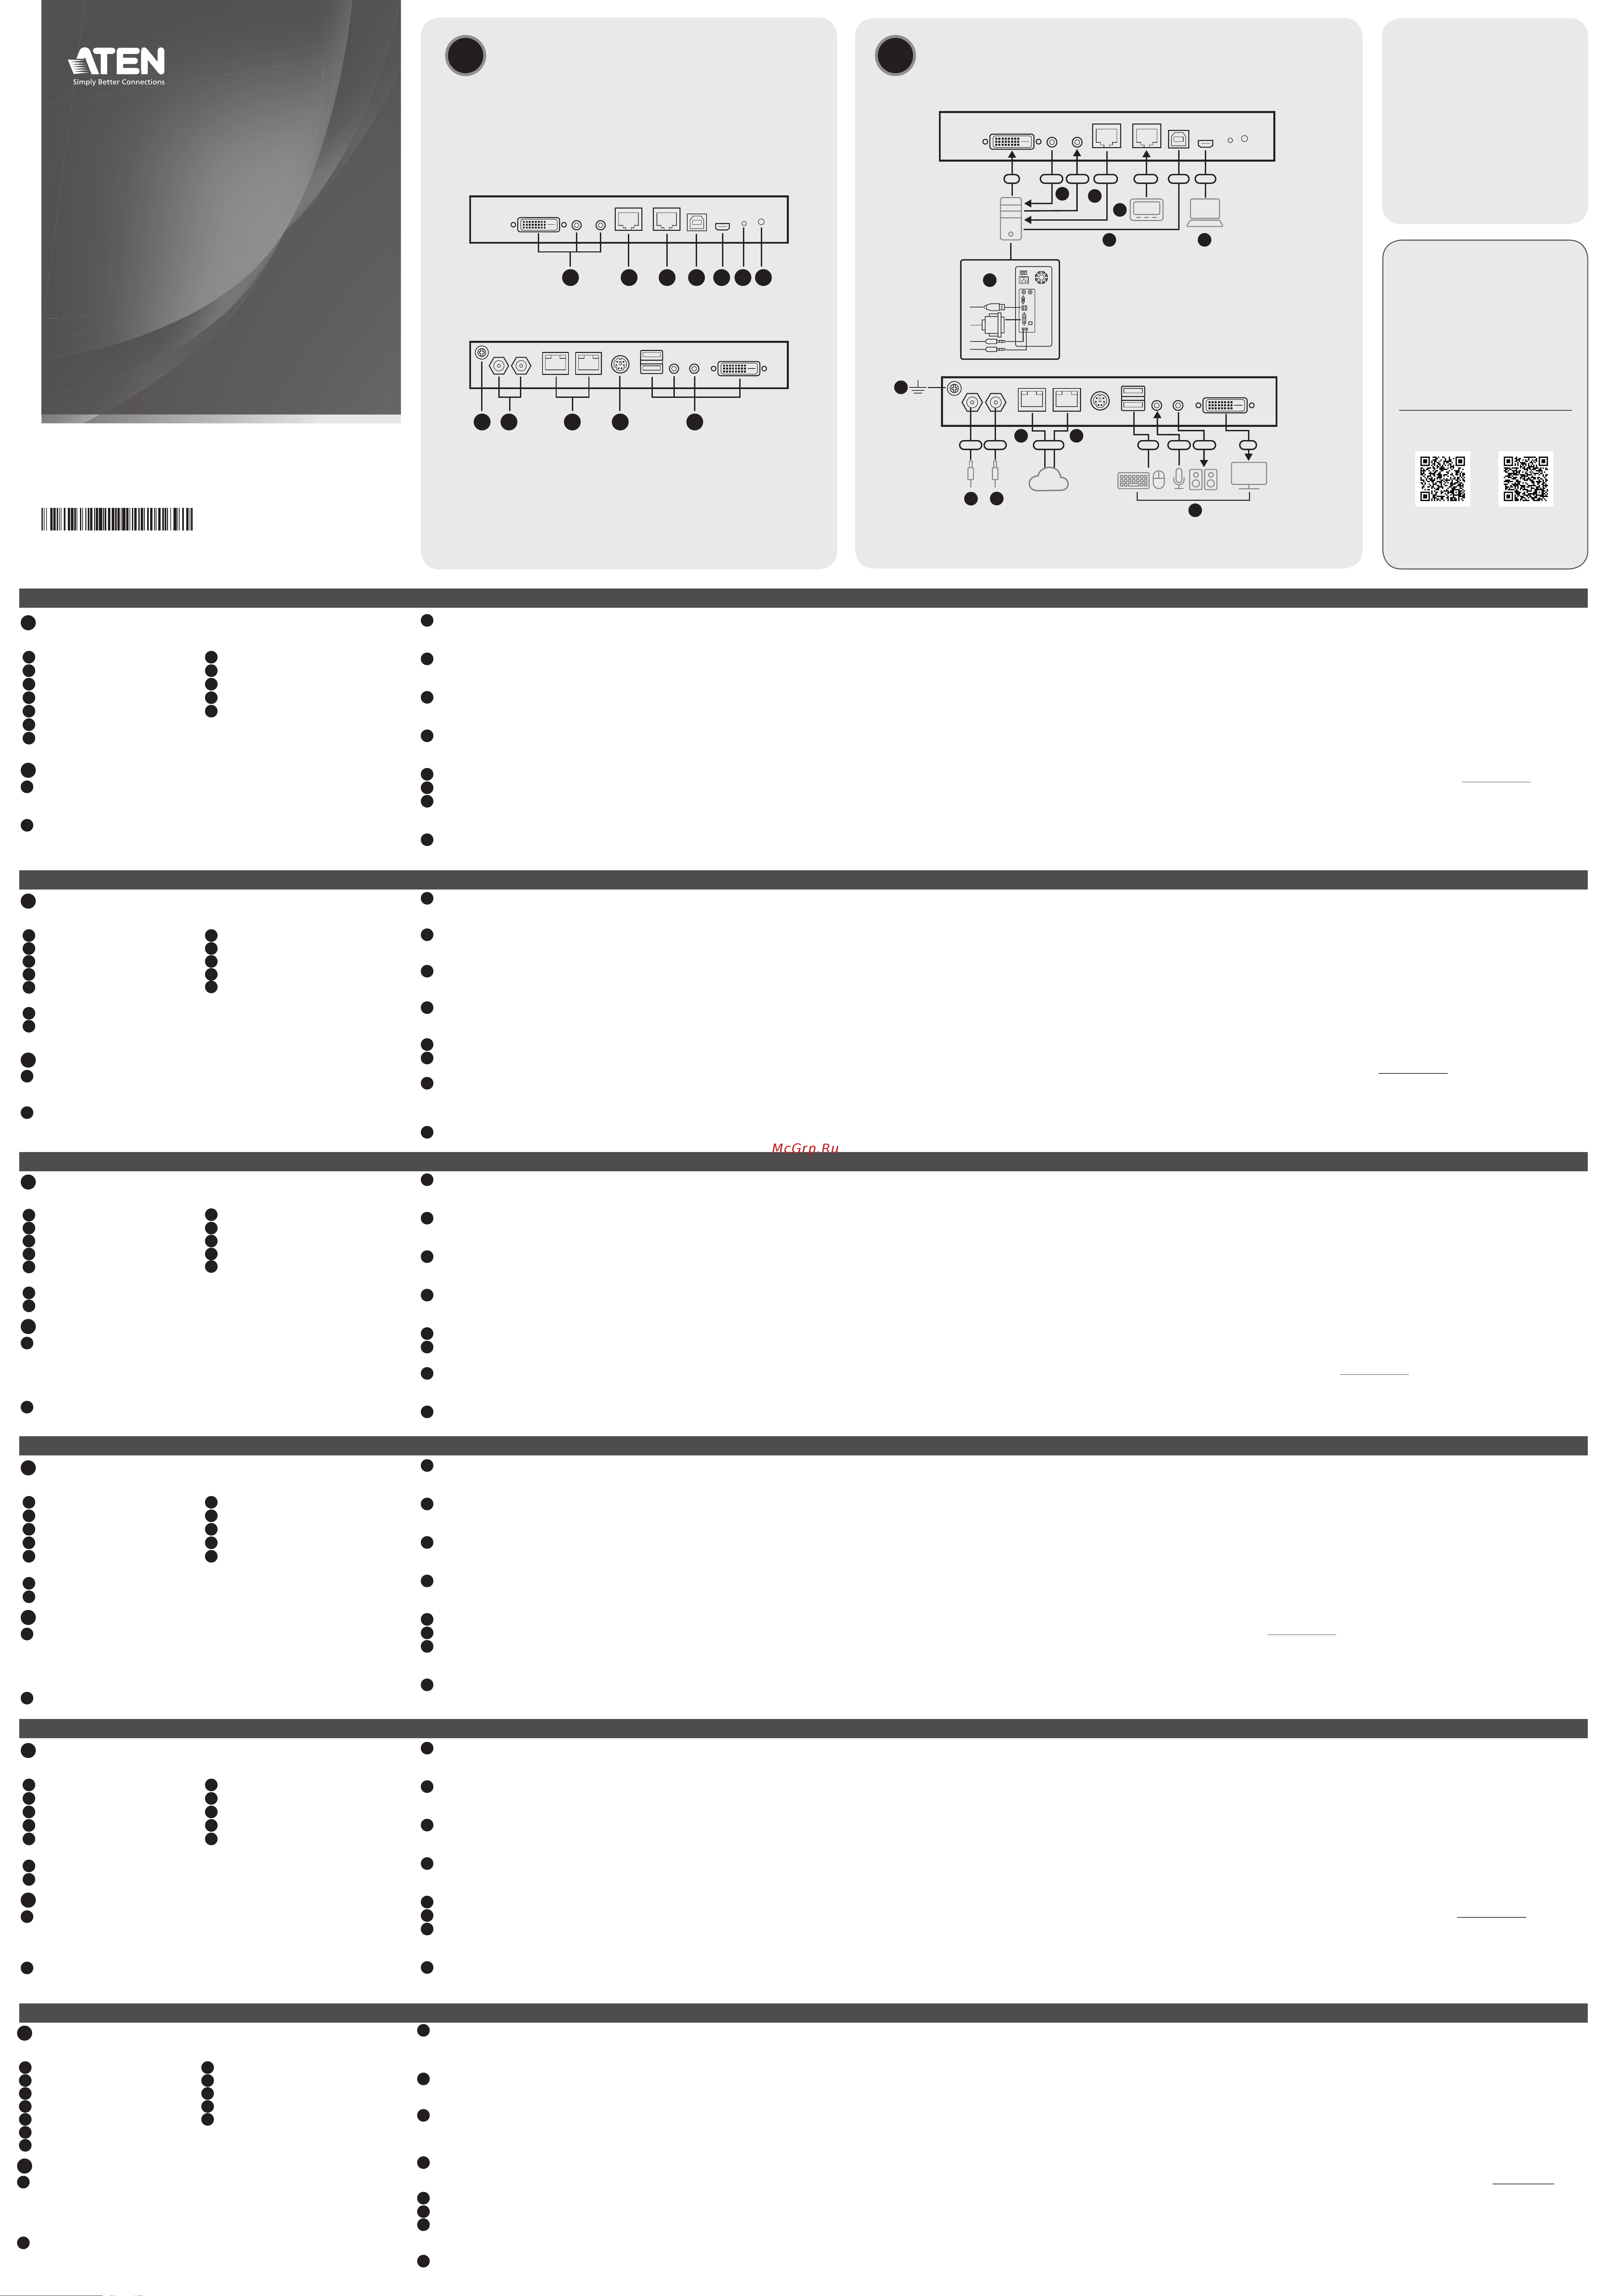
Hardware Overview
Support and Documentation Notice
All information, documentation, fi rmware,
software utilities, and specifi cations
contained in this package are subject to
change without prior notifi cation by the
manufacturer.
To reduce the environmental impact of
our products, ATEN documentation and
software can be found online at
http://www.aten.com/download/
Technical Support
www.aten.com/support
Scan for more information
ATEN Website User Manual
1 2 3 4 5 6 7
1 2 3 4 5
Front View
Rear View
Package Contents
1 CN9600 DVI KVM over IP Switch
1 KVM cable (DVI-D, USB Type-A, audio)
1 USB Type-A to USB Mini-B cable
1 power adapter
1 mounting kit
1 user instructions
10
7
9
8
3
3
4
5
6
3
2
1
Front View
Rear View
Ethernet
DVI RS-232
USB DVI
RS-232 USB
AudioAudio
USB
PowerPower
AudioAudio
Network
A
Hardware Overview
Front View
1
KVM ports (DVI-D, audio)
2
RS-232 DTE port
3
RS-232 DCE port
4
KVM USB Type-B port
5
laptop USB console (LUC) port
6
reset button
7
power LED
Rear View
1
grounding terminal
2
power jacks
3
LAN ports
4
control port (reserved)
5
local console ports
B
Installation
1
Connect the unit’s grounding terminal to a suitable grounded object.
Note: Do not omit this step. Proper grounding helps to prevent damage to
the unit from power surges or static electricity.
2
Plug your USB keyboard and mouse, DVI monitor, speakers, and microphone
into the local console ports located on the rear panel.
3
Use the KVM cable provided with this package to connect the unit's KVM
ports to the keyboard, mouse, video, speakers, and microphone ports of the
server or KVM switch that you are installing.
4
(Optional) If you wish to access locally using a laptop, use the USB Type-A
to USB Mini-B cable provided to connect the USB port of the laptop to the
unit's LUC port.
5
(Optional) If you are using other serial devices (data terminal equipment),
such as a touch panel, connect it to the RS-232 DCE port with a network
switch console cable.
6
(Optional) If you are using other serial devices (data communication
equipment), such as a PC, connect it to the RS-232 DTE port with a network
switch console cable.
7
Plug a network cable into the unit’s LAN port 1.
8
(Optional) Plug a second network cable into the unit’s LAN port 2.
9
Plug the power adapter provided with this package into an AC power source,
and plug the power adapter cable into one of the unit’s power jacks. Now
the unit is turned on.
10
(Optional) Connect the unit's other power jack to power via another power
adapter for power redundancy.
Note: Dual power operation is optional — the second power source is for
backup; a second power adapter requires a separate purchase.
Operation
1. Open your browser and specify the IP address of the CN9600 you want to
access in the browser’s URL location bar.
Note: You can get the IP address from the CN9600 administrator, or see the
IP Address Determination section of the user manual. (Default IP address for
non-DHCP: 192.168.0.60)
2. If a Security Alert dialog box appears, accept the certifi cate — it can be
trusted.The login page appears.
3. Provide a valid username and password.
Note: If you are logging in for the fi rst time, use the default Username:
administrator; and the default Password: password.
4. Then click Login to bring up the browser main page.
Local IP Setup
Use the local console to set the IP address. All procedures start from the OSD
main screen.
1. To access the OSD main screen, tap [Scroll Lock] twice.
2. When the login screen appears, enter a valid username and password to
continue.
Note: If you are logging in for the fi rst time, use the default Username:
administrator; and the default Password: password.
IP Installer
Using a Windows PC within the same LAN, users can search for the unit's IP
address or assign an IP address to it with the IP Installer utility. The utility can
be obtained from the Download area of our website www.aten.com. After
downloading the utility to the PC, go to the directory that the IP Installer resides
in, and run IPInstaller.exe.
CN9600 1-Local/Remote Share Access Single Port DVI KVM over IP Switch
A
Survol du matériel
Vue de face
1
Ports KVM (DVI-D, audio)
2
Port ETTD RS-232
3
Port ETCD RS-232
4
Port KVM USB Type B
5
Port de console USB pour ordinateur
portable (LUC)
6
Bouton de réinitialisation
7
Voyant d’alimentation
Vue de dos
1
Prise terre
2
Prises d’alimentation
3
Ports LAN
4
Port de contrôle (réservé)
5
Ports de console locale
B
Installation
1
Connectez le terminal de terre de l'unité à un objet correctement mis à terre.
Remarque : N'ignorez pas cette étape. Une mise à terre correcte évite tout
dommage à l'unité depuis des surtensions ou de l'électricité statique.
2
Branchez votre clavier et souris USB, votre moniteur DVI, vos haut-parleurs et
votre microphone dans les ports de console locale situés sur le panneau arrière.
3
Utilisez le câble KVM fourni avec cet emballage pour connecter les ports KVM
de l'unité aux ports du clavier, souris, vidéo, haut-parleurs et microphone du
serveur ou commutateur KVM que vous installez.
4
(Facultatif) Si vous souhaitez accéder localement en utilisant un ordinateur
portable, utilisez le câble mini-B USB Type-A vers USB fourni pour connecter
le port USB de l'ordinateur portable au port LUC de l'unité.
5
(Facultatif) Si vous utilisez d’autres périphériques série (équipement terminal
de données), par ex. un panneau tactile, connectez-le au port ETCD RS-232 à
l’aide d’un câble de console de commutateur réseau.
6
(Facultatif) Si vous utilisez d’autres périphériques série (équipement de
transmission de données), par ex. un ordinateur, connectez-le au port ETTD
RS-232 à l’aide d’un câble de console de commutateur réseau.
7
Branchez un câble réseau dans le port LAN 1 du commutateur CN9600.
8
(Facultatif) Branchez un second câble réseau dans le port LAN 2 du
commutateur CN9600.
9
Branchez l’adaptateur d’alimentation fourni avec cet appareil à une
prise d’alimentation secteur, puis branchez le câble de l’adaptateur
d’alimentation à l’une des prises d’alimentation du commutateur CN9600. Le
commutateur CN9600 est désormais alimenté.
10
(Facultatif) Connectez l'autre prise d'alimentation de l'unité à l'aide d'un
autre adaptateur d'alimentation pour assurer la redondance électrique.
Remarque : l’utilisation du mode double alimentation est facultative. La seconde
source d’alimentation sert d’alimentation de secours. Le second
adaptateur d’alimentation secteur doit être acheté séparément.
Fonctionnement
1. Ouvrez votre navigateur et saisissez l’adresse IP du commutateur CN9600
auquel vous voulez accéder dans la barre d’adresse URL du navigateur.
Remarque : Vous pouvez obtenir l'adresse IP de l'administrateur CN9600 ou
consulter la section Détermination de l'adresse IP du manuel de l'utilisateur.
(Adresse IP par défaut pour non-DHCP : 192.168.0.60)
2. Si une boîte de dialogue d’alerte de sécurité apparaît, acceptez le certifi cat
auquel vous pouvez vous fi er. La page de connexion s’affi che.
3. Renseignez un nom d’utilisateur et un mot de passe valides.
Remarque : Si vous vous connectez pour la première fois, utilisez le nom
d'utilisateur par défaut : administrator ; et le mot de passe par défaut :
password.
4. Cliquez ensuite sur Connexion pour affi cher la page principale du navigateur.
Confi guration de l’adresse IP locale
Utilisez la console locale pour défi nir l’adresse IP. Toutes les procédures
s’effectuent à partir de l’écran principal qui s’affi che.
1. Pour accéder à l'écran principal OSD, tapotez sur [Scroll Lock] deux fois.
2. Une fois que l’écran de connexion s’affi che, saisissez un nom d’utilisateur et
un mot de passe valides pour continuer.
Remarque : Si vous vous connectez pour la première fois, utilisez le nom
d'utilisateur par défaut : administrator ; et le mot de passe par défaut :
password.
Utilitaire IP Installer
À l'aide d'un ordinateur Windows dans même réseau local, les utilisateurs
peuvent rechercher l'adresse IP de l'unité ou lui attribuer une adresse IP à l'aide
de l'utilitaire d'installation IP. Vous pouvez obtenir l'utilitaire depuis la section
Télécharger sur notre site Internet www.aten.com. Après avoir téléchargé
l'utilitaire sur le PC, accédez au répertoire dans lequel se trouve le programme
d'installation IP et lancez IPInstaller.exe.
Commutateur sur IP KVM monoport DVI à 1 accès partagé local/distant CN9600
A
Hardware Übersicht
Ansicht von vorn
1
KVM-Anschlüsse (DVI-D, Audio)
2
RS-232 DTE-Port
3
RS-232 DCE-Port
4
KVM USB Typ-B Anschluss
5
Laptop-USB-Konsolen-Port (LUC-
Port)
6
Rücksetztaste
7
Betriebszustands-LED
Ansicht von hinten
1
Erdungsklemme
2
Netzadapteranschlussbuchsen
3
LAN-Ports
4
Kontrollanschluss (Reserviert)
5
Lokale Konsolenports
B
Installation
1
Schließen Sie den Erdungsanschluss des Geräts an ein geeignetes geerdetes
Objekt an.
Hinweis: Lassen Sie diesen Schritt nicht aus. Eine angemessene Erdung hilft
bei der Verhinderung von Geräteschäden durch Spannungsspitzen oder
statische Elektrizität.
2
Verbinden Sie Ihre USB-Tastatur, Maus, Lautsprecher sowie Ihren DVI-Monitor
und Ihr Mikrofon mit den lokalen Konsolenports auf der Rückseite.
3
Verwenden Sie das im Lieferumfang enthaltene KVM-Kabel, um die KVM-Anschlüsse
des Geräts mit den Tastatur-, Maus-, Video-, Lautsprecher- und Mikrofonanschlüssen
des Servers oder KVM-Switches zu verbinden, den Sie installieren.
4
(Optional) Wenn Sie mit einem Laptop lokal zugreifen möchten, verwenden
Sie das mitgelieferte USB Typ-A auf USB Mini-B Kabel, um den USB-Anschluss
des Laptops mit dem LUC-Anschluss des Geräts zu verbinden.
5
(Optional) Wenn Sie andere serielle Geräte (Datenendeinrichtungen) wie
beispielsweise ein Touchpanel benutzen, dann schließen Sie sie mit Hilfe eines
Netzwerk-Switch-Konsolenkabels am RS-232 DCE-Port an.
6
(Optional) Wenn Sie andere serielle Geräte (Datenübertragungseinrichtungen)
wie beispielsweise einen PC benutzen, dann schließen Sie sie mit Hilfe eines
Netzwerk-Switch-Konsolenkabels am RS-232 DTE-Port an.
7
Schließen Sie ein Netzwerkkabel am LAN-Port 1 des CN9600 an.
8
(Optional) Schließen Sie ein zweites Netzwerkkabel am LAN-Port 2 des
CN9600 an.
9
Stecken Sie den mitgelieferten Netzadapter in eine Netzsteckdose
und anschließend den Stecker des Netzadapterkabels in eine der
Netzadapteranschlussbuchsen des CN9600. Das CN9600 ist jetzt eingeschaltet.
10
(Optional) Verbinden Sie die andere Netzbuchse des Geräts über ein weiteres
Netzteil zur Redundanz der Stromversorgung an.
Hinweis: Die Zweifach-Stromversorgung ist optional – die zweite Stromversorgung
dient der Sicherheit, ein zweiter Netzadapter ist als Zubehör erhältlich.
Bedienung
1. Öffnen Sie Ihren Browser und geben Sie in der Adressleiste Ihres Browsers die
IP-Adresse des CN9600 ein, auf den Sie zugreifen möchten.
Hinweis: Sie können die IP-Adresse von Ihrem CN9600 Administrator
beziehen oder im Kapitel Ermittlung der IP-Adresse des Benutzerhandbuchs
nachschlagen. (Standard IP-Adresse für nicht-DHCP: 192.168.0.60)
2. Wenn eine Sicherheitswarnung eingeblendet wird, dann nehmen Sie dieses
Zertifi kat an – ihm kann vertraut werden. Daraufhin erscheint die Anmeldeseite.
3. Geben Sie einen gültigen Benutzernamen und das zugehörige Passwort ein.
Hinweis: Wenn Sie sich das erste Mal anmelden, benutzen Sie bitte den
Standardbenutzernamen: administrator; und das Standardkennwort:
password.
4. Klicken Sie anschließend auf Anmelden, um zur Browser Hauptseite zu
gelangen.
Lokale IP-Einstellung
Benutzen Sie die lokale Konsole, um die IP-Adresse einzugeben. Alle Vorgänge
beginnen im OSD-Hauptmenü.
1. Tippen Sie zum Aufrufen des OSD Hauptbildschirms zweimal auf [Scroll
Lock].
2. Geben Sie einen gültigen Benutzernamen und das zugehörige Passwort ein,
wenn der Anmeldebildschirm eingeblendet wird, um den Vorgang fortzusetzen.
Hinweis: Wenn Sie sich das erste Mal anmelden, benutzen Sie bitte den
Standardbenutzernamen: administrator; und das Standardkennwort:
password.
IP-Installationsprogramm
Mit einem Windows PC innerhalb desselben LANs können Benutzer nach der
IP-Adresse des Geräts suchen oder ihm mit dem IP-Installationsprogramm
eine IP-Adresse zuweisen. Dieses Dienstprogramm können Sie im Download
Bereich unserer Webseite www.aten.com herunterladen. Nachdem Sie das
Dienstprogramm auf den PC heruntergeladen haben, wechseln Sie in das
Verzeichnis, in dem sich das IP-Installationsprogramm befi ndet, und führen Sie
IPInstaller.exe aus.
CN9600 DVI/KVM-over-IP-Switch mit 1 geteilten Einzelport-Lokal/Remotezugriff
A
Vista general del hardware
Vista frontal
1
Puertos KVM (DVI-D, audio)
2
Puerto DTE RS-232
3
Puerto DCE RS-232
4
Puerto KVM USB tipo B
5
Puerto de consola USB de equipo
portátil (LUC)
6
Botón de reinicio
7
Indicador de alimentación
Vista posterior
1
Toma de tierra
2
Entradas de alimentación
3
Puertos LAN
4
Control Port (reservado)
5
Puertos de consola local
B
Instalación
1
Conecte el terminal de conexión a tierra de la unidad a un objeto
correctamente conectado a tierra.
Nota: No omita este paso. Una conexión a tierra adecuada ayuda a evitar
que se produzcan daños en la unidad por picos de tensión o por electricidad
estática.
2
Conecte el teclado USB, el ratón, el monitor DVI, los altavoces y el micrófono
a los puertos de la consola local ubicados en el panel posterior del equipo.
3
Use el cable KVM suministrado con este paquete para conectar los puertos
KVM de la unidad a los puertos de teclado, ratón, vídeo, altavoces y
micrófono del servidor o conmutador KVM que esté instalando.
4
(Opcional) Si desea acceder localmente utilizando un ordenador portátil,
utilice el cable USB tipo A a USB Mini B suministrado para conectar el puerto
USB del ordenador portátil al puerto LUC de la unidad.
5
(Opcional) Si va a emplear otro dispositivo serie (equipo terminal de datos),
como un panel táctil, conéctelo al puerto DCE RS-232 con un cable de
consola de conmutador de red.
6
(Opcional) Si va a emplear otro dispositivo serie (equipo de comunicación de
datos), como un PC, conéctelo al puerto DTE RS-232 con un cable de consola
de conmutador de red.
7
Conecte un cable de red al puerto LAN 1 del CN9600.
8
(Opcional) Conecte un segundo cable de red al puerto LAN 2 del CN9600.
9
Conecte el adaptador de alimentación incluido a una toma eléctrica CA y, a
continuación, conecte el cable del adaptador de alimentación a una de las entradas
de alimentación del CN9600. Seguidamente, el CN9600 se habrá encendido.
10
(Opcional) Conecte el otro conector de alimentación de la unidad a la
alimentación a través de otro adaptador de alimentación para obtener
redundancia en el suministro de energía.
Nota: el funcionamiento con doble alimentación es opcional: la segunda
fuente de alimentación sirve de respaldo. El segundo adaptador de
alimentación se debe adquirir por separado.
Funcionamiento
1. Abra el navegador web e indique la dirección IP del CN9600 al que desee
acceder en la barra de direcciones URL del navegador.
Nota: Puede obtener la dirección IP del administrador del CN9600 o consultar
la sección Determinación de la dirección IP del manual del usuario. (Dirección
IP predeterminada para no DHCP: 192.168.0.60)
2. En caso de que aparezca un cuadro de diálogo de advertencia de seguridad, acepte
el certifi cado (es un sitio de confi anza). Aparecerá la página de inicio de sesión.
3. Escriba un nombre de usuario y una contraseña válidos.
Nota: Si es la primera vez que inicia sesión, utilice el nombre de usuario
predeterminado: administrator; y la contraseña predeterminada: password.
4. A continuación, haga clic en Iniciar sesión para abrir la página principal del
navegador.
Establecer la dirección IP local
Establezca la dirección IP desde la consola local. Todos los procedimientos tienen
su origen en la pantalla principal del OSD.
1. Para acceder a la pantalla principal del OSD, toque dos veces [Scroll Lock].
2. Cuando aparezca la pantalla de inicio de sesión, escriba un nombre de usuario
y una contraseña válidos para continuar.
Nota: Si es la primera vez que inicia sesión, utilice el nombre de usuario
predeterminado: administrator; y la contraseña predeterminada: password.
Programa de instalación IP
Utilizando un PC con Windows dentro de la misma LAN, los usuarios pueden
buscar la dirección IP de la unidad o asignarle una dirección IP con la herramienta
IP Installer. La herramienta se puede obtener en el área de Descargas de nuestro
sitio web www.aten.com. Una vez descargada la herramienta en el PC, vaya al
directorio en el que reside el instalador IP y ejecute IPInstaller.exe.
CN9600 1-Conmutador KVM con puerto de acceso único compartido local/remoto sobre IP para DVI
A
Panoramica dell'Hardware
Vista anteriore
1
Porte KVM (DVI-D, audio)
2
Porta DTE RS-232
3
Porta DCE RS-232
4
Porta USB KVM di tipo B
5
Porta per console USB portatile
(LUC)
6
Pulsante reset
7
LED di accensione
Vista posteriore
1
Terminale di messa a terra
2
Jack di alimentazione
3
Porte LAN
4
Porta di controllo (riservata)
5
Porte console locali
B
Installazione
1
Collega il terminale di messa a terra dell'estensore a un oggetto idoneo
messo a terra.
Nota: Non saltare questo passaggio. Una corretta messa a terra aiuta a
evitare danni all’unità causati da sbalzi di tensione o elettricità statica.
2
Collegare la tastiera USB, il mouse, il monitor DVI, gli altoparlanti e il
microfono alle porte di console locali situate sul pannello posteriore.
3
Usa il cavo KVM fornito nella confezione per connettere le porte KVM
dell’unità alle porte per tastiera, mouse, video, altoparlanti e microfoni del
server o all’interruttore KVM che stai installando.
4
(Opzionale) Se vuoi accedere localmente usando un laptop, usa il cavo da
USB tipo A a USB mini B fornito nella confezione per connettere la porta USB
del laptop alla porta LUC dell’unità.
5
(Opzionale) In caso di utilizzo di altri dispositivi seriali (terminali di dati), quali
pannelli touch, collegarli alla porta DCE RS-232 con un cavo di rete per
console con switch.
6
(Opzionale) In caso di utilizzo di altri dispositivi seriali (apparecchiature di
comunicazione dati), quali PC, collegarli alla porta DTE RS-232 con un cavo di
rete per console con switch.
7
Inserire un cavo di rete nella porta LAN 1 del CN9600.
8
(Opzionale) Inserire un secondo cavo di rete nella porta LAN 2 del CN9600.
9
Inserire l'adattatore di alimentazione fornito in questa confezione a una
sorgente elettrica CA, quindi inserire il cavo dell'adattatore in una delle prese
di alimentazione del CN9600. Ora il CN9600 è acceso.
10
(Opzionale) Connetti all’alimentazione l’altro cavo di alimentazione dell’unità
per avere ridondanza di alimentazione.
Nota: Il funzionamento dell'alimentazione doppia è opzionale: la seconda
fonte di alimentazione è di backup; un secondo adattatore di
alimentazione deve essere acquistato separatamente.
Funzionamento
1. Aprire il browser e inserire l'indirizzo IP del CN9600 cui si intende avere
accesso nella barra degli indirizzi URL.
Nota: Puoi ottenere l’indirizzo IP dall’amministratore del CN9600, o vedere la
sezione Determinare l’indirizzo IP del manuale d’uso. (Indirizzo IP preimpostato
per non-DHCP: 192.168.0.60)
2. Se appare una fi nestra di dialogo di sicurezza, accettare il certifi cato, che è
affi dabile. A questo punto appare la pagina di accesso.
3. Inserire nome utente e password validi.
Nota: Se è la prima volta che accedi, usa il nome utente preimpostato:
administrator; e la password preimpostata: password.
4. Poi clicca su Login per aprire la pagina principale del browser.
Confi gurazione IP locale
Usare la console locale per impostare l'indirizzo IP. Tutte le procedure si avviano
dalla Schermata principale OSD.
1. Per accedere alla schermata principale dell’OSD, premi due volte su [Scroll
Lock].
2. Quando appare la schermata di accesso, inserire nome utente e password
validi per continuare.
Nota: Se è la prima volta che accedi, usa il nome utente preimpostato:
administrator; e la password preimpostata: password.
Programma di installazione IP
Da un PC Windows nella stessa LAN, gli utenti possono cercare l’indirizzo IP
dell’unità, o assegnarle un indirizzo IP con il programma “IP Installer.” L’utility
si trova nella sezione Download del nostro sito web www.aten.com. Dopo aver
scaricato l’utility nel PC, vai nella cartella dove si trova il fi le di installazione, ed
esegui IPInstaller.exe.
1-Switch CN9600 DVI KVM over IP con porta singola ad accesso condiviso remoto/locale
A
Основные элементы
Вид спереди
1
Порты KVM (DVI-D, аудио)
2
Порт RS-232 DTE
3
Порт RS-232 DCE
4
Порт KVM USB типа B
5
USB-порт для консоли с ноутбука (LUC)
6
Кнопка сброса
7
Индикатор питания
Вид сзади
1
Клемма заземления
2
Гнезда питания
3
Порты локальной сети (ЛВС)
4
Порт управления (резервный)
5
Локальные консольные порты
B
Установка
1
Подключите разъем заземления аппарата к подходящему заземленному
предмету.
Примечание: Не пропускайте это действие. Надлежащее заземление
помогает предотвратить повреждение устройства из-за перепадов напряжения
или статическим электричеством.
2
Подключите USB-клавиатуру, мышь, DVI-монитор, динамики и микрофон к
локальным консольным портам на задней панели.
3
Используйте кабель KVM, прилагаемый в комплекте поставки, для
подключения портов KVM на аппарате к портам клавиатуры, мыши,
видеоустройства, динамиков и микрофона на устанавливаемом сервере или
коммутаторе KVM.
4
(Дополнительно) Для локального доступа с помощью ноутбука используйте
прилагаемый кабель USB типа A - USB Mini-B, чтобы подключить USB-порт
ноутбука к порту LUC на аппарате.
5
(Опция) Если используются другие последовательно подключаемые
устройства (терминальное оборудование), такое как сенсорная панель,
подключите ее к порту RS-232 DCE с помощью консольного кабеля сетевого
коммутатора.
6
(Опция) Если используются другие последовательно подключаемые
устройства (коммуникационное оборудование), такое как ПК, подключите его
к порту RS-232 DTE с помощью консольного кабеля сетевого коммутатора.
7
Вставьте сетевой кабель в порт LAN 1 устройства CN9600.
8
(Опция) Вставьте второй сетевой кабель в порт LAN 2 устройства CN9600.
9
Подключите комплектный блок питания к источнику переменного тока, затем
вставьте шнур блока питания в одно из гнезд питания устройства CN9600.
Теперь устройство CN9600 включено.
10
(Дополнительно) Подключите второй разъем питания аппарата через еще
один адаптер питания, чтобы обеспечить резервное питание.
Примечание: Работа от двух источников питания является опцией — второй
источник питания используется, как резервный и приобретается
отдельно.
Эксплуатация
1. Откройте браузер и введите в адресную строку IP-адрес требуемого
устройства CN9600.
Примечание: IP-адрес можно узнать у администратора CN9600 или
посмотреть в разделе «Определение IP-адреса» в руководстве пользователя.
(IP-адрес по умолчанию для сети без DHCP: 192.168.0.60)
2. Если появилось диалоговое окно оповещения системы безопасности, примите
сертификат — ему можно доверять. Появится страница входа в систему.
3. Введите имя пользователя и пароль.
Примечание: При первом входе в систему используйте имя пользователя по
умолчанию: administrator; и пароль по умолчанию: password.
4. Нажмите кнопку «Войти», чтобы открыть главную страницу браузера.
Локальная настройка IP-адреса
Задайте IP-адрес с помощью локальной консоли. Все процедуры начинаются с
главного экранного меню.
1. Для доступа к главной странице экранного меню дважды нажмите кнопку
[Scroll Lock].
2. Когда появится экран входа в систему, введите имя пользователя и пароль.
Примечание: При первом входе в систему используйте имя пользователя по
умолчанию: administrator; и пароль по умолчанию: password.
Установщик IP-адреса
При использовании ПК с ОС Windows в той же сети пользователи, используя
утилиту IP Installer, могут узнать или назначить IP-адрес устройства. Утилиту
можно получить в разделе «Загрузить» на нашем веб-сайте www.aten.com.
После загрузки утилиты на ПК перейдите в каталог, где находится IP Installer и
запустите файл IPInstaller.exe.
Однопортовый DVI KVM-переключатель CN9600 с доступом по IP (1 локальный/удаленный пользователь совместного доступа)
Содержание
- Ansicht von hinten 1
- Ansicht von vorn 1
- Bedienung 1
- Cn9600 1
- Cn9600 1 conmutador kvm con puerto de acceso único compartido local remoto sobre ip para dvi 1
- Cn9600 1 local remote share access single port dvi kvm over ip switch 1
- Cn9600 dvi kvm over ip switch mit 1 geteilten einzelport lokal remotezugriff 1
- Commutateur sur ip kvm monoport dvi à 1 accès partagé local distant cn9600 1
- Confi guration de l adresse ip locale 1
- Confi gurazione ip locale 1
- Establecer la dirección ip local 1
- Fonctionnement 1
- Front view 1
- Funcionamiento 1
- Funzionamento 1
- Hardware overview 1
- Hardware übersicht 1
- Instalación 1
- Installation 1
- Installazione 1
- Ip installationsprogramm 1
- Ip installer 1
- Local ip setup 1
- Lokale ip einstellung 1
- Operation 1
- Panoramica dell hardware 1
- Programa de instalación ip 1
- Programma di installazione ip 1
- Rear view 1
- Survol du matériel 1
- Switch cn9600 dvi kvm over ip con porta singola ad accesso condiviso remoto locale 1
- Utilitaire ip installer 1
- Vista anteriore 1
- Vista frontal 1
- Vista general del hardware 1
- Vista posterior 1
- Vista posteriore 1
- Vue de dos 1
- Vue de face 1
- Вид сзади 1
- Вид спереди 1
- Локальная настройка ip адреса 1
- Однопортовый dvi kvm переключатель cn9600 с доступом по ip 1 локальный удаленный пользователь совместного доступа 1
- Основные элементы 1
- Установка 1
- Установщик ip адреса 1
- Эксплуатация 1
- Aplikacja ip installer 2
- Arka görünüm 2
- Cn9600 1 comutador kvm over ip de porta dvi única local remota de acesso partilhado 2
- Cn9600 1 comutator dvi kvm cu un singur port de acces pentru partajare locală la distanță prin rețele bazate pe ip 2
- Cn9600 1 yerel uzak paylaşımlı erişim ip switch üzerinden tek port dvi kvm 2
- Cn9600 1 ローカル リモートアクセス共有 1 ポート dvi kvm overip 2
- Cn9600 1 位本地 遠端使用者分享存取 單埠 dvi kvm over ip 遠端電腦管理方案 2
- Cn9600 1 本地 远程共享访问单端口 dvi kvm ip 交换机 2
- Cn9600 1 로컬 원격 공유 액세스 싱글 포트 dvi kvm over ip 스위치 2
- Cn9600 dvi kvm комутатор з доступом по ip 1 портовий одночасний спільний доступ для одного локального та одного дистанційного користувача 2
- Cn9600 przełącznik dvi kvm over ip z jednym złączem dostępu lokalnego zdalnego 2
- Configurarea adresei ip locale 2
- Configuração de ip local 2
- Donanıma genel bakış 2
- Instalacja 2
- Instalador ip 2
- Instalare 2
- Instalação 2
- Ip installer 2
- Ip インストーラー 2
- Ip 安裝工具 ip installer 2
- Ip인스톨러 2
- Konfiguracja lokalnego adresu ip 2
- Kurulum 2
- Obsługa 2
- Operare 2
- Operação 2
- Prezentare generală hardware 2
- Przegląd sprzętu 2
- Vedere din față 2
- Vedere din spate 2
- Vista frontal 2
- Vista geral do hardware 2
- Vista traseira 2
- Widok z przodu 2
- Widok z tyłu 2
- Yerel ip kurulumu 2
- Çalıştırma 2
- Önden görünüm 2
- Інсталяція 2
- Вигляд ззаду 2
- Вигляд спереду 2
- Експлуатація 2
- Локальне встановлення ip адреси 2
- Огляд обладнання 2
- セットアップ 2
- フロントパネル 2
- リアパネル 2
- ローカル ip セットアップ 2
- 前視圖 2
- 前视图 2
- 后视图 2
- 安装 2
- 操作 2
- 本地 ip 设置 2
- 硬件概览 2
- 硬體安裝 2
- 硬體檢視 2
- 背視圖 2
- 製品各部名称 2
- 近端 ip 設定 2
- 로컬ip설정 2
- 설치 2
- 작동방법 2
- 전면 2
- 하드웨어개요 2
- 후면 2
Похожие устройства
- Aten CN8600 Краткое руководство по установке
- Aten CN8600 Руководство пользователя
- Aten KN1108VA Краткое руководство по установке
- Aten KN1108VA Руководство пользователя
- Aten KN1116VA Краткое руководство по установке
- Aten KN1116VA Руководство пользователя
- Aten KA8288 Краткое руководство по установке
- Aten KA8288 Руководство пользователя
- Aten KE6900AT Краткое руководство по установке
- Aten KE6900AT Руководство пользователя
- Aten KN1132V Краткое руководство по установке
- Aten KN1132V Руководство пользователя
- Aten KA8278 Краткое руководство по установке
- Aten KA8278 Руководство пользователя
- Aten KN1000A Краткое руководство по установке
- Aten KN1000A Руководство пользователя
- Aten KA8280 Краткое руководство по установке
- Aten KA8280 Руководство пользователя
- Aten CN8000A Краткое руководство по установке
- Aten CN8000A Руководство пользователя