
Ibanez GU40 Руководство по эксплуатации онлайн
GUITAR & BASS AUTO TUNER
GU40
OWNER’S MANUAL
instrument matches the displayed note. The red LED at
the left will light if your instrument is flat, and the red LED
at the right will light if your instrument is sharp.
Tuning Procedure
For accurate tuning
• Don't use this tuner near sound equipment such as
radios or televisions.
• When tuning an electric guitar/bass, use a moderate
volume for best tuning results.
• In order to tune strings faster, mute all strings by hand
after you've finished tuning each string.
Tuning in Auto mode
1. Electric instruments: Connect the output of your
instrument to the input jack of the tuner.
Acoustic instruments: Use the internal mic.
2. When you turn on the power, the GU40 is automatically
set to MODE=AUTO GUITAR and PITCH=440 Hz.
3. Change the PITCH and FLAT settings if desired.
4. If you're tuning a bass guitar, use the MODE button to
select AUTO BASS.
5. If the pitch of the string is more than
±
50 cents away
from the correct pitch, tune the string until the correct
note name appears in the LCD and one of the tuning
guide LEDs is lit.
When the pitch of the string is within
±
50 cents of the
correct pitch, tune the string to make the needle stop
at the "0" position.
6. When the tuner needle stops at "0," the green LED in
the center will light. Tuning is complete.
Tuning in Manual mode
1. Electric instruments: Connect the output of your
instrument to the input jack of the tuner.
Acoustic instruments: Use the internal mic.
2. When you turn on the power, the GU40 is automatically
set to MODE=AUTO GUITAR and PITCH=440 Hz.
3. Change the PITCH and FLAT settings if desired.
4. Use the MODE button to select MAN. GUITAR or MAN.
BASS.
Use the FUNCTION button to select NOTE, and use the
▲▼buttons to select the note that you want to tune.
5. If the pitch of the string is more than
±
50 cents away
from the correct pitch, tune the string until the correct
note name appears in the LCD and one of the tuning
guide LEDs is lit.
When the pitch of the string is within
±
50 cents of the
correct pitch, tune the string to make the needle stop
at the "0" position.
6. When the tuner needle stops at "0," the green LED in
the center will light. Tuning is complete.
Tuning by Sound
1. When you press the SOUND button, MODE will be set
to MAN. GUITAR or MAN.BASS, FUNCTION will be set
to NOTE, the NOTE indication will be 5A (GUITAR) or
3A (BASS), and that pitch will be sounded.
2. Tune your instrument to match the pitch you hear from
the GU40's internal speaker.
3. Change the NOTE or FLAT settings accordingly.
Installing/replacing the batteries
1. Pull the tab of the
battery cover.
2. Lift the battery cover
with the tab.
3. Replace the batteries
and put the battery
cover back.
Specifications
Modes: Auto Tuning and Manual Tuning modes
Tuning range: A0 (27.50 Hz) ~ C8 (4,186.00 Hz)
Tuning notes: 5A, 4D, 3G, 2B, 1E, 7B, 6E
(electric guitar, acoustic guitar)
3A, 2D, 1G, HC, LB, 4E
(electric bass, acoustic bass)
Flat tuning: 1~ 5 semitones
Accuracy:
±
1 cent or less
Calibration: 435 Hz ~ 445 Hz
Indicators: LCD and LEDs
Input: Internal mic, INPUT jack
Output: Internal speaker, OUTPUT jack
Power supply: Two AAA batteries (3V)
Dimensions: 109 (W) x 73 (D) x 20 (H) mm
Weight: 120 g (including batteries)
* Design and specifications are subject to change without
notice for improvement of the product.
AUTOMATISCHES STIMMGERÄT FÜR GITARRE UND BASS
GU40
BEDIENUNGSANLEITUNG
ACCORDEUR AUTOMATIQUE POUR GUITARE ET BASSE
GU40
MANUEL DE I'UTILISATEUR
Attention
1 Pour éviter des courts-circuits, des électrocutions ou des
dysfonctionnements :
N'essayez jamais de démonter ou réparer cet appareil.
Evitez de placer cet appareil dans des endroits soumis à une
chaleur ou une humidité excessive (p. ex. près d'un radiateur,
en plein soleil, dans une salle de bains ou sur un sol humide).
Evitez de soumettre cet appareil à de fortes vibrations.
Evitez de placer cet appareil dans des endroits poussiéreux ou
sales.
N'utilisez pas cet appareil avec des mains humides.
2 Pour éviter des dommages
N'appliquez pas trop de pression sur les commutateurs et autres
commandes.
Ne laissez pas tomber cet appareil.
3 Nettoyage
N'utilisez pas de détergent, de benzène ou d'autres solvants
pour nettoyer cet appareil.
4 Pour économiser la pile
Si vous n'utilisez pas cet appareil pendant une période
prolongée, retirez la pile.
Fonctions de l'accordeur
1 Bouton POWER
Permet de mettre l'appareil sous/hors tension.
Si vous laissez l'appareil sous tension pendant environ 20
minutes, il se met automatiquement hors tension.
2 Bouton MODE
Permet de sélectionner le mode d'accord. Chaque fois que
vous appuyez sur le bouton MODE, le mode d'accord bascule
entre les deux réglages suivants.
AUTO GUITAR - MAN. GUITAR - AUTO BASS - MAN.BASS
3 Bouton FUNCTION
Permet de sélectionner le type de réglage souhaité : PITCH,
NOTE ou FLAT. (Vous ne pouvez sélectionner NOTE que si le
mode d'accord MAN. (manuel) est défini.)
4 Boutons ▲▼
Permettent de régler le paramètre sélectionné à l'aide du
bouton FUNCTION.
i) PITCH : Réglage du diapason de référence (calibrage)
Réglez le diapason de référence (A4) dans une plage de 435
à 445 Hz (par pas de 1 Hz).
ii) NOTE : Réglage de la note
En mode MAN. (manuel), sélectionnez la note à accorder à
partir des options suivantes.
NOTE : 6E (mi 6eme), 5A (la), 4D (ré), 3G (sol) 2B (si), 1E (mi
1ere), 7B (si) (guitare électrique, guitare acoustique)
4E (mi), 3A (la), 2D (ré), 1G (sol), HC (do aigu), LB (si
grave)(guitare basse)
iii) FLAT : Réglage bémol
Accordage plus bas par rapport à la note affichée. Vous
pouvez sélectionner un accordage d'un à cinq demi-tons
plus bas que la note affichée.
5 Bouton SOUND
Emet une tonalité de référence à partir du haut-parleur interne.
Vous pouvez régler l'accord en comparant le son émis par votre
instrument à la tonalité de référence.
Vous pouvez utiliser les boutons FUNCTION et ▲▼ pour spécifier
la note et le réglage plus bas pour l'accordage de référence.
Remarque : Lorsque vous utilisez la sortie SOUND, le réglage
PITCH est défini sur 440 Hz. Vous ne pouvez pas le modifier.
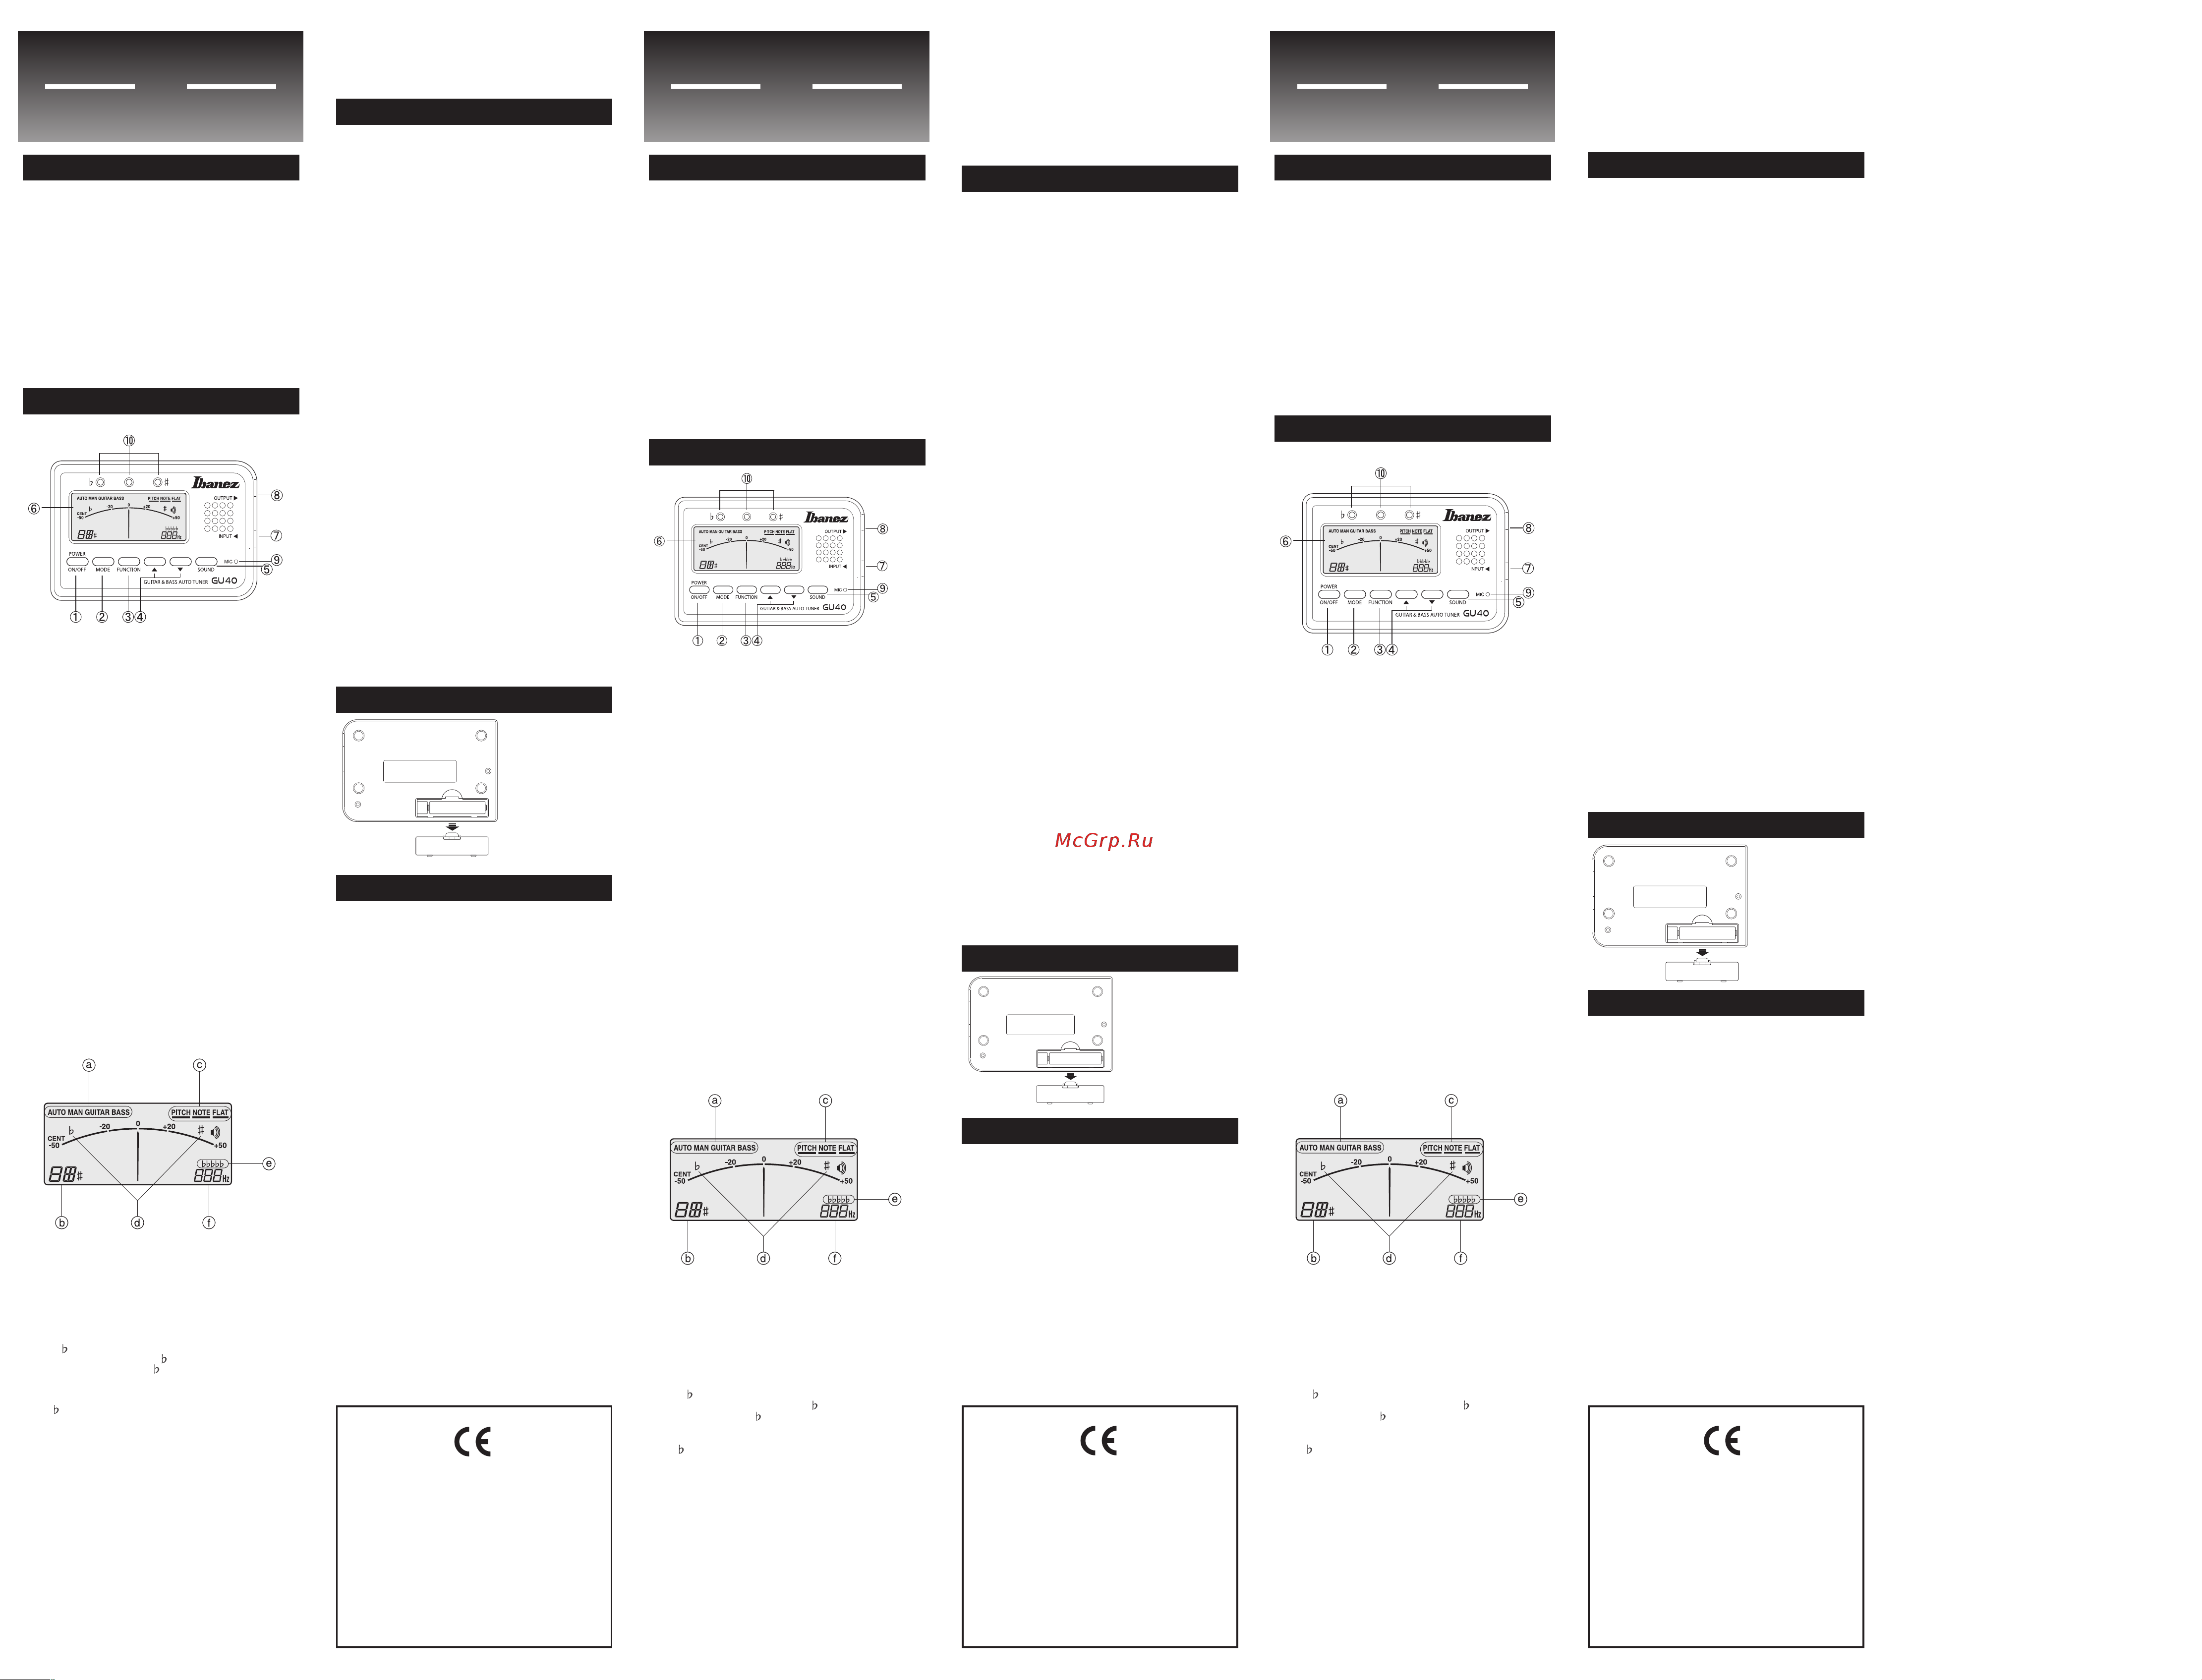
6 Ecran à cristaux liquides (LCD)
* Lorsque vous mettez l'appareil sous tension, l'écran LCD
affiche les réglages suivants.
MODE = AUTO GUITAR
FUNCTION = PITCH
PITCH = 440 Hz
a MODE : AUTO GUITAR, MAN. GUITAR, AUTO BASS, MAN.
BASS
b NOTE : MAN. GUITAR 6E, 5A, 4D, 3G, 2B, 1E, 7B
MAN. BASS 4E, 3A, 2D, 1G, HC, LB
c FUNCTION : PITCH, NOTE, FLAT
d #/
:
Lorsque l'accordage est correct, l'aiguille s'arrête au
milieu de l'écran et les indications "
" et "#" s'affichent.
L'indication
" "
s'affiche si votre instrument est plus
bas que la note affichée. L'indication
"#"
s'affiche si
votre instrument est plus haut.
e
: Indique que le réglage de l'accordage est trop bas.
f Diapason de référence : Indique le diapason de référence
actuellement spécifié.
7 Prise INPUT
Vous pouvez brancher votre instrument à cette prise d'entrée.
Si vous accordez une guitare électrique, électro-acoustique ou
une basse électrique, branchez la sortie de votre instrument à
la prise INPUT du GU40.
Toutefois, dans ce cas, vous ne pouvez pas utiliser le
microphone interne du GU40.
8 Prise OUTPUT
Cette prise retransmet directement le signal de l'instrument.
Vous pouvez brancher votre amplificateur à cette prise. Veillez
toutefois à mettre l'accordeur hors tension pour éviter les
bourdonnements ou autres bruits pendant que vous jouez.
9 MICROPHONE
Utilisez le microphone interne lorsque vous souhaitez accorder
Caution
1 To avoid short circuit, electric shock, or malfunction
Do not disassemble or attempt to repair this unit.
Do not place this unit in locations of high temperature or
high humidity (such as nearby heating equipment, in
direct sunlight, in a bathroom, or on a wet floor).
Do not place this unit where it will be subjected to heavy
vibration.
Do not place this unit in dusty or dirty locations.
Do not operate this unit with wet hands.
2 To avoid damage
Do not apply excessive force to the switches or other
controls.
Do not drop this unit.
3 Cleaning
Do not use thinner, alcohol, or other solvents to clean this
unit.
4 To prevent battery failure
Remove the battery if you won't be using this unit for an
extended time.
Features and Functions
1 POWER button
Turns the power on/off.
If you leave the power turned on for approximately twenty
minutes, it will turn off automatically.
2 MODE button
Switches the tuning mode. Each time you press the MODE
button, the tuning mode will cycle between the following
settings.
AUTO GUITAR - MAN.GUITAR - AUTO BASS - MAN.BASS
3 FUNCTION button
Select the type of adjustment you want to make: PITCH,
NOTE, or FLAT.
(You can select NOTE only if you're in MAN. (manual)
tuning mode.)
4 ▲▼ buttons
Adjust the parameter you've selected using the
FUNCTION button.
i) PITCH: Reference pitch setting (calibration)
Adjust the reference pitch (A4) in the range of 435~445
Hz (1 Hz steps).
ii) NOTE: Note setting
When in MAN. (manual) mode, select the note to which
you want to tune, from the following choices.
NOTE: 6E, 5A, 4D, 3G, 2B, 1E, 7B (electric guitar,
acoustic guitar) 4E, 3A, 2D, 1G, HC, LB (bass guitar)
iii) FLAT: Flat setting
Adjust the flatted tuning relative to the displayed
note.You can tune to a flatted tuning from one to five
semitones below the displayed note.
5 SOUND button
Sounds a reference tone from the internal speaker. This
lets you tune while comparing the output sound of your
instrument to the reference tone.
You can use the FUNCTION button and the ▲▼ buttons
to specify the note and flatted setting for the reference
tone.
Note) When using the SOUND output, the PITCH is fixed
at 440 Hz. This cannot be changed.
6 Liquid Crystal Display (LCD)
* When you turn the power on, the LCD will show the
following settings.
MODE = AUTO GUITAR
FUNCTION = PITCH
PITCH = 440 Hz
a MODE: AUTO GUITAR, MAN GUITAR, AUTO BASS,
MAN BASS
b
NOTE: MAN.GUITAR 6E, 5A, 4D, 3G, 2B, 1E, 7B
MAN.BASS 4E, 3A, 2D, 1G, HC, LB
c FUNCTION: PITCH, NOTE, FLAT
d #/
: When the tuning is correct, the needle will stop in
the center, and the "
" and "#" indications will
both appear. The "
" indication appears if your
instrument is flatter than the displayed note, and
the "#" indication appears if your instrument is
sharper.
e
: Indicates the flatted tuning setting.
f Reference pitch: Indicates the currently-specified
reference pitch.
7 INPUT jack
You can connect your instrument to this input jack.
If you're tuning an electric guitar, acoustic-electric guitar,
or electric bass, connect the output of your instrument to
the GU40's INPUT jack.
However in this case, you won't be able to use the GU40's
internal mic.
8 OUTPUT jack
This jack directly outputs the signal that is being input.
You can connect this jack to your amp. However to
prevent hum or other noise while you're performing, turn
off the power of the tuner.
9 MICROPHONE
Use the internal mic when you want to tune an instrument
that has no pickup, such as an acoustic guitar.
However, the internal mic cannot be used if a plug is
inserted in the INPUT jack.
0 Tuning guide LEDs
The green LED in the center will light when your
Vorsicht
1 Um Kurzschlüsse, elektrische Schläge oder
Funktionsstörungen zu vermeiden
Nehmen Sie das Gerät nicht auseinander und versuchen Sie
nicht, es zu reparieren.
Platzieren Sie dieses Gerät nicht an extrem heißen oder
feuchten Orten (zum Beispiel in der Nähe von Heizungen, in
direktem Sonnenlicht, im Bad oder auf einem feuchten
Fußboden).
Setzen Sie dieses Gerät keinen starken Erschütterungen aus!
Platzieren Sie dieses Gerät nicht an staubigen oder
schmutzigen Orten!
Bedienen Sie dieses Gerät nicht mit nassen Händen!
2 Um Beschädigungen zu vermeiden
Üben Sie keine übermäßigen Druck auf die Schalter oder
andere Bedienungselemente aus.
Lassen Sie dieses Gerät nicht fallen!
3 Reinigung
Verwenden Sie zum Reinigen keine Lösungsmittel, Alkohol oder
andere Reinigungsmittel.
4 Um Schäden an der Batterie zu vermeiden
Nehmen Sie die Batterie heraus, wenn Sie das Gerät längere
Zeit nicht benutzen.
Merkmale und Funktionen
1 POWER-Taste
Schaltet das Gerät ein und aus.
Wenn Sie das Gerät etwa zwanzig Minuten eingeschaltet
lassen, schaltet es sich automatisch aus.
2 MODE-Taste
Schaltet den Tuning-Modus um. Mit jedem Drücken auf die
MODE-Taste schaltet der Tunig-Modus zwischen den folgenden
beiden Einstellungen um.
AUTO GUITAR - MAN.GUITAR - AUTO BASS - MAN.BASS
3 FUNCTION-Taste
Wählt die Art der Einstellungen, die Sie vornehmen möchten:
PITCH, NOTE oder FLAT. (NOTE können Sie nur dann wählen,
wenn sich das Gerät im Modus MAN. (manueller Tuning-Modus)
befindet.
4 ▲▼-Tasten
Stellen den Parameter ein, den Sie mit der FUNCTION-Taste
ausgewählt haben.
i)
PITCH: Einstellung der Referenztonhöhe (Kalibrierung) Stellt
die Referenztonhöhe (A4) im Bereich von 435~445 Hz ein (in
Schritten von 1 Hz).
ii)
NOTE: Noteneinstellung
Wählen Sie im MAN.- Modus (manuell) aus folgenden
Möglichkeiten die Note aus, die Sie stimmen möchten.
NOTE: 6E, 5A, 4D, 3G, 2B, 1E, 7B (E-Gitarre,
akustische Gitarre) 4E, 3A, 2D, 1G, HC, LB(Bassgitarre)
iii)
FLAT: Tiefalteration
Stellen Sie die Verminderung relativ zur angezeigten Note
ein.Sie können eine Alteration von einem bis zu
fünf Halbtönen unter der angezeigten Note einstellen.
5 SOUND-Taste
Es erklingt ein Referenzton aus dem eingebauten Lautsprecher.
Dadurch können Sie stimmen, indem Sie die Tonhöhe Ihres
Instrumentenklanges mit der des Referenztons vergleichen.
Mit der FUNCTION-Taste und den ▲▼-Tasten können Sie die
Note und die Tiefalteration für den Bezugston einstellen.
Hinweis) Bei Verwendung der SOUND-Ausgabe ist die Tonhöhe
(PITCH) auf 440 Hz festgelegt. Dies kann nicht geändert
werden.
6 Flüssigkristallanzeige (LCD)
* Wenn Sie das Gerät einschalten, erscheinen im LCD die
folgenden Einstellungen.
MODE = AUTO GUITAR
FUNCTION = PITCH
PITCH = 440 Hz
a MODE: AUTO GUITAR, MAN GUITAR, AUTO BASS, MAN
BASS
b NOTE: MAN.GUITAR 6E, 5A, 4D, 3G, 2B, 1E, 7B
MAN.BASS 4E, 3A, 2D, 1G, HC, LB
c FUNCTION: PITCH, NOTE, FLAT
d #/
: Wenn die Stimmung richtig ist, stoppt die Nadel in der
Mitte, und beide Anzeigen “
” und “#” leuchten auf.
Die Anzeige “
” erscheint, wenn Ihr Instrument tiefer
als die angezeigte Note gestimmt ist, und die Anzeige
“#” erscheint, wenn Ihr Instrument höher gestimmt ist.
e
: Zeigt die Einstellung der Tiefalteration an.
f Bezugstonhöhe: Zeigt die aktuell eingestellte
Bezugstonhöhe an.
7 INPUT-Buchse
An dieser Buchse können Sie Ihr Instrument anschließen.
Wenn Sie eine E-Gitarre, eine akustisch-elektrische Gitarre oder
einen E-Bass stimmen möchten, verbinden Sie den Ausgang
Ihres Instruments mit der Eingangsbuchse INPUT des GU40.
In diesem Fall lässt sich das eingebaute Mikrofon des GU40 nicht
benutzen.
8 OUTPUT-Buchse
Diese Buchse gibt das Signal genauso aus, wie es empfangen
wurde. Sie können an dieser Buchse Ihren Verstärker
anschließen. Um jedoch während des Spiels Brummen oder
Rauschen zu vermeiden, schalten Sie das Stimmgerät aus.
9 MICROPHONE
Bentzen Sie das interne Mikrofon, wenn Sie ein akustisches
This is to certify that Guitar & Bass Tuner GU40 is in
conformity with : Council Directive 2004/108/EC (EMC
Directive)
Applicable Standards :
EN 55013:2001+A1,2003+A2:2006
Electromagnetic Compatibility-Generic emission
standard.
Part 1 :
Residential, commercial and light industry.
EN 55020:2007
Electromagnetic Compatibility-Generic immunity
standard.
Part 1 :
Residential, commercial and light industry.
Hiermit wird die Konformität des Gitarren- & Bass-Stimmgeräts
GU40 mit der EU-Richtlinie
2004/108/EC
bestätigt.
Relevante Vorschriften:
EN 55013:2001+A1,2003+A2:2006
Elektromagnetische Kompatibilität – allgemeiner
Emissionsvorschriften.
Teil 1:
Haushaltsgeräte, gewerbliche und leichtindustrielle
Ausrüstung.
EN 55020:2007
Elektromagnetische Kompatibilität – allgemeine
Verträglichkeitsvorschriften.
Teil 1:
Haushaltsgeräte, gewerbliche und leichtindustrielle Ausrüstung.
Instrument ohne Tonabnehmer stimmen möchten, z. B. eine
akustische Gitarre.
Das eingebaute Mikro kann nicht benutzt werden, wenn ein
Stecker in der Buchse INPUT eingesteckt wurde.
0 Stimm-LEDs
Die grüne LED in der Mitte leuchtet auf, wenn Ihr Instrument auf
die angezeigte Note gestimmt ist. Die rote LED links leuchtet
auf, wenn Ihr Instrument zu tief gestimmt ist, die rote LED
rechts leuchtet auf, wenn es zu hoch gestimmt ist.
Stimmen
Für präzises Stimmen beachten
• Verwenden Sie das Stimmgerät möglichst nicht in
unmittelbarer Nähe möglicher Störquellen wie Radios oder
Fernsehgeräten.
• Spielen Sie für beste Ergebnisse beim Stimmen einer E-
Gitarre oder eines E-Basses mit verringerter Lautstärke.
• Um die jeweils nächste Saite schneller stimmen zu können,
sollten Sie zuvor nachklingende Saiten mit der Hand
abdämpfen.
Automatisches Stimmen in der Betriebsart AUTO
1. Elektrische Instrumente: Verbinden Sie den Ausgang Ihres
Instruments mit der Eingangsbuchse des Stimmgerätes.
Akustische Instrumente: Benutzen Sie das eingebaute
Mikrofon.
2. Nach dem Einschalten befindet sich das GU40 automatisch
im Modus “AUTO GUITAR” und die Tonhöhe (PITCH) ist auf
440 Hz eingestellt.
3. Nehmen Sie die gewünschten Einstellungen für PITCH und
FLAT vor.
4. Wenn Sie eine Bassgitarre stimmen möchten, wählen Sie
mit der Taste MODE die Einstellung “AUTO BASS”.
5. Wenn die Höhe der zu stimmenden Saite mehr als 50 Cents
von der korrekten Höhe abweicht, stimmen Sie die Saite, bis
der richtige Notenname in der Anzeige erscheint und eine
der Stimm-LEDs aufleuchtet.
Wenn die Höhe der zu stimmenden Saite weniger als 50
Cents von der korrekten Höhe abweicht, stimmen Sie die
Saite, bis die Nadel an der “0”-Stellung stoppt.
6.
Wenn die Nadel des Stimmgeräts bei “0” stoppt, leuchtet
zusätzlich die grüne LED in der Mitte auf. Der Stimmvorgang
ist beendet.
Manuelles Stimmen in der Betriebsart MANUAL (MAN.)
1. Elektrische Instrumente: Verbinden Sie den Ausgang Ihres
Instruments mit der Eingangsbuchse des Stimmgerätes.
Akustische Instrumente: Benutzen Sie das eingebaute
Mikrofon.
2. Nach dem Einschalten befindet sich das GU40 automatisch
im Modus “AUTO GUITAR” und die Tonhöhe (PITCH) ist auf
440 Hz eingestellt.
3.
Nehmen Sie die gewünschten Einstellungen für PITCH und
FLAT vor.
4. Wählen Sie mit der MODE-Taste die Betriebsart MAN.
GUITAR oder MAN. BASS.
Wählen Sie mit der FUNCTION-Taste die Einstellung NOTE aus,
und verwenden Sie die ▲▼-Tasten zur Auswahl der zu
stimmenden Note.
5. Wenn die Höhe der zu stimmenden Saite mehr als 50 Cents
von der korrekten Höhe abweicht, stimmen Sie die Saite bis
der richtige Notenname in der Anzeige erscheint und eine
der Stimm-LEDs aufleuchtet.
Wenn die Höhe der zu stimmenden Saite weniger als 50
Cents von der korrekten Höhe abweicht, stimmen Sie die
Saite, bis die Nadel an der “0”-Stellung stoppt.
6.
Wenn die Nadel des Stimmgeräts bei “0
”
stoppt, leuchtet
zusätzlich die grüne LED in der Mitte auf. Der Stimmvorgang ist
beendet.
Stimmen nach Referenzton
1. Wenn Sie die SOUND-Taste drücken, wird die Betriebsart
(MODE) auf MAN, GUITAR oder MAN.BASS eingestellt,
FUNCTION auf NOTE, die NOTE-Anzeige ist 5A (GUITAR)
oder 3A (BASS), und es erklingt ein Ton mit dieser Tonhöhe.
2. Stimmen Sie Ihr Instrument nach Gehör so, dass dessen
Tonhöhe mit dem Ton aus dem Lautsprecher des GU40
übereinstimmt.
3. Ändern Sie die Einstellungen bei NOTE oder FLAT wie
gewünscht.
Einsetzen/Wechseln der Batterien
Technische Daten
Betriebsarten: automatisches und manuelles Stimmen (AUTO und
MAN)
Stimmbereich: A0 (27,50 Hz) ~ C8 (4.186,00 Hz)
Stimmnoten: 5A, 4D, 3G, 2B, 1E, 7B, 6E
(elektrische/akustische Gitarre)
3A, 2D, 1G, HC, LB, 4E
(elektrischer/akustischer Bass)
Tiefalterationsmodus: 1~5 Halbtöne
Genauigkeit:
±
1 Cent oder weniger
Kalibrierung: 435 Hz ~ 445 Hz
Anzeigen: LCD und LEDs
Eingang: Internes Mikro, INPUT-Buchse
Ausgang: Eingebauter Lautsprecher, OUTPUT-Buchse
Stromversorgung: Zwei AAA-Batterien (3 V)
Abmessungen: 109 (B) x 73 (T) x 20 (H) mm
Gewicht: 120 g (mit Batterien)
* Ausführung und Technische Daten können sich aus Gründen
der Weiterentwicklung des Produkts ohne Ankündigung
ändern.
1. Ziehen Sie an der Lasche
der
Batteriefachabdeckung.
2. Heben Sie die
Batteriefachabdeckung an
der Lasche an.
3. Tauschen Sie die
Batterien aus und setzen
Sie die
Batteriefachabdeckung
wieder auf.
Par la présente, nous certifions que l’accordeur pour Guitar
& Bass Tuner GU40 se conforme à: Directive du Conseil
2004/108/EC
(directive EMC)
Normes étant d’application :
EN 55013:2001+A1,2003+A2:2006
Compatibilité électromagnétique – norme générale
d’émission.
Partie 1:
Résidentiel, commercial, industrie légère.
EN 55020:2007
Compatibilité électromagnétique – norme générale
d’immunité.
Partie 1:
Résidentiel, commercial, industrie légère.
un instrument sans micro comme une guitare acoustique.
Vous ne pouvez toutefois pas utiliser le microphone interne si
un instrument est branché à la prise INPUT.
0 Témoins de référence pour l'accordage
Le témoin vert au centre s'allume lorsque votre accordage
correspond à la note affichée. Si la note est trop basse, le
témoin rouge de gauche s'allume. Si elle est trop haute, le
témoin rouge de droite s'allume.
Procédure d'accordage
Pour accorder votre instrument avec précision
• Evitez d'utiliser cet accordeur à proximité d'un poste de
radio ou de télévision.
• Lorsque vous accordez une guitare/basse électrique, réglez
le volume de façon modérée pour obtenir un a
ccordage
précis.
• Pour accorder les cordes plus vite, atténuez le son de
toutes les cordes avec la main après avoir accordé chacune
d'elles.
Accordage en mode automatique
1. Instruments électriques : Branchez la sortie de votre
instrument à la prise d'entrée de l'accordeur.
Instruments acoustiques : Utilisez le microphone interne.
2. Lorsque vous mettez le GU40 sous tension, il sélectionne
automatiquement MODE=AUTO GUITAR et PITCH=440 Hz.
3. Modifiez les réglages PITCH et FLAT le cas échéant.
4. Si vous accordez une guitare basse, utilisez le bouton
MODE pour sélectionner AUTO BASS.
5. Si la tonalité de la corde est supérieure à
±
50 cents par
rapport à la tonalité juste, accordez la corde jusqu'à ce que
le nom de la note correcte s'affiche sur l'écran LCD et que
l'un des témoins s'allume.
Lorsque la tonalité de la corde se trouve à moins de
±
50
cents de la tonalité correcte, accordez la corde jusqu'à ce
que l'aiguille s'arrête sur la position "0".
6. Lorsque l'aiguille de l'accordeur s'arrête sur "0", le témoin
vert au milieu s'allume. L'accordage est terminé.
Accordage en mode manuel
1. Instruments électriques : Branchez la sortie de votre
instrument à la prise d'entrée de l'accordeur.
Instruments acoustiques : Utilisez le microphone interne.
2. Lorsque vous mettez le GU40 sous tension, il sélectionne
automatiquement MODE=AUTO GUITAR et PITCH=440 Hz.
3. Modifiez les réglages PITCH et FLAT le cas échéant.
4. Utilisez le bouton MODE pour sélectionner MAN. GUITAR ou
MAN. BASS.
Le bouton FUNCTION permet de sélectionner NOTE. Les
boutons ▲▼ permettent de sélectionner la note à accorder.
5. Si la tonalité de la corde est supérieure à
±
50 cents par
rapport à la tonalité juste, accordez la corde jusqu'à ce que
le nom de la note correcte s'affiche sur l'écran LCD et que
l'un des témoins s'allume.
Lorsque la tonalité de la corde se trouve à moins de
±
50
cents de la tonalité correcte, accordez la corde jusqu'à ce
que l'aiguille s'arrête sur la position "0".
6. Lorsque l'aiguille de l'accordeur s'arrête sur "0", le témoin
vert au milieu s'allume. L'accordage est terminé.
Accordage avec notes pilotes
1. Lorsque vous appuyez sur le bouton SOUND, MODE est
défini sur MAN. GUITAR ou MAN. BASS, FUNCTION est
défini sur NOTE, NOTE indique 5A (GUITAR) ou 3A (BASS) et
la tonalité sélectionnée retentit.
2. Accordez votre instrument selon la tonalité qui retentit du
haut-parleur interne du GU40.
3. Modifiez les réglages NOTE ou FLAT en conséquence.
Installation/remplacement des piles
Fiche technique
Modes : A
ccordage
automatique et A
ccordage
manuel
Fréquences reconnues : A0 (27,50 Hz) ~ C8 (4 186 Hz)
Notes d'accordage : 5A, 4D, 3G, 2B, 1E, 7B, 6E
(guitare électrique, guitare acoustique)
3A, 2D, 1G, HC, LB, 4E
(basse électrique, basse acoustique)
A
ccordage
bémol : 1~5 demi-tons
Précision :
±
1 cent ou moins
Calibrage : 435 Hz ~ 445 Hz
Témoins : écran LCD et témoins
Entrée : microphone interne, prise INPUT
Sortie : haut-parleur interne, prise OUTPUT
Alimentation : deux piles de type AAA (3V)
Dimensions : 109 (L) x 73 (P) x 20 (H) mm
Poids : 120 g (piles comprises)
* Les caractéristiques et la présentation sont susceptibles
d'être modifiées sans avis préalable pour l'amélioration du
produit.
1. Tirez sur la languette du
couvercle.
2. Soulevez le couvercle à
l'aide de la languette.
3. Remplacez les piles et
refermez le couvercle.
Содержание
- Accordeur automatique pour guitare et basse 1
- Attention 1
- Bedienungsanleitung 1
- Caution 1
- Einsetzen wechseln der batterien 1
- Elektromagnetische kompatibilität allgemeine verträglichkeitsvorschriften 1
- Elektromagnetische kompatibilität allgemeiner emissionsvorschriften 1
- Features and functions 1
- Fiche technique 1
- Fonctions de l accordeur 1
- Guitar bass auto tuner 1
- Installation remplacement des piles 1
- Installing replacing the batteries 1
- Manuel de i utilisateur 1
- Merkmale und funktionen 1
- N essayez jamais de démonter ou réparer cet appareil evitez de placer cet appareil dans des endroits soumis à une chaleur ou une humidité excessive p ex près d un radiateur en plein soleil dans une salle de bains ou sur un sol humide 1
- Owner s manual 1
- Procédure d accordage 1
- Specifications 1
- Stimmen 1
- Technische daten 1
- Toutefois dans ce cas vous ne pouvez pas utiliser le microphone interne du gu40 1
- Tuning procedure 1
- Vorsicht 1
- 108 ec 2
- Afinador automático de guitarra y bajo 2
- Apartado 1 residencial comercial e industria liviana 2
- Apartado 1 residencial comercial e industria liviana en 55020 2007 2
- Con la presente si certifica che l accordatore per bassi e accordatore automatico per bassi e chitarre gu40 è conforme alla direttiva del consiglio 2
- Direttiva inerente la compatibilità elettromagnetica 2
- Electromagnetic compatibility generic emission standard part 1 residential commercial and light industry 2
- Electromagnetic compatibility generic immunity standard part 1 residential commercial and light industry 2
- Emc directive 2
- En 55013 2001 a1 2003 a2 2006 2
- En 55020 2007 2
- En el modo man manual seleccione la nota que desea afinar entre las siguientes 2
- Estándar de compatibilidad electromagnética sobre emisiones genéricas 2
- Estándar de compatibilidad electromagnética sobre inmunidad genérica 2
- Estándares aplicables en 55013 2001 a1 2003 a2 2006 2
- Guitar bass auto tuner 2
- Hz 1hz 単位 の範囲で 変更します ii note note 設定 man modeの時にチューニングするnoteを以下の 中から選択します note 6e 5a 4d 3g 2b 1e 7b エレキギター アコ スティッ クギター 4e 3a 2d 1g hc lb ベースギター iii flat フラット設定 表示された各noteに対してどれだけ低い音にチュー ニングするかを調整します 半音 2音半下げた音に チューニングを合わせることができます 5 sound ボタン 内蔵スピーカーから基準音を発音します 基準音とお持 ちの楽器の出力音を比較し チューニングを行います function ボタンと ボタンで基準音のノート設定 とフラット設定ができます 注意 sound出力を行う場合pitchは440hz固定にな ります 変更はできません 2
- Libretto di istruzioni 2
- Manual del usuario 2
- Norme applicabili en 55013 2001 a1 2003 a2 2006 norma sulle emissioni generiche compatibilità elettromagnetica parte 1 in ambienti residenziali commerciali e dell industria leggera en 55020 2007 norme generiche sull immunità compatibilità elettromagnetica parte 1 in ambienti residenziali commerciali e dell industria leggera 2
- Power on した時点で以下の設定になっています mode auto guitar function pitch pitch 440hz a mode auto guitar man guitar auto bass man bass b note man guitar 6e 5a 4d 3g 2b 1e 7b man bass 4e 3a 2d 1g hc lb c function pitch note flat d チューニングが合うと針が中央で止まり と を同時に表示します チューニングが表示された noteよりも低いときは を表示し 高い時は を表示します e フラット チューニングの設定を表示します f 基準ピッチ 現在設定されている基準ピッチを表示し ます 7 input jack 楽器用入力端子です エレキギター エレクトリックアコースティックギター エレキベースのチューニング時は楽器の出力を本機の input ジャックへ接続してください 但し その場合 本機の内蔵マイクは使用できません 8 output jack 本機に入力された信号をダイレクトに出力します アン プなどに接続してご使用ください 但し 演奏中はハム などのノイズ発生を防ぐために チューナーの電源を off にしてください 9 microphone アコースティックギターのようにピック アップのない 楽器のチューニングには内蔵マイクをご使用ください 但し input jack にプラグが接続された状態で内蔵マ イクはご使用になれませんので ご注意ください 0 チューニングガイド led チューニングが表示されたノートにあうと中央緑色の led が点灯します 表示されたノートよりも低いときは 左側の赤色 led が 高いときは右側の赤色の led が点 灯します 2
- Power ボタン 電源の on off を切り替えます 電源をon にして約20分経過すると 機器の電源が自動 的に off になります 2 mode ボタン チューニング モードを切り替えます チューニング モードは modeボタンを押すたびに 以下の順で切り替 わります auto guitar man guitar auto bass man bass 3 function ボタン pitch note flat のなかから使用する調整機能を選択 します note はチューニング モードが man の 時のみ変更 できます 4 ボタン functionボタンで選択した調整機能で それぞれのパ ラメータを設定します i pitch 基準ピッチ設定 キャリブレイション 基準ピッチ a 4 を 43 2
- Se certifica que el afinador automatico de gutarra y bajo gu40 cumple con la normativa council directive 2
- Sound に依るチューニング 1 sound ボタンを押すと mode は man guitar ま たは man bass に function は note に その 状態でnote 表示は5a guitar 3a bass を表示 し その音を発音します 2 本機内蔵スピーカーより出力する音と 楽器の音を比 較しチューニングを行います 3 必要に応じて note flat を調整します 2
- This is to certify that guitar bass tuner gu40 is in conformity with council directive 2004 108 ec emc directive applicable standards 2
- Tuttavia il microfono interno non può essere usato se jack è inserito nel jack input 2
- この機器を分解 修理 改造しない 故障 ショートの原因になります 2
- ご使用の前にこの 安全上のご注意 をよくお読みのうえ 正しくお使いください お読みになった後は お使いになる方がいつでも見られる に必ず保管してください 2
- エレクトリックギター ベースをチューニングするとき は適度のvolume にして頂けると適切なチューニングが できます 2
- オートモードに依るチューニング 1 エレクトリック弦楽器の場合 楽器の出力とチュー ナーの入力ジャックを接続します アコースティック弦楽器の場合 内蔵マイク をお使 いください 2 power on した時は mode auto guitar pitch 440hz に自動的に設定されます 3 必要に応じて pitch flat を変更してください 4 ベース ギターをチューニングする場合は mode ボ タンで auto bass に合わせてください 2
- ショート 感電 故障の防止 本製品を分解 修理しないでください 高温 多湿の場所 暖房器具の近く 直射日光の当たる 場所 浴室 濡れた床など に置かないでください 振動の多い場所に置かないでください ほこりや汚れの多い場所に置かないでください 濡れた手で本製品を操作しないでください 2 破損の防止 スイッチ類に無理な力を加えないでください 本製品を落とさないでください 3 お手入れ お手入れにシンナー アルコール類を使用しないでくだ さい 4 電池消耗の防止 本製品を長時間使用しない時は 電池を外してください 2
- チューナーの針が 0 で止まると中央の緑のled が点 灯してチューニング完了です 2
- バッテリーを交換してカバー を取り付けて下さい 2
- バッテリーカバーの引手を 持って上方へ持ち上げて下さ い 2
- バッテリーカバーの引手を引 いて下さい 2
- マニュアルモードに依るチューニング 1 エレクトリック弦楽器の場合 楽器の出力とチュー ナー入力ジャックを接続します アコースティック弦楽器の場合 内蔵マイクをお使 いください 2 power on 時は mode auto guitar pitch 440hz に自動的に設定されます 3 必要に応じて pitch flat を変更してください 4 mode ボタンで man guitar または man bass に合わせてください function ボタンで note を選択し ボタン でチューニングするノートの選択を行います 5 弦の音程が正確な音の音程より土 50 セント以上はな れている場合は 弦の張りを調整しながら目的の音 名を lcd に表示させ どちらかのガイドライン led を点灯させます 弦の音程が土 50 セント以内の場合は針を見ながら調 整して針の位置を 0 に近づけます 6 チューナーの針が 0 で止まると中央の緑の led が 点灯してチューニング完了です 2
- 取扱説明書 2
- 弦の音程が土 50 セント以内の場合は針を見ながら調 整して針の位置を 0 に近づけます 2
- 正確にチューニングするには ラジオ テレビなどの音響機器の近くでは本製品を使 用しないようにしてください 2
- 水滴のついた手で スイッチ操術をしない ショート 感電の恐れがあります 2
- 注意 2
- 液晶ディスプレイ lcd 2
- 複数の弦をスピーディにチューニングするには調弦が 一本終わるごとに 軽く弦全体を押さえてミュートし ます 2
- 警告 2
- 電池は を正しく装着する 故障の原因になります 2
- 電池を火の中に入れない 破裂 発熱 発火の恐れがあります 2
Похожие устройства
- Ibanez GU20 Руководство по эксплуатации
- Ibanez WH10V2 Руководство по эксплуатации
- Ibanez SH7 Руководство по эксплуатации
- Ibanez TK999OD Руководство по эксплуатации
- Ibanez PM7 Руководство по эксплуатации
- Ibanez PD7 Руководство по эксплуатации
- Ibanez FZ7 Руководство по эксплуатации
- Ibanez DE7 Руководство по эксплуатации
- Ibanez AW7 Руководство по эксплуатации
- Ibanez AP7 Руководство по эксплуатации
- Ibanez TS9DX Руководство по эксплуатации
- Ibanez GU1 Руководство по эксплуатации
- Ibanez JD9 Руководство по эксплуатации
- Ibanez CS9 Руководство по эксплуатации
- Ibanez BB9 Руководство по эксплуатации
- Ibanez AD9 Руководство по эксплуатации
- Ibanez VBG Руководство по эксплуатации
- Ibanez TSA5 Руководство по эксплуатации
- Ibanez TSA5VTR Руководство по эксплуатации
- Ibanez TB50R Руководство по эксплуатации