
Switel BCF910 Инструкция по эксплуатации онлайн
Baby Monitor BCF 910
ON/OFF RESET
15 16 17 18
19202122
13
14
12 3
4
5
6
7
8
9
10
12 11
MIC
ENGLISH
Operating manual
Pleasereadand observethe f ollowingin-
formation and keep the operatingmanual
nearby for f uture reference!
Safety information
WARNING!
• Risk offatalinjurythrough cable!
Children could b ecome entangled in the cables and strang le
themselves.
Ensure that the b ab y monitoring units and power cables are
out of reach of babies/children,i.e.they are at leasto ne meter
away.
• Risk of explosion!
Onlyuse the poweradapterplugs supplied!
Only use batteriessupplied or ones of the same type!
Always treatbatterieswithduecare and attention and only
use batteries as described.
Never use standard and rechargeable batteries together.
Never use rech arg eable batteries or stan dard batteries with
different capacities or charge statuses together. Never use
standard or rechargeablebatterieswhich aredamaged.
• Risk of suffocation through small objects, packaging and
protectivefoil!
Keep children away fromtheproduct and its packaging!
CAUTION!
• Risk offirethrough power adapter plugs!
Poweradapterplugs canheat up.
Never leave any objectson the po wer adapter plugs. Ensure
access to po w er adapter plugs isnot obstructed by furniture or
such.
• Risk oftripping due toimproperlylaid cable!
Lay thecables so thatnobody can trip overthem!
• Risks to health and the environment from batteries!
Never op en, damage or swallow batteriesor allow th em to
pollutethe environment.They couldcontain toxic and ecolo-
gically harmful heavy metals.
Intended use
The baby monitorserves tomonitor a baby/child in a room.The
transmitter unit,located near thechild,transmits noisesand images
fromits immediate vicinity tothe receiverunit. Anyother use is con-
sidered unintendeduse.Unauthorisedmodificationorreconstruction
is notpermitted.Under no circumstances open thedevices or com-
plete anyrepairwork yourself.
The devices are notintended for medicalpurposes. Warning
and signal tones from respiratory or heartbeat monitoring equip-
mentare not transmitted.
Use only in suitable environments
Observeall localdirectivesand regulations.
Preventexcessive exposure to smoke,dust,vibration,chemicals,
moisture,heat and direct sunlight.
Package contents
- Receiver unit
- T ransmitter unit
- Cradle for receiver unit
- Base for transmitter unit
- Battery for receiver unit
- 2 power adapter plugs
- USB cable
- O perating manual
Operating elements
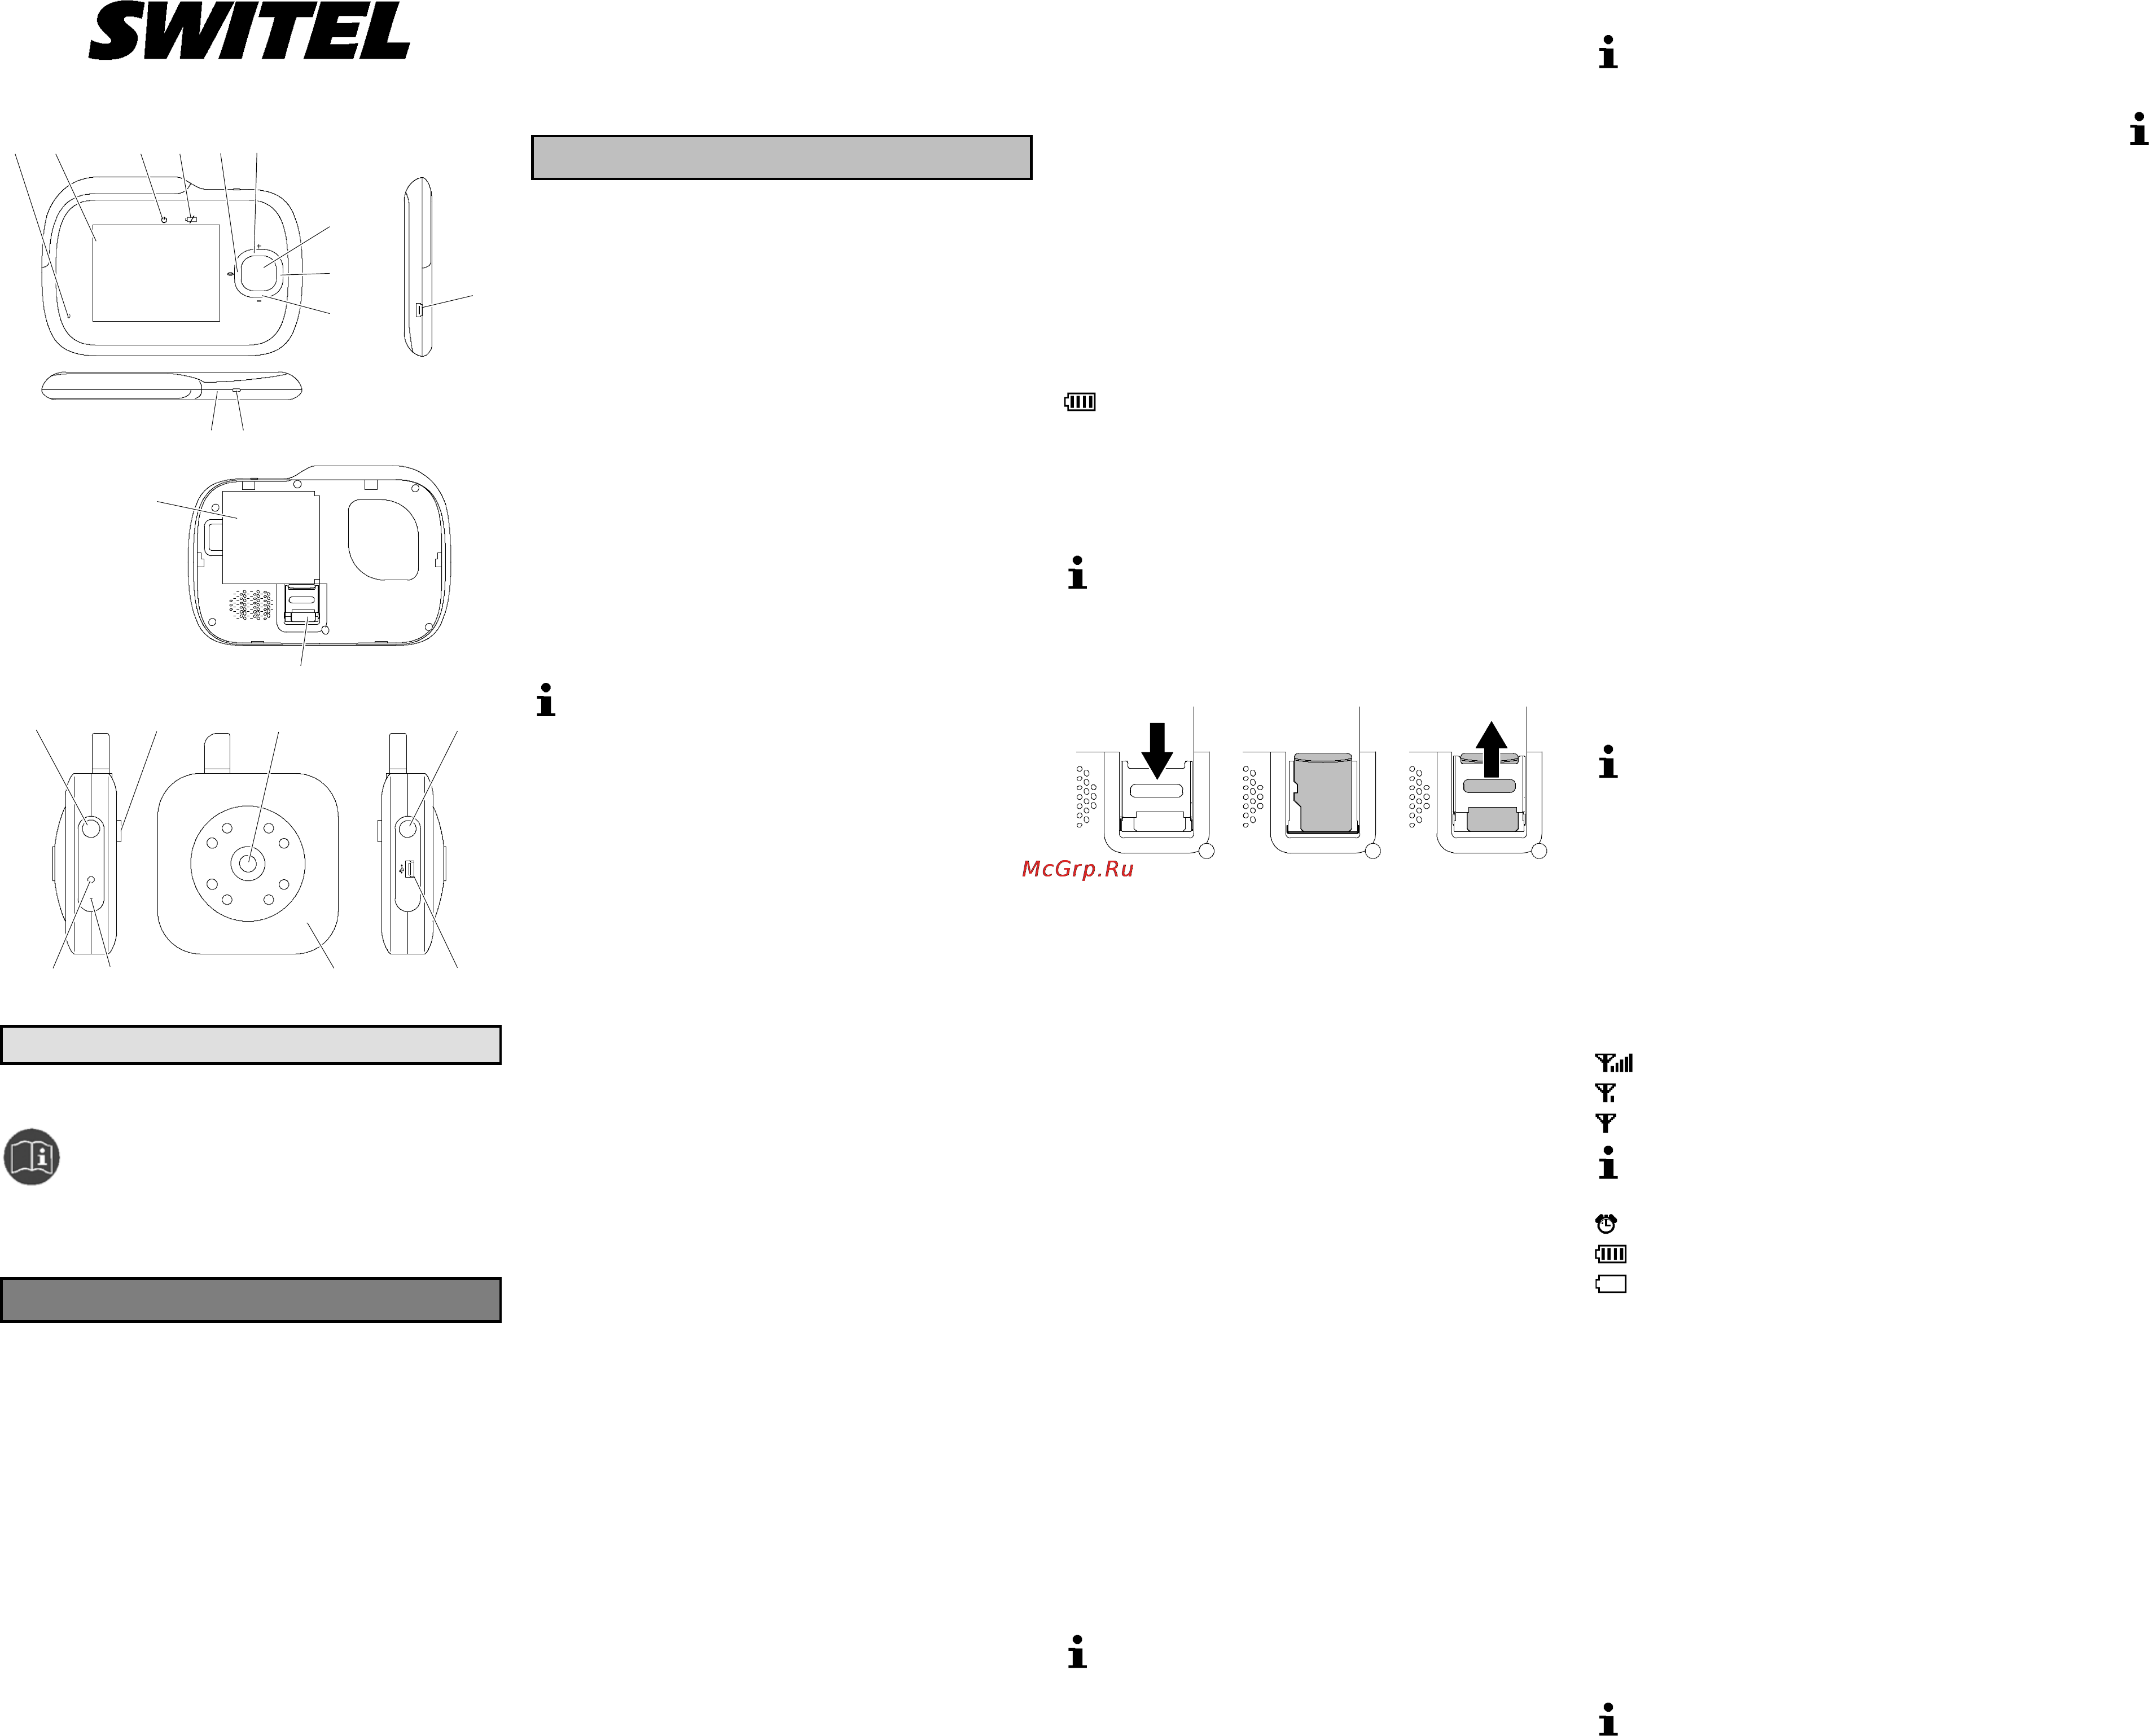
Receiver unit
1 Microphone
2 Display
3 Operation indicator
4 Chargeindicator
5 Left button (Talk /Menu navigation)
6 Top button (Volume adjustment/ Cameraselection / Menu
navigation)
7 Menu button
8 Right button (Photo / Record/Menu navigation)
9 Bottom button (Volumeadjustment/ Camera selection / Menu
navigation)
10 USBconnection / Poweradapter connection
11 On/Off button(ESC /Splitscreen)
12 RESET button
13 Batterycompartment
14 Micro SD card (notincluded)
Transmitterunit
15 ON/OFF button
16 Thread forbase
17 Camera
18 RESET button
19 USBconnection / Poweradapter connection
20 Microphone
21 Only for firmware update
22 Operationindicator / Chargeindicator
Display and explanation of operations
Action to take
Resultof action
[2] Reference in the graphic
RESET Pressthe button
Pressand hold the button
5sec. Keep thebutton pressedthe button for5 seconds
Selectthe subsequentmenu option with the
Navigationbuttons Left [5], Top
[6],Right [8] or Bottom [9]
and confirm the selection by pressing the Menu
button [7].
┠Volume┨ Represents the appearanceofa menu option
Represents an icon in the display
Inserting the battery in the receiver unit
Slide the cover on the rear downwardsand remove it.
Insertthe rechargeablebatteryin thebatterycompartment.
Close the battery compartment.
The batterymust be chargedfor at least8 hours before being
used forthe firsttime.
Inserting the micro SD card in the receiver unit
In orderto record videosorpictures,a micro SD card [14]mustbe
inserted (not included).
Slide the holderdownwards, carefully. The holder is unlocked.
Open out the holder.
Insert the micro SD card [14].
Close the holder.
Slide the holderupwards, carefully. The holder is locked.
Using the base for the transmitter unit
The base enables the camera [17]to be aligned accurately.The
base can alsobe usedto install thetransmitter uniton a wall or the
ceiling.
Screwthe screw in the base in the thread [16]on therear side of
the transmitter unit.
Align thecamera [17].
Fix the alignmentusing the screw atthe rear of thebase.
Starting up the transmitter unit
The transmitterunit is equipped with a built-in battery.The unit can
be powered by the integrated battery,bya normal mainspower
supply viathe power adapter plug or by a USBconnection on a
computer.
Connecting the transmitter unit via the power adapter
plug
Connect the power adapter plug to thepower connection [19]on
the transmitter unitand a properlyinstalled mains poweroutlet.
The transmitterunit is switchedonautomatically.
Connecting the transmitter unit via the USB
Connect the USB cable to the power adapter connection [19] on
the transmitter unit and a freeUSB port on thecomputer.
The transmitterunit is switchedonautomatically.
The USB cable only serves to chargethe battery. Itdoes not
servefor data transfer.
Switching the transmitter unit on/off
The transmitterunit continues to transmiteven when the receiv-
er unit isswitched off. The signals canbe received by other
devices.
ON/OFF [15]5 sec. The transmitter unitisswitched on.
ON/OFF [15]5 sec. The transmitter unitisswitched off.
Operation/Charge indicator on the transmitter unit
Operation/Charge indicator[22] lightsup green.
The unit is switched on, the battery ischarged.
Operation/Charge indicator[22] flashesgreen. The unit is
switched on, thebatteryis being charged.
Operation/Charge indicator[22] lightsup red. T he unit is switched
on, thebatterymust be charged.
Operation/Charge indicator[22] flashesred. The unit is switched
off, thebatteryis being charged.
Starting up the receiver unit
The unit can be powered by thebattery,by a normal mains power
supply viathe power adapter plug or by a USBconnection on a
computer.
Connecting the receiver unit via the power adapter plug
Connect the power adapter plug to thepower adapter connection
[10]on the receiverunitand a properly installedmainspower outlet.
The receiver unitis switched on automatically.
Connecting the receiver unit via the USB cable
Connect the USB cable tothe USB connection [10] on thereceiv-
er unit and a freeUSB port on thecomputer. The receiverunit is
switched on automatically.
The USB cable only serves to chargethe battery. Itdoes not
servefor data transfer.
Switching the receiver unit on/off
On/Off [11]5 sec. The receiver unit is switched on.
The startscreen appears in thedisplay.
On/Off [11]5 sec. The receiver unit is switched off.
Operation and charge indicators on the receiver unit
Operation indicator [3]lights up. The unit is switched on.
Charge indicator [4]lights up. The batteryis charged.
Charge indicator[4] flashes. The battery is being charged.
Icons in the display
High signal strength.
Low signal strength.
No signal.
The equipment has a range ofup to200 m.The range can be
reduced byobstructions, suchas walls etc.Electronicequip-
mentin the vicinitycan also cause disturbance.
Alarmclock or feed alarmis switched on.
Battery isfully charged.
Battery isempty.
Ifthe bars run through the battery icon,the batteryis being charged.
Split screen
Up to fourtransmitter unitscan be registeredon thereceiver unit.
The split screen function can be used todisplay all (four)pictures
fromthe transmitterunits registered.
Press On/Off [11]briefly. Switch betweenfull screen and
splitscreen.
Talk function
Left [5] Voicecommunication is possible from the
receiverunit to thetransmitter unit.
Photo function
In orderto take a photo,a micro SD card(notincluded) mustbe
installedin thereceiver unit.
Right [8] Photo is saved on themicro SD card.
All the photostaken in one day are storedin a separate folder.
Night vision function
Ifthe brightnessof the area monitored no longer sufficesfor normal
operation,the equipmentautomatically switches to nightvision.
When the nightvision functionisactivated,only objectsup to
2 m away can be viewed.The display only provides a blackand
white image.
Settings using the menu
The menu can be used to execute various functions and define
diversesettings.All the settings are confirmedbypressing the
Menu button [7]. Skip back in the menu levelsby pressing the
On/Off button [11].
Menu [7] Open the menu.
Setting the volume
┠Volume┨.
Top [6] or Right [8] Raise the volume.
Bottom [9] or Left [5] Lower thevolume.
Setting the brightness
┠Bright ness┨
Top [6] or Right [8] Increase thebrightness.
Bottom [9] or Left [5] Reduce thebrightness.
Selecting the picture section
┠Zoom In┨.
Top [6] or Bottom [9] Select thepicture section.
Select the language
┠Language┨.
Top [6] or Bottom [9] Select thelanguage.
Registering/Deregistering transmitter units
┠Register Camera┨.
An icon indicates whethera transmitter uniti s registeredatpositions
┠Camera 1┨ to ┠Camera 4┨.
Thumbs up. Transmitterunitis registered.
Registering a transmitterunit
Registration is only possible at a freeposition, e.g. ┠Camera 2┨.
┠Register Camera┨┠Camera 2┨┠Yes┨
┠Register Camera 2?┨.
Press ON/OFF [15]on thetransmitter unit.
Deregistering a transmitterunit
E.g. ┠Camera 2┨.
┠Register Camera┨┠Camera 2┨┠Yes┨
┠Camera 2 unregistered┨.
Selecting a transmitter unit
Ifseveral transmitterunits are registered, a transmitter unit canbe
selected manually or the screen canswitch unitsautomatically at
presetintervals.
Selecting a tran smitter unit manually
Example ┠Camera 2┨.
┠Camera Selection┨┠Manual Selection┨┠Camera 2┨.
Changing transmitter units automatically
Example: every20seconds.
┠Camera Selection┨┠Auto Scan┨┠20 seconds┨.
Deactivating ch anging transmitter units automatically
┠Camera Selection┨┠Auto Scan┨┠Never┨.
Setting the wake-up / feed time alarms
A wake-upalarmand up to four feedtime alarmscanbe set.
Setting the time
Example. Wake-up alarmtime.
┠Alarm Clocks┨┠Morning Call┨┠Alarm Time ┨.
Top [6] or Bottom [9] Set the hour.
Top [6] or Bottom [9] Set the minute.
Содержание
- Baby monitor bcf 910 1
- Connecting the receiver unit via the power adapter plug 1
- Connecting the receiver unit via the usb cable 1
- Connecting the transmitter unit via the power adapter plug 1
- Connecting the transmitter unit via the usb 1
- Display and explanation of operations 1
- English 1
- Icons in the display 1
- Inserting the battery in the receiver unit 1
- Inserting the micro sd card in the receiver unit 1
- Intended use 1
- Night vision function 1
- Operating elements 1
- Operating manual 1
- Operation and charge indicators on the receiver unit 1
- Operation charge indicator on the transmitter unit 1
- Package contents 1
- Photo function 1
- Please read and observe the following in formation and keep the operating manual nearby for future reference 1
- Registering deregistering transmitter units 1
- Safety information 1
- Select the language 1
- Selecting a transmitter unit 1
- Selecting the picture section 1
- Setting the brightness 1
- Setting the volume 1
- Setting the wake up feed time alarms 1
- Settings using the menu 1
- Split screen 1
- Starting up the receiver unit 1
- Starting up the transmitter unit 1
- Switching the receiver unit on off 1
- Switching the transmitter unit on off 1
- Talk function 1
- Use only in suitable environments 1
- Using the base for the transmitter unit 1
- Activating motion detection 2
- Basic settings 2
- Declaration of conformity 2
- Displaying photo recordings 2
- Displaying video recordings 2
- Disposal 2
- Guarantee 2
- Maintenance 2
- Power adapter plug receiver unit 2
- Power adapter plug transmitter unit 2
- Service hotline 2
- Voice activation 2
Похожие устройства
- Hikvision DS-7208HVI-SH Инструкция по эксплуатации
- Bosch WAE20465 Инструкция по эксплуатации
- Switel BCF900 Инструкция по эксплуатации
- Hikvision DS-9104 Инструкция по эксплуатации
- Bosch WAY24541OE Инструкция по эксплуатации
- Switel BCF860 Инструкция по эксплуатации
- Hikvision DS-9108 Инструкция по эксплуатации
- Electrolux EWT1066TSW Инструкция по эксплуатации
- Switel BCF850 Инструкция по эксплуатации
- Hikvision DS-9116HFI-SH Инструкция по эксплуатации
- Bosch WVH28442OE Инструкция по эксплуатации
- Switel BCF820 Инструкция по эксплуатации
- Hikvision DS-9116HFI-ST Инструкция по эксплуатации
- Electrolux EWW51476HW Инструкция по эксплуатации
- Switel BCF819 Инструкция по эксплуатации
- Hikvision DS-7316HI-ST Инструкция по эксплуатации
- Electrolux EWW51676HW Инструкция по эксплуатации
- Switel BCF817 Инструкция по эксплуатации
- Hikvision DS-7604HI-S Инструкция по эксплуатации
- Samsung WD806U2GAWQ Инструкция по эксплуатации