
Velomann V1_23 Инструкция по эксплуатации онлайн
Содержание
Похожие устройства
- Stiga DECK 100 COMBI 3 Инструкция по эксплуатации
- Velomann V1.20HR Инструкция по эксплуатации
- Stiga DECK 100 COMBI 3 EL Инструкция по эксплуатации
- Velomann V1.20A Инструкция по эксплуатации
- Stiga DECK 125 B TITAN COMBI Инструкция по эксплуатации
- Velomann V1.16C Инструкция по эксплуатации
- Stiga DECK 125 H TITAN COMBI Инструкция по эксплуатации
- Velomann V1.11W Инструкция по эксплуатации
- Stiga DECK 135 B TITAN DOD Инструкция по эксплуатации
- Velomann V1.10 Инструкция по эксплуатации
- Stiga DECK 135 H TITAN DOD Инструкция по эксплуатации
- Velomann V1.07W Инструкция по эксплуатации
- Stiga DECK 155 B TITAN DOD Инструкция по эксплуатации
- Stiga DECK 155 H TITAN DOD Инструкция по эксплуатации
- Stiga DECK PARK 105 C /2+4WD (ANSI) Инструкция по эксплуатации
- Stiga DECK PARK 105 C EL /2+4WD (ANSI) Инструкция по эксплуатации
- Stiga DECK PARK 110 C PRO Инструкция по эксплуатации
- Stiga DECK PARK 110 C PRO /2+4WD (ANSI) Инструкция по эксплуатации
- Stiga DECK PARK 110 C PRO EL /2+4WD (ANSI) Инструкция по эксплуатации
- Stiga DECK PARK 125 C PRO /2+4WD (ANSI) Инструкция по эксплуатации
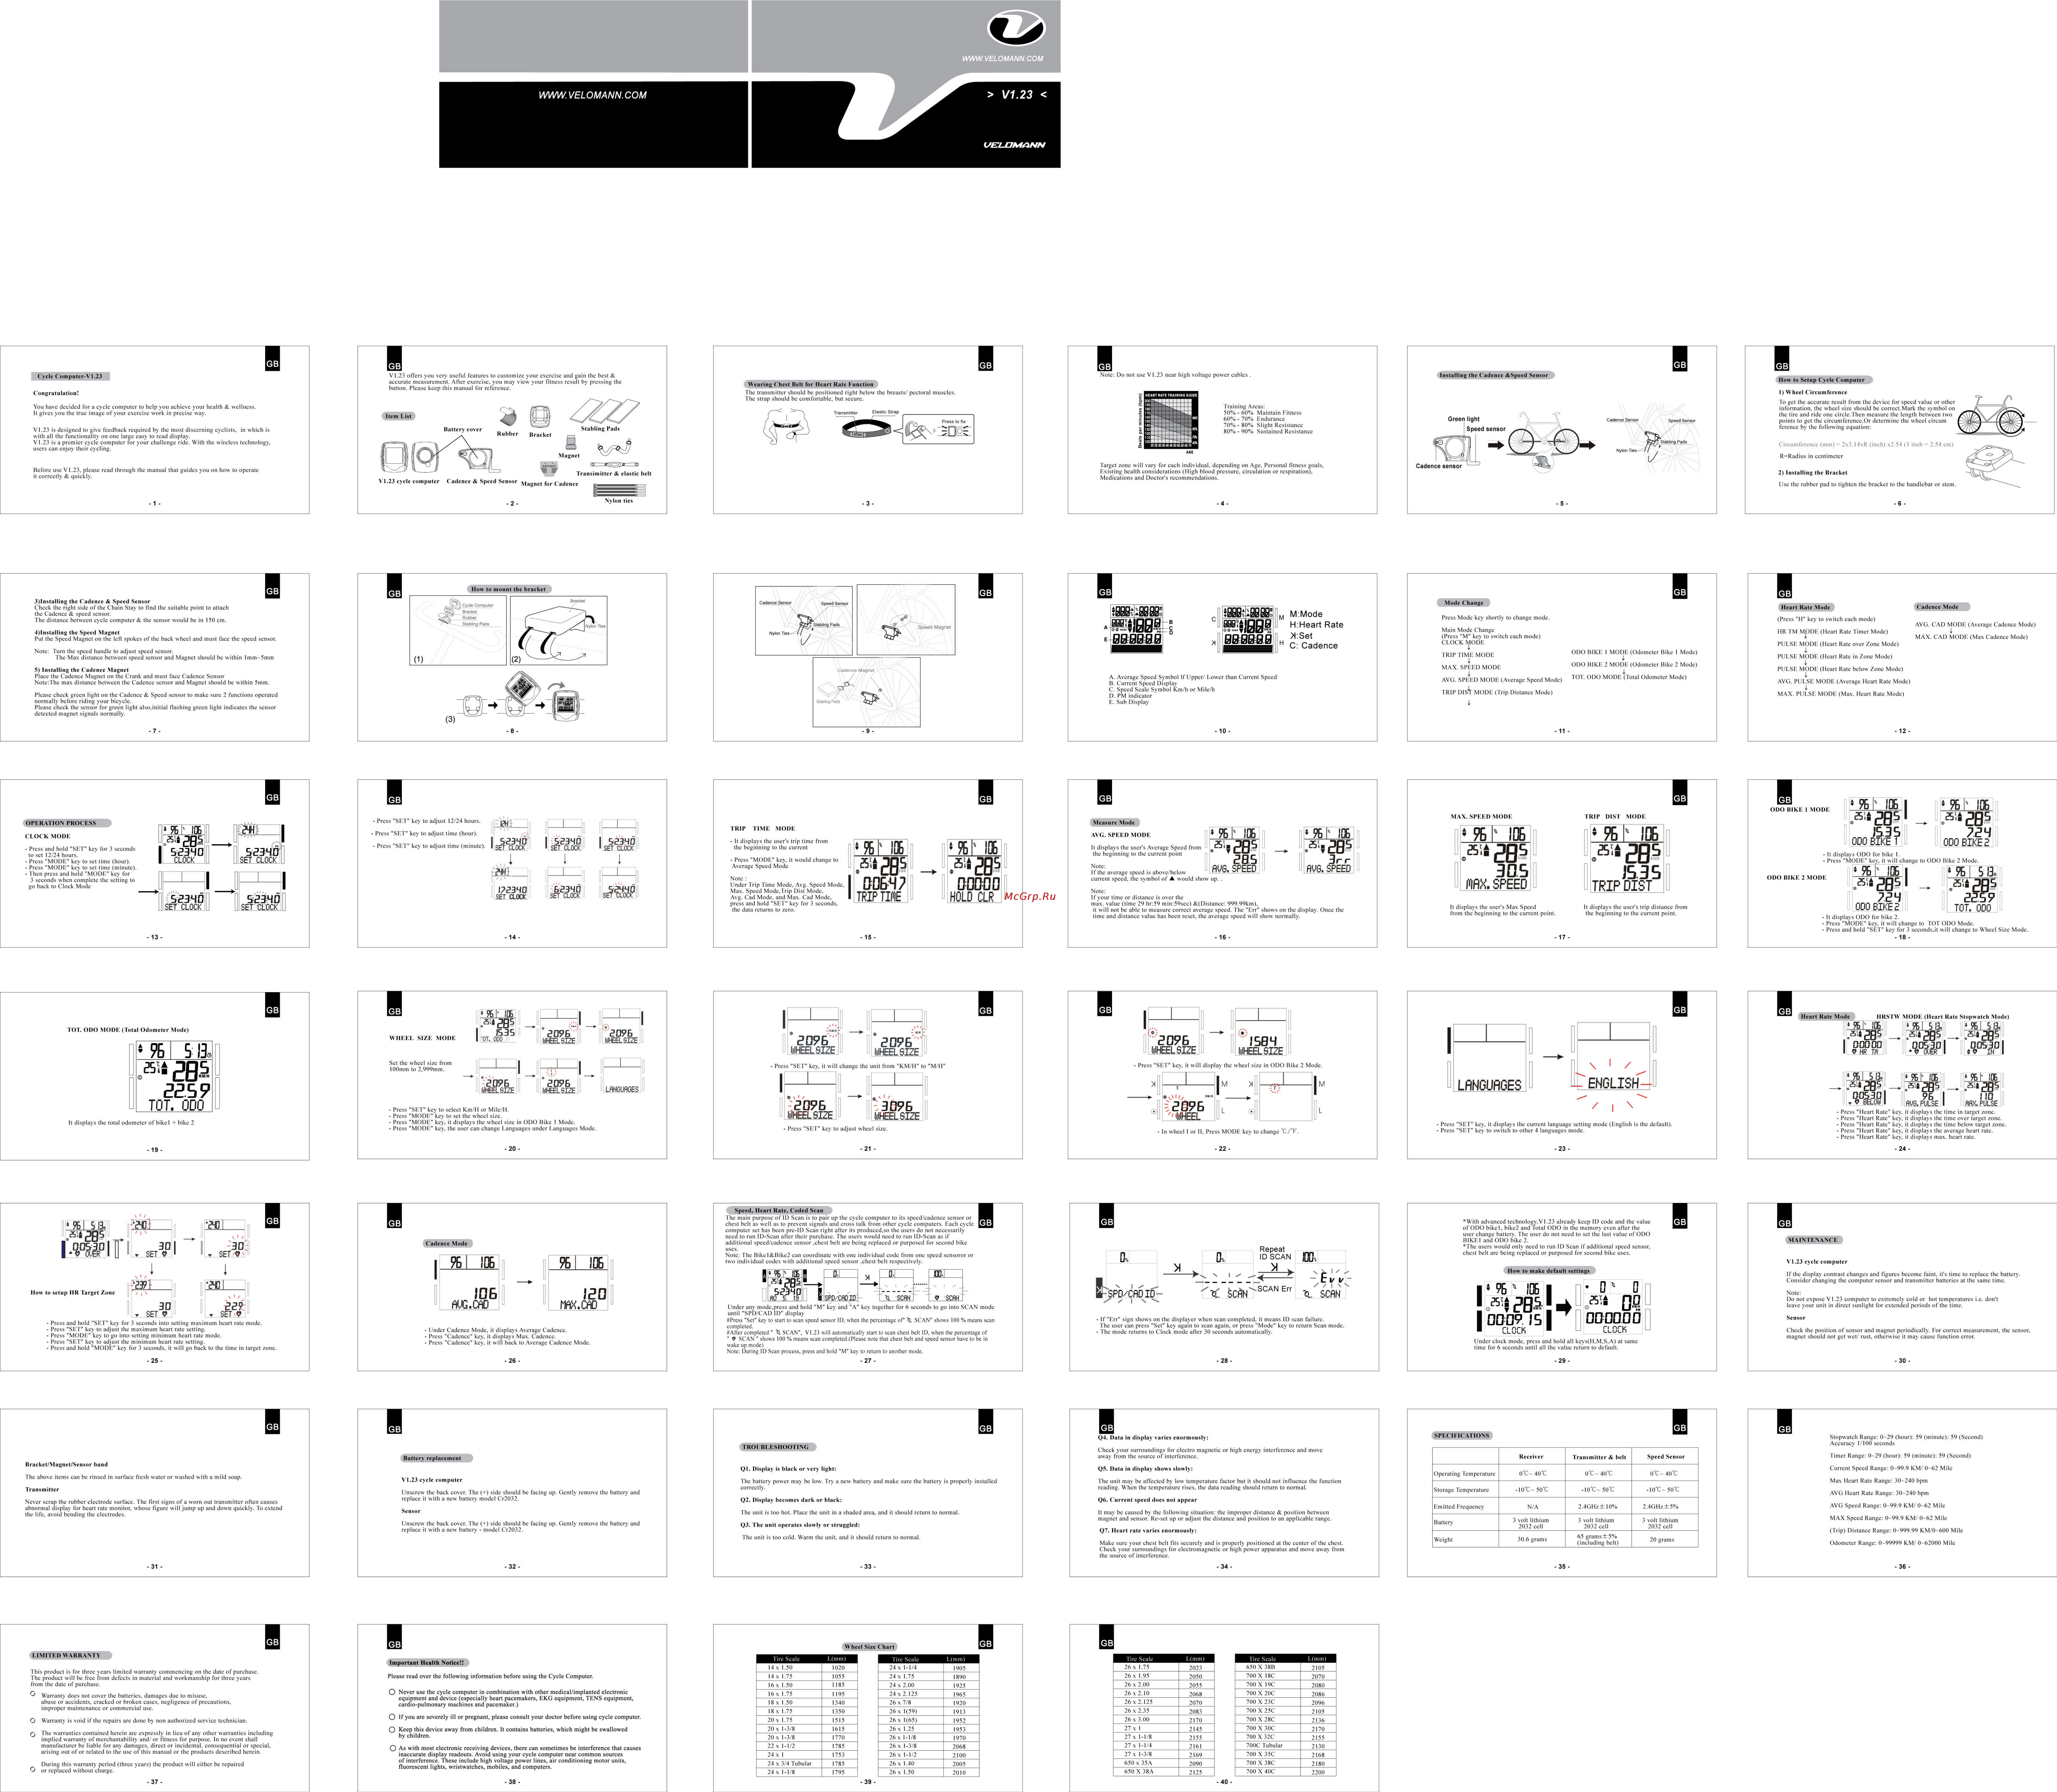
GB GB GB VI 23 offers you very useful features to customize your exercise and gain the best accurate measurement After exercise you may view your fitness result by pressing the button Please keep this manual for reference Cycle Computer VI 23 Congratulation Note Do not use VI 23 near high voltage power cables How to Setup Cycle Computer Wearing Chest Belt for Heart Rate Function The transmitter should be positioned right below the breasts pectoral muscles The strap should be comfortable but secure 1 Wheel Circumference To get the accurate result from the device for speed value or other information the wheel size should be correct Mark the symbol on the tire and ride one circle Then measure the length between two points to get the circumference Or determine the wheel circum ference by the following equation You have decided for a cycle computer to help you achieve your health wellness It gives you the true image of your exercise work in precise way V1 23 is designed to give feedback required by the most discerning cyclists in which is with all the functionality on one large easy to read display VI 23 is a premier cycle computer for your challenge ride With the wireless technology users can enjoy their cycling Circumference mm 2x3 14xR inch x2 54 1 inch 2 54 cm R Radius in centimeter Before use V1 23 please read through the manual that guides you on how to operate it correctly quickly Existing health considerations High blood pressure circulation or respiration Medications and Doctor s recommendations 2 Installing the Bracket Use the rubber pad to tighten the bracket to the handlebar or stem 1 GB GB 3 lnstalling the Cadence Speed Sensor Check the right side of the Chain Stay to find the suitable point to attach the Cadence speed sensor The distance between cycle computer the sensor would be in 150 cm Mode Change GB Cadence Mode Heart Rate Mode Press Mode key shortly to change mode Press H key to switch each mode 4 Installing the Speed Magnet Put the Speed Magnet on the left spokes of the back wheel and must face the speed sensor Main Mode Change Press M key to switch each mode CLOCK tvlODE HR TM MpDE Heart Rate Timer Mode Note Turn the speed handle to adjust speed sensor The Max distance between speed sensor and Magnet should be within lmm 5mm TRIP TIME MODE ODO BIKE 1 MODE Odometer Bike 1 Mode MAX SPEED MODE ODO BIKE 2 MODE Odometer Bike 2 Mode 5 Installing the Cadence Magnet Place the Cadence Magnet on the Crank and must face Cadence Sensor Note The max distance between the Cadence sensor and Magnet should be within 5mm Please check green light on the Cadence Speed sensor to make sure 2 functions operated normally before riding your bicycle Please check the sensor for green light also initial flashing green light indicates the sensor detected magnet signals normally AVG CAD MODE Average Cadence Mode AVG SPEED MODE Average Speed Mode T0T 0D0 M0DE Tolal Odometer Mode AVG PULSE MODE Average Heart Rate Mode TRIP DIsV MODE Trip Distance Mode MAX PULSE MODE Max Heart Rate Mode 4 7 11 GB 12 GB GB GB 96h 106 ODO BIKE 1 MODE MAX SPEED MODE Press SET key to adjust 12 24 hours OPERATION PROCESS Measure Mode TRIP TIME MODE Press SET key to adjust time hour CLOCK MODE Press SET key to adjust time minute Press and hold SET key for 3 seconds to set 12 24 hours Press MODE key to set time hour Press MODE key to set time minute Then press and hold MODE key for 3 seconds when complete the setting to go back to Clock Mode MAX CAD MODE Max Cadence Mode PULSE MODE Heart Rate over Zone Mode I PULSE MODE Heart Rate in Zone Mode 4 PULSE MODE Heart Rate below Zone Mode AVG SPEED MODE I Бгэчо It displays the user s trip time from the beginning to the current I SET CLOCK Press MODE key it would change to Average Speed Mode РЯН1 I 125340 5034 0 SET CLOCK SEW SET CLOCK II Note Under Trip Time Mode Avg Speed Mode Max Speed Mode Trip Dist Mode Avg Cad Mode and Max Cad Mode press and hold SET key for 3 seconds the data returns to zero 00БЧ2 ODOOD I TRIF TIPlE HOLD CLR iE 3E 000 BIKE I It displays the user s Average Speed from the beginning to the current point Note HVG If the average speed is above below current speed the symbol of A would show up It displays ODO for bike 1 Press MODE key it will change to ODO Bike 2 Mode aas I SPEED h 106 I ППЫ Note If your time or distance is over the max value time 29 hr 59 min 59sec Distance 999 99km it will not be able to measure correct average speed The Err shows on the display Once the time and distance value has been reset the average speed will show normally 50 Sâ20 PIRX SPEED It displays the user s trip distance from the beginning to the current point It displays the user s Max Speed from the beginning to the current point GB IF43 2259 TOT 0D0 It displays ODO for bike 2 Press MODE key it will change to TOT ODO Mode Press and hold SET key for 3 seconds it will change to Wheel Size Mode 18 GB Heart Rate Mode 4 WHEEL SIZE WHEELSIZE 224 0D0 BIKES HRSTW MODE Heart Rate Stopwatch Mode 4 h 10Б Л 2В5 00000 I I 9 HR TH WHEEL SIZE 1 WHEEL SIZE 513 00530 Г 10Б I GB With advanced technology VI 23 already keep ID code and the value of ODO bikel bike2 and Total ODO in the memory even after the user change battery The user do not need to set the last value of ODO B1KE1 and ODO bike 2 The users would only need to run ID Scan if additional speed sensor chest belt are being replaced or purposed for second bike uses I 553401 IIЙ0 5 19 II Press and hold SET key for 3 seconds into setting maximum heart rate mode Press SET key to adjust the maximum heart rate setting Press MODE key to go into setting minimum heart rate mode Press SET key to adjust the minimum heart rate setting Press and hold MODE key for 3 seconds it will go back to the time in target zone Under Cadence Mode it displays Average Cadence Press Cadence key it displays Max Cadence Press Cadence key it will back to Average Cadence Mode if Ispp cw дЛ SCAN Note Do not expose VI 23 computer to extremely cold or hot temperatures i e don t leave your unit in direct sunlight for extended periods of the time Sensor 30 GB GB GB SPECIFICATIONS Q4 Data in display varies enormously TROl BLESHOOTING Check your surroundings for electro magnetic or high energy interference and move away from the source of interference QI Display is black or very light Q5 Data in display shows slowly The battery power may be low Try a new battery and make sure the battery is properly installed correctly The unit may be affected by low temperature factor but it should not influence the function reading When the temperature rises the data reading should return to normal Battery replacement The above items can be rinsed in surface fresh water or washed with a mild soap V1 23 cycle computer Transmitter Unscrew the back cover The side should be facing up Gently remove the battery and replace it with a new battery model Cr2032 Never scrap the rubber electrode surface The first signs of a worn out transmitter often causes abnormal display for heart rate monitor whose figure will jump up and down quickly To extend the life avoid bending the electrodes Operating Temperature Q2 Display becomes dark or black Q6 Current speed does not appear Sensor The unit is too hot Place the unit in a shaded area and it should return to normal Unscrew the back cover The side should be facing up Gently remove the battery and replace it with a new battery model Cr2032 It may be caused by the following situation the improper distance position between magnet and sensor Re set up or adjust the distance and position to an applicable range Q3 The unit operates slowly or struggled Make sure your chest belt fits securely and is properly positioned at the center of the chest Check your surroundings for electromagnetic or high power apparatus and move away from the source of interference 32 GB GB O Warranty does not cover the batteries damages due to misuse abuse or accidents cracked or broken cases negligence of precautions improper maintenance or commercial use O Warranty is void if the repairs are done by non authorized service technician Q The warranties contained herein are expressly in lieu of any other warranties including implied warranty of merchantability and or fitness for purpose In no event shall manufacturer be liable for any damages direct or incidental consequential or special arising out of or related to the use of this manual or the products described herein During this warranty period three years the product will either be repaired O or replaced without charge 37 34 Please read over the following information before using the Cycle Computer O Never use the cycle computer in combination with other medical implanted electronic equipment and device especially heart pacemakers EKG equipment TENS equipment cardio pulmonary machines and pacemaker O If you are severely ill or pregnant please consult your doctor before using cycle computer Q Keep this device away from children It contains batteries which might be swallowed by children O As with most electronic receiving devices there can sometimes be interference that causes inaccurate display readouts Avoid using your cycle computer near common sources of interference These include high voltage power lines air conditioning motor units fluorescent lights wristwatches mobiles and computers 38 Tire Scale 14 X 1 50 14 X 1 75 16 X 1 50 16 X 1 75 18 X 1 50 18 X 1 75 20 X 1 75 20 X 1 3 8 20 X 1 3 8 22 X 1 1 2 24 X 1 24 X 3 4 Tubular 24 X 1 1 8 L mm 1020 1055 1185 1195 1340 1350 1515 1615 1770 1785 1753 1785 1795 Tire Scale 24 X 1 1 4 24 X 1 75 24 X 2 00 24x2 125 26 X 7 8 26 X 1 59 26 X 1 65 26 X 1 25 26 X 1 1 8 26 X 1 3 8 26 X 1 1 2 26 X 1 40 26 X 1 50 39 L mm 1905 1890 1925 1965 1920 1913 1952 1953 1970 2068 2100 2005 2010 Tire Scale 26 X 1 75 26 X 1 95 26 X 2 00 26x2 10 26x2 125 26 X 2 35 26 X 3 00 27 X 1 27 X 1 1 8 27 X 1 1 4 27 X 1 3 8 650 X 35A 650 X 38A L mm Tire Scale 650 X 38B 700X 18C 700X 19C 700 X 20C 700 X 23C 700 X 25C 700 X 28C 700 X 30C 700 X 32C 700C Tubular 700 X 35C 700 X 38C 700 X 40C 2023 2050 2055 2068 2070 2083 2170 2145 2155 2161 2169 2090 2125 40 Timer Range 0 29 hour 59 minute 59 Second Receiver Transmitter belt Speed Sensor 0 C 40 C 0 C 40 C 0 C 40 C 10 C 50 C 10 C 50 C I0 C 50 C N A 2 4GHz 10 2 4GHz 5 AVG Speed Range 0 99 9 KM 0 62 Mile 3 volt lithium 2032 cell MAX Speed Range 0 99 9 KM 0 62 Mile Current Speed Range 0 99 9 KM 0 62 Mile 3 volt lithium 2032 cell 3 volt lithium 2032 cell Weight 30 6 grams 65 grams 5 including belt 20 grams AVG Heart Rate Range 30 240 bpm Trip Distance Range 0 999 99 KM 0 600 Mile Odometer Range 0 99999 KM 0 62000 Mile 36 GB Wheel Size Chart Important Health Notice This product is for three years limited warranty commencing on the date of purchase The product will be free from defects in material and workmanship for three years from the date of purchase 33 Stopwatch Range 0 29 hour 59 minute 59 Second Accuracy 1 100 seconds Battery Q7 Heart rate varies enormously The unit is too cold Warm the unit and it should return to normal GB Max Heart Rate Range 30 240 bpm Storage Temperature Emitted Frequency LIMITED WARRANTY Check the position of sensor and magnet periodically For correct measurement the sensor magnet should not get wet rust otherwise it may cause function error Under clock mode press and hold all keys H M S A at same time for 6 seconds until all the value return to default 27 GB Bracket Magnet Sensor band If the display contrast changes and figures become faint it s time to replace the battery Consider changing the computer sensor and transmitter batteries at the same time V SCAN Under any mode press and hold M key and A key together for 6 seconds to go into SCAN mode until SPD CAD ID display Press Set key to start to scan speed sensor ID when the percentage of 11 SCAN shows 100 means scan completed After completed 0 SCAN VI 23 will automatically start to scan chest belt ID when the percentage of O SCAN shows 100 means scan completed Please note that chest belt and speed sensor have to be in wake up mode Note During ID Scan process press and hold M key to return to another mode 26 GB VL23 cycle computer X I ГОЯХ PULSE MAINTENANCE How to make default settings 205 IIO 9Б AVG PULSE I 24 23 Speed Heart Rate Coded Scan The main purpose of ID Scan is to pair up the cycle computer to its speed cadence sensor or chest belt as well as to prevent signals and cross talk from other cycle computers Each cycle computer set has been pre ID Scan right after its produced so the users do not necessarily need to run ID Scan after their purchase The users would need to run ID Scan as if additional speed cadence sensor chest belt are being replaced or purposed for second bike uses Note The Bikel Bike2 can coordinate with one individual code from one speed sensoror or two individual codes with additional speed sensor chest belt respectively 9Б b Jæ Press Heart Rate key it displays the time in target zone Press Heart Rate key it displays the time over target zone Press Heart Rate key it displays the time below target zone Press Heart Rate key it displays the average heart rate Press Heart Rate key it displays max heart rate Press SET key it displays the current language setting mode English is the default Press SET key to switch to other 4 languages mode Press SET key to adjust wheel size 4 _ i B V BELOW I GB Ææl Press SET key it will display the wheel size in ODO Bike 2 Mode Press SET key it will change the unit from KM H to M H Press SET key to select Km H or Mile H Press MODE key to set the wheel size Press MODE key it displays the wheel size in ODO Bike 1 Mode Press MODE key the user can change Languages under Languages Mode 9Б 5 13 L mm 2105 2070 2080 2086 2096 2105 2136 2170 2155 2130 2168 2180 2200