Netis GP8501G — quick Installation Guide for PON Terminal Devices [1/1]
Содержание
15- 1 92 68 01
- Netis pon terminal
- Manually set the ip address of the wired network adapter
- Login the onu via
- Hardware connection
- Finish the further settings
- Appendix fcc statement
- Address field then type in the username guest and password guest to login the web management page
- You will see the following onu management page to
- Web management page
- Trou bl eshooting pi
- Quick installation guide
- Package contents 3 led and button description
- Open your browser and type 192 68 01 in the
- On your computer as below
Похожие устройства
-
 Netis GP8501GPТехнические характеристики
 -
 Netis GP8501GPИнструкция по эксплуатации
 -
 Netis GP8502PТехнические характеристики
 -
Netis GP8502PИнструкция по эксплуатации
-
 Netis EP8204Инструкция по эксплуатации
 -
 Netis EP8101GТехнические характеристики
 -
Netis EP8101GИнструкция по эксплуатации
-
 Netis EP8104Технические характеристики
 -
 Netis EP8104Инструкция по эксплуатации
 -
 Netis EP8104PТехнические характеристики
 -
Netis EP8104PИнструкция по эксплуатации
-
 Netis EP8208Инструкция по эксплуатации
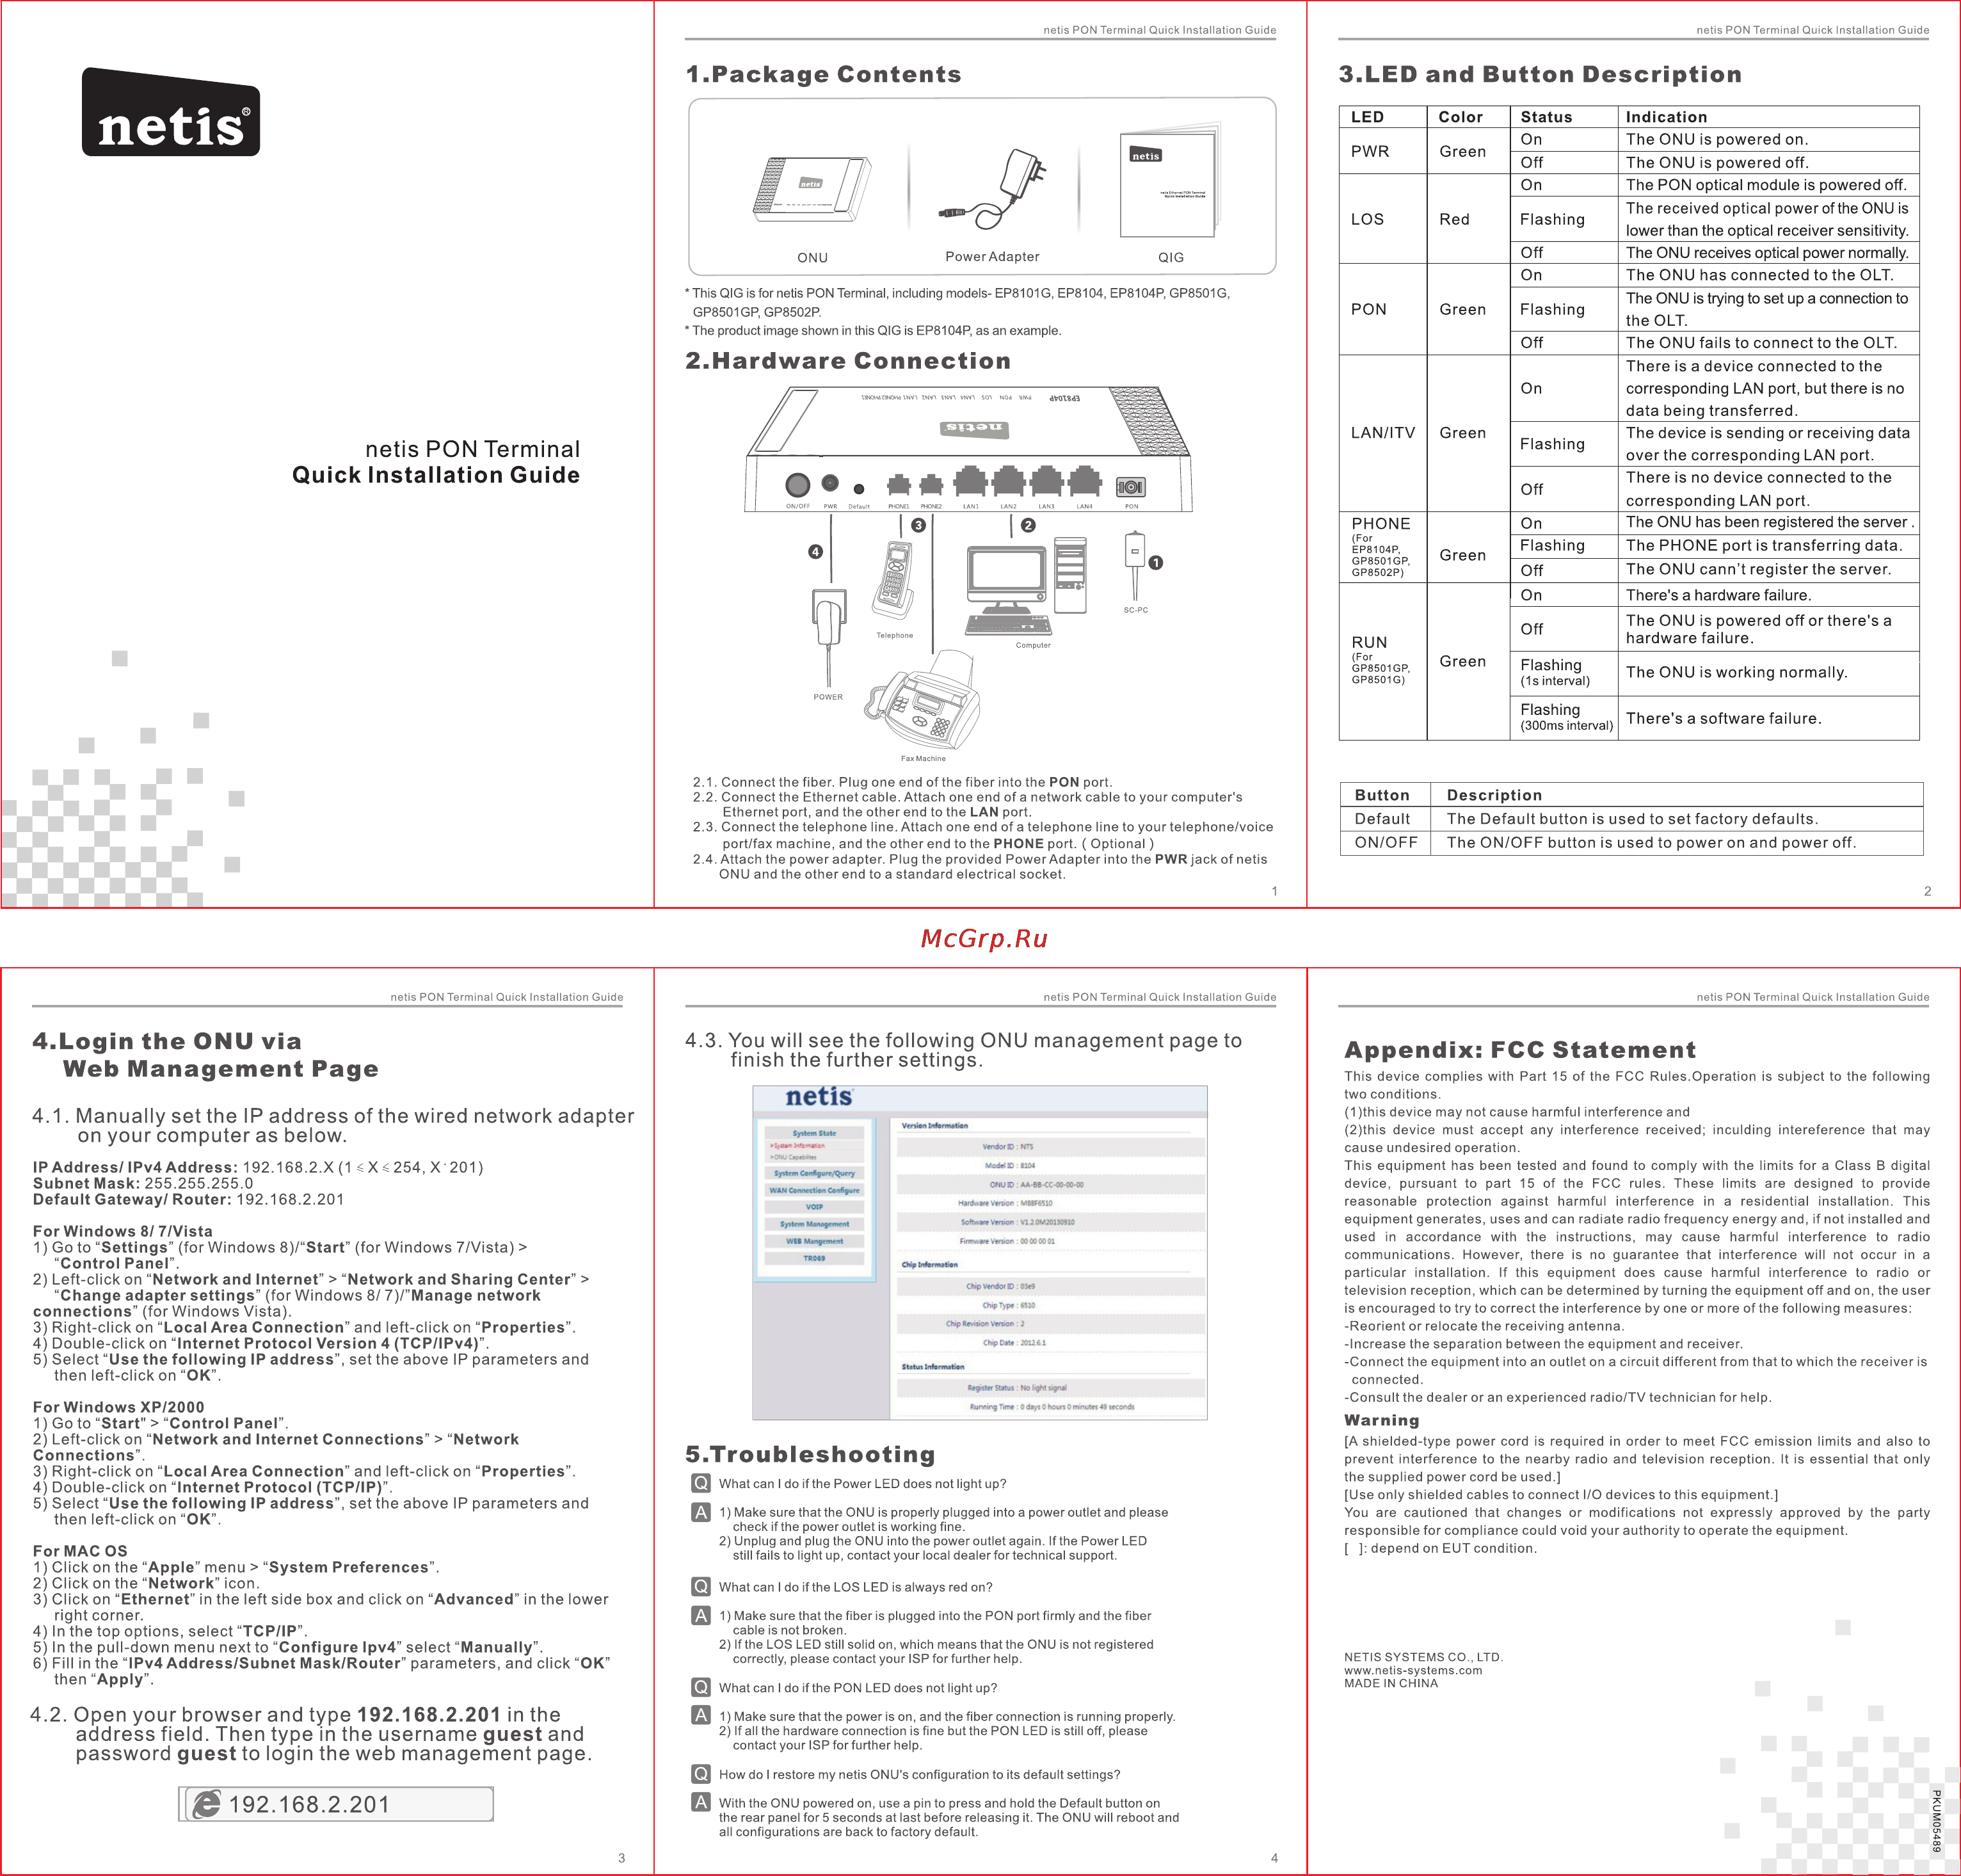
netis PON Terminal Quick Installation Guide 1 Package Contents 3 LED and Button Description netis h_____________________________ à LED Color PWR Green LOS This QIG is for netis PON Terminal including models EP8101G EP8104 EP8104P GP8501G GP8501GP GP8502P The product image shown in this QIG is EP8104P as an example PON Red Green Status Indication On The ONU is powered on Off The ONU is powered off On The PON optical module is powered off Flashing The received optical poweroftheONU is lower than the optical receiver sensitivity Off The ONU receives optical power normally On The ONU has connected to the OLT Flashing Off 2 Hardware Connection The ONU is trying to set up a connection to the OLT The ONU fails to connect to the OLT There is a device connected to the On corresponding LAN port but there is no data being transferred LAN ITV netis PON Terminal Quick Installation Guide Green Flashing Off PHONE For EP8104P GP8501GP GP8502P Green RUN For GP8501GP GP8501G Green The device is sending or receiving data over the corresponding LAN port There is no device connected to the corresponding LAN port On The ONU has been registered the server Flashing The PHONE port is transferring data Off The ONU cann t register the server On There s a hardware failure Off The ON U is powered off or there s a hardware failure Flashing 1s interval The ONU is working normally Flashing 300ms interval There s a software failure 2 1 Connect the fiber Plug oneend ofthefiberintothe PON port 2 2 Connect the Ethernet cable Attach oneendofa network cable to your computer s Ethernet port and the other end to the LAN port 2 3 Connect the telephone line Attach one end of a telephone line to your telephone voice port fax machine and the other end to the PHONE port Optional 2 4 Attach the power adapter Plug the provided Power Adapter into the PWR jack of netis ONU and the other end to a standard electrical socket netis PON Terminal Quick Installation Guide Button Description Default The Default button is used to set factory defaults ON OFF The ON OFF button is used to power on and power off netis PON Terminal Quick Installation Guide 4 Login the ONU via Web Management Page netis PON Terminal Quick Installation Guide 4 3 You will see the following ONU management page to finish the further settings Appendix FCC Statement This device complies with Part 15 of the FCC Rules Operation is subject to the following two conditions 1 thls device may not cause harmful interference and 2 thls device must accept any interference received inculding intereference that may cause undesired operation This equipment has been tested and found to comply with the limits for a Class B digital device pursuant to part 15 of the FCC rules These limits are designed to provide reasonable protection against harmful interference in a residential installation This equipment generates uses and can radiate radio frequency energy and if not installed and used in accordance with the instructions may cause harmful interference to radio communications However there is no guarantee that interference will not occur in a particular installation If this equipment does cause harmful interference to radio or television reception which can be determined by turning the equipment off and on the user is encouraged to try to correct the interference by one or more of the following measures Reorient or relocate the receiving antenna Increase the separation between the equipment and receiver Connect the equipment into an outlet on a circuit different from that to which the receiver is connected Consult the dealer or an experienced radio TV technician for help netis 4 1 Manually set the IP address of the wired network adapter on your computer as below Version Informa t n IP Address IPv4 Address 192 168 2 X 1 s X s 254 X 201 Subnet Mask 255 255 255 0 Default Gateway Router 192 168 2 201 WAN Connection Configure For Windows 8 7 Vista 1 Go to Settings for Windows 8 Start for Windows 7 Vista Control Panel 2 Left click on Network and Internet Network and Sharing Center Change adapter settings for Windows 8 7 Manage network connections for Windows Vista 3 Right click on Local Area Connection and left click on Properties 4 Double click on Internet Protocol Version 4 TCP IPv4 5 Select Use the following IP address set the above IP parameters and then left click on OK Wit Maternent Chip Vendor IO 03e9 Chip Type CikpDi BUSI Reistet Status rw light ssiW For Windows XP 2000 1 Go to Start Control Panel 2 Left click on Network and Internet Connections Network Connections 3 Right click on Local Area Connection and left click on Properties 4 Double click on Internet Protocol TCP IP 5 Select Use the following IP address set the above IP parameters and then left click on OK Warning A shlelded type power cord is required in order to meet FCC emission limits and also to prevent interference to the nearby radio and television reception It is essential that only the supplied power cord be used Use only shielded cables to connect I O devices to this equipment You are cautioned that changes or modifications not expressly approved by the party responsible for compliance could void your authority to operate the equipment depend on EUT condition 5 Trou bl eshooting PI What can I do if the Power LED does not light up U 1 Make sure that the ONU is properly plugged into a power outlet and please check if the power outlet is working fine 2 Unplug and plug the ONU into the power outlet again If the Power LED still fails to light up contact your local dealer for technical support For MAC OS 1 Click on the Apple menu System Preferences 2 Click on the Network icon 3 Click on Ethernet in the left side box and click on Advanced in the lower right corner 4 In the top options select TCP IP 5 In the pull down menu next to Configure Ipv4 select Manually 6 Fill in the IPv4 Address Subnet Mask Router parameters and click OK then Apply Pl What can I do if the LOS LED is always red on U 1 Make sure that the fiber is plugged into the PON port firmly and the fiber cable is not broken 2 If the LOS LED still solid on which means that the ONU is not registered correctly please contact your ISP for further help NETIS SYSTEMS CO LTD www netis systems com MADE IN CHINA Pl What can I do if the PON LED does not light up 0 1 Make sure that the power is on and the fiber connection is running properly 4 2 Open your browser and type 192 168 2 201 in the address field Then type in the username guest and password guest to login the web management page 2 If all the hardware connection is fine but the PON LED is still off please contact your ISP for further help s How do I restore my netis ONU s configuration to its default settings Q With the ONU powered on use a pin to press and hold the Default button on 1 92 168 2 201 the rear panel for 5 seconds at last before releasing it The ONU will reboot and all configurations are back to factory default 3 4
Discover the essential steps for setting up your PON terminal device. This guide covers hardware connections, LED indicators, and troubleshooting tips for optimal performance.