
Gelid siberian pro Инструкция по эксплуатации онлайн
Содержание
- All brand names trademarks are the properties of their respective owners 1
- Alle marken und warenzeichen sind eigentum ihrer jeweiligen besitzer 1
- Copyright 2013 all rights reserved by gelid solutions limited 1
- For für amd socket sockel 1
- For für intel socket sockel 1
- Installation instructions installationsanleitung 1
- Instrucciones de instalación procé dure d installation installatie instructies 1
- Siberian pro 1
Похожие устройства
- Gelid slim hero Инструкция по эксплуатации
- Gezatone super wet cleaner Инструкция по эксплуатации
- Gezatone amg115, с функцией прогрева Инструкция по эксплуатации
- Gezatone biolift4 201s, 4 сменные насадки Инструкция по эксплуатации
- Gezatone drenalift, вакуумный Инструкция по эксплуатации
- Gezatone ultra-tonic m115 "ультразвук+миостимуляция" Инструкция по эксплуатации
- Gezatone isee208 Инструкция по эксплуатации
- Gezatone amg107 Инструкция по эксплуатации
- Gezatone amg108, 3 насадки Инструкция по эксплуатации
- Gezatone bio wave m920 Инструкция по эксплуатации
- Gezatone hs575, многофункциональный Инструкция по эксплуатации
- Gezatone galvanic beauty spa m775, косметический многофункциональный Инструкция по эксплуатации
- Ginzzu r3 dual, черный Инструкция по эксплуатации
- Ginzzu rs61 dual Инструкция по эксплуатации
- Ginzzu m102 dual Инструкция по эксплуатации
- Ginzzu dc281 Инструкция по эксплуатации
- Ginzzu dc261 aquas Инструкция по эксплуатации
- Ginzzu r32 dual Инструкция по эксплуатации
- Ginzzu gt-x831 3g 8gb black Инструкция по эксплуатации
- Ginzzu gt-x870 3g 8gb Инструкция по эксплуатации
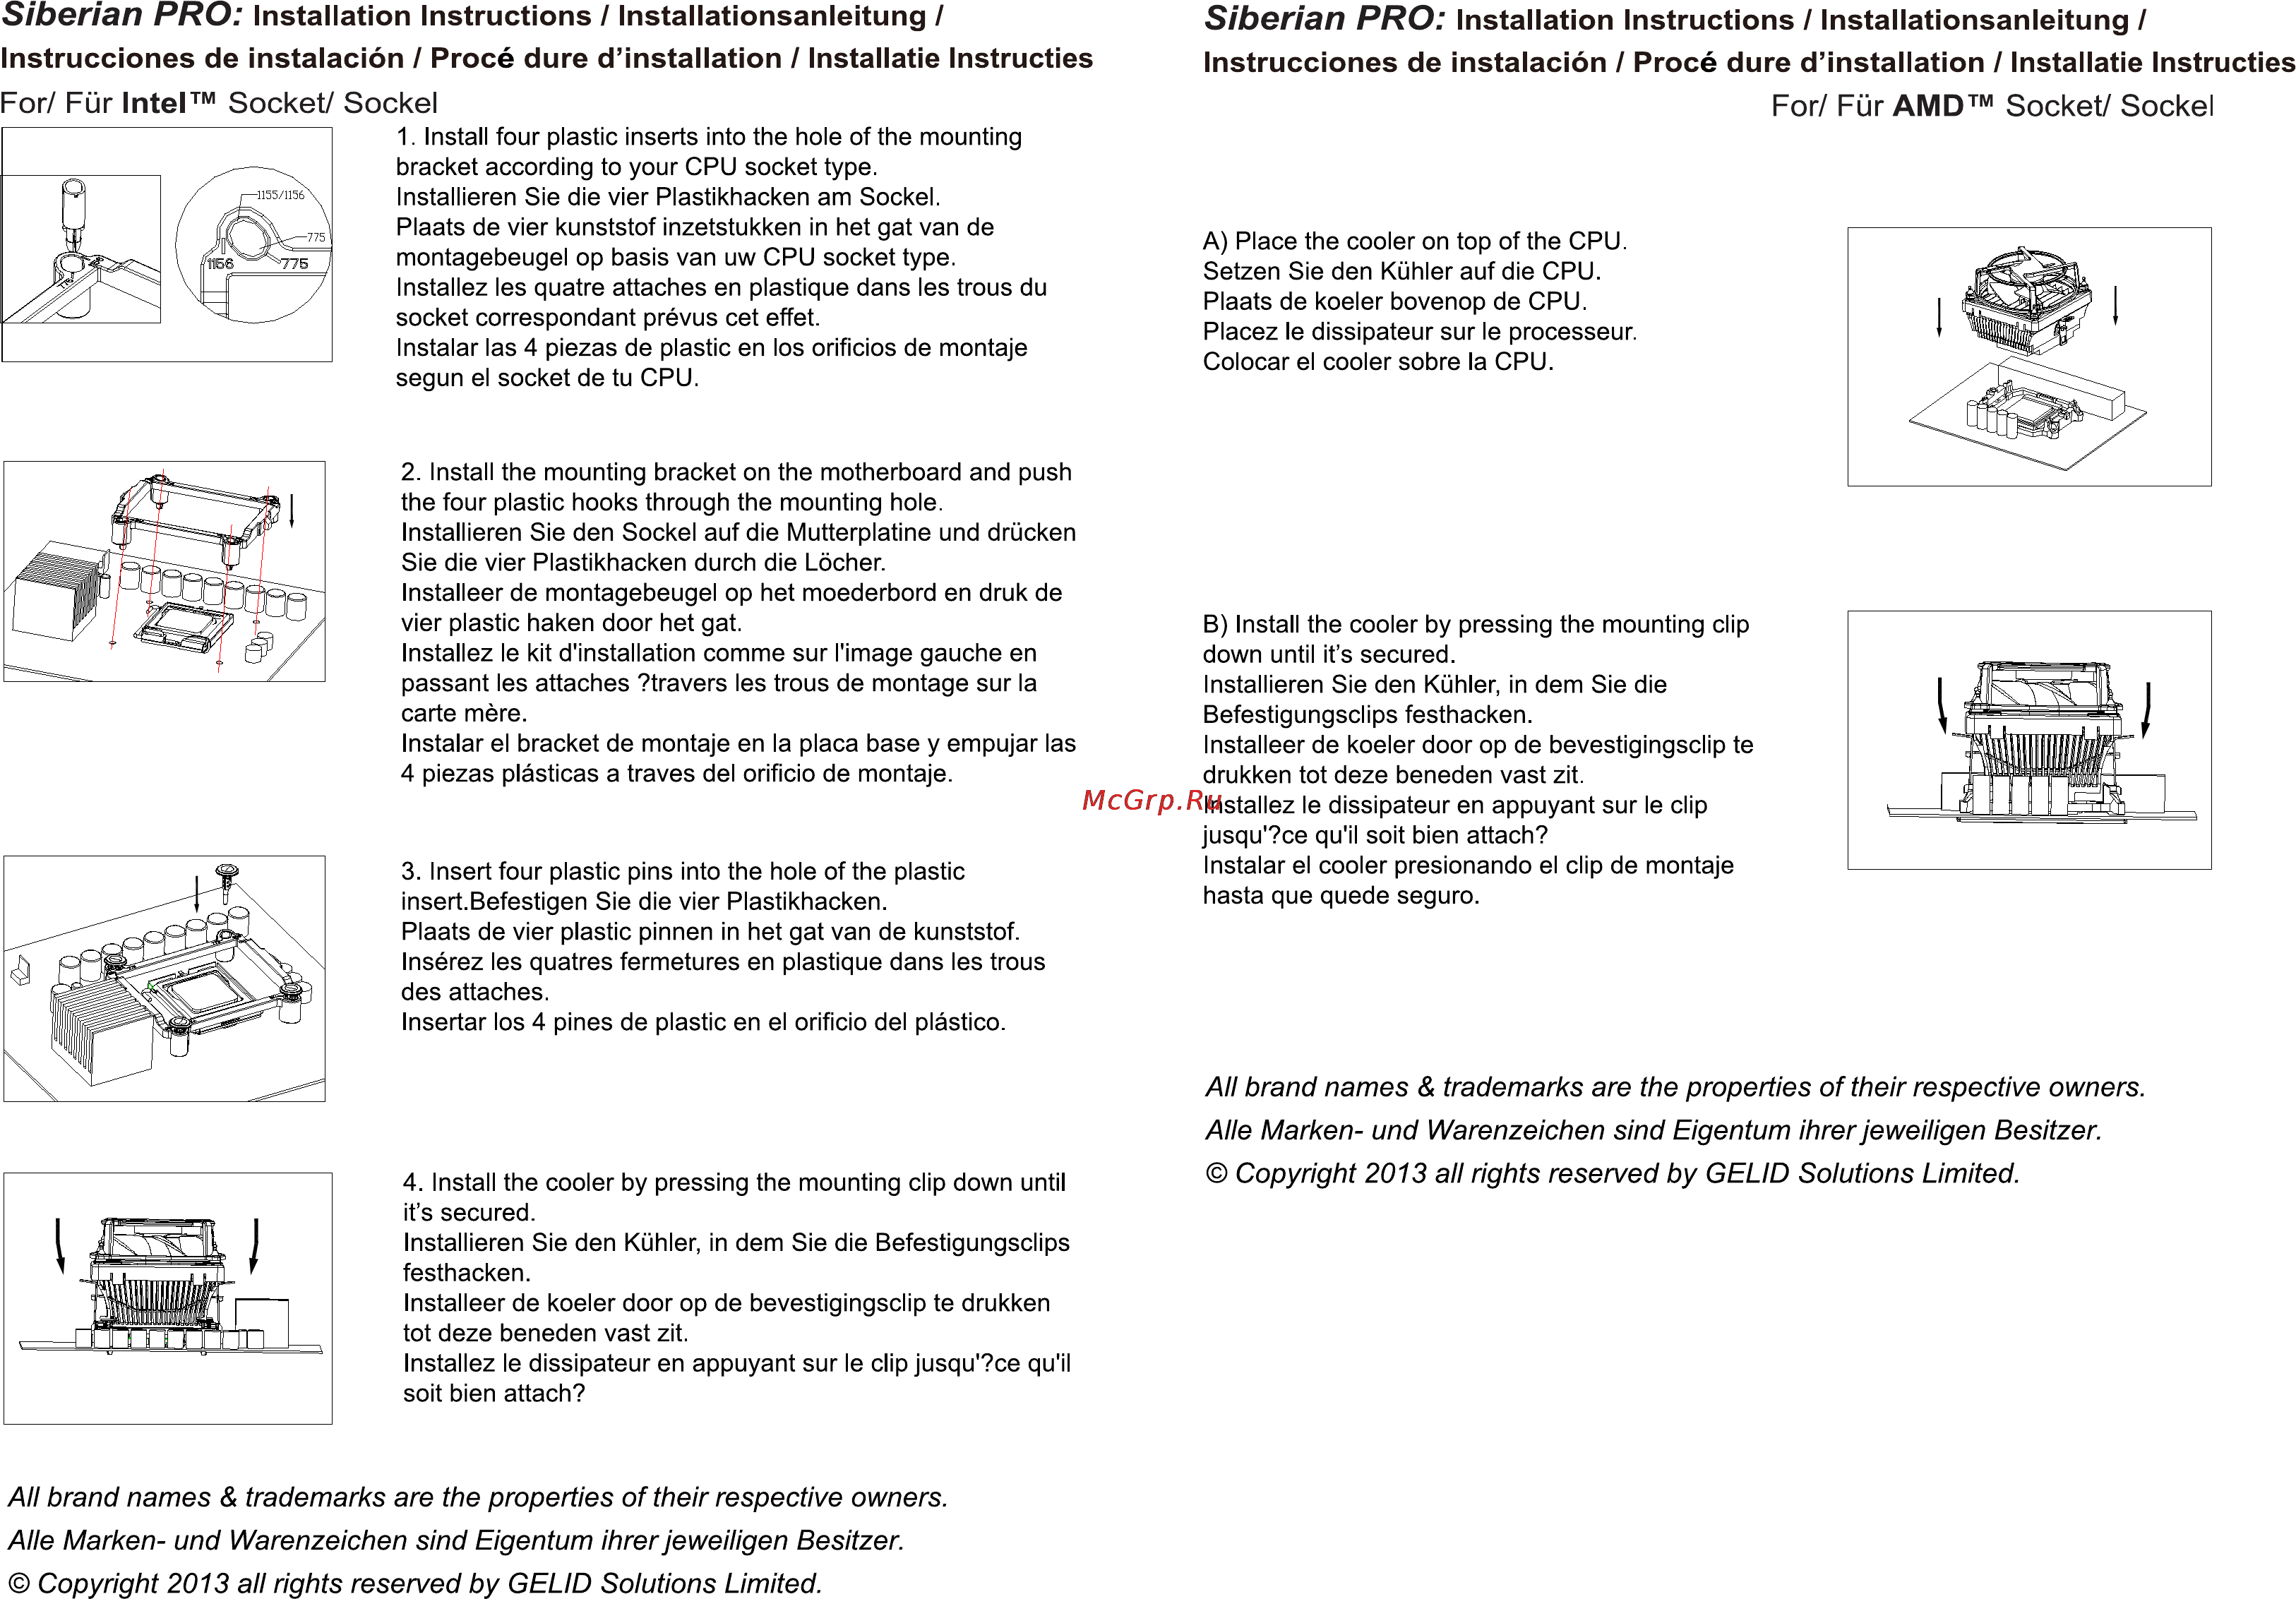
Siberian PRO Installation Instructions Installationsanleitung Siberian PRO Installation Instructions Installationsanleitung Instrucciones de instalación Procé dure d installation Installatie Instructies Instrucciones de instalación Procé dure d installation Installatie Instructies For Für Intel Socket Sockel For Für AMD Socket Sockel 1 Install four plastic inserts into the hole of the mounting bracket according to your CPU socket type Installieren Sie die vier Plastikhacken am Sockel Plaats de vier kunststof inzetstukken in het gat van de montagebeugel op basis van uw CPU socket type Installez les quatre attaches en plastique dans les trous du socket correspondant prévus cet effet Instalar las 4 piezas de plastic en los orificios de montaje segun el socket de tu CPU 2 Install the mounting bracket on the motherboard and push the four plastic hooks through the mounting hole Installieren Sie den Sockel auf die Mutterplatine und drücken Sie die vier Plastikhacken durch die Löcher Installeer de montagebeugel op het moederbord en druk de vier plastic haken door het gat Installez le kit d installation comme sur l image gauche en passant les attaches travers les trous de montage sur la carte mère Instalar el bracket de montaje en la placa base y empujar las 4 piezas plásticas a través del orificio de montaje 3 Insert four plastic pins into the hole of the plastic insert Befestigen Sie die vier Plastikhacken Plaats de vier plastic pinnen in het gat van de kunststof Insérez les quatres fermetures en plastique dans les trous des attaches Insertar los 4 pines de plastic en el orificio del plástico A Place the cooler on top of the CPU Setzen Sie den Kühler auf die CPU Plaats de koeler bovenop de CPU Placez le dissipateur sur le processeur Colocar el cooler sobre la CPU B Install the cooler by pressing the mounting clip down until it s secured Installieren Sie den Kühler in dem Sie die Befestigungsclips festhacken Installeer de koeler door op de bevestigingsclip te drukken tot deze beneden vast zit Installez Ie dissipateur en appuyant sur Ie clip jusqu ce qu il soit bien attach Instalar el cooler presionando el clip de montaje hasta que quede seguro All brand names trademarks are the properties of their respective owners Alle Marken und Warenzeichen sind Eigentum ihrer jeweiligen Besitzer 4 Install the cooler by pressing the mounting clip down until it s secured Installieren Sie den Kühler in dem Sie die Befestigungsclips festhacken Installeer de koeler door op de bevestigingsclip te drukken tot deze beneden vast zit Installez Ie dissipateur en appuyant sur Ie clip jusqu ce qu il soit bien attach All brand names trademarks are the properties of their respective owners Alle Marken und Warenzeichen sind Eigentum ihrer jeweiligen Besitzer Copyright 2013 all rights reserved by GELID Solutions Limited Copyright 2013 all rights reserved by GELID Solutions Limited