![Dell Venue Pro [59/107] To open the browser](/img/pdf.png)
Dell Venue Pro [59/107] To open the browser
![Dell Venue Pro [59/107] To open the browser](/views2/1002268/page59/bg3b.png)
Internet 59
Browsing the Internet
To open the browser
Touch
Start
→
Internet Explorer tile , or touch Start →
applications → Internet Explorer.
NOTE: If you have an application tile on your Start Screen, you will be
able to access that application simply by touching the tile. For all other
applications that are not pinned to your Start Screen, you will need to go
to the applications list to access them.
4
a Touch the displayed information to start the browser and view web
content, or to start the Maps application to locate a place
associated with the information.
b Touch the square to display information relevant to the current bing
picture.
5 The matching web links and news feeds are displayed in separate
sections. For example, touch or flick to web to view matching web links;
touch or flick to news to view matching news feeds.
6 Touch a desired link to open the browser and view the content.
bk0.book Page 59 Monday, November 8, 2010 4:26 PM
Содержание
- User s manual p.1
- ____________________ p.2
- Warning p.2
- Notes cautions and warnings p.2
- Caution p.2
- A warning indicates a potential for property damage personal injury or death p.2
- A note indicates important information that helps you make better use of your device p.2
- A caution indicates potential damage to hardware or loss of data if instructions are not followed p.2
- Contents p.3
- Using your dell venue pr p.3
- Setting up your dell venue pr p.3
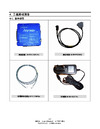
- Package content p.3
- Getting to know your dell venue pr p.3
- Interne p.4
- Customizing your dell venue pro 70 p.4
- Communicating with people using your dell venue pro p.4
- Troubleshootin p.5
- Application p.5
- Package contents p.6
- Europe p.6
- This section provides information about the features available on your dell venue pro phone p.7
- Getting to know your dell venue pro p.7
- Setting up your dell venue pro p.11
- Remove the back cover p.11
- Getting your phone ready for use p.11
- This section provides information on setting up your dell venue pro phone for the first time p.11
- Insert the sim card p.12
- Insert the battery p.12
- Close the back cover p.13
- Turning on your phone p.14
- The windows phone 7 operating system screen appears when the phone goes through a cold boot process p.14
- Press the power and sleep wake button to turn on your phone p.14
- If your sim card is locked by a personal identification number pin type the pin by touching corresponding number keys on the on screen keypad touch the enter button to confirm your input p.14
- Charge the phone p.14
- Turning on the screen p.15
- Turning off your phone p.15
- First time setup p.15
- Using your dell venue pro p.16
- To access the keyboard p.16
- Physical qwerty keyboard p.16
- Keyboard controls p.17
- To open the start screen p.18
- The start screen is the starting point for your phone activities and is made up of customizable tiles shortcuts or links that provide easy access to your favorite or frequently used features applications contacts web pages and media playlists tiles are dynamic and updated in real time to display notifications of new text messages e mails upcoming calendar events missed calls and latest feed updates on your social networks such as twitter facebook and windows live p.18
- Start screen p.18
- From any phone activities touch start p.18
- To reposition a tile on the start screen p.19
- To remove a tile from the start screen p.19
- To navigate the start screen p.19
- To add a tile to the start screen p.19
- To change the tile color p.20
- To change the background color of the start screen p.20
- Your phone has a multi touch sensitive screen you can touch the screen to navigate and control the phone the following touch screen gestures are supported on your phone p.21
- Touch screen gestures p.21
- Screen orientation p.25
- Portrait orientation p.25
- Landscape orientation p.25
- Applications list p.26
- Touch the application to open it p.26
- To navigate the applications list p.26
- To display the applications list p.26
- The applications list contains the list of all the applications available on your phone p.26
- Flick or pan the applications list upwards or downwards until it displays the desired application p.26
- Status bar p.27
- At the top of your smart phone screen there is a thin bar known as the status bar the status bar displays icon indicators for current time battery power signal strength network connectivity ringtone settings and other system information p.27
- Wallpaper p.28
- To set the screen time out period p.28
- To lock the wallpaper with a password p.28
- To hide the wallpaper p.28
- To change the wallpaper p.28
- To set the time and date p.29
- Panoramic screen layers p.30
- Panoramic screen p.30
- Navigating applications p.30
- On screen controls p.31
- Application bar menu p.31
- Application bar p.31
- Toggle switch p.32
- Push button p.32
- Context menu p.32
- Slider track p.33
- Radio button p.33
- Check box p.33
- Using the cursor p.34
- To move the cursor between letters p.34
- To highlight a word or move the cursor between words p.34
- Text box p.34
- Allows you to type or edit text into your phone touch the text box to activate the on screen keyboard and to type the text p.34
- Keyboard layouts p.35
- Displays a list of choices touch a desired item and the list box highlights the item selected from the list p.35
- You can type text using the on screen keyboard when you touch a field that requires text input the on screen keyboard appears the keyboard automatically rotates to either the portrait or landscape mode based on the orientation of your phone p.35
- Touch the back key p.35
- Touch anywhere outside the text box p.35
- To open the on screen keyboard p.35
- To close the on screen keyboard p.35
- Slide out the physical qwerty keyboard p.35
- On screen keyboard p.35
- List box p.35
- Keyboard controls p.36
- To configure the keyboard settings p.37
- To sign in with your existing account p.38
- Setting up e mail and social networking accounts p.38
- Communicating with people using your dell venue pro p.38
- To configure your account settings or to create a new account p.39
- To open your e mail account p.40
- Once you have successfully set up your e mail account on your phone the start screen displays the tile for that account for example the hotmail tile is the starting point for your hotmail account p.40
- When a new e mail arrives your e mail tile such as on the start screen displays the number of new messages to alert you touch the e mail tile to open your email inbox all your received e mails are delivered to your inbox p.40
- Using e mail p.40
- Touch the e mail tile for example on the start screen p.41
- Touch the e mail thread to read the content p.41
- To read e mails p.41
- To quickly find an e mail p.41
- Other than flicking the list of e mails touch search and type the name of the sender in the text box keyword of the e mail subject or the content you are looking for the screen displays the matching e mail and highlights the text that matches the text you have entered in the text box p.41
- To compose and send an e mail p.42
- To call by dialing p.43
- To call a contact p.43
- Calling p.43
- To manage missed outgoing and received calls p.44
- To cancel dialing or end an active call p.44
- To answer a call p.44
- To manage ongoing calls p.45
- To listen to your voicemail p.45
- To reject an incoming call p.45
- You can change call settings to suit your personal needs or enable the call services available from your network service provider p.46
- Warning p.46
- Touch start phone tile or touch start applications phone p.46
- Touch or drag the application bar upwards call settings p.46
- To adjust call settings p.46
- To add a new contact manually p.49
- To add a new contact from the application bar of the phone application p.49
- Managing contacts using the people application p.49
- To quickly locate a contact p.50
- To find a contact p.50
- To call e mail or send a message to a contact p.50
- To pin a contact to the start screen p.51
- To link contacts p.51
- To edit a contact p.52
- To delete a contact p.52
- To view feeds from a social networking account p.52
- To import contacts from your accounts p.52
- To post a quick message to your account p.53
- To import contacts from your sim card p.53
- To compose and send a text message p.53
- Messaging p.53
- Touch the message box to compose your message p.54
- Touch send to send the message p.54
- To read a text message p.55
- Receiving messages p.55
- To reply to a text or multimedia message p.56
- To forward the message p.56
- To delete a message or a message thread p.56
- You can use the bing search box to find websites and other internet content such as news feeds p.58
- Using bing search p.58
- Internet p.58
- To open the browser p.59
- Internet explorer tile or touch start p.59
- Browsing the internet p.59
- Applications internet explorer p.59
- To use the browser p.60
- Using maps p.62
- To move around a map p.62
- To enable location source p.62
- To find a location on the map p.63
- Map viewing controls p.63
- To view the details of a place p.65
- To get directions to your destination p.65
- Type the starting point in the start text box and your destination in the end text box p.66
- To open marketplace p.67
- To install applications or games from marketplace p.67
- Marketplace p.67
- To download music from marketplace p.68
- To start a game p.69
- To play on line games on xbox live p.69
- To open games p.69
- Games and xbox live p.69
- You can customize how your phone works to suit your individual needs p.70
- Touch start applications settings p.70
- Flick to the system section to choose from the following settings p.70
- Display settings p.70
- Customizing your dell venue pro p.70
- Sound and ringtone settings p.71
- Connectivity settings p.72
- To set the date time and language p.75
- To reset your phone to the default state p.76
- To check for operating software version and storage spaces p.76
- Disability settings p.76
- To start the camera p.77
- Camera p.77
- Applications p.77
- To manage captured pictures p.78
- To capture pictures p.78
- On screen camera controls p.78
- Touch or flick the sequential dots up or touch and hold a desired video from the application bar menu that appears choose the action you want to do with the video p.79
- To play a video touch on the frozen image of the video p.79
- To manage captured videos p.79
- To capture videos p.79
- Press the camera button to stop recording p.79
- Press the camera button to start recording p.79
- Frame your subject on the viewfinder p.79
- Flick the viewfinder away to view captured videos p.79
- Ensure that the camcorder mode is enabled as indicated p.79
- Pictures p.80
- To view pictures p.80
- To start the zune application p.81
- To access music using marketplace p.81
- Playing music and video using zune p.81
- To play music p.82
- To play a video p.82
- To control video playback p.82
- To control music playback p.82
- Listening to fm radio using zune p.84
- To use the calendar p.85
- To open the calendar p.85
- Calendar p.85
- Touch start applications calenda p.86
- Touch month to view the calendar p.86
- The calendar view p.86
- Appears in the notifications area of the status bar when p.87
- Touch start applications calenda p.87
- Touch an appointment on the calendar to view the details p.87
- To view appointment details p.87
- The reminder time arrives p.87
- If you set a reminder for an event the upcoming appointment tile p.87
- Event reminders p.87
- To set an alarm p.88
- To enable or disable an alarm p.88
- To delete an alarm p.88
- Calculator p.88
- Alarms p.88
- Voice recognition p.89
- Office p.89
- To create a new note p.90
- Onenote p.90
- Editing tools and commands for a note p.90
- To open a note p.91
- To delete a note p.91
- To create a new word document p.91
- Documents p.91
- Editing tools and commands for a word document p.92
- To send a word document in e mail p.93
- To delete a word document p.93
- To create an excel workbook p.93
- Editing tools and commands for an excel worksheet p.94
- To send an excel workbook in e mail p.95
- To delete an excel workbook p.95
- Touch a powerpoint file that you can access on your phone the powerpoint application opens automatically p.96
- To view a powerpoint file p.96
- To edit a powerpoint file p.97
- Sharepoint p.97
- Microsoft office sharepoint is a server program that is part of the microsoft office system sharepoint allows you to view edit and download documents stored on microsoft sharepoint server 2010 for information on using sharepoint visit windowsphone com p.97
- Troubleshooting p.98
- Sim card error p.98
- Problem possible causes possible solutions p.98
- Poor reception p.98
- Call related problems p.98
- You cannot make outgoing calls p.99
- You cannot answer incoming calls p.99
- Unable to add contacts to the phone p.99
- Troubleshooting p.99
- Problem possible causes possible solutions p.99
- Noises during a call p.99
- Echo or noise p.99
- System problems p.100
- Problem possible causes possible solutions p.100
- Pin code is blocked p.100
- Battery does not charge p.100
- You cannot enable certain call features p.100
- Unable to turn the phone on p.100
- Troubleshooting p.100
- Unable to send or receive text messages p.101
- Troubleshooting p.101
- Shortened standby time p.101
- Problem possible causes possible solutions p.101
- Messaging problems p.101
- Unable to send or receive multimedia messages p.102
- Unable to send or receive e mail p.102
- Troubleshooting p.102
- Problem possible causes possible solutions p.102
- Internet problems p.102
- Troubleshooting p.103
- Problem possible causes possible solutions p.103
- Media problems p.103
- Windows media player on my computer cannot play the sounds of the video captured using the phone p.103
- Unable to connect to the internet p.103
Похожие устройства
-
 Dell x51vРуководство пользователя
 -
Dell X51Руководство пользователя
-
 Dell AeroИнструкция по эксплуатации
 -
 HTC TitanИнструкция по работе
 -
 Xiaomi Mi 4Руководство по использованию
 -
 Nokia 5250 Dark GreyИнструкция по эксплуатации
 -
 Nokia C7-00 Charcoal BlackРуководство по эксплуатации
 -
 Alpha Geo S60III PROРуководство по эксплуатации
 -
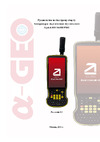 Alpha Geo S60III PROРуководство по быстрому старту
 -
 Samsung GT-B7300 Omnia LITE Noir BlackИнструкция 8
 -
 Samsung GT-B7300 Omnia LITE Noir BlackИнструкция 7
 -
 Samsung GT-B7300 Omnia LITE Noir BlackИнструкция 6