
Pulsar Лось Инструкция по эксплуатации онлайн
Содержание
Похожие устройства
- Pulsar Боковой кронштейн Инструкция по эксплуатации
- Pulsar МАК Инструкция по эксплуатации
- Pulsar NV50 1.5x Инструкция по эксплуатации
- Pulsar NV60 1.5x Инструкция по эксплуатации
- Pulsar Компакт Инструкция по эксплуатации
- Pulsar RCC Инструкция по эксплуатации
- Pulsar TSD1 Инструкция по эксплуатации
- CTV CTV-IPD4028 MFA Инструкция по быстрому запуску
- CTV CTV-IPD4028 MFE Инструкция по быстрому запуску
- CTV CTV-IPD4036 FLE Инструкция по быстрому запуску
- CTV CTV-IPB4028 VFE Инструкция по быстрому запуску
- CTV CTV-IPB4036 FLE Инструкция по быстрому запуску
- CTV CTV-IPD4028 VFA Инструкция по быстрому запуску
- CTV CTV-IPD4036 FLA Инструкция по быстрому запуску
- CTV CTV-IPD3028 VFE Инструкция по быстрому запуску
- CTV CTV-IPD2028 VFE Инструкция по быстрому запуску
- CTV CTV-IPD3036 FLE Инструкция по быстрому запуску
- CTV CTV-IPD2036 FLE Инструкция по быстрому запуску
- CTV CTV-IPB4028 VFA Инструкция по быстрому запуску
- CTV CTV-IPB3028 VFE Инструкция по быстрому запуску
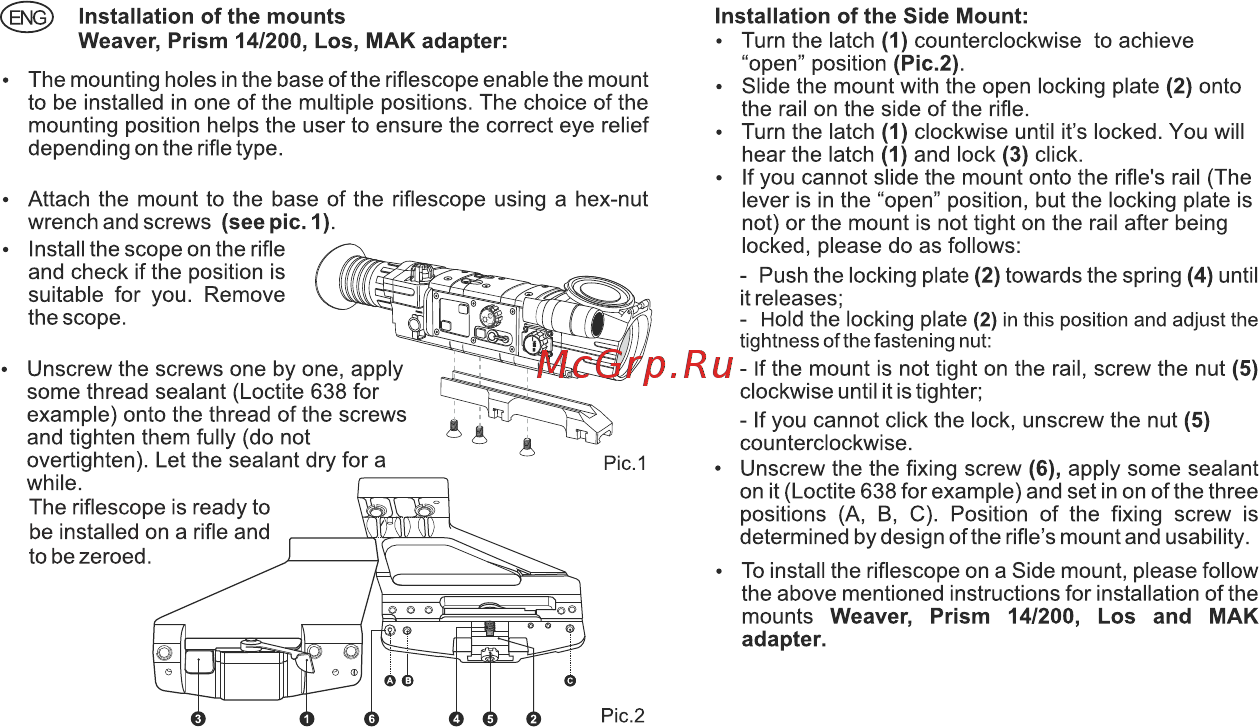
ENG Installation of the mounts Weaver Prism 14 200 Los MAK adapter The mounting holes in the base of the riflescope enable the mount to be installed in one of the multiple positions The choice of the mounting position helps the user to ensure the correct eye relief depending on the rifle type Attach the mount to the base of the riflescope using a hex nut wrench and screws see pic 1 Install the scope on the rifle and check if the position is suitable for you Remove the scope Unscrew the screws one by one apply some thread sealant Loctite 638 for example onto the thread of the screws and tighten them fully do not overtighten Let the sealant dry for a while The riflescope is ready to be installed on a rifle and to be zeroed Installation of the Side Mount Turn the latch 1 counterclockwise to achieve open position Pic 2 Slide the mount with the open locking plate 2 onto the rail on the side of the rifle Turn the latch 1 clockwise until it s locked You will hear the latch 1 and lock 3 click If you cannot slide the mount onto the rifle s rail The lever is in the open position but the locking plate is not or the mount is not tight on the rail after being locked please do as follows Push the locking plate 2 towards the spring 4 until it releases Hold the locking plate 2 in this position and adjust the tightness ofthefastening nut If the mount is not tight on the rail screw the nut 5 clockwise until it is tighter If you cannot click the lock unscrew the nut 5 counterclockwise Unscrew the the fixing screw 6 apply some sealant on it Loctite 638 for example and set in on of the three positions A B C Position of the fixing screw is determined by design ofthe rifle s mountand usability To install the riflescope on a Side mount please follow the above mentioned instructions for installation of the mounts Weaver Prism 14 200 Los and MAK adapter