![Pioneer MVH-150UB — проблемы с USB-накопителями и их решения для аудиоустройств [11/28]](/img/pdf.png)
Pioneer MVH-150UB — проблемы с USB-накопителями и их решения для аудиоустройств [11/28]
![Pioneer MVH-150UB [11/28] English](/views2/1027879/page11/bgb.png)
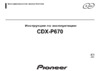
Message Cause Action
SKIPPED The connected
USB storage de-
vice contains
files embedded
with Windows
Mediaä DRM 9/
10.
Play an audio file
not embedded
with Windows
Media DRM 9/10.
PROTECT All the files in
the USB storage
device are em-
bedded with
Windows Media
DRM 9/10.
Transfer audio
files not em-
bedded with
Windows Media
DRM 9/10 to the
USB storage de-
vice and connect.
N/A USB The USB device
connected to is
not supported
by this unit.
! Connect a USB
Mass Storage
Class compliant
device.
! Disconnect
your device and
replace it with a
compatible USB
storage device.
CHECK USB The USB con-
nector or USB
cable has short-
circuited.
Check that the
USB connector or
USB cable is not
caught in some-
thing or dam-
aged.
The connected
USB storage de-
vice consumes
more than maxi-
mum allowable
current.
Disconnect the
USB storage de-
vice and do not
use it. Turn the
ignition switch to
OFF, then to ACC
or ON and then
connect only
compliant USB
storage devices.
Message Cause Action
ERROR-19 Communication
failed.
Perform one of
the following op-
erations.
–Turn the ignition
switch OFF and
back ON.
–Disconnect the
USB storage de-
vice.
–Change to a dif-
ferent source.
Then, return to
the USB source.
ERROR-23 USB storage de-
vice was not for-
matted with
FAT12, FAT16 or
FAT32.
USB storage de-
vice should be for-
matted with
FAT12, FAT16 or
FAT32.
STOP There are no
songs in the
current list.
Select a list that
contains songs.
Handling guidelines
USB storage device
Address any questions you have about your USB
storage device to the manufacturer of the device.
Connections via USB hub are not supported.
Do not connect anything other than a USB stor-
age device.
Firmly secure the USB storage device when driv-
ing. Do not let the USB storage device fall onto the
floor, where it may become jammed under the
brake or accelerator pedal.
Depending on the USB storage device, the follow-
ing problems may occur.
! Operations may vary.
! The storage device may not be recognized.
! Files may not be played back properly.
! The device may generate noise in the radio.
Compressed audio
compatibility (USB)
WMA
File extension: .wma
Bit rate: 48 kbps to 320 kbps (CBR), 48 kbps to
384 kbps (VBR)
Sampling frequency: 32 kHz, 44.1 kHz, 48 kHz
Windows Media Audio Professional, Lossless,
Voice/DRM Stream/Stream with video: Not com-
patible
MP3
File extension: .mp3
Bit rate: 8 kbps to 320 kbps (CBR), VBR
Sampling frequency: 8 kHz to 48 kHz (32 kHz,
44.1 kHz, 48 kHz for emphasis)
Compatible ID3 tag version: 1.0, 1.1, 2.2, 2.3, 2.4
(ID3 tag Version 2.x is given priority over Version
1.x.)
M3u playlist: Not compatible
MP3i (MP3 interactive), mp3 PRO: Not compatible
WAV
File extension: .wav
Quantization bits: 8 and 16 (LPCM), 4 (MS
ADPCM)
Sampling frequency: 16 kHz to 48 kHz (LPCM),
22.05 kHz and 44.1 kHz (MS ADPCM)
Supplemental information
Only the first 32 characters can be displayed as a
file name (including the file extension) or a folder
name.
Russian text to be displayed on this unit should be
encoded in one of the following character sets:
! Unicode (UTF-8, UTF-16)
! A character set other than Unicode that is
used in a Windows environment and is set to
Russian in the multi-language setting
This unit may not operate correctly depending on
the application used to encode WMA files.
There may be a slight delay at the start of playback
of audio files embedded with image data or audio
files stored on a USB storage device that has nu-
merous folder hierarchies.
USB storage device
Playable folder hierarchy: up to eight tiers (A prac-
tical hierarchy is less than two tiers.)
Playable folders: up to 500
Playable files: up to 15 000
Playback of copyright-protected files: Not compati-
ble
English
Additional information
11
Appendix
Additional information
En
Содержание
- Mvh 150ub p.1
- 1 3 7 5 p.2
- About this manual p.2
- Before you start p.2
- Display indication p.2
- About this unit p.2
- Head unit p.2
- Caution p.2
- Operating this unit p.2
- In case of trouble p.2
- English p.3
- Basic operations p.3
- Set up menu p.3
- After installation of this unit turn the ignition switch to on set up appears p.3
- Important handle gently when removing or attaching the front panel avoid subjecting the front panel to excessive shock keep the front panel out of direct sunlight and high temperatures to avoid damaging the device or vehicle inte rior remove any cables and devices attached to the front panel before detaching it p.3
- Press m c to select p.3
- Operating this unit p.3
- Notes you can set up the menu options from the system menu for details about the settings refer to system menu on page 7 you can cancel set up menu by pressing src off p.3
- When you turn the ignition switch to on after in stallation set up menu appears on the display you can set up the menu options below p.3
- Turn m c to switch to yes p.3
- To finish your settings turn m c to select yes p.3
- Perform the following procedures to set the menu to proceed to the next menu option you need to confirm your selection p.3
- Basic operations p.4
- Notes if the program service name cannot be ac quired in frequency the broadcast fre quency is displayed instead if the program service name is detected the program serv ice name will be displayed brdcst info text information will change automatically depending on the band text information can be changed text information items that can be changed depend on the area p.4
- Note when this unit s blue white lead is connected to the vehicle s auto antenna relay control termi nal the vehicle s antenna extends when this unit s source is turned on to retract the anten na turn the source off p.4
- Caution p.4
- Using pty functions p.4
- Using preset tuning buttons p.4
- Switching the display p.4
- Pty list p.4
- Operating this unit p.4
- Note this unit s af alternative frequencies search function can be turned on and off af should be off for normal tuning operation refer to af al ternative frequencies search on the next page p.4
- Frequently used menu operations p.4
- For safety reasons park your vehicle when re moving the front panel p.4
- You can tune in to a station using pty program type information p.4
- When you find a station that you want to store in memory press one of the preset tuning buttons 1 to 6 and hold until the preset number stops flashing p.4
- Storing and recalling stations for each band p.4
- Press one of the preset tuning buttons 1 to 6 to select the desired station p.4
- English p.5
- Function settings p.5
- Usb storage device p.5
- Press m c to display the main menu p.5
- Press to switch to the file track name list mode p.5
- Operating this unit p.5
- Notes track info and file info text information will change automatically depending on the version of itunes used to write mp3 files to media file types incompati ble text stored within an audio file may be displayed incorrectly text information items that can be changed depend on the media p.5
- Note disconnect usb storage devices from the unit when not in use p.5
- Basic operations p.5
- Use m c to select the desired file name or folder name p.5
- Turn m c to select the function once selected the following functions can be adjusted p.5
- Turn m c to change the menu option and press to select function p.5
- Switching the display p.5
- Selecting and playing files tracks from the name list p.5
- Function settings p.6
- Audio adjustments p.6
- Operating this unit p.6
- Operations using special buttons p.6
- System menu p.7
- Operating this unit p.7
- English p.7
- Turn m c to select the initial menu func tion once selected the following initial menu func tions can be adjusted p.7
- Press and hold src off until the unit turns off p.7
- Press and hold src off until the main menu appears in the display p.7
- Initial menu p.7
- Important pw save power saving is canceled if the ve hicle battery is disconnected and will need to be turned back on once the battery is reconnected when pw save power saving is off depend ing on connection methods the unit may con tinue to draw power from the battery if your vehicle s ignition doesn t have an acc acces sory position p.7
- You can adjust the brightness of illumination p.7
- Turn m c to select the system menu function once selected the following system menu func tions can be adjusted for details refer to system menu on this page p.7
- Turn m c to select the system menu function once selected the following system menu func tions can be adjusted p.7
- Turn m c to display illumi and press to select p.7
- Turn m c to change the menu option and press to select system p.7
- Turn m c to change the menu option and press to select initial p.7
- Switching the dimmer setting p.7
- Press m c to select the desired setting off off on on p.7
- Press m c to display the main menu p.7
- Connections p.8
- Installation p.8
- Switching the display p.8
- This unit p.8
- Operating this unit p.8
- If an unwanted display appears p.8
- Using an aux source p.8
- Power cord p.9
- Din front rear mount p.9
- Power amp sold separately p.9
- Installation p.9
- Din front mount p.9
- Additional information p.10
- When you contact your dealer or your nearest pioneer service center be sure to note the error message p.10
- Remove the trim ring p.10
- Pull the unit out of the dashboard p.10
- Installation p.10
- Insert the supplied extraction keys into both sides of the unit until they click into place p.10
- Error messages p.10
- Din rear mount p.10
- Determine the appropriate position where the holes on the bracket and the side of the unit match p.10
- You can remove the front panel to protect your unit from theft press the detach button and push the front panel upward and pull it toward you for details refer to removing the front panel to protect your unit from theft and re attaching the front panel on page 3 p.10
- Troubleshooting p.10
- Tighten two screws on each side p.10
- Removing the unit p.10
- Removing and re attaching the front panel p.10
- English p.11
- Usb storage device p.11
- Compressed audio compatibility usb p.11
- Supplemental information p.11
- Handling guidelines p.11
- Additional information p.11
- Russian character chart p.12
- Usb storage device p.12
- Copyright and trademark p.12
- Caution p.12
- Windows media is either a registered trademark or trademark of microsoft corporation in the united states and or other countries this product includes technology owned by microsoft corporation and cannot be used or distributed without a license from microsoft licensing inc p.12
- Apple and itunes are trademarks of apple inc registered in the u s and other countries p.12
- Additional information p.12
- The user cannot assign folder numbers and specify playback sequences with this unit p.12
- Supply of this product only conveys a license for private non commercial use and does not con vey a license nor imply any right to use this prod uct in any commercial i e revenue generating real time broadcasting terrestrial satellite cable and or any other media broadcasting p.12
- Streaming via internet intranets and or other networks or in other electronic content distribu tion systems such as pay audio or audio on de mand applications an independent license for such use is required for details please visit http www mp3licensing com p.12
- Specifications p.12
- Sequence of audio files p.12
- Save the folder containing files on the usb storage device however depending on the system environment you may not be able to specify the playback se quence for usb portable audio players the sequence is different and depends on the player p.12
- Playback sequence is the same as recorded se quence in the usb storage device to specify the playback sequence the following method is recommended 1 create a file name that includes numbers that specify the playback sequence e g 001xxx mp3 and 099yyy mp3 2 put those files into a folder p.12
- Pioneer cannot guarantee compatibility with all usb mass storage devices and assumes no responsibility for any loss of data on media players smart phones or other devi ces while using this product do not leave a usb storage device in any place that is subject to high temperatures p.12
- Itunes p.12
- General p.12
- D display c character p.12
- Note specifications and the design are subject to modifications without notice p.13
- English p.13
- Additional information p.13
- Mw tuner p.13
- Lw tuner p.13
- Fm tuner p.13
- В случае возникновения неполадок p.14
- Перед началом эксплуатации p.14
- Сведения об этом устройстве p.14
- Внимание p.14
- Сведения об этом руководстве p.14
- Для настройки выполните следующие процедуры для перехода к следующему пункту меню необходимо подтвердить выбор p.15
- Для подключения запоминающих ус тройств usb используйте usb кабель pioneer cd u50e приобретается отдель но поскольку любое устройство при под ключении напрямую выступает из устройства что создает потенциальную опасность не используйте изделия не разрешенные производителем к использованию p.15
- Управление данным устройством p.15
- Русский p.15
- Внимание p.15
- 1 3 7 5 p.15
- Основное устройство p.15
- Индикация на дисплее p.15
- Нажмите m c для выбора p.15
- При повороте ключа зажигания в положение on после установки устройства на дисплее появляется установочное меню оно позволяет выполнить следующие на стройки p.15
- Установочное меню p.15
- Поверните m c для выбора yes p.15
- После установки устройства поверни те ключ зажигания в положение on появится надпись set up p.15
- Основные операции p.16
- Управление данным устройством p.16
- Тюнер p.16
- Примечания настроить параметры меню можно в меню системы более подробную инфор мацию см в разделе меню системы на стр 20 вы можете отменить настройку парамет ра нажав кнопку src off p.16
- Примечание когда голубой белый провод этого устрой ства подключен к реле панели управления автомобильной антенной антенна на авто мобиле выдвигается при включении источни ка сигнала этого устройства чтобы втянуть антенну выключите источник сигнала p.16
- Чтобы закончить настройку поверни те m c и выберите yes p.16
- Примечание можно включить или выключить функцию af поиск альтернативных частот данного ус тройства для обычной настройки функция af должна быть выключена смотрите в af поиск альтернативных частот на стр 17 p.16
- Нажмите m c для выбора p.16
- Внимание p.16
- Важно соблюдайте осторожность при снятии и установке передней панели оберегайте переднюю панель от сильных ударов предохраняйте переднюю панель от воз действия прямого солнечного света и вы соких температур прежде чем снять переднюю панель обя зательно отключите от нее все кабели и устройства чтобы не повредить устрой ство и внутреннюю отделку салона p.16
- В целях безопасности остановите автомо биль прежде чем снять переднюю панель p.16
- Часто используемые элементы меню p.16
- Русский p.17
- Чтобы сохранить в памяти нужную ра диостанцию нажмите одну из кнопок предварительной настройки с 1 по 6 p.17
- Для выбора нужной радиостанции на жмите одну из кнопок предварительной настройки с 1 по 6 p.17
- Сохранение и вызов из памяти радиостанций для каждого диапазона p.17
- Настройка функций p.17
- Можно настроиться на радиостанцию с по мощью информации pty типа программы p.17
- Использование функций pty p.17
- И удерживайте ее пока номер предва рительной настройки не прекратит ми гать p.17
- Список pty p.17
- Примечания если служебное название программы в поле frequency отсутствует вместо него отображается канал если служеб ное название программы обнаружено оно будет отображаться текстовая информация brdcst info будет изменяться автоматически текстовая информация может меняться в зависимости от диапазона возможность внесения изменений в тек стовую информацию зависит от региона p.17
- Поворачивайте m c для прокрутки пунктов меню нажмите чтобы выбрать function p.17
- Переключение дисплея p.17
- Нажмите m c чтобы открыть главное меню p.17
- Использование кнопок предварительной настройки p.17
- Для выбора функции поворачивайте m c следующие выбранные функции можно на страивать p.17
- Управление данным устройством p.17
- Настройка функций p.18
- Запоминающее устройство usb p.18
- Основные операции p.18
- Выбор и воспроизведение фалов дорожек из списка p.18
- Функции с использованием специальных кнопок p.18
- Управление данным устройством p.18
- С помощью m c выберите нужное имя файла или папки p.18
- Примечания текстовая информация track info и file info будет изменяться автоматиче ски p.18
- Примечание если запоминающее устройство usb не ис пользуется отключите его p.18
- Переключение дисплея p.18
- Нажмите кнопку чтобы отобразить список названий файлов дорожек p.18
- Нажмите m c чтобы открыть главное меню p.18
- В зависимости от версии itunes исполь зуемой для записи файлов мр 3 или от типа медиафайла текстовая информация несовместимого формата записанная в аудиофайле может отображаться некор ректно возможность внесения изменений в тек стовую информацию зависит от типа но сителя p.18
- Русский p.19
- Управление данным устройством p.19
- Для выбора аудиофункции поворачи вайте m c следующие выбранные аудиофункции можно настраивать p.19
- Регулировки параметров звука p.19
- Поворачивайте m c для прокрутки пунктов меню нажмите чтобы выбрать function выбранные функции которые можно на страивать перечислены ниже p.19
- Поворачивайте m c для прокрутки пунктов меню нажмите чтобы выбрать audio p.19
- Нажмите m c чтобы открыть главное меню p.19
- Для выбора функции меню системы поворачивайте m c следующие выбранные функции стартового меню можно настраивать p.20
- Нажмите кнопку src off и удерживай те ее пока не откроется стартовое меню p.20
- Поворачивайте m c для прокрутки пунктов меню нажмите чтобы выбрать initial p.20
- Настройка регулятора освещенности p.20
- Нажмите и удерживайте кнопку src off пока устройство не выключится p.20
- Нажмите m c чтобы открыть главное меню p.20
- Нажмите m c для выбора нужной на стройки off выкл on вкл p.20
- Можно настроить яркость и подсветку p.20
- Меню системы p.20
- Для выбора функции меню системы поворачивайте m c следующие выбранные функции меню си стемы можно настраивать p.20
- Важно pw save режим энергосбережения отклю чается при отсоединении аккумуляторной батареи автомобиля при подсоединении ба тареи его потребуется включить снова при выключенном режиме pw save режим энергосбережения возможно что в зависи мости от метода подключения устройство будет потреблять энергию аккумулятора если зажигание автомобиля не имеет поло жения асс p.20
- Управление данным устройством p.20
- Стартовое меню p.20
- Поворачивайте m c для прокрутки пунктов меню нажмите чтобы выбрать system p.20
- Поверните m c чтобы отобразить illumi затем нажмите p.20
- Управление данным устройством p.21
- Нажмите кнопку src off и удерживай те ее пока не откроется стартовое меню p.21
- Нажмите и удерживайте кнопку src off пока устройство не выключится p.21
- Нажмите m c для выбора p.21
- Использование дополнительного источника сигнала aux p.21
- Отключите неверный экран как описано ниже p.21
- Нажмите кнопку src off чтобы вы брать aux в качестве источника сигнала p.21
- Нажмите m c чтобы открыть главное меню p.21
- Меню системы p.21
- Если открылся неверный экран p.21
- Для выбора функции меню системы поворачивайте m c следующие выбранные функции меню си стемы можно настраивать подробную информацию см в меню систе мы на стр 20 p.21
- Русский p.21
- Вставьте мини штекер стереокабеля в гнездо aux p.21
- Примечание невозможно выбрать aux если не включе на вспомогательная настройка подробную информацию см в разделе aux вспомога тельный вход на стр 20 p.21
- Поворачивайте m c для прокрутки пунктов меню нажмите чтобы выбрать system p.21
- Поверните m c чтобы отобразить demo off затем нажмите p.21
- Поверните m c для выбора yes p.21
- Переключение дисплея p.21
- Установка p.22
- Соединения p.22
- Шнур питания p.22
- Данное устройство p.22
- Установка p.23
- Усилитель мощности приобретается отдельно p.23
- Переднее крепление стандарта din p.23
- Переднее заднее крепление стандарта din p.23
- Заднее крепление стандарта din p.23
- Установка p.24
- Сообщения об ошибках p.24
- Устранение неисправностей p.24
- Затяните по два винта с каждой сторо ны p.24
- Снятие и установка передней панели p.24
- Снимите рамку p.24
- Прежде чем обратиться к торговому пред ставителю или в ближайший сервисный центр pioneer обязательно запомните сооб щение об ошибке p.24
- Дополнительная информация p.24
- Демонтаж устройства p.24
- Вытяните устройство из приборной панели автомобиля p.24
- Вставьте прилагаемые экстракторы с обеих сторон устройства до щелчка p.24
- В целях защиты от кражи переднюю панель можно снять нажмите на кнопку снятия панели и потяните панель вверх и на себя чтобы получить дополнительную информа цию см снятие передней панели в целях за щиты от кражи и установка передней панели на стр 16 p.24
- Русский p.25
- Дополнительная информация p.25
- Рекомендации по обращению с изделием p.25
- Поддержка сжатых аудиофайлов usb p.25
- Запоминающее устройство usb p.25
- Последовательность воспроизведения аудиофайлов p.26
- Дополнительная информация p.26
- Файлы воспроизводятся в той последова тельности в которой они записаны на запо минающем устройстве usb для выбора алгоритма воспроизведения ре комендуется выполнить следующие дей ствия 1 присвойте файлам имена с цифрами определяющими последовательность воспроизведения например 001xxx mp3 и 099yyy mp3 2 поместите эти файлы в папку 3 сохраните папку содержащую файлы на запоминающем устройстве usb учитывайте что в некоторых системных сре дах невозможно установить порядок вос произведения последовательность воспроизведения фай лов на портативном аудиоплеере usb может изменяться и зависит от типа плеера p.26
- Таблица символов для русского языка p.26
- Пользователь не может назначать номера папок и устанавливать последовательность воспроизведения с помощью данного ус тройства p.26
- Запоминающее устройство usb p.26
- Д дисплей б буква p.26
- Внимание p.26
- Pioneer не гарантирует совместимость со всеми устройствами usb mass storage и не несет ответственности за любую поте рю данных на медиапроигрывателях смартфонах и других устройствах при ис пользовании этого изделия не оставляйте запоминающее устройство usb в местах с высокой температурой воздуха p.26
- Технические характеристики p.27
- Дополнительная информация p.27
- Авторское право и товарные знаки p.27
- Itunes p.27
- Корпорация пайонир p.28
- Pioneer corporation p.28
Похожие устройства
-
 Pioneer DEH-X5500BTИнструкция по применению
 -
 Pioneer avh-x8800btЭксплуатационная инструкция
 -
 Pioneer deh-x5900btИнструкция по работе
 -
 Pioneer fh-x730btИнструкция пользователя
 -
 Pioneer FH-X720BTЭксплуатационная инструкция
 -
 Pioneer AVH-P3200BTИнструкция по работе
 -
 Pioneer MVH-S520BTfw_update_instructions
 -
 Pioneer CDX-P1270Руководство пользователя
 -
 Pioneer CDX-P2050VSРуководство пользователя
 -
 Pioneer CDX-P650Руководство пользователя
 -
 Pioneer CDX-P670Руководство пользователя
 -
 Pioneer DEH-1310Инструкция по установке
Узнайте, как решить проблемы с подключением USB-накопителей к аудиоустройствам. Получите советы по форматированию и совместимости файлов для лучшего воспроизведения.