
Sony SLV-GA55TH Инструкция по эксплуатации онлайн
Checking your model
name
The instructions in this manual are for
the 10 models: SLV-GA35ME, GA35PS,
GA35SG, GA35TH, GA55ME,
GA55MES, GA55PS, GA55SG,
GA55TH and GA65MJ. Check your
model number by looking at the rear
panel of your unit. The SLV-GA65MJ is
the model used for illustration
purposes. Any difference in operation
is clearly indicated in the text, for
example, “SLV-GA35ME only.”
3-867-577-13 (1)
Video Cassette Player
Operating Instructions
SLV-GA35ME/PS/SG/TH
SLV-GA55ME/MES/PS/SG/TH
SLV-GA65MJ
©1999 by Sony Corporation
Getting Started
Step 1
Unpacking
Check that you have received the following
items with the unit:
• Remote commander
• R6 (Size AA) batteries
• Aerial cable
• Plug adaptor (SLV-GA35ME, GA55ME,
GA55MES and GA65MJ)
Step 2
Setting up the
remote commander
Inserting the batteries
Insert two R6 (size AA) batteries by
matching the + and – on the batteries to the
diagram inside the battery compartment.
Insert the negative (–) end first, then push
in and down until the positive (+) end
clicks into position.
Using the remote commander
You can use this remote commander to
operate the unit and a Sony TV. To operate
this unit, point at the remote sensor on the
unit. To operate the TV, point at the remote
sensor on the TV. Buttons in the shaded
area of the remote commander can be used
to operate your Sony TV. If the TV does not
have the g symbol near the remote sensor,
this remote commander will not operate the
TV.
To
Turn the TV to standby
or active mode
Turn on the TV power
Increase (+) or decrease (–)
the TV volume
Change the TV
programme position
Select an input source
of the TV either from aerial
in or from line in
Notes
• With normal use, the batteries should last
about three to six months.
• If you do not use the remote commander for an
extended period of time, remove the batteries
to avoid possible damage from battery leakage.
• Do not use a new battery with an old one.
• Do not use different types of batteries.
Remote sensor
a (TV power)
?/1
(on/standby)
TV/VIDEO
PROG (CH) +/–
VOL +/–
Press
?/1 (on/standby)
a (TV power)
VOL +/–
PROG (CH) +/–
TV/VIDEO
Step 3
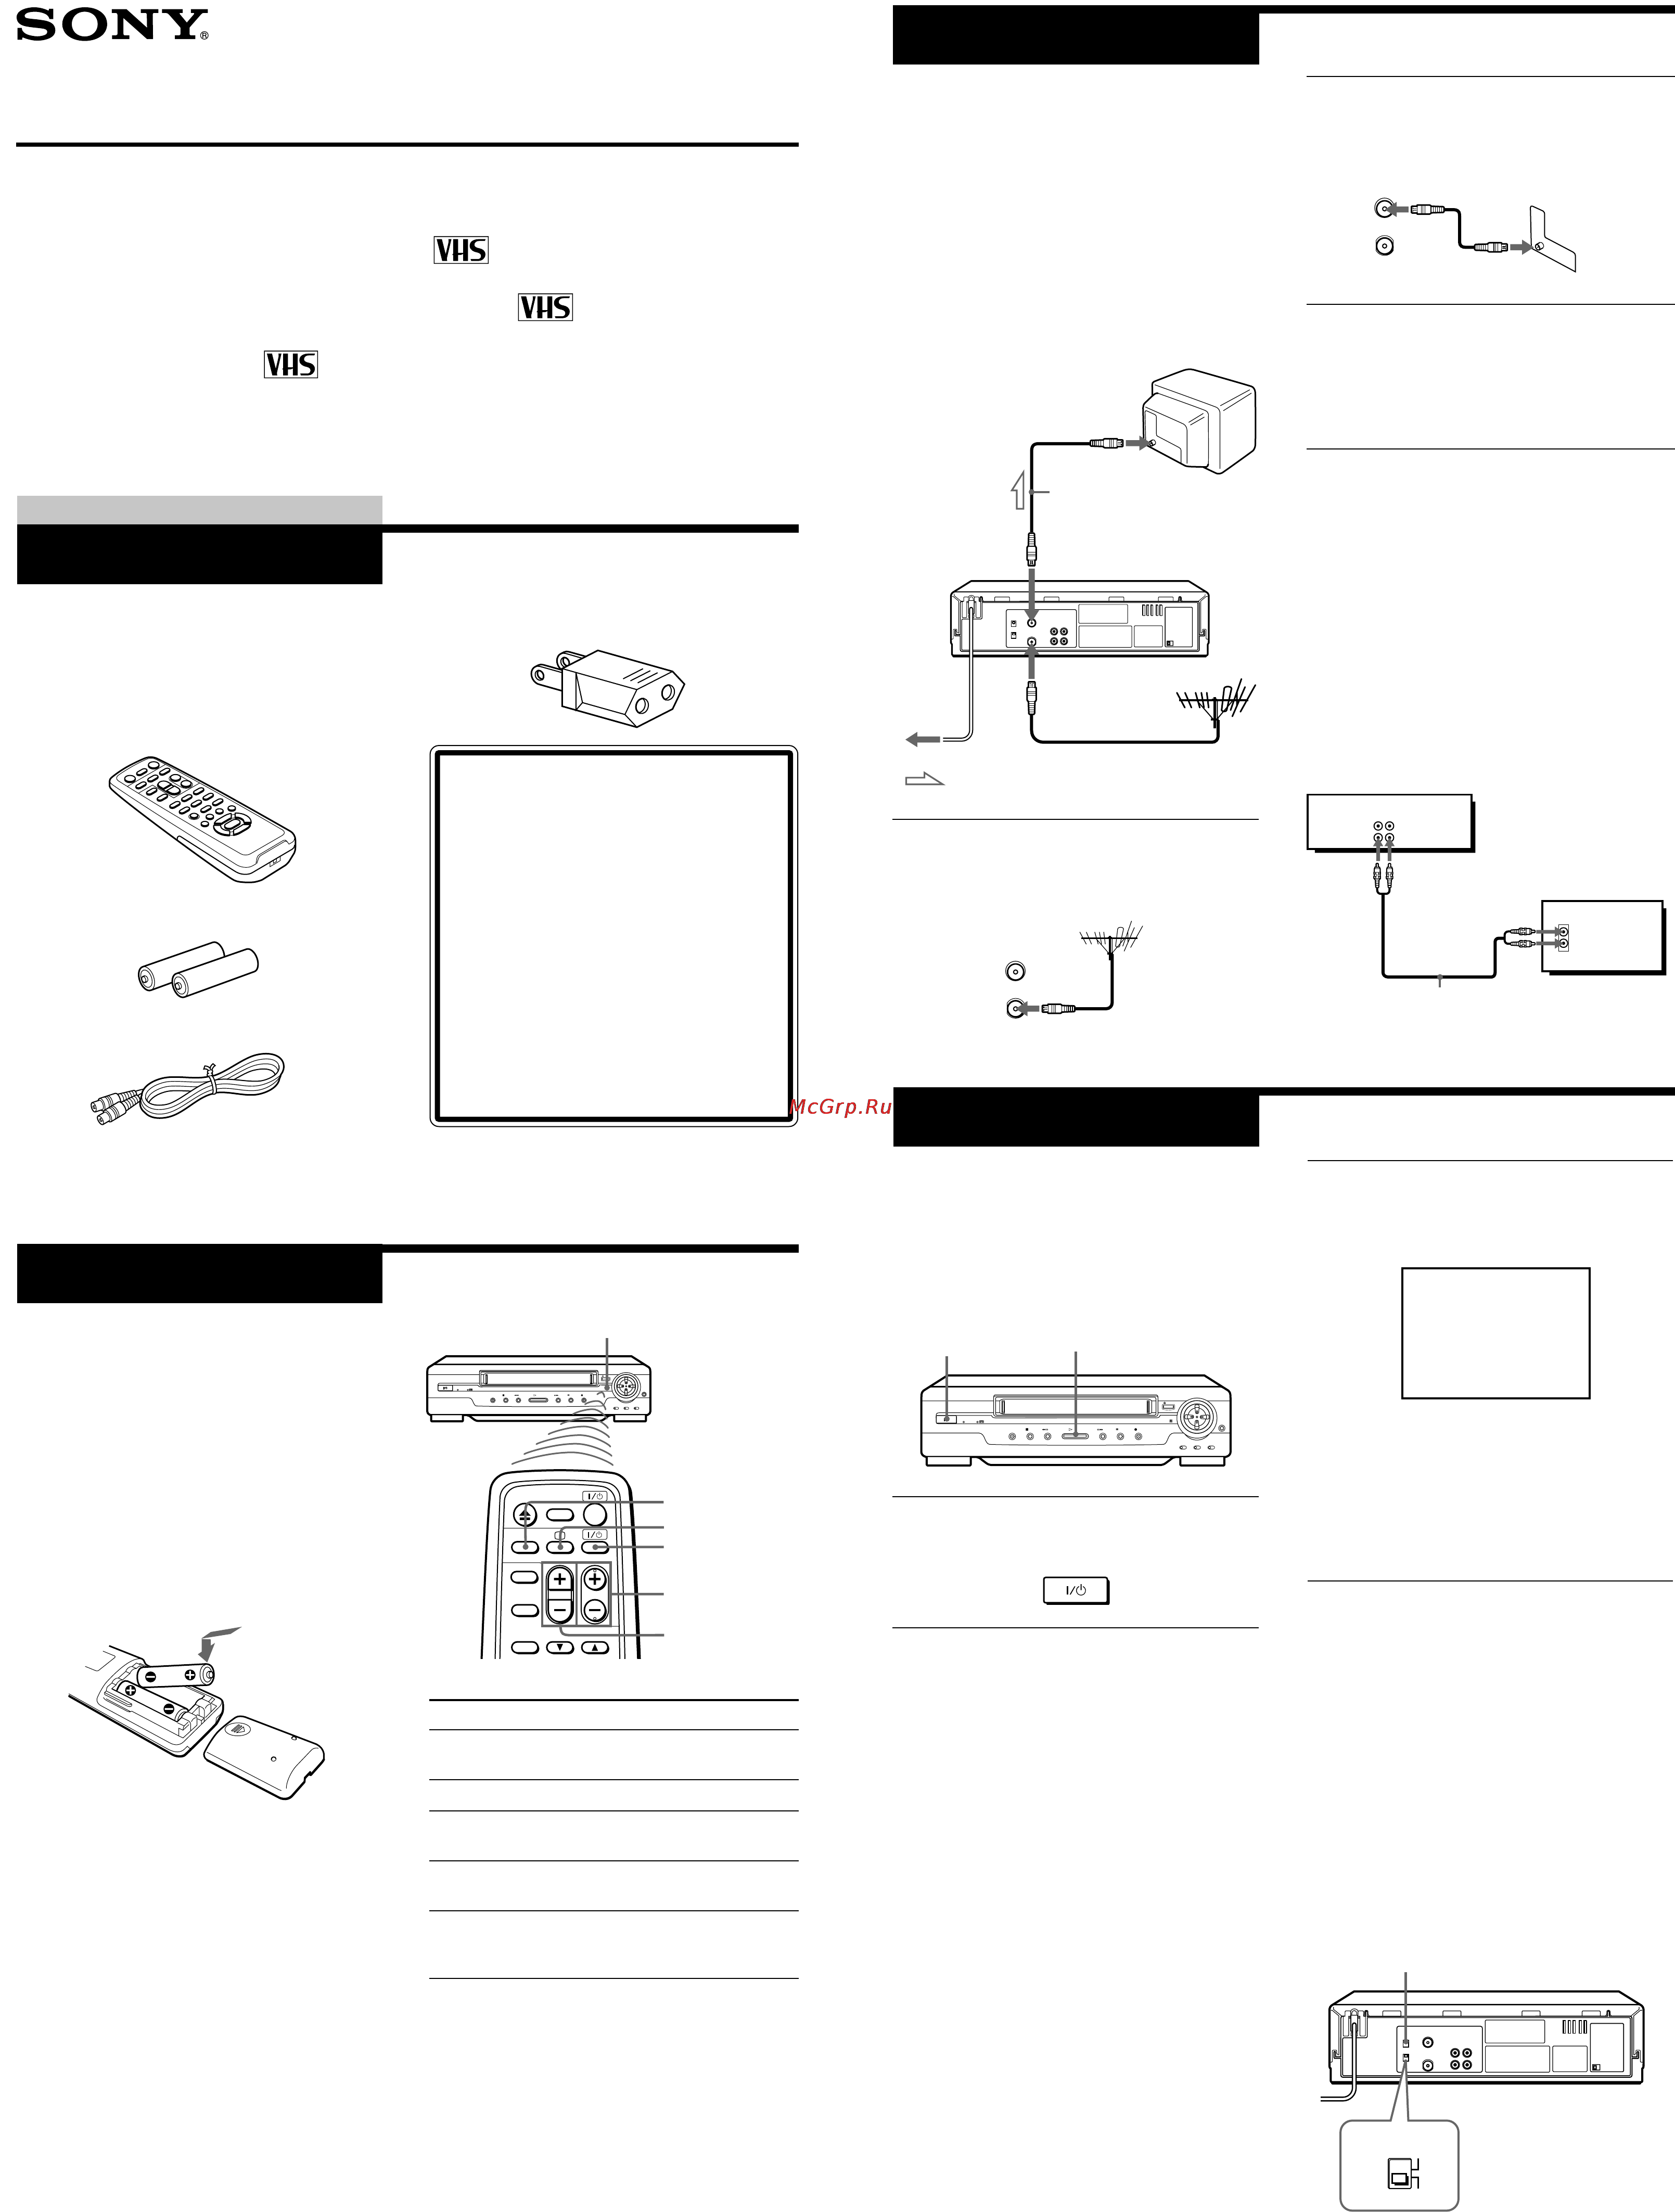
Connecting the unit
Connect the aerial to your unit and TV as
shown below to watch TV programmes and
video pictures on your TV. In addition, if
your TV has audio/video (A/V) input
jacks, we recommend you connect the unit
to your TV using an audio/video cable to
get a better picture and sound.
Connecting the aerial
to mains
1 Disconnect the aerial cable from your
TV and connect it to AERIAL IN on the
rear panel of the unit.
: Signal flow
AERIAL IN
AERIAL OUT
Aerial cable (supplied)
2 Connect AERIAL OUT of the unit and
the aerial input of your TV using the
supplied aerial cable.
3 Connect the mains lead to the mains.
Use the supplied plug adaptor, if
necessary, depending on the design of
the mains (SLV-GA35ME, GA55ME,
GA55MES and GA65MJ).
Additional connections
To a TV that has audio/video input jacks
This additional connection improves picture
and sound quality. Connect the TV as
shown below.
If you want to use the Trinitron TV Synchro
Play function, this connection is necessary.
(If your TV has two or more inputs, connect
the audio/video cable to the VIDEO IN 1
jacks.)
1 Press ?/1 ON/STANDBY to turn on
the unit.
2 Turn on your TV and select a
programme position for the video
picture.
This channel will now be referred to as
the video channel.
Some TV has the programme position,
such as 0, that is reserved for a VCR. In
this case, select that programme
position for the video picture. Refer to
the instruction manual of your TV for
details.
Step 4
Tuning your TV to
the unit
If you have connected your unit to the TV
using the audio/video cable, skip this step.
3 Tune the TV until the video picture
below is clearly displayed on the TV
screen.
Refer to your TV manual for tuning
instructions.
You have now tuned your TV to the
unit. From now on, whenever you want
to play a tape, set the TV to the video
channel.
To obtain a clear playback picture
If the video picture does not appear clearly
in step 3 above, turn the RF CHANNEL
screw on the rear panel of the unit with a
screwdriver to a position where the TV
clearly displays the playback picture.
To select the TV system
For your TV to receive the correct signal
from your unit, you must set the TV
SYSTEM switch on the rear panel of the
unit to either G (for system B/G) or K (for
system D/K). If this switch is set to the
wrong position, the sound will be distorted.
Audio/video cable (not supplied)
This unit
TV
?/1 ON/STANDBY
H PLAY
RF CHANNEL
PAL NTSC
PAL NTSC 4.43
PAL NTSC
AERIAL
IN
OUT
AERIAL
IN
OUT
AUDIO VIDEO
LINE IN
LINE OUT
IN
VIDEO
AUDIO
ON/STANDBY
TV SYSTEM
K
G
AERIAL IN
SONY
VIDEO CASSETTE PLAYER
Содержание
- Connecting the unit 1
- Getting started 1
- Setting up the remote commander 1
- Slv ga35me ps sg th 1
- Slv ga55me mes ps sg th 1
- Slv ga65mj 1
- Step 1 1
- Step 1 unpacking 1
- Step 2 1
- Step 2 setting up the remote commander 1
- Step 3 1
- Step 3 connecting the unit 1
- Step 4 1
- Step 4 tuning your tv to the unit 1
- Tuning your tv to the unit 1
- Unpacking 1
- Video cassette player 1
- About adaptive picture control apc slv ga55me mes ps sg th and slv ga65mj only 2
- About optimum picture control opc slv ga35me ps sg th only 2
- Adaptive picture control apc automatically improves recording and playback quality by adjusting the unit to the condition of the video heads and tape 2
- Additional tasks 2
- Adjusting the picture 2
- Adjusting the resolution and colour 2
- Adjusting the tracking 2
- Although the unit automatically adjusts the picture when playing a tape distortions or noise may occur if the tape was recorded in poor condition if so manually adjust the resolution colour and tracking 2
- Apc playback the apc function automatically works on all types of tapes including rental tapes and tapes that were not recorded with apc 2
- Apc recording whenever you insert a tape and first start recording the unit adjusts to the tape using the apc function this adjustment is retained until the tape is ejected 2
- How to connect to use this function connect the unit and tv with the audio video cable be sure to connect the audio video cable to the video in 1 jacks on the tv if the tv has two inputs or more the tv must be placed where it will respond to the remote commander while you are pointing it at the unit 2
- Insert a tape 2
- Operation make sure that the tv s power is in standby mode 2
- Operations 2
- Optimum picture control opc automatically improves playback quality by adjusting the unit to the condition of the video heads and tape 2
- Playing searching at various speeds 2
- Press h play if playback did not start in step 2 2
- Press m m resolution control ii up down button on the unit to get the best picture colour wait for several seconds until the resolution control ii menu disappears 2
- Press resolution control ii left right button on the unit to get a clearer picture 2
- Press trinitron tv synchro play and hold the remote commander in place for about two seconds 2
- Press v v tracking normal slow still adjust to obtain the best possible picture the distortion should disappear as you press one of the two buttons if you cannot get a clear picture with manual adjustment press tracking auto manu to return to automatic adjustment 2
- Slv ga35me ps sg th the unit turns on and starts playing automatically 2
- Slv ga55me mes ps sg th and ga65mj the unit turns on and starts playing automatically if you insert a tape with its safety tab removed 2
- The opc function automatically works on all types of tapes including rental tapes and the tapes that were not recorded with opc 2
- The unit and tv turn on and the tv is set to the video channel if there is a tape in the unit playback starts automatically 2
- To play an ntsc recorded tape set ntsc pb on the unit according to the colour system of your tv 2
- To resume the automatic adjustment press standard picture on the remote commander std pict on the unit so that the resolution control ii buttons turn off 2
- To set the colour system if streaks appear during playback set color system on the unit to conform to the system that the tape was recorded in normally set the switch to auto 2
- To turn the display off press display again 2
- To view the tape status on the screen press display the following information appears on the tv screen 2
- Turn on your tv and set it to the video channel 2
- Turning on the unit and tv to start playback trinitron tv synchro play 2
- When the tape reaches the end it will rewind automatically 2
- While playing a tape press m m resolution control ii up down left right button on the unit to display the resolution control ii menu the resolution control ii buttons light up 2
- You can only use this function if your tv is made by sony trinitron tv 2
- Editing when recording on this unit 3
- Editing with another unit 3
- How to connect to record on this unit 3
- How to connect to use this function 3
- Slv ga55me mes ps sg th and ga65mj only 3
- Synchronised recording 3
- To prepare the synchronised recording 3
- Additional information 4
- Auto head cleaner the unit incorporates an auto head cleaner which cleans the video heads when a tape is loaded or unloaded when the heads are not sufficiently clean even after a tape has been loaded unloaded several times use a video head cleaning cassette 4
- Demonstration mode 4
- General 4
- Inputs and outputs 4
- Precautions 4
- Sapphire tape cleaner 4
- Specifications 4
- Supplied accessories 4
- Symptoms caused by contaminated video heads 4
- System 4
- The demonstration mode will activate when you press std pict and the resolution control ii down button on the unit at the same time 4
- The unit incorporates a sapphire tape cleaner which cleans a video tape when it is loaded this cleaner can prevent the video heads from contamination by removing dust or mold from a tape with the sapphire edge 4
- To cancel the demonstration mode press std pict 4
- Troubleshooting 4
- Warning 4
- Warning if the unit is brought directly from a cold to a troubleshooting 4
- When demonstration mode starts during playback resolution control ii menu appears and the level of picture adjustment changes automatically 4
- When demonstration mode starts during power off and synchronised recording off the indicator lights on the unit flash 4
Похожие устройства
- Indesit IWSC 6105 Инструкция по эксплуатации
- Vitek VT-1719 Инструкция по эксплуатации
- Leica Summilux-M 24mm f/1.4 Asph Инструкция по эксплуатации
- Xoro HSD 402 Plus Инструкция по эксплуатации
- Indesit PWSE 6104 S Инструкция по эксплуатации
- Sony SLV-GA55SG Инструкция по эксплуатации
- Leica Summilux-M 35mm f/1.4 ASPH Инструкция по эксплуатации
- Nokia 6303ci Matt Black Инструкция по эксплуатации
- Celestron PowerSeeker 127 EQ Инструкция по эксплуатации
- BBK BKT-128 RU Инструкция по эксплуатации
- Leica Super-Elmar-M 18mm f/3.8 Asph Инструкция по эксплуатации
- Sony SLV-GA55PS Инструкция по эксплуатации
- Indesit PWSE 6107 S Инструкция по эксплуатации
- Celestron AstroMaster 90 AZ Инструкция по эксплуатации
- Samsung WF6600N7 Инструкция по эксплуатации
- Indesit IWSD 5125 SL Инструкция по эксплуатации
- Sony SLV-GA55MES Инструкция по эксплуатации
- Leica Summicron-M 28 mm f/2.0 ASPH. Инструкция по эксплуатации
- Nokia C3-01 Gold Инструкция по эксплуатации
- Celestron AstroMaster 90 EQ Инструкция по эксплуатации