
Joyetech Cuboid, 150w, без аккумуляторов, серый Инструкция по эксплуатации онлайн
Содержание
Похожие устройства
- Joyetech eVic VTС Mini, с клиромайзером Tron-T, без аккумулятора, золотой Инструкция по эксплуатации
- Joyetech eVic VTС Mini, с клиромайзером Tron-T, без аккумулятора, черный Инструкция по эксплуатации
- Joyetech Cubis 3.5 мл, стальной Инструкция по эксплуатации
- Joyetech Cubis 3.5 мл, черный Инструкция по эксплуатации
- Joyetech eVic VTС Mini, с клиромайзером Tron-S, без аккумулятора, черный Инструкция по эксплуатации
- Joyetech eVic VTС Mini Simple, без аккумулятора, черный Инструкция по эксплуатации
- Joyetech eGrip VT, 1500 mAh, серый Инструкция по эксплуатации
- Joyetech eGrip VT, 1500 mAh, черный Инструкция по эксплуатации
- Joyetech Cuboid, 150w, без аккумуляторов, черный Инструкция по эксплуатации
- Joyetech eVic VTС Mini, с клиромайзером Tron-S, без аккумулятора, серый Инструкция по эксплуатации
- Joyetech eVic VTС Mini, с клиромайзером Tron-S, без аккумулятора, красный Инструкция по эксплуатации
- Joyetech eVic VTС Mini, с клиромайзером Tron-S, без аккумулятора, золотой Инструкция по эксплуатации
- Joyetech eGo One СT, 2200 mAh, 2.5 мл, стальной Инструкция по эксплуатации
- Joyetech eGo One СT, 2200 mAh, 2.5 мл, перламутровый Инструкция по эксплуатации
- Joyetech eGo One СT, 2200 mAh, 2.5 мл, красный Инструкция по эксплуатации
- Joyetech eGo One СT, 2200 mAh, 2.5 мл, черный Инструкция по эксплуатации
- Joyetech eGo One VT, 2300 mAh, 4 мл, стальной Инструкция по эксплуатации
- Joyetech eGo One VT, 2300 mAh, 4 мл, черный Инструкция по эксплуатации
- Joyetech eVic VTС Mini, с клиромайзером, без аккумулятора, бирюзовый Инструкция по эксплуатации
- Joyetech eVic VTС Mini, с клиромайзером, без аккумулятора, черный Инструкция по эксплуатации
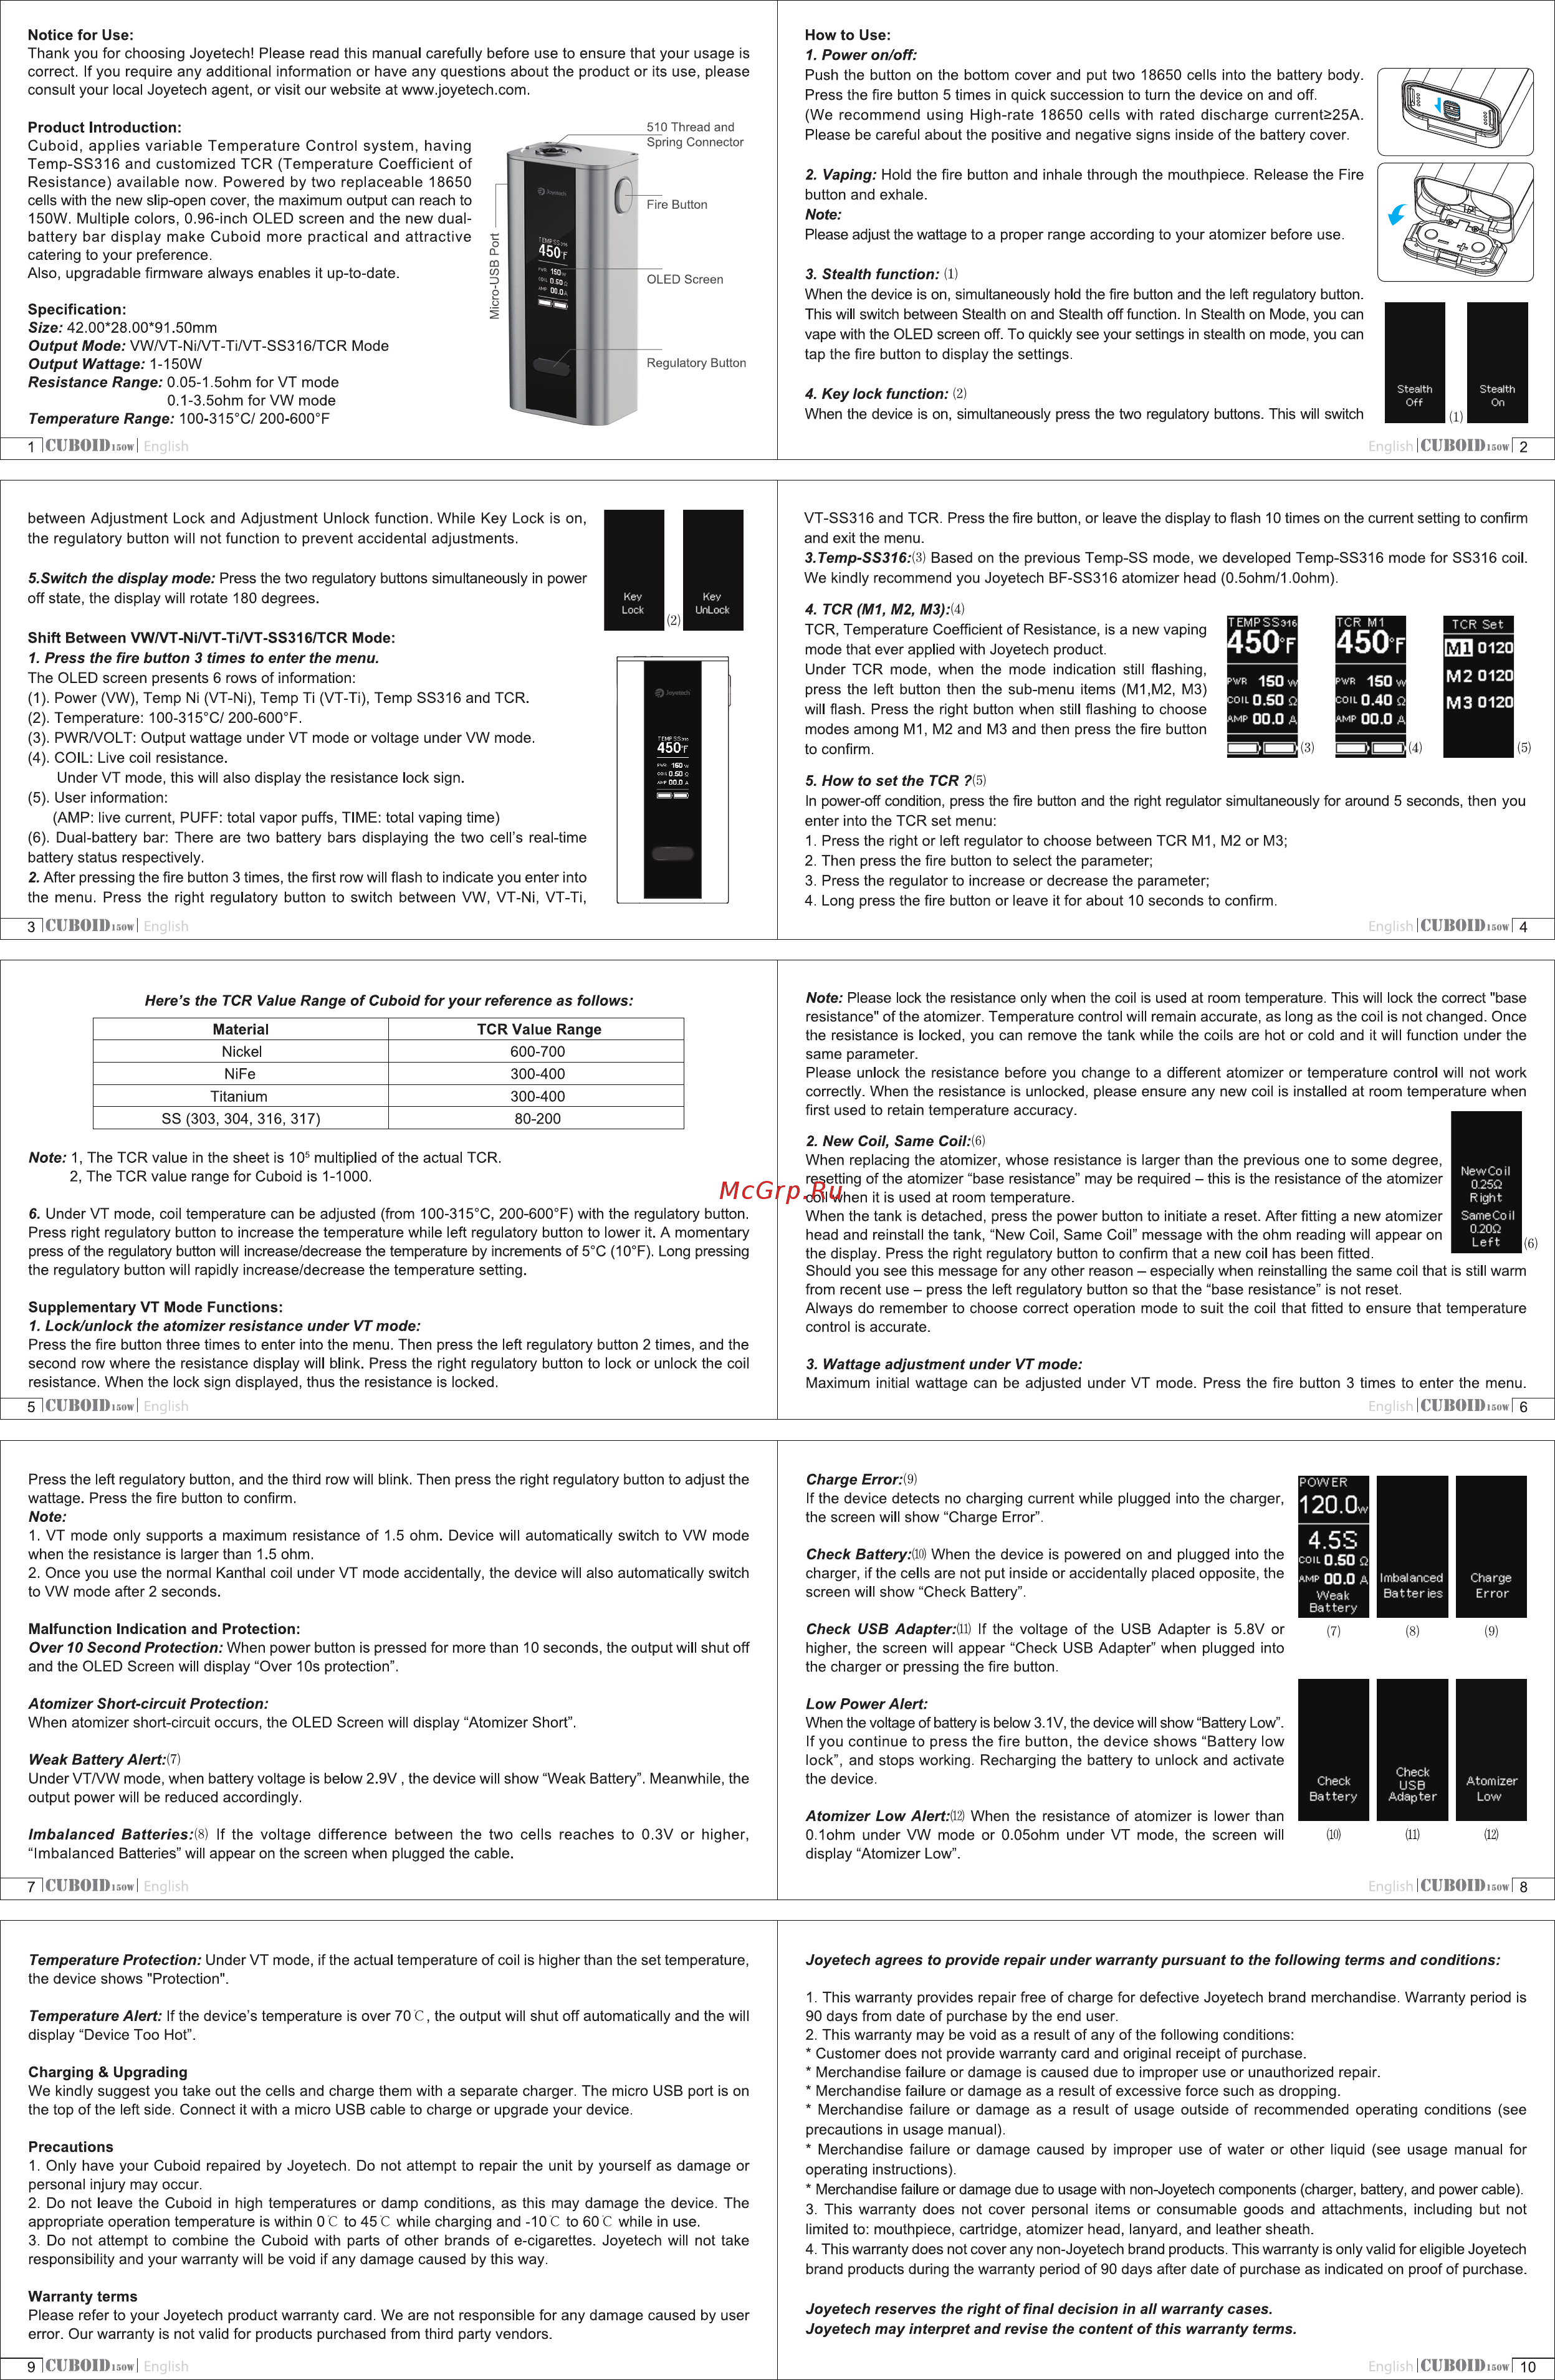
Notice for Use Thank you for choosing Joyetech Please read this manual carefully before use to ensure that your usage is correct If you require any additional information or have any questions about the product or its use please consult your local Joyetech agent or visit our website at www joyetech com How to Use 1 Power on off Push the button on the bottom cover and put two 18650 cells into the battery body Press the fire button 5 times in quick succession to turn the device on and off 510 Thread and Spring Connector Product Introduction Cuboid applies variable Temperature Control system having Temp SS316 and customized TCR Temperature Coefficient of Resistance available now Powered by two replaceable 18650 cells with the new slip open cover the maximum output can reach to 150W Multiple colors 0 96 inch OLED screen and the new dual battery bar display make Cuboid more practical and attractive catering to your preference Also upgradable firmware always enables it up to date We recommend using High rate 18650 cells with rated discharge current 25A Please be careful about the positive and negative signs inside of the battery cover 2 Vaping Hold the fire button and inhale through the mouthpiece Release the Fire Fire Button button and exhale Note Please adjust the wattage to a proper range according to your atomizer before use OLED Screen 3 Stealth function 1 When the device is on simultaneously hold the fire button and the left regulatory button Specification Size 42 00 28 00 91 50mm Output Mode VW VT Ni VT Ti VT SS316 TCR Mode Output Wattage 1 150W Resistance Range 0 05 1 5ohm for VT mode 0 1 3 5ohm for VW mode Temperature Range 100 315 C 200 600 F This will switch between Stealth on and Stealth off function In Stealth on Mode you can vape with the OLED screen off To quickly see your settings in stealth on mode you can Regulatory Button tap the fire button to display the settings 4 Key lock function 2 When the device is on simultaneously press the two regulatory buttons This will switch FlCUBOIDmwl I CUBOID sow F2 between Adjustment Lock and Adjustment Unlock function While Key Lock is on VT SS316 and TCR Press the fire button or leave the display to flash 10 times on the current setting to confirm the regulatory button will not function to prevent accidental adjustments and exit the menu 3 Temp SS316 3 S Switch the display mode Press the two regulatory buttons simultaneously in power Based on the previous Temp SS mode we developed Temp SS316 mode for SS316 coil We kindly recommend you Joyetech BF SS316 atomizer head 0 5ohm 1 0ohm Key Lock off state the display will rotate 180 degrees Key BB UnLock 2 Shift Between VW VT Ni VT Ti VT SS316 TCR Mode 4 TCR M1 M2 M3 M TCR Set TCR Temperature Coefficient of Resistance is a new vaping rm oi2o mode that ever applied with Joyetech product 1 Press the fire button 3 times to enter the menu Under The OLED screen presents 6 rows of information TCR mode when the mode indication still flashing M2 0120 press the left button then the sub menu items M1 M2 M3 1 Power VW Temp Ni VT Ni Temp Ti VT Ti Temp SS316 and TCR M3 0120 will flash Press the right button when still flashing to choose 2 Temperature 100 315 C 200 600 F modes among M1 M2 and M3 and then press the fire button 3 PWR VOLT Output wattage under VT mode or voltage under VW mode to confirm 4 COIL Live coil resistance Under VT mode this will also display the resistance lock sign 5 How to set the TCR 5 5 User information In power off condition press the fire button and the right regulator simultaneously for around 5 seconds then you AMP live current PUFF total vapor puffs TIME total vaping time enter into the TCR set menu 6 Dual battery bar There are two battery bars displaying the two cell s real time 1 Press the right or left regulator to choose between TCR M1 M2 or M3 battery status respectively 2 Then press the fire button to select the parameter 2 After pressing the fire button 3 times the first row will flash to indicate you enter into 3 Press the regulator to increase or decrease the parameter the menu Press the right regulatory button to switch between VW VT Ni VT Ti 4 Long press the fire button or leave it for about 10 seconds to confirm English I CUBOID 5w Here s the TCR Value Range of Cuboid for your reference as follows Material TCR Value Range Nickel 600 700 NiFe 300 400 Titanium 300 400 SS 303 304 316 317 80 200 Note Please lock the resistance only when the coil is used at room temperature This will lock the correct base resistance of the atomizer Temperature control will remain accurate as long as the coil is not changed Once the resistance is locked you can remove the tank while the coils are hot or cold and it will function under the same parameter Please unlock the resistance before you change to a different atomizer or temperature control will not work correctly When the resistance is unlocked please ensure any new coil is installed at room temperature when first used to retain temperature accuracy 2 New Coil Same Coihid 105 Note 1 The TCR value in the sheet is multiplied of the actual TCR 2 The TCR value range for Cuboid is 1 1000 6 Under VT mode coil temperature can be adjusted from 100 315 C 200 600 F with the regulatory button Press right regulatory button to increase the temperature while left regulatory button to lower it A momentary press of the regulatory button will increase d ecrease the temperature by increments of 5 C 10 F Long pressing the regulatory button will rapidly increase decrease the temperature setting Supplementary VT Mode Functions 1 Lock unlock the atomizer resistance under VT mode Press the fire button three times to enter into the menu Then press the left regulatory button 2 times and the second row where the resistance display will blink Press the right regulatory button to lock or unlock the coil resistance When the lock sign displayed thus the resistance is locked When replacing the atomizer whose resistance is larger than the previous one to some degree resetting of the atomizer base resistance may be required this is the resistance of the atomizer coil when it is used at room temperature When the tank is detached press the power button to initiate a reset After fitting a new atomizer New Co il H 0 25Q Right H Same Co il H 0 20Q Left RS head and reinstall the tank New Coil Same Coil message with the ohm reading will appear on the display Press the right regulatory button to confirm that a new coil has been fitted Should you see this message for any other reason especially when reinstalling the same coil that is still warm from recent use press the left regulatory button so that the base resistance is not reset Always do remember to choose correct operation mode to suit the coil that fitted to ensure that temperature control is accurate 3 Wattage adjustment under VT mode Maximum initial wattage can be adjusted under VT mode Press the fire button 3 times to enter the menu CUBOID I English Englh I CUBOID 5wF6 Press the left regulatory button and the third row will blink Then press the right regulatory button to adjust the wattage Press the fire button to confirm Note Charge Error POWER If the device detects no charging current while plugged into the charger the screen will show Charge Error 120 0 1 VT mode only supports a maximum resistance of 1 5 ohm Device will automatically switch to VW mode when the resistance is larger than 1 5 ohm 2 Once you use the normal Kanthal coil under VT mode accidentally the device will also automatically switch to VW mode after 2 seconds Check Battery W When the device is powered on and plugged into the COIL charger if the cells are not put inside or accidentally placed opposite the screen will show Check Battery AMP 0 0 A Imbalanced Charge Weak Batteries Error Battery Malfunction Indication and Protection Check USB Adapter If the voltage of the USB Adapter is 5 8V or higher the screen will appear Check USB Adapter when plugged into Over 10 Second Protection When power button is pressed for more than 10 seconds the output will shut off and the OLED Screen will display Over 10s protection the charger or pressing the fire button Atomizer Short circuit Protection When atomizer short circuit occurs the OLED Screen will display Atomizer Short When the voltage of battery is below 3 1V the device will show Battery Low Weak Battery Alert 7 Under VT VW mode when battery voltage is below 2 9V the device will show Weak Battery Meanwhile the output power will be reduced accordingly Imbalanced Batteries will appear on the screen when plugged the cable D 50 Q 7 8 9 Check Battery Check USB Adapter Atomizer Low Low Power Alert If you continue to press the fire button the device shows Battery low lock and stops working Recharging the battery to unlock and activate the device Atomizer Imbalanced Batteries 3 If the voltage difference between the two cells reaches to 0 3V or higher 4 5S Low Alert When 0 1ohm under VW mode display Atomizer Low or the resistance of atomizer 0 05ohm under VT mode is lower than the screen will I CUBOID TneUBOIDmwl Temperature Protection Under VT mode if the actual temperature of coil is higher than the set temperature the device shows Protection Temperature Alert If the device s temperature is over 70 C the output will shut off automatically and the will display Device Too Hot Charging Upgrading We kindly suggest you take out the cells and charge them with a separate charger The micro USB port is on the top of the left side Connect it with a micro USB cable to charge or upgrade your device Joyetech agrees to provide repair under warranty pursuant to the following terms and conditions 1 This warranty provides repair free of charge for defective Joyetech brand merchandise Warranty period is 90 days from date of purchase by the end user 2 This warranty may be void as a result of any of the following conditions Customer does not provide warranty card and original receipt of purchase Merchandise failure or damage is caused due to improper use or unauthorized repair Merchandise failure or damage as a result of excessive force such as dropping Merchandise failure or damage as a result of usage outside of recommended operating conditions see precautions in usage manual Precautions Merchandise failure or damage caused by improper use of water or other liquid see usage manual for 1 Only have your Cuboid repaired by Joyetech Do not attempt to repair the unit by yourself as damage or personal injury may occur 2 Do not leave the Cuboid in high temperatures or damp conditions as this may damage the device The appropriate operation temperature is within 0C to 45 C while charging and 10 C to 60 C while in use operating instructions 3 Do not attempt to combine the Cuboid with parts of other brands of e cigarettes Joyetech will not take responsibility and your warranty will be void if any damage caused by this way Merchandise failure or damage due to usage with non Joyetech components charger battery and power cable 3 This warranty does not cover personal items or consumable goods and attachments including but not limited to mouthpiece cartridge atomizer head lanyard and leather sheath 4 This warranty does not cover any non Joyetech brand products This warranty is only valid for eligible Joyetech brand products during the warranty period of 90 days after date of purchase as indicated on proof of purchase Warranty terms Please refer to your Joyetech product warranty card We are not responsible for any damage caused by user error Our warranty is not valid for products purchased from third party vendors 91 CUBOID sow English Joyetech reserves the right of final decision in all warranty cases Joyetech may interpret and revise the content of this warranty terms English I CUBOID aw Ho