![Asus X99-E-10G WS — declaração de Conformidade da UE para Dispositivos Eletrônicos [194/196]](/img/pdf.png)
Asus X99-E-10G WS — declaração de Conformidade da UE para Dispositivos Eletrônicos [194/196]
![Asus X99-E-10G WS [194/196] Appendix](/views2/1307899/page194/bgc2.png)
A-6
Appendix
Appendix
Português A ASUSTeK Computer Inc. declara que este dispositivo está em
conformidade com os requisitos essenciais e outras disposições relevantes
das Diretivas relacionadas. Texto integral da declaração da UE disponível em:
www.asus.com/support
Română ASUSTeK Computer Inc. declară că acest dispozitiv se conformează
cerinţelor esenţiale şi altor prevederi relevante ale directivelor conexe. Textul
complet al declaraţiei de conformitate a Uniunii Europene se găseşte la:
www.asus.com/support
Srpski ASUSTeK Computer Inc. ovim izjavljuje da je ovaj uređaj u saglasnosti
sa osnovnim zahtevima i drugim relevantnim odredbama povezanih
Direktiva. Pun tekst EU deklaracije o usaglašenosti je dostupan da adresi:
www.asus.com/support
Slovensky Spoločnosť ASUSTeK Computer Inc. týmto vyhlasuje, že toto
zariadenie vyhovuje základným požiadavkám a ostatým príslušným
ustanoveniam príslušných smerníc. Celý text vyhlásenia o zhode pre štáty EÚ
je dostupný na adrese: www.asus.com/support
Slovenščina ASUSTeK Computer Inc. izjavlja, da je ta naprava skladna z
bistvenimi zahtevami in drugimi ustreznimi določbami povezanih direktiv.
Celotno besedilo EU-izjave o skladnosti je na voljo na spletnem mestu:
www.asus.com/support
Español Por la presente, ASUSTeK Computer Inc. declara que este dispositivo
cumple los requisitos básicos y otras disposiciones pertinentes de las
directivas relacionadas. El texto completo de la declaración de la UE de
conformidad está disponible en: www.asus.com/support
Svenska ASUSTeK Computer Inc. förklarar härmed att denna
enhet överensstämmer med de grundläggande kraven och andra
relevanta föreskrifter i relaterade direktiv. Fulltext av EU-försäkran om
överensstämmelse nns på: www.asus.com/support
Українська ASUSTeK Computer Inc. заявляє, що цей пристрій відповідає
основним вимогам та іншим відповідним положенням відповідних
Директив. Повний текст декларації відповідності стандартам ЄС
доступний на: www.asus.com/support
Türkçe AsusTek Computer Inc., bu aygıtın temel gereksinimlerle ve ilişkili
Yönergelerin diğer ilgili koşullarıyla uyumlu olduğunu beyan eder. AB
uygunluk bildiriminin tam metni şu adreste bulunabilir:
www.asus.com/support
Bosanski ASUSTeK Computer Inc. ovim izjavljuje da je ovaj uređaj usklađen
sa bitnim zahtjevima i ostalim odgovarajućim odredbama vezanih direktiva.
Cijeli tekst EU izjave o usklađenosti dostupan je na: www.asus.com/support
English ASUSTeK Computer Inc. hereby declares that this device is in
compliance with the essential requirements and other relevant provisions of
related Directives. Full text of EU declaration of conformity is available at:
www.asus.com/support
Français AsusTek Computer Inc. déclare par la présente que cet appareil est
conforme aux critères essentiels et autres clauses pertinentes des directives
concernées. La déclaration de conformité de l’UE peut être téléchargée à
partir du site Internet suivant : www.asus.com/support
Deutsch ASUSTeK Computer Inc. erklärt hiermit, dass dieses Gerät mit
den wesentlichen Anforderungen und anderen relevanten Bestimmungen
der zugehörigen Richtlinien übereinstimmt. Der gesamte Text der EU-
Konformitätserklärung ist verfügbar unter: www.asus.com/support
Italiano ASUSTeK Computer Inc. con la presente dichiara che questo
dispositivo è conforme ai requisiti essenziali e alle altre disposizioni pertinenti
con le direttive correlate. Il testo completo della dichiarazione di conformità
UE è disponibile all’indirizzo: www.asus.com/support
Русский Компания ASUS заявляет, что это устройство соответствует
основным требованиям и другим соответствующим условиям
соответствующих директив. Подробную информацию, пожалуйста,
смотрите на www.asus.com/support
Български С настоящото ASUSTeK Computer Inc. декларира, че това
устройство е в съответствие със съществените изисквания и другите
приложими постановления на свързаните директиви. Пълният текст на
декларацията за съответствие на ЕС е достъпна на адрес:
www.asus.com/support
Hrvatski ASUSTeK Computer Inc. ovim izjavljuje da je ovaj uređaj sukladan
s bitnim zahtjevima i ostalim odgovarajućim odredbama vezanih direktiva.
Cijeli tekst EU izjave o sukladnosti dostupan je na: www.asus.com/support
Čeština Společnost ASUSTeK Computer Inc. tímto prohlašuje, že toto
zařízení splňuje základní požadavky a další příslušná ustanovení souvisejících
směrnic. Plné znění prohlášení o shodě EU je k dispozici na adrese:
www.asus.com/support
Dansk ASUSTeK Computer Inc. erklærer hermed, at denne enhed er i
overensstemmelse med hovedkravene og andre relevante bestemmelser i de
relaterede direktiver. Hele EU-overensstemmelseserklæringen kan ndes på:
www.asus.com/support
Nederlands ASUSTeK Computer Inc. verklaart hierbij dat dit apparaat
voldoet aan de essentiële vereisten en andere relevante bepalingen van
de verwante richtlijnen. De volledige tekst van de EU-verklaring van
conformiteit is beschikbaar op: www.asus.com/support
Eesti Käesolevaga kinnitab ASUSTeK Computer Inc, et see seade vastab
asjakohaste direktiivide oluliste nõuetele ja teistele asjassepuutuvatele
sätetele. EL vastavusdeklaratsiooni täielik tekst on saadaval järgmisel
aadressil: www.asus.com/support
Suomi ASUSTeK Computer Inc. ilmoittaa täten, että tämä laite on
asiaankuuluvien direktiivien olennaisten vaatimusten ja muiden tätä
koskevien säädösten mukainen. EU-yhdenmukaisuusilmoituksen koko teksti
on luettavissa osoitteessa: www.asus.com/support
Ελληνικά Με το παρόν, η AsusTek Computer Inc. δηλώνει ότι αυτή η
συσκευή συμμορφώνεται με τις θεμελιώδεις απαιτήσεις και άλλες σχετικές
διατάξεις των Οδηγιών της ΕΕ. Το πλήρες κείμενο της δήλωσης συμβατότητας
είναι διαθέσιμο στη διεύθυνση: www.asus.com/support
Magyar Az ASUSTeK Computer Inc. ezennel kijelenti, hogy ez az eszköz
megfelel a kapcsolódó Irányelvek lényeges követelményeinek és egyéb
vonatkozó rendelkezéseinek. Az EU megfelelőségi nyilatkozat teljes szövege
innen letölthető: www.asus.com/support
Latviski ASUSTeK Computer Inc. ar šo paziņo, ka šī ierīce atbilst saistīto
Direktīvu būtiskajām prasībām un citiem citiem saistošajiem nosacījumiem.
Pilns ES atbilstības paziņojuma teksts pieejams šeit: www.asus.com/support
Lietuvių „ASUSTeK Computer Inc.“ šiuo tvirtina, kad šis įrenginys atitinka
pagrindinius reikalavimus ir kitas svarbias susijusių direktyvų nuostatas. Visą
ES atitikties deklaracijos tekstą galima rasti: www.asus.com/support
Norsk ASUSTeK Computer Inc. erklærer herved at denne enheten er i
samsvar med hovedsaklige krav og andre relevante forskrifter i relaterte
direktiver. Fullstendig tekst for EU-samsvarserklæringen nnes på:
www.asus.com/support
Polski Firma ASUSTeK Computer Inc. niniejszym oświadcza, że
urządzenie to jest zgodne z zasadniczymi wymogami i innymi właściwymi
postanowieniami powiązanych dyrektyw. Pełny tekst deklaracji zgodności UE
jest dostępny pod adresem: www.asus.com/support
Содержание
- Motherboard p.1
- E13677 revised edition v3 december 2017 p.2
- Chapter 2 basic installation p.3
- Chapter 1 product introduction p.3
- Contents p.3
- Chapter 3 bios setup p.4
- Chapter 5 raid support p.5
- Chapter 4 software support p.5
- Chapter 6 multi gpu support p.6
- Appendix p.6
- Safety information p.7
- Operation safety p.7
- Electrical safety p.7
- Where to find more information p.8
- How this guide is organized p.8
- About this guide p.8
- Typography p.9
- Conventions used in this guide p.9
- X99 e 10g ws specifications summary p.10
- X99 e 10g ws specifications summary p.11
- High performance p.11
- X99 e 10g ws specifications summary p.12
- Q design p.12
- Powerful home server p.12
- Gaming scenario p.12
- Asus ez diy p.12
- X99 e 10g ws specifications summary p.13
- Special features p.13
- X99 e 10g ws specifications summary p.14
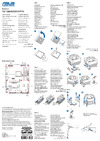
- The illustrated items above are for reference only actual product specifications may vary with different models p.15
- Package contents p.15
- If any of the above items is damaged or missing contact your retailer p.15
- Check your motherboard package for the following items p.15
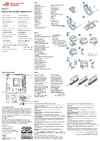
- The tools and components in the table above are not included in the motherboard package p.16
- Installation tools and components p.16
- Chapter 1 p.17
- Special features p.17
- Product introduction p.17
- Product highlights p.17
- Chapter 1 product introduction p.17
- Other special features p.18
- Dts ultrapc ii p.18
- Dts connect p.18
- Complete usb 3 integration p.18
- Chapter 1 p.18
- Take note of the following precautions before you install motherboard components or change any motherboard settings p.19
- Motherboard overview p.19
- Chapter 1 p.19
- Before you proceed p.19
- Asus x99 e 10g ws p.19
- Chapter 1 product introduction p.20
- Chapter 1 p.20
- Motherboard layout p.20
- Layout contents p.21
- Chapter 1 p.21
- The motherboard comes with a surface mount lga2011 v3 socket designed for inte p.22
- Core i7 x series i7 processors p.22
- Chapter 1 product introduction p.22
- Chapter 1 p.22
- Central processing unit cpu p.22
- System memory p.23
- Recommended memory configurations p.23
- Chapter 1 p.23
- You may install 2 gb 4 gb 8 gb and 16gb unbuffered and non ecc ddr4 dimms into the dimm sockets p.24
- Memory configurations p.24
- Chapter 1 product introduction p.24
- Chapter 1 p.24
- Chapter 1 p.25
- Expansion slots p.25
- Chapter 1 p.26
- Irq assignments for this motherboard p.27
- Chapter 1 p.27
- Onboard buttons and switches p.28
- Chapter 1 p.28
- Memok button memok p.29
- Installing dimms that are not compatible with the motherboard may cause system boot failure if the system fails to boot during post stage and the dram_led near the memok button lights continuously press the memok button until the dram_led starts blinking system will begin automatic memory compatibility tuning and reboot for successful boot p.29
- Chapter 1 p.29
- Asus x99 e 10g ws p.29
- Chapter 1 p.30
- This switch allows you to determine the slots for 2 way or 3 way graphics card installation when enabled the pcie leds near the slots light up telling you to install the graphics cards to the specific slots p.31
- Sli cfx switch sli cfx p.31
- Chapter 1 p.31
- Asus x99 e 10g ws p.31
- Chapter 1 p.32
- Jumpers p.32
- Onboard leds p.33
- Chapter 1 p.33
- Chapter 1 p.34
- Chapter 1 p.35
- Chapter 1 p.36
- Chapter 1 p.37
- Chapter 1 p.38
- Chapter 1 p.39
- X99 chipset p.40
- These connectors connect to serial ata 6 gb s hard disk drives via serial ata 6 gb s signal cables p.40
- Rapid storage technology through the onboard inte p.40
- Internal connectors p.40
- If you installed serial ata hard disk drives you can create a raid 0 1 5 and 10 configuration with the inte p.40
- Chapter 1 product introduction p.40
- Chapter 1 p.40
- X99 serial ata 6 gb s connectors 7 pin sata6g_12 sata6g_34 sata6g_56 sata6g_78 sata6g_910 p.40
- This connector is for an additional sony philips digital interface s pdif port connect the s pdif out module cable to this connector then install the module to a slot opening at the back of the system chassis p.41
- This connector is for a chassis mounted front panel audio i o module that supports either hd audio or legacy ac 97 audio standard connect one end of the front panel audio i o module cable to this connector p.41
- Front panel audio connector 10 1 pin aafp p.41
- Digital audio connector 4 1 pin spdif_out p.41
- Chapter 1 p.41
- Asus x99 e 10g ws p.41
- Usb 3 connectors 20 1 pin usb3_e78 usb3_e910 p.42
- These connectors allow you to connect a usb 3 module for additional usb 3 front or rear panel ports with an installed usb 3 module you can enjoy all the benefits of usb 3 including faster data transfer speeds of up to 5 gb s faster charging time for usb chargeable devices optimized power efficiency and backward compatibility with usb 2 p.42
- Chapter 1 product introduction p.42
- Chapter 1 p.42
- Chapter 1 p.43
- Cpu cpu optional water pump chassis and high amp fan connectors 4 pin cpu_fan 4 pin cpu_opt 4 pin w_pump 4 pin cha_fan1 2 4 pin h_amp_ fan p.44
- Connect the fan cables to the fan connectors on the motherboard ensuring that the black wire of each cable matches the ground pin of the connector p.44
- Chapter 1 product introduction p.44
- Chapter 1 p.44
- These connectors are for atx power supply plugs the power supply plugs are designed to fit these connectors in only one orientation find the proper orientation and push down firmly until the connectors completely fit p.45
- Chapter 1 p.45
- Atx power connectors 24 pin eatxpwr 8 pin eatx12v 8 pin eatx12v1 6 pin eatx12v_1 p.45
- Asus x99 e 10g ws p.45
- Chapter 1 p.46
- Chapter 1 p.47
- U connector u p.48
- This socket allows you to install an m ngff ssd module p.48
- This motherboard comes with a u connector which supports pcie 3 x4 nvm express storage p.48
- M socket 3 p.48
- Chapter 1 product introduction p.48
- Chapter 1 p.48
- Chapter 1 p.49
- Rgb header 4 pin rgb_header p.50
- Chapter 1 product introduction p.50
- Chapter 1 p.50
- This connector is for rgb led strips p.50
- Chapter 1 p.51
- Chapter 1 product introduction p.52
- Chapter 1 p.52
- Motherboard installation p.53
- Chapter 2 basic installation p.53
- Chapter 2 p.53
- Building your pc system p.53
- Basic installation p.53
- Chapter 2 p.54
- Cpu installation p.55
- Chapter 2 p.55
- Asus x99 e 10g ws p.55
- Chapter 2 basic installation p.56
- Chapter 2 p.56
- Asus x99 e 10g ws p.57
- To install the cpu heatsink and fan assembly p.57
- Cpu heatsink and fan assembly installation p.57
- Chapter 2 p.57
- Dimm installation p.58
- Chapter 2 p.58
- Chapter 2 p.59
- Atx power connection p.59
- Sata device connection p.60
- Chapter 2 p.60
- Reset sw p.61
- Hdd led p.61
- Front i o connector p.61
- Chapter 2 p.61
- Expansion card installation p.62
- Chapter 2 p.62
- Bios update utility p.63
- Usb bios flashback p.63
- Chapter 2 p.63
- Wait until the light goes out indicating that the bios updating process is completed p.64
- Chapter 2 basic installation p.64
- Chapter 2 p.64
- Rear i o connection p.65
- Motherboard rear and audio connections p.65
- Chapter 2 p.65
- Chapter 2 p.66
- Audio 2 4 6 or 8 channel configuration p.66
- 10g lan ports led indications p.66
- Chapter 2 p.67
- Audio i o connections p.67
- Chapter 2 p.68
- Connect to 7 channel speakers p.69
- Chapter 2 p.69
- Starting up for the first time p.69
- Turning off the computer p.70
- Chapter 2 p.70
- Knowing bios p.71
- Chapter 3 bios setup p.71
- Chapter 3 p.71
- Bios setup p.71
- Press the power button to turn the system off then back on do this option only if you failed to enter bios setup using the first two options p.72
- Post continues with its routines p.72
- Key to enter bios p.72
- Entering bios setup after post p.72
- Entering bios at startup p.72
- Chapter 3 bios setup p.72
- Chapter 3 p.72
- Bios setup program p.72
- Bios menu screen p.72
- Use the bios setup to update the bios or configure its parameters the bios screen include navigation keys and brief onscreen help to guide you in using the bios setup program p.72
- To enter bios setup after post p.72
- The bios setup program can be used under two modes ez mode and advanced mode you can change modes from the exit menu or from the e xit advanced mode screen p.72
- Simultaneously p.72
- Press the reset button on the system chassis p.72
- The default screen for entering the bios setup program can be changed refer to the setup mode item in section boot menu for details p.73
- The boot device options vary depending on the devices you installed to the system p.73
- Hot key for the advanced bios settings p.73
- Ez mode p.73
- Chapter 3 p.73
- Asus x99 e 10g ws p.73
- To switch from ez mode to advanced mode click advanced mode or press f7 hotkey p.74
- The advanced mode provides advanced options for experienced end users to configure the bios settings the figure below shows an example of the advanced mode refer to the following sections for the detailed configurations p.74
- Chapter 3 bios setup p.74
- Chapter 3 p.74
- Advanced mode p.74
- Submenu items p.75
- Q fan control f6 p.75
- Myfavorites f3 p.75
- Menu items p.75
- Menu bar p.75
- Language p.75
- Ez tuning wizard f11 p.75
- Chapter 3 p.75
- Search on faq p.76
- Scroll bar p.76
- Quick note f9 p.76
- Last modified button p.76
- Hot keys p.76
- General help p.76
- Configuration fields p.76
- Chapter 3 p.76
- The qfan control allows you to set a fan profile or manually configure the operating speed of your cpu and chassis fans p.77
- Qfan control p.77
- Chapter 3 p.77
- Asus x99 e 10g ws p.77
- Configuring fans manually p.78
- Chapter 3 p.78
- Oc tuning p.79
- Ez tuning wizard p.79
- Chapter 3 p.79
- Creating raid p.80
- Chapter 3 p.80
- Chapter 3 p.81
- My favorites p.82
- Chapter 3 p.82
- Chapter 3 p.83
- Adding items to my favorites p.83
- The security menu items allow you to change the system security settings p.84
- The main menu screen appears when you enter the advanced mode of the bios setup program the main menu provides you an overview of the basic system information and allows you to set the system date time language and security settings p.84
- Security p.84
- Main menu p.84
- Chapter 3 bios setup p.84
- Chapter 3 p.84
- User password p.85
- Chapter 3 p.85
- Administrator password p.85
- Chapter 3 p.86
- Ai tweaker menu p.86
- Ai overclock tuner auto p.86
- Chapter 3 p.87
- Asus multicore enhancement auto p.87
- Cpu core ratio by specific core p.88
- Chapter 3 p.88
- Min cpu cache ratio auto p.89
- Max cpu cache ratio auto p.89
- Chapter 3 p.89
- Avx instruction core ratio negative offset auto p.89
- Tpu keep current settings p.90
- Internal pll overvoltage auto p.90
- Epu power saving mode disabled p.90
- Dram timing control p.90
- Dram frequency auto p.90
- Chapter 3 p.90
- Bclk frequency dram frequency ratio auto p.90
- Chapter 3 p.91
- Chapter 3 p.92
- Chapter 3 p.93
- Chapter 3 p.94
- Chapter 3 p.95
- External digi power control p.96
- Chapter 3 p.96
- Chapter 3 p.97
- Internal cpu power management p.98
- Chapter 3 p.98
- Chapter 3 p.99
- Tweaker s paradise p.100
- Fully manual mode disabled p.100
- Chapter 3 p.100
- Cpu core voltage auto p.101
- Chapter 3 p.101
- Cpu svid support auto p.102
- Cpu input voltage auto p.102
- Cpu cache voltage auto p.102
- Chapter 3 p.102
- Chapter 3 p.103
- Vttddr voltage chc chd auto p.103
- Vttddr voltage cha chb auto p.103
- Vccio pch 1 5v voltage auto p.103
- Vccio cpu 1 5v voltage auto p.103
- Pll termination voltage auto p.103
- Pch i o voltage auto p.103
- Pch core voltage auto p.103
- Dram voltage chc chd auto p.103
- Dram voltage cha chb auto p.103
- Dram svid support auto p.103
- Pll reference offset value auto p.104
- Pll reference offset mode sign p.104
- Cpu spread spectrum auto p.104
- Chapter 3 p.104
- Chapter 3 p.105
- Advanced menu p.105
- Limit cpuid maximum disabled p.106
- Intel adaptive thermal monitor enabled p.106
- Hyper threading all enabled p.106
- Execute disable bit enabled p.106
- Cpu configuration p.106
- Chapter 3 p.106
- Maximum cpu core temperature auto p.107
- Intel virtualization technology disabled p.107
- Hardware prefetcher enabled p.107
- Cpu power management configuration p.107
- Chapter 3 p.107
- Boot performance mode max performance p.107
- Adjacent cache line prefetcher enabled p.107
- Active processor cores p.107
- Pch configuration p.108
- Chapter 3 p.108
- Sata controller 1 mode selection ahci p.109
- Sata controller 1 p.109
- S m a r t status check on p.109
- Pch storage configuration p.109
- Hyper kit mode disabled p.109
- Chapter 3 p.109
- Support aggressive link power management disabled p.110
- Sata6g_1 gray sata6g_6 gray p.110
- Sata controller 2 mode selection ahci p.110
- Sata controller 2 p.110
- Chapter 3 p.110
- System agent configuration p.111
- Sata6g_7 black sata6g_10 black p.111
- Nb pci e configuration p.111
- Dmi configuration p.111
- Chapter 3 p.111
- Chapter 3 p.112
- Mctp disabled p.113
- Intel vt for directed i o vt d p.113
- Chapter 3 p.113
- Acs control disabled p.113
- Xhci hand off enabled p.114
- Usb configuration p.114
- Intel xhci mode smart auto p.114
- Ehci legacy support enabled p.114
- Chapter 3 p.114
- Peg aspm support disabled p.115
- Pch pci express p.115
- Pch dmi aspm disabled p.115
- Ehci hand off disabled p.115
- Chapter 3 p.115
- Aspm support disabled p.115
- Usb single port control p.115
- Sa pci express p.115
- Sa dmi aspm disabled p.115
- Platform misc configuration p.115
- Onboard devices configuration p.116
- Hd audio controller enabled p.116
- Chapter 3 p.116
- Asmedia usb 3 controller enabled p.116
- Asmedia usb 3 battery charging support disabled p.116
- Serial port configuration p.117
- Rgb led lighting on p.117
- Rgb led lighting effects auto p.117
- Rgb led lighting color p.117
- Intel lan2 controller enabled p.117
- Intel lan1 controller enabled p.117
- Chapter 3 p.117
- Ssd m u p.117
- Restore ac power loss power off p.118
- Power on by rtc disabled p.118
- Power on by ring disabled p.118
- Power on by pci e pci disabled p.118
- Erp ready disabled p.118
- Chapter 3 p.118
- Apm configuration p.118
- Network stack disabled p.119
- Network stack configuration p.119
- Hdd sdd smart information p.119
- Chapter 3 p.119
- Nic configuration p.120
- Intel r ethernet controller 00 1e 99 00 01 1b p.120
- Chapter 3 p.120
- Blink leds 0 p.120
- Nic configuration p.121
- Intel r ethernet controller 00 1e 99 00 01 1c p.121
- Chapter 3 p.121
- Blink leds 0 p.121
- Optimize all p.122
- Monitor menu p.122
- Cpu temperature motherboard temperature pciex16_1 slot temperature pciex16_3 slot temperature vrm temperature pch temperature t_ sensor1 temperature xxx c xxx f p.122
- Cpu fan speed cpu optional fan speed chassis fan 1 2 speed water pump speed hamp fan speed xxxx rpm p.122
- Cpu core voltage 3 v voltage 5v voltage 12v voltage x xxxx v p.122
- Chapter 3 p.122
- Cpu q fan control auto p.123
- Chapter 3 p.123
- Chassis fan 1 2 q fan control auto p.124
- Chapter 3 p.124
- Water pump control disabled p.125
- Chapter 3 p.125
- Hamp fan control auto p.126
- Chapter 3 p.126
- Chapter 3 p.127
- Cpu ovt led support on p.128
- Chassis intrude detect support on p.128
- Chapter 3 p.128
- Anti surge support on p.128
- Fast boot enabled p.129
- Chapter 3 p.129
- Boot menu p.129
- Boot configuration p.129
- Option rom messages force bios p.130
- Directkey drct enabled p.130
- Chapter 3 p.130
- Boot up numlock state enabled p.130
- Boot logo display auto p.130
- Wait for f1 if error enabled p.130
- Setup mode ez mode p.131
- Secure boot p.131
- Csm compatibility support module p.131
- Chapter 3 p.131
- Above 4g decoding disabled p.131
- Chapter 3 p.132
- Chapter 3 p.133
- Boot override p.133
- Boot option priorities p.133
- Tool menu p.134
- Setup animator disabled p.134
- Secure erase p.134
- Gpu post p.134
- Chapter 3 p.134
- Asus ez flash 3 utility p.134
- Chapter 3 p.135
- Asus x99 e 10g ws p.135
- Save to profile p.136
- Profile name p.136
- Load save profile from to usb drive p.136
- Load from profile p.136
- Chapter 3 p.136
- Asus overclocking profile p.136
- Chapter 3 p.137
- Asus spd information p.137
- Save changes reset p.138
- Load optimized defaults p.138
- Launch efi shell from usb drives p.138
- Exit menu p.138
- Discard changes exit p.138
- Chapter 3 p.138
- Updating bios p.139
- Ez update p.139
- Chapter 3 p.139
- Chapter 3 p.140
- Asus ez flash 3 p.140
- To update the bios by internet p.141
- Select via internet p.141
- Reboot the system when the update process is done p.141
- Follow the onscreen instructions to complete the update p.141
- Chapter 3 p.141
- Asus x99 e 10g ws p.141
- Recovering the bios p.142
- Chapter 3 p.142
- Asus crashfree bios 3 p.142
- Chapter 4 software support p.143
- Chapter 4 p.143
- Support dvd information p.143
- Software support p.143
- Running the support dvd p.143
- Installing an operating system p.143
- Toreadaboutyourmotherboard ssoftwaremanual p.144
- Thesoftwaremanualsareincludedinthesupportdvd followtheinstructionsbelowtoget thenecessarysoftwaremanuals p.144
- Thesoftwaremanualfilesareinportabledocumentformat pdf installtheadob p.144
- Support dvd main menu p.144
- Runthesupportdvd p.144
- Readerfromthe utilities tabbeforeopeningthefiles p.144
- Obtaining the software manuals p.144
- Inthesupportdvdmainmenu clickthe manual tab p.144
- Clickthesoftwaremanualthatyouwishtoread p.144
- Chapter 4 software support p.144
- Chapter 4 p.144
- Acroba p.144
- Software information p.145
- Installing ai suite 3 p.145
- Chapter 4 p.145
- Ai suite 3 p.145
- Launching ai suite 3 p.146
- Chapter 4 p.146
- Theaisuitemainmenuincludesisaquick accessmenubarthatallowsyoutoswiftlylaunch anyoftheintegratedasusutilities click p.147
- Theaisuite3mainmenugivesyoueasy accesscontrolsandinsighttowhat sgoingon withyourcomputer allowingyoutooptimizeperformancesettingswhileatthesametime ensuringsystemstability p.147
- Ontheleftofthemenutolaunchthemenubar p.147
- Chapter 4 p.147
- Asus x99 e 10g ws p.147
- Ai suite 3 main menu bar p.147
- Ai suite 3 main menu p.147
- Chapter 4 p.148
- Ai suite 3 mini menu p.148
- Chapter 4 p.149
- Way optimization p.149
- Dual intelligent processors 5 p.149
- Using tpu p.150
- Tpuallowsyoutomanuallyadjustthecpufrequency coreratio dramfrequency and relatedvoltagesforenhancedsystemstabilityandperformanceboost p.150
- Tpu turbo processing unit p.150
- Tolaunchtpu clickortap p.150
- Onthetop rightcorneroftheaisuite3mainmenu then select tpu p.150
- Launching tpu on your computer p.150
- Cpu frequency p.150
- Chapter 4 software support p.150
- Chapter 4 p.150
- Turbo app p.151
- Launching turbo app on your computer p.151
- Chapter 4 p.151
- Chapter 4 software support p.152
- Chapter 4 p.152
- Using epu p.152
- Tolaunchepu clickortap p.152
- Onthetop rightcorneroftheaisuite3mainmenu then select epu p.152
- Launching epu on your computer p.152
- Epuisareal timesystempower savingchipthatautomaticallydetectsthecurrent systemloadandintelligentlymoderatespowerusage itoffersatotalsystem wideenergy optimization reducesfannoise andextendsthelifespanofyourhardwarecomponents p.152
- Epu energy processing unit p.152
- Tolaunchfanxpert4 clickortap p.153
- Smartmodeallowsyoutocustomizethefans rotationspeedsandresponsivenessbasedon yoursystem stemperature p.153
- Smart mode p.153
- Onthetop rightcorneroftheaisuite3mainmenu thenselect fan xpert 4 p.153
- Launching fan xpert 4 on your computer p.153
- Fan xpert 4 p.153
- Customizing the fan settings p.153
- Chapter 4 p.153
- Asusfanxpert4providescustomizablesettingsofyourfansforacoolerandquieter computingenvironment withitsfanautotuningfeature asusfanxpert4automatically tweaksthesettingsofcpuandchassisfanstoachievetheirbestcoolingperformance asusfanxpert4alsosupportshardwarelevelpwm dccombomodeforthecpu chassis fans andfansconnectedtothefanextensioncard youcanalsoreducethecpufanspeed belowthedefaultminimumforanoiselessoperationduringlightloads p.153
- Asus x99 e 10g ws p.153
- Tolaunchpccleaner clickortap p.154
- Rpmmodeallowsyoutosetthefanspeedwhenthecputemperatureisbelow7 p.154
- Rpm mode p.154
- Pccleanerallowsyoutocleanthesystemjunkfilesbyscanninganddeletingselectedfiles p.154
- Pc cleaner p.154
- Onthetop rightcorneroftheaisuite3mainmenu thenselect pc cleaner p.154
- Launching pc cleaner on your computer p.154
- Chapter 4 software support p.154
- Chapter 4 p.154
- Launching digi power control on your computer p.155
- Digi power control p.155
- Chapter 4 p.155
- Chapter 4 p.156
- Aicharger allowsyoutofast chargeyourportablebc1 mobiledevicesonyour computer susbportthreetimesfasterthanthestandardusbdevices p.157
- Ai charger screen p.157
- Ai charger p.157
- Tolaunchaicharger clickortap p.157
- Onthetop rightcorneroftheaisuite3mainmenu thenselect ai chager p.157
- Launching ai charger on your computer p.157
- Chapter 4 p.157
- Asus x99 e 10g ws p.157
- Using the usb 3 boost p.158
- Usb3 boosttechnologysupportsuasp usbattachedscsiprotocol thatautomatically speedsupthetransferratesofyourusbstoragedevices p.158
- Usb 3 boost p.158
- Tolaunchusb3 boost clickortap p.158
- Onthetop rightcorneroftheaisuite3mainmenu thenselect usb 3 boost p.158
- Launching usb 3 boost on your computer p.158
- Chapter 4 software support p.158
- Chapter 4 p.158
- Ez update screen p.159
- Ez update p.159
- Chapter 4 p.159
- Launching ez update on your computer p.159
- System information p.160
- Launching system information on your computer p.160
- Chapter 4 p.160
- Mobo connect screen p.161
- Mobo connect p.161
- Launching mobo connect on your computer p.161
- Chapter 4 p.161
- Using usb bios flashback p.162
- Usb bios flashback p.162
- Launching usb bios flashback on your computer p.162
- Chapter 4 p.162
- Chapter 4 p.163
- Pairing your computer and smart device p.164
- Launching push notice on your computer p.164
- Chapter 4 p.164
- Push notice screen p.164
- Push notice p.164
- Thisfeatureallowsyoutosendalertsoftheunusualactivitiesofthevoltage temperature andfansettingsofyourcomputertoyoursmartdevice p.165
- Thisfeatureallowsyoutorestart shutdown orputyourcomputertosleepmodeandsends analerttoyoursmartdevice p.165
- Setting up pc status alerts p.165
- Setting up pc mode alerts of your computer p.165
- Chapter 4 p.165
- Asus x99 e 10g ws p.165
- Viewing your computer status on your smart device p.166
- Thisfeatureallowsyoutosendmessagestoyoursmartdevice p.166
- Thenselect p.166
- Sending messages to your smart device p.166
- Onyoursmartdevicetolaunchpushnotice p.166
- Cornerofyourscreen todothis clickortap thenclickortap p.166
- Chapter 4 software support p.166
- Chapter 4 p.166
- Youcanalsosendmessagesviathepushnoticemessagingshortcutonthelower right p.166
- Window p.167
- Realte p.167
- Hd audio manager with dts studio soun p.167
- For window p.167
- Chapter 4 p.167
- Audio configurations p.167
- Selecting an audio output p.168
- Chapter 4 p.168
- Raid support p.169
- Raid definitions p.169
- Raid configurations p.169
- Chapter 5 raid support p.169
- Chapter 5 p.169
- Installing serial ata hard disks p.170
- Chapter 5 p.170
- Rapid storage technology in uefi bios p.170
- Intel rapid storage technology in uefi bios p.170
- Turn on the system p.171
- To enter the inte p.171
- To display the utility main menu p.171
- The utility supports maximum four hard disk drives for raid configuration p.171
- The raid bios setup screens shown in this section are for reference only and may not exactly match the items on your screen p.171
- The navigation keys at the bottom of the screen allow you to move through the menus the navigation keys at the bottom of the screen allow you to move through the menus and select the menu options p.171
- Rapid storage technology option rom utility p.171
- Intel rapid storage technology option rom utility p.171
- Chapter 5 p.171
- Asus x99 e 10g ws p.171
- Select disks p.172
- Creating a raid set p.172
- Chapter 5 raid configurations p.172
- Chapter 5 p.172
- To select the hard disk drives you want to include in the raid set the select disks screen appears p.172
- To create a raid set p.172
- The following screen appears p.172
- Chapter 5 p.173
- Deleting a raid set p.174
- Chapter 5 p.174
- Rapid storage technology option rom utility p.175
- Exiting the inte p.175
- Creating a raid driver disk in windows p.175
- Creating a raid driver disk in window p.175
- Creating a raid driver disk p.175
- Chapter 5 p.175
- Chapter 5 raid configurations p.176
- Chapter 5 p.176
- Before you begin p.177
- Amd crossfirex technology p.177
- Requirements p.177
- Multiple gpu support p.177
- Crossfirex technology p.177
- Chapter 6 multi gpu support p.177
- Chapter 6 p.177
- Installing two crossfirex graphics cards p.178
- Chapter 6 p.178
- Installing three crossfirex graphics cards p.179
- Chapter 6 p.179
- Installing four crossfirex graphics cards p.180
- Chapter 6 p.180
- Installing the device drivers p.181
- Enabling the amd crossfirex technology p.181
- Enabling the am p.181
- Crossfirex technology p.181
- Chapter 6 p.181
- Launching the amd vision engine control center p.181
- Enabling dual crossfirex technology p.182
- Chapter 6 p.182
- Technology p.183
- Requirements p.183
- Nvidia sli technology p.183
- Installing two sli ready graphics cards p.183
- Chapter 6 p.183
- Installing three sli ready graphics cards p.184
- Chapter 6 p.184
- Installing four sli ready graphics cards p.185
- Chapter 6 p.185
- Installing the device drivers p.186
- Enabling the nvidia sli technology p.186
- Enabling the nvidi p.186
- Chapter 6 p.186
- Technology p.186
- Launching the nvidia control panel p.186
- Enabling sli settings p.187
- Chapter 6 p.187
- Chapter 6 multiple gpu support p.188
- Chapter 6 p.188
- X99 e 10g ws block diagram p.189
- Appendix p.189
- Notices p.190
- Federal communications commission statement p.190
- Appendix p.190
- Appendix p.191
- Exposure to radio frequency energy p.192
- Ce european community compliance statement p.192
- Asus recycling takeback services p.192
- Appendix p.192
- Wireless radio use p.192
- Warning p.192
- Rf equipment notices p.192
- Regional notice for california p.192
- Ncc taiwan wireless statement p.193
- Japan rf equipment statement p.193
- Google license terms p.193
- Fcc bluetooth wireless compliance p.193
- Bluetooth industry canada statement p.193
- Appendix p.193
- Appendix p.194
- Asustek computer inc p.195
- Asus contact information p.195
- Asus computer international america p.195
- Asus computer gmbh germany and austria p.195
- Appendix p.195
- Technical support p.195
- Declaration of conformity p.196
- Ca 94539 p.196
- Asus computer international p.196
- Appendix p.196
Похожие устройства
-
 Asus TUF GAMING B550-PROРуководство по быстрому запуску
 -
 Asus PRIME A520M-A IIКраткое руководство пользователя
 -
 Asus PRIME B250M-PLUSКраткое руководство
 -
 Asus TUF GAMING Z590-PLUSКраткое руководство
 -
 Asus ProArt B650-CREATORКраткий обзор функций
 -
 Asus TUF GAMING B650-PLUSБыстрый старт
 -
 Asus ROG STRIX X670E-I GAMING WIFIКраткое руководство пользователя
 -
Asus ROG FPS-IIРуководство по быстрому запуску
-
 Asus Pro WS W680M-ACE SEКраткая эксплуатационная инструкция
 -
 Asus PRIME B760M-A WIFI D4Инструкция в сокращённом виде
 -
 Asus PRIME H770-PLUSБыстрый старт
 -
 Asus B850-PLUS WIFIКраткое руководство
Saiba mais sobre a conformidade de dispositivos eletrônicos com as diretrizes da UE. A declaração completa está disponível online para consulta.