
Moser 1557 Инструкция по эксплуатации онлайн
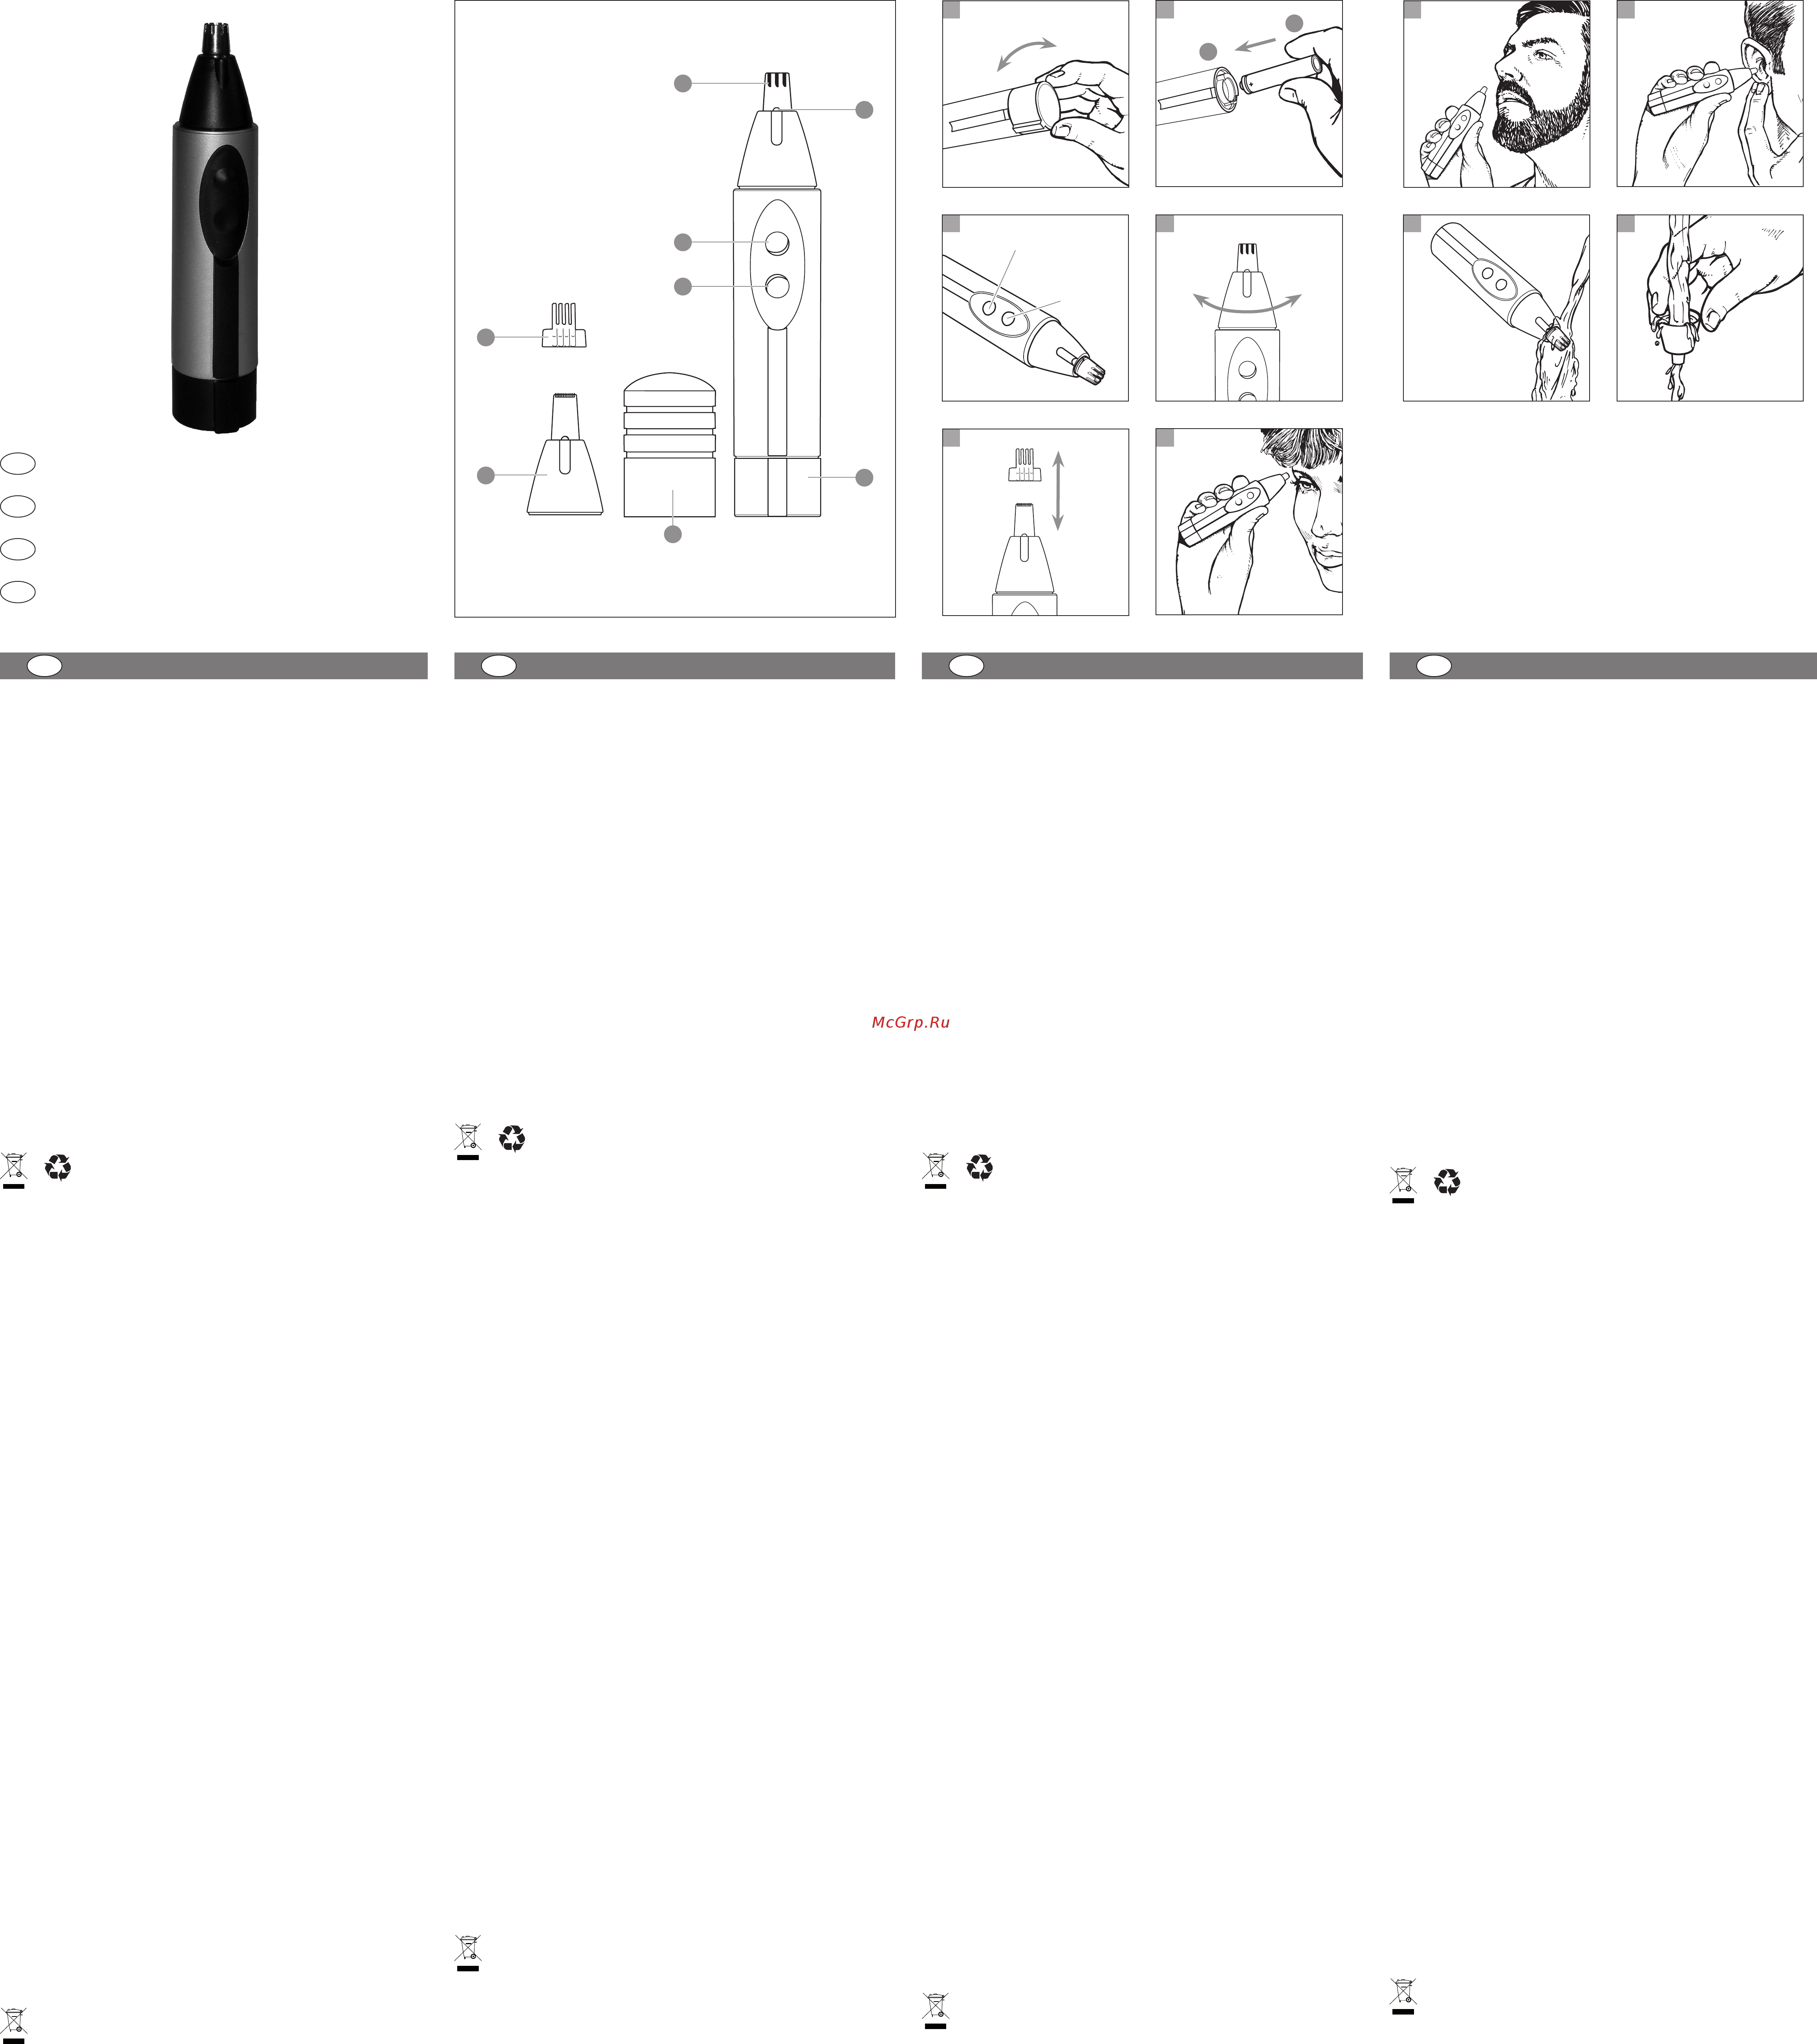
Description des pièces
A Tête de coupe pour poils du nez et des oreilles
B Lampe spot
C Interrupteur marche
D Interrupteur arrêt
E Tête de coupe pour sourcils
F Peigne adaptable
G Étui de protection de la lame
H Couvercle du boîtier de batterie
Remarques importantes
Lorsque vous utilisez des appareils électriques, respectez toujours les précautions
d'usage pour votre sécurité et en particulier: (
Lisez toutes les notices avant d'utiliser
l'appareil)
· Utilisez l’appareil exclusivement pour couper les cheveux.
· Ne laissez jamais l'appareil sans surveillance si des enfants ou des personnes
nécessitant des soins se trouvent à proximité.
· Ne jamais laisser l'appareil sans surveillance.
· Après utilisation, éteignez l’appareil et placer l’étui de protection de la lame dur la
tête de coupe.
· Retirez immédiatement les piles usagées de l'appareil.
· Utilisez uniquement des piles qui ne coulent pas, modèle AA-LR6 1,5 V.
· Si l'appareil n'est pas utilisé pendant une longue période, retirez la pile.
· Pour éviter l'écoulement d'électrolyte, ne pas exposer la pile à des températures
élevées et ne pas l'ouvrir. En cas d'écoulement d'électrolyte, essuyez avec un chiffon
humide et jetez la pile. En cas de contact avec les yeux, consultez immédiatement
un médecin !
· N’utilisez jamais l’appareil avec une tête de coupe défectueuse.
· Utilisez exclusivement les accessoires d’origine.
· L'appareil satisfait les exigences de la directive UE Compatibilité Electromagnétique
(CEM) 89/336/CEE.
Ne pas jeter les piles/batteries usagées avec les ordures ménagères.
Veuillez mettre les piles/batteries usagées au rebut en respectant les
dispositions légales en la matière.
Utilisation
· Tournez le couvercle du boîtier de batterie dans le sens inverse des aiguilles d’une
montre et retirez-le (Fig. 1a).
· Insérez la pile avec le pôle plus (+) en direction de la tête de coupe (Fig. 2).
· Replacez le couvercle du boîtier de batterie et tournez dans le sens des aiguilles
d’une montre jusqu’à ce qu’il s’enclenche (Fig. 1b).
· Allumez l’appareil en appuyant sur l’interrupteur de marche (Fig. 3a) et éteignez-le
après utilisation en appuyant sur l’interrupteur d’arrêt (Fig. 3b).
Remplacer la tête de coupe
L’appareil est équipé de deux têtes de coupe pour tondre les poils du nez et des
oreilles et les sourcils.
· Tournez la tête de coupe dans le sens inverse des aiguilles d’une montre et retirez-la
(Fig. 4a).
· Placez la nouvelle tête de coupe et tournez dans le sens des aiguilles d’une montre
jusqu’à ce qu’elle s’enclenche (Fig. 4b).
Tondre les poils du nez
Introduisez précautionneusement l’appareil en marche dans la narine (Fig. 7), mais
pas à plus de 0,5 cm de profondeur. Éliminez les poils du nez par des mouvements
circulaires doux de l’appareil.
Tondre les poils des oreilles
Introduisez précautionneusement l’appareil en marche dans le trou de l’oreille (Fig. 8).
Amenez précautionneusement l’appareil le long des parties poilues de l’oreille.
Attention: Ne pas enfoncer l’appareil à plus de 0,5 cm de profondeur pour éviter tout
endommagement du tympan.
Epiler les sourcils
Mettez en place la tête de coupe pour les sourcils. Amenez lentement l’appareil en
marche le long des sourcils à enlever. Réglez la longueur des sourcils en ajustant
l’espacement entre la tête de coupe et la peau ; un espacement régulier peut égale-
ment être respecté en utilisant le peigne adaptable.
Placer/retirer le peigne adaptable (adapté à le tête de coupe pour les sourcils)
· Glissez le peigne dans le sens de la flèche sur la tête de coupe pour les sourcils
(Fig. 5a).
· Le peigne adaptable peut être retiré en tirant dans le sens de la flèche (Fig. 5b).
Nettoyage et entretien
L’appareil est étanche et peut être nettoyé de manière hygiénique en le passant sous
un robinet.
· Débranchez l’appareil avant le nettoyage.
· Lavez le système de coupe en acier spécial à l’eau chaude (Fig. 9).
· Lavez le système de coupe en acier spécial comme suit:
Tournez la tête de coupe dans le sens inverse des aiguilles d’une montre et retirez-la
(Fig. 4a), lavez brièvement le moteur, passez la tête de coupe sous le robinet
(Fig. 10) et laissez égoutter.
· Replacez la tête de coupe et tournez dans le sens des aiguilles d’une montre jusqu’à
ce qu’elle s’enclenche (Fig. 4b).
· Séchez le boîtier à l’aide d’un chiffon doux.
· Placer l’étui de protection de la lame sur la tête de coupe.
Mise au rebut pays de l’UE
L’appareil ne doit pas être mis au rebut avec les déchets ménagers. Dans le
cadre de la directive UE relative à la mise au rebut d’appareils électriques et
électroniques, l’appareil sera repris gratuitement dans les points de collecte
ou déchetteries municipaux.
La mise au rebut conforme protège l’environnement et empêche les impacts
possibles sur l’homme et l’environnement.
Mise au rebut pays extérieurs à l’UE
· À la fin de sa durée de vie l'appareil doit être mis au rebut de façon à respecter
l'environnement.
Garantie
1. Wahl GmbH consent une garantie de 2 ans pour tous vos petits appareils élec-
triques, pour tous les éléments d’appareil qui ne sont pas soumis à l’usure.
Les droits issus de cette garantie s'ajoutent aux droits légaux et/ou contractuels de
garantie revenant au client vis-à-vis de son vendeur.
2. La période de garantie de 2 ans commence à compter de l'achat de l'appareil. La
date d’achat devra être prouvée par la présentation du bon d’achat tel qu’un ticket de
caisse, une facture ou tout autre document semblable.
3. Les défectuosités constatées pendant la période de garantie et qui nous sont com-
muniquées par écrit dans un délai de trois semaines après leur apparition sont éli-
minées gratuitement par nos soins, sous réserve du point 4. Les réparations doivent
être effectuées dans notre atelier ou chez un revendeur autorisé.
Le client ne dispose d’aucune revendication passée cette garantie.
4. Les défectuosités dûes à une sollicitation trop importante, une manipulation et un
entretien inappropriés ainsi qu'au non respect du mode d'emploi ne sont pas couver-
tes par la garantie. Il est de même pour les défectuosités qui découlent d’une usure
normale des pièces d’usure (par ex. éléments du moteur et têtes de coupe).
5. L’intervention de services dans le cadre de la garantie ne prolonge en aucun cas sa
durée.
6. Les pièces remplacées dans le cadre de réparations sous garantie passent en notre
possession.
7. Pour tout recours non autorisé à notre service après-vente, le client devra s’acquitter
de tous les frais encourus.
Denominazione dei componenti
A Testina per la peluria del naso e delle orecchie
B Lampadina spot
C Pulsante on
D Pulsante off
E Testina per sopracciglia
F Pettine ad innesto
G Cappuccio di protezione della lama
H Coperchio del vano batteria
Avvertenze importanti
Si raccomanda di seguire attentamente le seguenti avvertenze durante l'uso di
dispositivi elettrici, onde garantire la propria sicurezza: (
prima di utilizzare l'appa-
recchio leggere attentamente le avvertenze).
· Usare l’apparecchio esclusivamente per tagliare i capelli.
· Non lasciare mai l'apparecchio incustodito, in presenza di bambini o persone non
autosufficienti.
· Non lasciare incustodito l'apparecchio acceso.
· Dopo l'uso, spegnere l'apparecchio e posizionare il cappuccio di protezione della
lama sulla testina.
· Rimuovere subito dall'apparecchio le pile esaurite.
· Utilizzare esclusivamente pile a tenuta stagna del tipo AA-LR6 1,5 V.
· Se l'apparecchio non viene utilizzato per un lungo periodo di tempo, si raccoman
-
da di estrarre la pila.
· Onde evitare la fuoriuscita dell'elettrolito, si raccomanda di non aprire o esporre la
pila a temperature elevate. Laddove si fosse verificata una perdita di elettrolito,
pulire con un panno umido e provvedere allo smaltimento della pila. In caso di
contatto con gli occhi, consultare subito un medico.
· Non utilizzare il dispositivo se la testina risulta difettosa.
· Usare solo gli accessori originali.
· L'apparecchio soddisfa i requisiti della direttiva UE in materia di compatibilità elet-
tromagnetica (EMC) 89/336/CEE.
Non gettare le pile/batterie esauste nei rifiuti domestici. Smaltire le
pile/batterie esauste secondo le disposizioni di legge.
Funzionamento
· Ruotare in senso antiorario il coperchio del vano batteria e rimuoverlo (fig. 1a).
· Inserire la batteria con il polo positivo (+) rivolto verso la testina (fig. 2).
· Ricollocare ora il coperchio del vano batteria e ruotarlo in senso orario finché non
si aggancia correttamente (fig. 1b).
· Accendere l'apparecchio con il pulsante on (fig. 3a) e spegnerlo, dopo l'uso, con il
pulsante off (fig. 3b).
Sostituzione delle testine
Il dispositivo è dotato di due testine per l'eliminazione della peluria di naso e
orecchie e per la cura delle sopracciglia.
· Ruotare in senso antiorario la testina e rimuoverla (fig. 4a).
· Collocare ora l'altra testina e ruotarla in senso orario finché non si aggancia
correttamente (fig. 4b).
Eliminazione della peluria del naso
Accendere l'apparecchio e inserirlo delicatamente in una narice, (fig. 7) non spingen-
dosi comunque mai oltre il 1/2 cm. Eliminare la peluria muovendo delicatamente
l'apparecchio in senso circolare.
Eliminazione della peluria nelle orecchie
Accendere l'apparecchio e inserirlo delicatamente nella parte esterna del padiglione
auricolare (fig. 8). Far scorrere l'apparecchio con attenzione sulle parti del padiglione
ricoperte da peluria.
Attenzione: non introdurre il dispositivo nell'orecchio per più di 1/2 cm, sono possibili
lesioni della membrana del timpano.
Regolazione delle sopracciglia
Inserire la testina per sopracciglia. Accendere l'apparecchio e farlo scorrere lenta-
mente sulla peluria da eliminare. Per determinare la lunghezza desiderata dei peli,
regolare la distanza tra la testina e la pelle, ovvero mantenerla costante inserendo
un rialzo intercambiabile.
Inserimento / rimozione del rialzo intercambiabile (per testina da sopracciglia)
· Far scorrere il rialzo intercambiabile nella direzione della freccia sulla testina per
sopracciglia (fig. 5a).
· Per toglierlo, far scorrere il pettine ad innesto nella direzione della freccia (fig. 5b).
Pulizia e manutenzione
Il dispositivo è a tenuta stagna e può quindi essere pulito in maniera igienica sotto
l'acqua corrente:
· Si raccomanda di spegnere l'apparecchio prima di procedere alla pulizia.
· Sciacquare il set di testine in acciaio inox con acqua calda (fig. 9).
· Per la pulizia delle testine in acciaio inox, procedere come segue:
ruotare la testina in senso antiorario ed estrarla (fig. 4a); sciacquare velocemente
il motorino e lavare la testina con acqua corrente (fig. 10); lasciar sgocciolare.
· Riposizionare la testina e ruotarla in senso orario finché non si aggancia corretta-
mente (fig. 4b).
· Asciugare l'alloggiamento con un panno morbido.
· Collocare il cappuccio di protezione della lama sulla testina.
Procedure di smaltimento per i paesi dell'UE
Il dispositivo non può essere smaltito gettandolo nei rifiuti domestici. In
conformità a quanto previsto dalla direttiva europea in materia di smalti-
mento dei dispositivi elettrici ed elettronici, l'apparecchio può essere
gettato e smaltito gratuitamente presso i punti di raccolta previsti dal
comune nonché negli appositi contenitori per i diversi materiali da riciclare.
Uno smaltimento conforme alle prescrizioni di legge garantisce la tutela
dell'ambiente ed impedisce possibili effetti dannosi sull'uomo e sull'ambien-
te medesimo.
Procedure di smaltimento per i paesi all'infuori dell'UE
· Alla fine del ciclo di vita di dell'apparecchio, smaltire questo ultimo in modo
ecocompatibile.
Garanzia
1. La ditta Wahl GmbH garantisce i piccoli dispositivi elettronici di propria produzio-
ne, per tutti componenti non soggetti ad usura, per due anni. I diritti che derivano
dalla garanzia di cui sopra, si aggiungono a quelli normalmente spettanti al cliente
ed a lui dovuti da ogni rivenditore, in virtù di clausole contrattuali e / o disposizioni
di legge.
2. Il periodo di due anni previsto dalla garanzia, decorre dal momento della con-
segna dell'apparecchio. Il momento preciso di cui sopra deve essere dimostrato
dalla relativa documentazione d'acquisto: lo scontrino, la fattura, la bolla di conse-
gna o materiale d'appoggio similare.
3. Eventuali vizi o difetti che dovessero palesarsi durante il periodo di copertura della
garanzia e che ci venissero segnalati per iscritto entro tre settimane a decorrere
dal momento in cui si sono presentati, verranno riparati senza alcun costo, sem-
pre che non rientranti nella casistica di cui al punto 4. Le manovre di riparazione
debbono essere eseguite presso il nostro stabilimento o da un rivenditore da noi
autorizzato in tal senso. Non sussistono ulteriori diritti, e quindi rivendicazioni degli
stessi da parte dei clienti, derivanti dalla presente garanzia
4. La garanzia non comprende vizi o difetti che dovessero presentarsi in virtù di un
utilizzo improprio e che causi un'eccessiva sollecitazione dell'apparecchio, nonché
da manovre di manutenzione scorrette e dalla mancata osservanza delle istruzioni
per l'uso. Quanto sopra vale anche per vizi o difetti che dovessero scaturire da
un normale impiego dell'apparecchio, colpendo, tuttavia, componenti soggetti ad
usura (come, per es., parti del motore e testine).
5. Un'eventuale prestazione concessa entro il periodo di garanzia, non comporta
alcuna proroga del medesimo.
6. Eventuali parti sostituite negli apparecchi in virtù di riparazioni eseguite in garan-
zia, divengono di nostra proprietà.
7. Eventuali costi dovuti a un ricorso non autorizzato al nostro servizio clienti, sono a
carico del cliente.
Description of parts
A Blade set for nose / ear-hair
B Spot lamp
C On-switch
D Off-switch
E Blade set for eyebrows
F Attachment comb
G Blade guard cover
H Battery housing cover
Important information
For your own protection, the following information must be observed when using
electrical equipment (
read all the instructions before using the appliance).
· Only use the appliance to cut hair.
· Never leave the appliance unsupervised if children or persons needing care are
nearby.
· Never leave the appliance unattended when switched on.
· Switch off appliance after use and place blade guard cover over the blade set.
· Immediately remove used batteries from the appliance.
· Only use leak-proof batteries type AA-LR6 1.5 V.
· If the appliance is not used for an extended period of time, remove the battery.
· To prevent the leakage of electrolyte, the battery is not to be exposed to high tem
-
peratures or opened. If electrolyte does leak, wipe it with a damp cloth and dispose
of this battery. If electrolyte comes into contact with the eyes, consult a doctor imme-
diately.
· Do not use the appliance if the blade set is faulty.
· Only use the original accessories.
· The appliance meets the requirements of the EU directive regarding to electromag-
netic compatibility (EMC) 89/336/EC.
Exhausted batteries/rechargeable batteries should not be disposed
of in household waste. Dispose of them in accordance with legal
regulations.
Using for the first time
· Turn the battery housing cover in an anti-clockwise direction and remove it (Fig. 1a).
· Insert the battery with the plus (+) pole pointing in the direction of the blade set
(Fig. 2).
· Replace the battery housing cover and turn it in a clockwise direction until it clicks
into position (Fig. 1b).
· Use the on-switch to switch on the appliance (Fig. 3a) and use the off-switch to
switch off the appliance after use (Fig. 3b).
Changing the blade sets
The appliance has two blade sets - one for trimming nose and ear-hair and one for
trimming eyebrows.
· Turn the blade set in an anti-clockwise direction and remove it (Fig. 4a).
· Insert the other blade set and turn it in a clockwise direction until it clicks into position
(Fig. 4b).
Trimming nose hair
Carefully insert the switched-on appliance no more than 0,5 cm into the nostril (Fig. 7).
Make gentle, circular movements with the appliance to remove any hairs in the nose.
Trimming hair in the ears
Carefully insert the switched-on appliance into the outer opening of the ear (Fig. 8).
Carefully run the appliance along the hairy areas of the ears.
Caution: Do not insert the appliance more than 0,5 cm into the ear. This could damage
the ear drum.
Trimming eyebrows
Attach blade set for trimming eyebrows. Slowly run the switched-on appliance over the
hair that needs to be removed. The hair length can be set by adjusting the distance
between the blade set and the skin or the distance can be fixed by using the attach-
ment comb.
Attaching / removing attachment comb (for blade set for eyebrows)
· Slide the attachment comb on to the blade set for eyebrows in the direction indicated
by the arrow (Fig. 5a).
· The attachment comb can be removed by pushing it in the direction of the arrow
(Fig. 5a).
Cleaning and general care
The appliance is waterproof and can be hygienically cleaned by holding it under
running water:
· Switch off the appliance before cleaning.
· Rinse the stainless steel cutting system with warm water (Fig. 9).
· Clean the stainless steel cutting system as follows:
Turn the blade set in an anti-clockwise direction and remove (Fig. 4a), quickly rinse
drive, rinse blade set under running water (Fig. 10) and dry off.
· Reinsert the other blade set and turn it in a clockwise direction until it clicks into
position (Fig. 4b).
· Dry the housing with a soft cloth.
· Place the blade guard cover over the blade set.
Disposal in EU countries
Do not dispose of the appliance with domestic refuse. As part of the EU
Directive governing the disposal of electric and electronic appliances, the
appliance is accepted free of charge by local waste collection points or
recycling centres.
Correct disposal will ensure environment protection and prevent potential
harmful impact on people and the environment.
Disposal in non-EU countries
· Please dispose of the appliance at the end of its service life in an environmentally
friendly manner.
Guarantee
1. Wahl GmbH electrical appliances come with a two-year guarantee on all components
that are not subject to wear. In addition to the warranty claims associated with the
contract of sale, the rights arising from this guarantee are granted by the respective
seller to the customer.
2. The two-year guarantee commences at the time of delivery of the appliance to the
customer. The date of delivery should be proven by submitting proof of purchase, for
example, the sales receipt, invoice, delivery note or similar document.
3. With the exception of defects covered by section 4, we shall eliminate at no addi-
tional cost any defects that occur during the guarantee period if we are notified in
writing within three weeks of their occurrence . Repairs must be carried out at our
factory or by an authorized point of sale. Further claims of the customer arising from
this guarantee shall be excluded.
4. The guarantee shall not cover any defects caused as a result of subjecting the appli-
ance to excessive stress, incorrect use and maintenance, as well as by the failure to
observe the operating instructions. The same shall apply to defects that occur as a
result of normal use of wear parts (e.g. drive components and blade sets).
5. The guarantee period shall not be extended if services are performed under the
terms of the guarantee.
6. The parts replaced when carrying out the repairs under warranty shall become our
property.
7. If our customer services are called upon without due cause, the costs thus incurred
shall be borne by the customer.
Bezeichnung der Teile
A Schneidkopf für Nasen-/Ohrenhaare
B Spotlampe
C Ein-Schalter
D Aus-Schalter
E Schneidkopf für Augenbrauen
F Aufsteckkamm
G Messerschutzkappe
H Batteriegehäusedeckel
Wichtige Hinweise
Beim Gebrauch von elektrischen Geräten zum eigenen Schutz die folgenden
Hinweise unbedingt beachten: (
Vor Gebrauch des Gerätes alle Anweisungen
durchlesen)
· Nutzen Sie das Gerät ausschließlich zum Schneiden von Haaren.
· Das Gerät niemals unbeaufsichtigt lassen, wenn Kinder oder pflegebedürftige
Personen in der Nähe sind.
· Eingeschaltetes Gerät nicht unbeaufsichtigt lassen.
· Gerät nach dem Gebrauch ausschalten und Messerschutzkappe auf den
Schneidkopf aufstecken.
· Verbrauchte Batterien sofort aus dem Gerät nehmen.
· Verwenden Sie ausschließlich auslaufsichere Batterien vom Typ AA-LR6 1,5 V.
· Falls das Gerät für längere Zeit nicht gebraucht wird, Batterie herausnehmen.
· Um Austritt von Elektrolyt zu vermeiden darf die Batterie weder erhöhten
Temperaturen ausgesetzt, noch geöffnet werden. Sollte Elektrolyt ausgetre
-
ten sein, mit einem feuchten Tuch abwischen und die Batterie entsorgen. Bei
Augenkontakt sofort Arzt aufsuchen!
· Benutzen Sie das Gerät nicht mit defektem Schneidkopf.
· Benutzen Sie nur das Original-Zubehör.
· Das Gerät erfüllt die Anforderungen der EU-Richtlinie Elektromagnetische
Verträglichkeit (EMV) 89/336/EWG.
Verbrauchte Batterien/Akkus gehören nicht in den Hausmüll.
Entsorgen Sie verbrauchte Batterien/Akkus entsprechend den
gesetzlichen Bestimmungen.
In Betrieb nehmen
· Drehen Sie den Batteriegehäusedeckel gegen den Uhrzeigersinn und nehmen Sie
ihn ab (Abb. 1a).
· Legen Sie die Batterie mit dem Plus(+)-Pol in Richtung Schneidkopf ein (Abb. 2).
· Setzen Sie den Batteriegehäusedeckel wieder auf und drehen Sie ihn im
Uhrzeigersinn bis er einrastet (Abb. 1b).
· Schalten Sie das Gerät über den Softtouch Ein-Schalter ein (Abb. 3a) und nach
Gebrauch über den Softtouch Aus-Schalter aus (Abb. 3b).
Schneidköpfe wechseln
Das Gerät besitzt zwei Schneidköpfe für das Trimmen von Nasen- und Ohrenhaaren
sowie das Trimmen von Augenbrauen.
· Drehen Sie den Schneidkopf gegen den Uhrzeigersinn und nehmen Sie ihn ab
(Abb. 4a).
· Setzen Sie den anderen Schneidkopf auf und drehen Sie ihn im Uhrzeigersinn bis
er einrastet (Abb. 4b).
Nasenhaare trimmen
Führen Sie das eingeschaltete Gerät vorsichtig in das Nasenloch ein (Abb. 7),
jedoch nicht tiefer als 0,5 cm. Entfernen Sie die Nasenhaare durch sanfte, kreis-
förmige Bewegungen des Gerätes.
Ohrenhaare trimmen
Führen Sie das eingeschaltete Gerät vorsichtig in die äußere Ohröffnung ein
(Abb. 8). Führen Sie das Gerät vorsichtig an den behaarten Ohrpartien entlang.
Vorsicht: Gerät nicht tiefer als 0,5 cm ins Ohr einführen, das Trommelfell könnte
verletzt werden.
Augenbrauen trimmen
Setzen Sie den Schneidsatz für Augenbrauen auf. Führen Sie das eingeschaltete
Gerät langsam über die zu entfernenden Haare. Die Haarlänge bestimmen Sie
durch den Abstand zwischen Schneidkopf und Haut bzw. kann der Abstand mit auf-
gesetztem Aufsteckkamm gleichmäßig eingehalten werden.
Aufsteckkamm (passend zum Schneidkopf für Augenbrauen)
aufstecken / abnehmen
· Aufsteckkamm in Pfeilrichtung auf den Schneidsatz für Augenbrauen schieben
(Abb. 5a).
· Der Aufsteckkamm lässt sich durch Schieben in Pfeilrichtung entfernen (Abb. 5b).
Reinigung und Pflege
Das Gerät ist wasserdicht und lässt sich unter fließendem Wasser hygienisch
reinigen:
· Schalten Sie das Gerät vor dem Reinigen aus.
· Spülen Sie das Edelstahl-Schneidsystem mit warmem Wasser ab (Abb. 9).
· Reinigen Sie das Edelstahl-Schneidsystem wie folgt:
Schneidkopf gegen den Uhrzeigersinn drehen und abnehmen (Abb. 4a), Antrieb
kurz abspülen, Schneidkopf unter fließendem Wasser durchspülen (Abb. 10) und
abtropfen lassen.
· Setzen Sie den Schneidkopf wieder auf und drehen Sie ihn im Uhrzeigersinn bis
er einrastet (Abb. 4b).
· Trocknen Sie das Gehäuse mit einem weichen Tuch.
· Stecken Sie die Messerschutzkappe auf den Schneidkopf.
Entsorgung EU-Länder
Das Gerät darf nicht mit dem Hausmüll entsorgt werden. Im Rahmen der
EU-Richtlinie über die Entsorgung von Elektro- und Elektronikgeräten wird
das Gerät bei den kommunalen Sammelstellen bzw. Wertstoffhöfen kosten-
los entgegengenommen.
Die ordnungsgemäße Entsorgung dient dem Umweltschutz und verhindert
mögliche schädliche Auswirkungen auf Mensch und Umwelt.
Entsorgung Nicht-EU-Länder
· Das Gerät am Ende seiner Lebensdauer bitte umweltgerecht entsorgen.
Garantie
1. Die Wahl GmbH gewährt für alle ihre Elektrokleingeräte eine Zwei-Jahres-
Garantie auf alle nicht dem Verschleiß unterliegenden Gerätekomponenten. Die
Rechte aus dieser Garantie treten neben die gesetzlichen und/oder vertraglichen
Gewährleistungsansprüche, die dem Kunden gegenüber seinem jeweiligen
Verkäufer zustehen.
2. Die zweijährige Garantiezeit beginnt mit der Übergabe des Gerätes. Der Zeitpunkt
der Übergabe ist durch Vorlage des Kaufbelegs wie Kassenzettel, Rechnung,
Lieferschein oder Ähnliches nachzuweisen.
3. Mängel, die innerhalb der Garantiezeit auftreten und die uns innerhalb von drei
Wochen nach ihrem Auftreten schriftlich angezeigt werden, werden von uns vor-
behaltlich Ziff. 4 ohne Kostenberechnung beseitigt. Die Reparaturen müssen in
unserem Werk oder in einer von uns autorisierten Verkaufsstelle ausgeführt wer-
den. Weitergehende Ansprüche des Kunden aus dieser Garantie bestehen nicht.
4. Mängel, die durch übermäßige Beanspruchung, unsachgemäße Behandlung
und Wartung sowie durch Nichtbeachtung der Gebrauchsanweisung entstehen,
werden von der Garantie nicht erfasst. Das Gleiche gilt für Mängel, die infolge
normaler Abnutzung an Verschleißteilen auftreten (z.B. Antriebskomponenten und
Schneidköpfe).
5. Durch die Erbringung von Garantieleistungen tritt keine Verlängerung der
Garantiezeit ein.
6. Die im Rahmen von Garantiereparaturen ausgetauschten Teile gehen in unser
Eigentum über.
7. Bei unberechtigter Inanspruchnahme unseres Kundendienstes gehen die entstan-
denen Kosten zu Lasten des Kunden.
Gebrauchsanweisung
D
Operating instructions
GB
Mode d’emploi
F
Istruzioni per l'uso
I
1557-1530 · 06/2007
1
3
2
4
a (ON)
b (OFF)
5 6
a
b
7
9
8
a
b
Gebrauchsanweisung
Nasen-/Ohrenhaar- und Augenbrauen-Trimmer
D
Istruzioni d’uso
Trimmer per naso, orecchie e sopracciglia
I
Operating instructions
Nose/Ear-hair and Eyebrow Trimmer
GB
Mode d’emploi – Tondeuses pour poils du nez et des
oreilles et pour sourcils
F
Typ 1557
a
b
10
B
A
G
E
F
C
H
D
+
–
WAHL GmbH
Roggenbachweg 9
D-78089 Unterkirnach
Germany
Telefon: +49 / (0) 7721 / 806-212
Telefax: +49 / (0) 7721 / 806-205
info@wahlgmbh.com
Serviceline: +49 / 180 / 323 54 12
Содержание
- B gebrauchsanweisung nasen ohrenhaar und augenbrauen trimmer 1
- Gebrauchsanweisung d operating instructions gb mode d emploi f istruzioni per l uso i 1
- Istruzioni d uso trimmer per naso orecchie e sopracciglia 1
- Mode d emploi tondeuses pour poils du nez et des oreilles et pour sourcils 1
- Operating instructions nose ear hair and eyebrow trimmer 1
- Typ 1557 1
- B instrucciones de uso retocador para el vello nasal de la oreja y de las cejas 2
- Brugsanvisning trimmer til næse ørehår og øjenbryn 2
- Instrucciones de uso e brugsanvisning dk manual de utilização p 2
- Manual de utilização aparador de pelos do nariz das orelhas e de sobrancelhas 2
- Typ 1557 2
- Инструкция по применению триммер для стрижки бровей и ухода за носом и ушами 2
- Инструкция по эксплуатации ru 2
Похожие устройства
- Sharp SJP-692 NSL Инструкция по эксплуатации
- Pioneer DV-610AV-S Инструкция по эксплуатации
- Yamaha DVD-C996 Инструкция по эксплуатации
- Qnap VS-4016U Инструкция по эксплуатации
- Sharp SJPT-561 RHS Инструкция по эксплуатации
- Yamaha DVD-S1200 Инструкция по эксплуатации
- Bosch HSG 142 E EU Инструкция по эксплуатации
- Qnap NVR-104 Инструкция по эксплуатации
- Sharp SJP692NBE Инструкция по эксплуатации
- Yamaha DVD-S1500 Инструкция по эксплуатации
- Panasonic TC-21FJ10T Инструкция по эксплуатации
- Dialog AM-11B Инструкция по эксплуатации
- Vitek VT-1355 Инструкция по эксплуатации
- Sharp SJWP331THS Инструкция по эксплуатации
- Panasonic KX-FT934RU Инструкция по эксплуатации
- Yamaha DVD-S1700 Инструкция по эксплуатации
- Dialog AM-11S Инструкция по эксплуатации
- Gama GC585 Инструкция по эксплуатации
- Sharp SJWP331TBK Инструкция по эксплуатации
- Yamaha DVD-S1800 Инструкция по эксплуатации