Ezviz CS-X3C-8E Белый [7/54] Wiring
Превью страниц
Страница 7 /
54
![Ezviz Vault Plus [7/54] Wiring](/views2/1403027/page7/bg7.png)
3
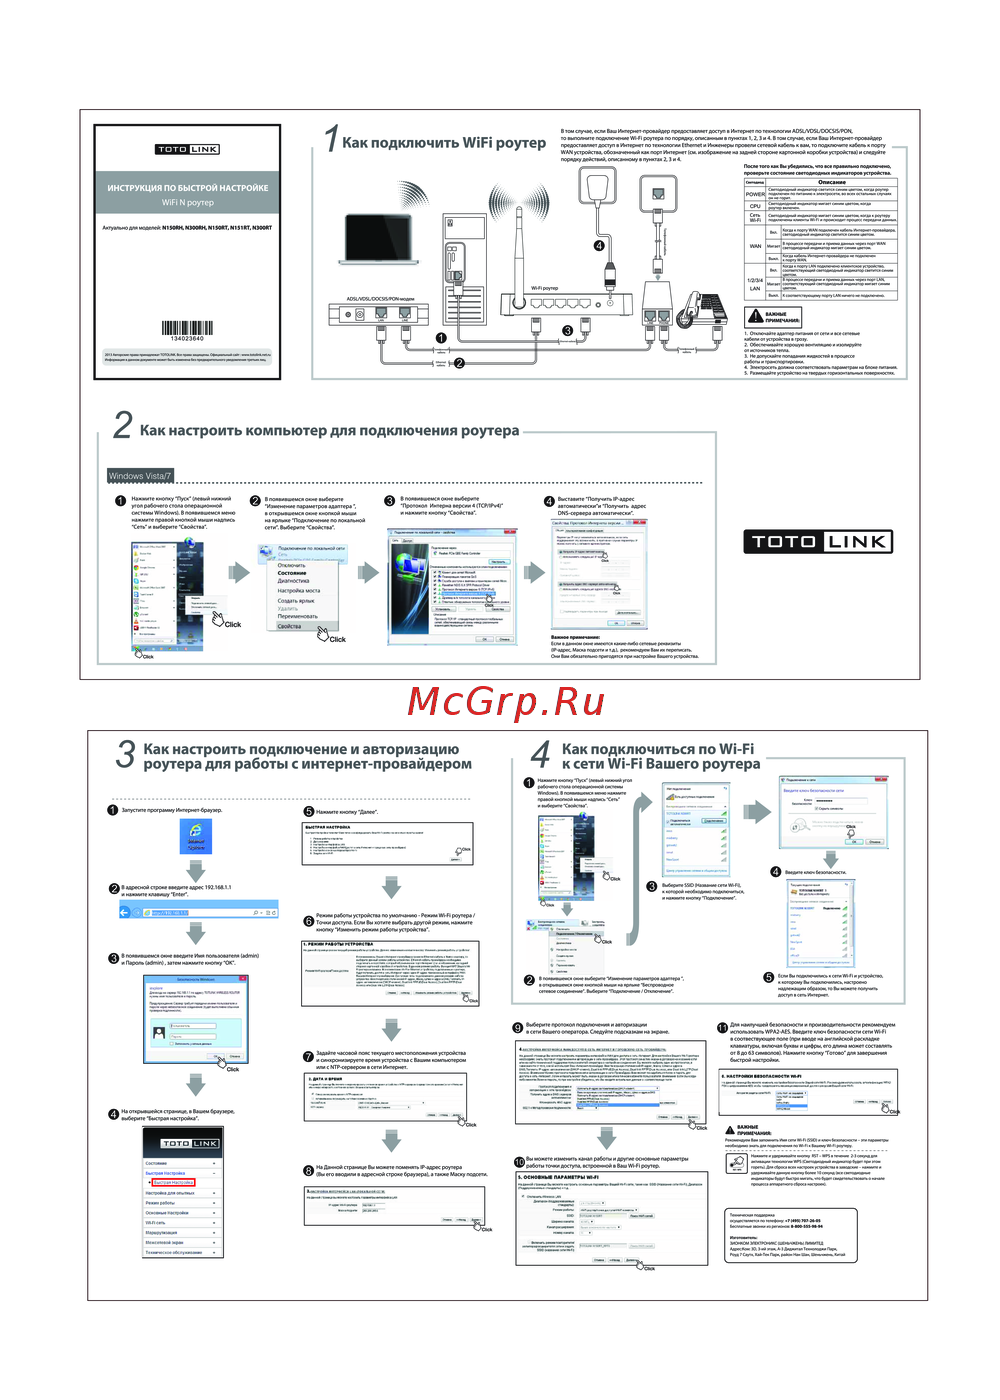
Wiring
Cable Connection
1. Connect the WAN interface of Vault Plus to the LAN interface of router, see figure below. When the
connection succeeds, the WAN network indicator displays green, and the system status indicator
displays green.
2. Connect the power cable to the Vault Plus, and the Vault Plus starts up within two minutes.
If you want to install the HDD by yourself, refer to the Appendix.
Setup
Powering on Device
(Before You Start) The camera should be within 20' (6m) from the Vault Plus.
1. Power on the camera.
- Wait until camera status light blinks alternating Blue and Red.
2. Press the One-Touch Access button of the Vault Plus.
- Its system status indicator light will start to flash.
- The EZVIZ camera will automatically connect to it.
(Result) When the camera status light starts to flash Blue, the connection process is complete.
Restore the camera if it has been connected to Wi-Fi before. You can connect to the device with One-touch access. For cameras that do
not support Wi-Fi, connect the camera to the LAN interface with the network cable.
Содержание
94- Fcc information
- About the documents
- Safety instruction
- Eu conformity statement
- Ec declaration of conformity
- Save this manual for future reference
- Rear panel overview
- Box contents
- Basic information
- Product view
- Led indicator status
- Wiring
- Linkage
- Appendix
- Übersicht geräterückseite
- Lieferumfang
- Allgemeine informationen
- Produktinformation
- Led anzeigestatus
- Verkabelung
- Einrichtung
- Verbindung
- Anhang
- Vista general del panel trasero
- Información básica
- Contenido de la caja
- Vista del producto
- Indicador de estado led
- Configuración
- Cableado
- Vinculación
- Présentation du panneau arrière
- Informations de base
- Contenu du carton
- État de l indicateur led
- Présentation du produit
- Câblage
- Mise en place
- Liaison
- Annexe
- Vista del pannello posteriore
- Informazioni di base
- Contenuto della confezione
- Vista del prodotto
- Stato indicatori led
- Configurazione
- Cablaggio
- Abbinamento
- Appendice
- Overzicht achterkant
- Doosinhoud
- Basis informatie
- Productoverzicht
- Status led lampje
- Installatie
- Bedrading
- Linken
- Bijlage
- Zawartość opakowania
- Przegląd tylnego panelu
- Podstawowe informacje
- Widok produktu
- Status wskaźnika led
- Okablowanie
- Konfiguracja
- Podłączanie
- Załącznik
- Основная информация
- Внешний вид задней панели
- Содержимое упаковочной коробки
- Светодиодные индикаторы и их обозначения
- Внешний вид устройства
- Настройка
- Схема подключения
- Связь с другими устройствами
- Приложение
- Περιεχόμενα κουτιού
- Επισκόπηση πίσω πλευράς
- Βασικές πληροφορίες
- Προβολή προϊόντος
- Κατάσταση ενδεικτικής λυχνίας led
- Ρύθμιση
- Καλωδίωση
- Σύνδεση
- Παράρτημα
- Základní informace
- Přehled zadního panelu
- Obsah balení
- Stav indikátoru led
- Náhled na produkt
- Zapojení
- Instalace
- Propojení
- Příloha
Похожие устройства
-
 Ezviz W3Инструкция по эксплуатации
 -
 Ezviz ezWireLess KitИнструкция по эксплуатации
 -
 Ezviz Vault LiveИнструкция по эксплуатации
 -
 Ezviz Vault PlusИнструкция по эксплуатации
 -
 Digma Wi-Fi 4G HOMEИнструкция к устройству
 -
 Tp-Link Archer XXXXИнструкция в сокращённом виде
 -
 TOTOLINK N150RTРуководство по работе с устройством
 -
 Eltex RG-5440-WacРуководство пользователя
 -
 Asus TUF-AX4200Краткая инструкция
 -
 Hikvision DS-3WR12GCОписание параметров
 -
 Eltex NTU-RG-5420Документ с характеристиками
 -
Eltex NTU-RG-5440Техническая спецификация
