
D-Link DES-1100-10P Краткое руководство по установке онлайн
Getting Started Guide For
D-Link EasySmart Switch
Краткое руководство по
установке коммутатора
D-Link EasySmart
Switch Management
The D-Link EasySmart Switch can be managed through
a web browser. Each switch must be assigned its own IP
address, which is used for communication with Web-
Based Management and the PC should have an IP
address in the same range as the switch.
Web-based Management Interface
After a successful physical installation, you can congure
the switch, monitor the LED panel, and display statistics
using a web browser. You need the following equipment
to begin the web conguration of your device:
- A PC with a RJ-45 Ethernet connection
- A standard Ethernet cable
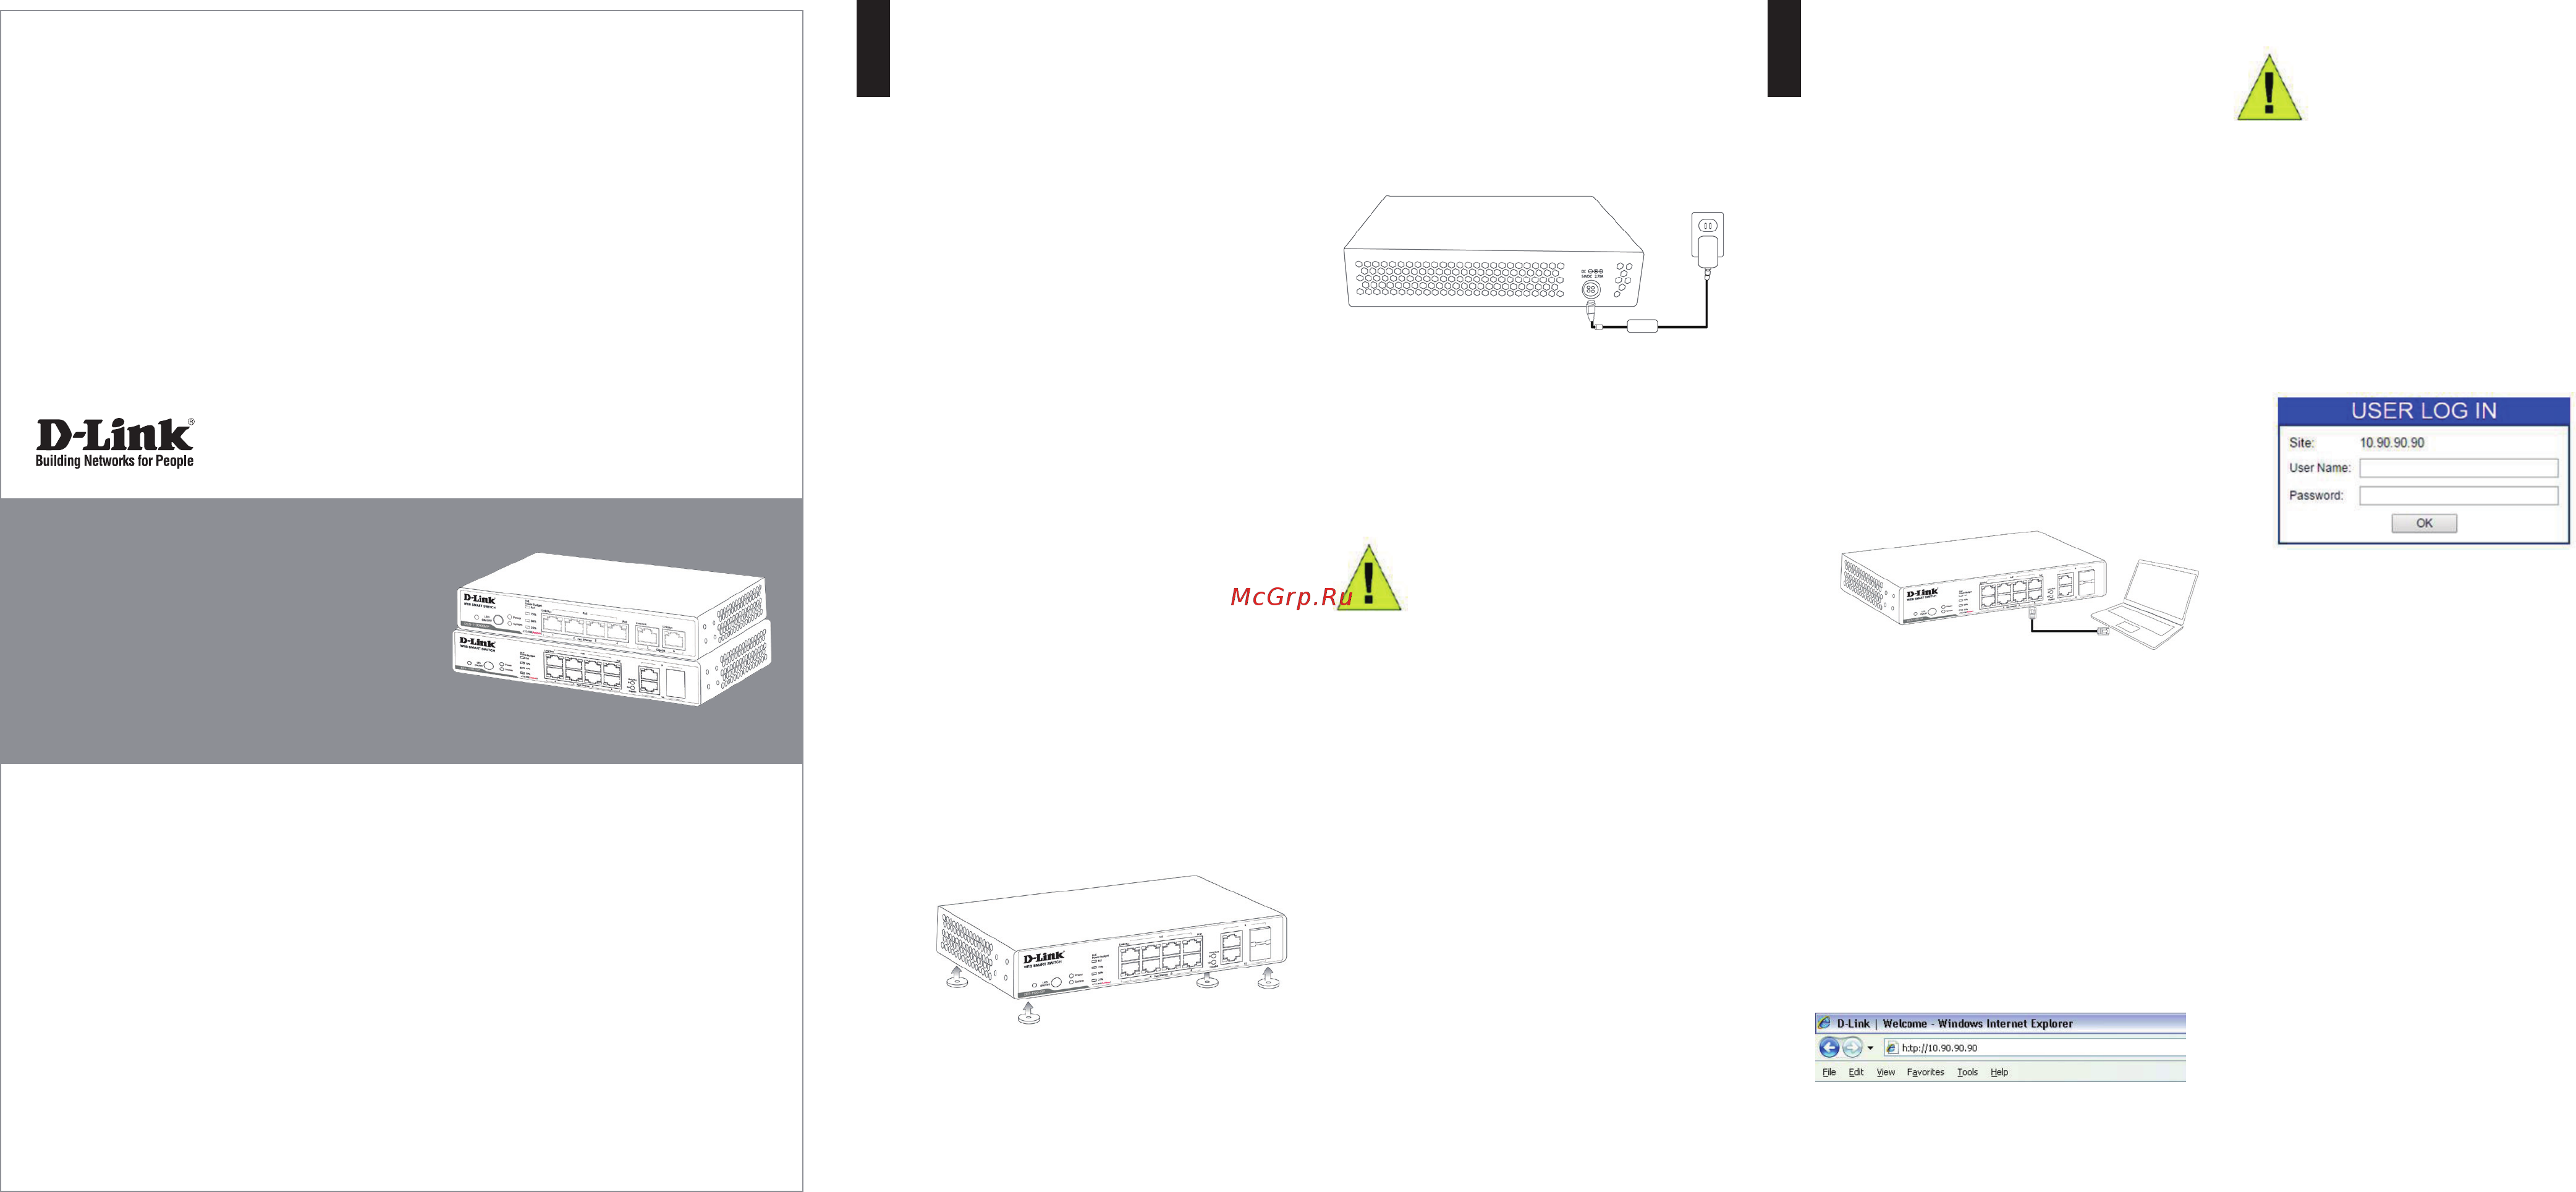
Step 1
Connect the Ethernet cable to any of the ports on the
front panel of the switch and to the Ethernet port on the
PC.
Figure 3. Connected Ethernet cable
Step 2
In order to login and congure the switch via an Ethernet
connection, the PC must have an IP address in the same
range as the switch. For example, if the switch has an
IP address of 10.90.90.90, the PC should have an IP
address of 10.x.y.z (where x/y is a number between 0 ~
254 and z is a number between 1 ~254), and a subnet
mask of 255.0.0.0.
Open your web browser and enter http://10.90.90.90
(the factory-default IP address) in the address box. Then
press <Enter>.
Figure 4. Enter the IP address 10.90.90.90 in the web
browser
NOTE:
The switch’s factory default IP address is
10.90.90.90 with a subnet mask of 255.0.0.0 and a default
gateway of 0.0.0.0
Step 3
When the following logon box appears, enter “admin”
for the User Name, enter “admin” for the password.
Press OK to enter the main conguration window.
Figure 5. User authentication window
ENGLISH
ENGLISH
DES-1100-10P
About This Guide
This guide gives step-by-step instructions for setting
up all D-Link EasySmart switches. Please note that the
model you have purchased may appear slightly different
from those shown in the illustrations. For more detailed
information about your switch, its components, making
network connections, and technical specications, please
refer to the User’s Guide included with your switch.
Step 1 – Unpacking
Open the shipping carton and carefully unpack its
contents. Please consult the packing list located in the
User Guide to make sure all items are present and
undamaged. If any item is missing or damaged, please
contact your local D-Link reseller for replacement.
- One D-Link EasySmart Switch
- Power Adapter
- Power Cord
- Getting Started Guide
- Rubber Foot and Cable Latch
Step 2 – Switch Installation
For safe switch installation and operation, it is
recommended that you:
• Visually inspect the Power Cord and Power Adapter
to see that it is secured fully to the AC and DC power
connector.
• Make sure that there is proper heat dissipation and
adequate ventilation around the switch.
• Do not place heavy objects on the switch.
When installing the switch on a desktop, the rubber feet
included with the device must be attached on the bottom
at each corner of the device’s base. Allow enough
ventilation space between the device and the objects
around it.
Figure 1. Attaching the rubber feet
Step 3 – Plug in the AC Power
Cord
You can now connect the Power Adapter into the rear of
the switch and to an electrical outlet (preferably one that
is grounded and surge protected).
Figure 2. Plugging the switch into an outlet
Power Failure
As a precaution, the switch should be unplugged in
case of power failure. When power is resumed, plug the
switch back in.
NOTE:
For function and safety, please do use the Power
Adapter shipped with this D-Link EasySmart Switch.
Содержание
- About this guide 1
- Getting started guide for d link easysmart switch 1
- Step 1 1
- Step 1 unpacking 1
- Step 2 1
- Step 2 switch installation 1
- Step 3 1
- Step 3 plug in the ac power cord 1
- Switch management 1
- Web based management interface 1
- Краткое руководство по установке коммутатора d link easysmart 1
- Техническая поддержка 2
- Технические характеристики des 1100 10p 2
- Управление 2
- Управление через web интерфейс 2
- Шаг 1 2
- Шаг 1 распаковка 2
- Шаг 2 2
- Шаг 2 установка коммутатора 2
- Шаг 3 2
- Шаг 3 подключение кабеля питания переменного тока 2
Похожие устройства
- D-Link DES-1100-10P Руководство пользователя
- D-Link DGS-1100-05 rev.A Краткое руководство по установке
- D-Link DGS-1100-05 rev.A Руководство пользователя
- D-Link DGS-1100-05 rev.B Руководство пользователя
- D-Link DGS-1100-05 rev.B Краткое руководство по установке
- D-Link DGS-1100-05PD Краткое руководство по установке
- D-Link DGS-1100-08P Руководство пользователя _Web UI_
- D-Link DGS-1100-08P Краткое руководство по установке
- D-Link DGS-1100-08PD Краткое руководство по установке
- D-Link DGS-1100-10MP Руководство пользователя _Web UI для мониторинга систем видеонаблюдения_
- D-Link DGS-1100-10MP Руководство пользователя _Web UI_
- D-Link DGS-1100-10MP Краткое руководство по установке
- D-Link DGS-1100-10MPP Руководство пользователя _Web UI для мониторинга систем видеонаблюдения_
- D-Link DGS-1100-10MPP Руководство пользователя _Web UI_
- D-Link DGS-1100-10MPP Краткое руководство по установке
- D-Link DGS-1100-24P Руководство пользователя _Web UI_
- D-Link DGS-1100-24P Краткое руководство по установке
- D-Link DGS-1100-26MPP Руководство пользователя _Web UI для мониторинга систем видеонаблюдения_
- D-Link DGS-1100-26MPP Руководство пользователя _Web UI_
- D-Link DGS-1100-26MPP Краткое руководство по установке