
Xigmatek Lamiya Инструкция по эксплуатации онлайн
Содержание
- 7 нч7й h owjtw 7да7й н йа 1
- Add on card installation 1
- Lam i ya 1
- Motherboard installation 1
- Removal of panels 1
- Rítvv 1
- User manual 1
- Дадаадаадв 1
- Й sjbw whä 1
- Й1 й 1
- Йун77нсдадада 1 0 да да жи то i o 1
- Нтдадаида 1
- Рс1 рс1 ей н 0ежгт х ки даад 1
- Ялаш âéiiu 1
- Front i rear fan installation 2
- Liquid cooling installation 2
- Power supply installation 2
- S3 xigiviatek 2
- Ssd installation 2
- Ssd or 3 hdd installation 2
- Top fan installation 2
- Www xigmatek com 2
- Manual sîîfsêêlm ep 3
- N níf 1ооржепй 3
- R3 w594mm x h420mm a2 3
- W198mm x h 140mm 3
- Xx xigmatek 3
Похожие устройства
- Xigmatek Zeus Spectrum Edition Инструкция по эксплуатации
- Xigmatek Zeus Инструкция по эксплуатации
- Xigmatek Aquarius Plus Инструкция по эксплуатации
- Xigmatek Triple X Инструкция по эксплуатации
- Xigmatek Sirocon III Инструкция по эксплуатации
- Xigmatek Helios Инструкция по эксплуатации
- Vixter BT-1005 Инструкция по эксплуатации
- Vixter BT-1007 Инструкция по эксплуатации
- Vixter BT-1100 Инструкция по эксплуатации
- Vixter BT-1009 Инструкция по эксплуатации
- Vixter PB-4000 Инструкция по эксплуатации
- Vixter VCW-2800 Инструкция по эксплуатации
- Vixter DT-4010 Инструкция по эксплуатации
- Vixter AO-915P Инструкция по эксплуатации
- SAFUN BCL-18-302 Инструкция по эксплуатации
- SAFUN AG-150-1700VL Инструкция по эксплуатации
- SAFUN AG-180-1700VL Инструкция по эксплуатации
- SAFUN CCS-36-401 Инструкция по эксплуатации
- SAFUN CD-18 Инструкция по эксплуатации
- SAFUN CD-12 Инструкция по эксплуатации
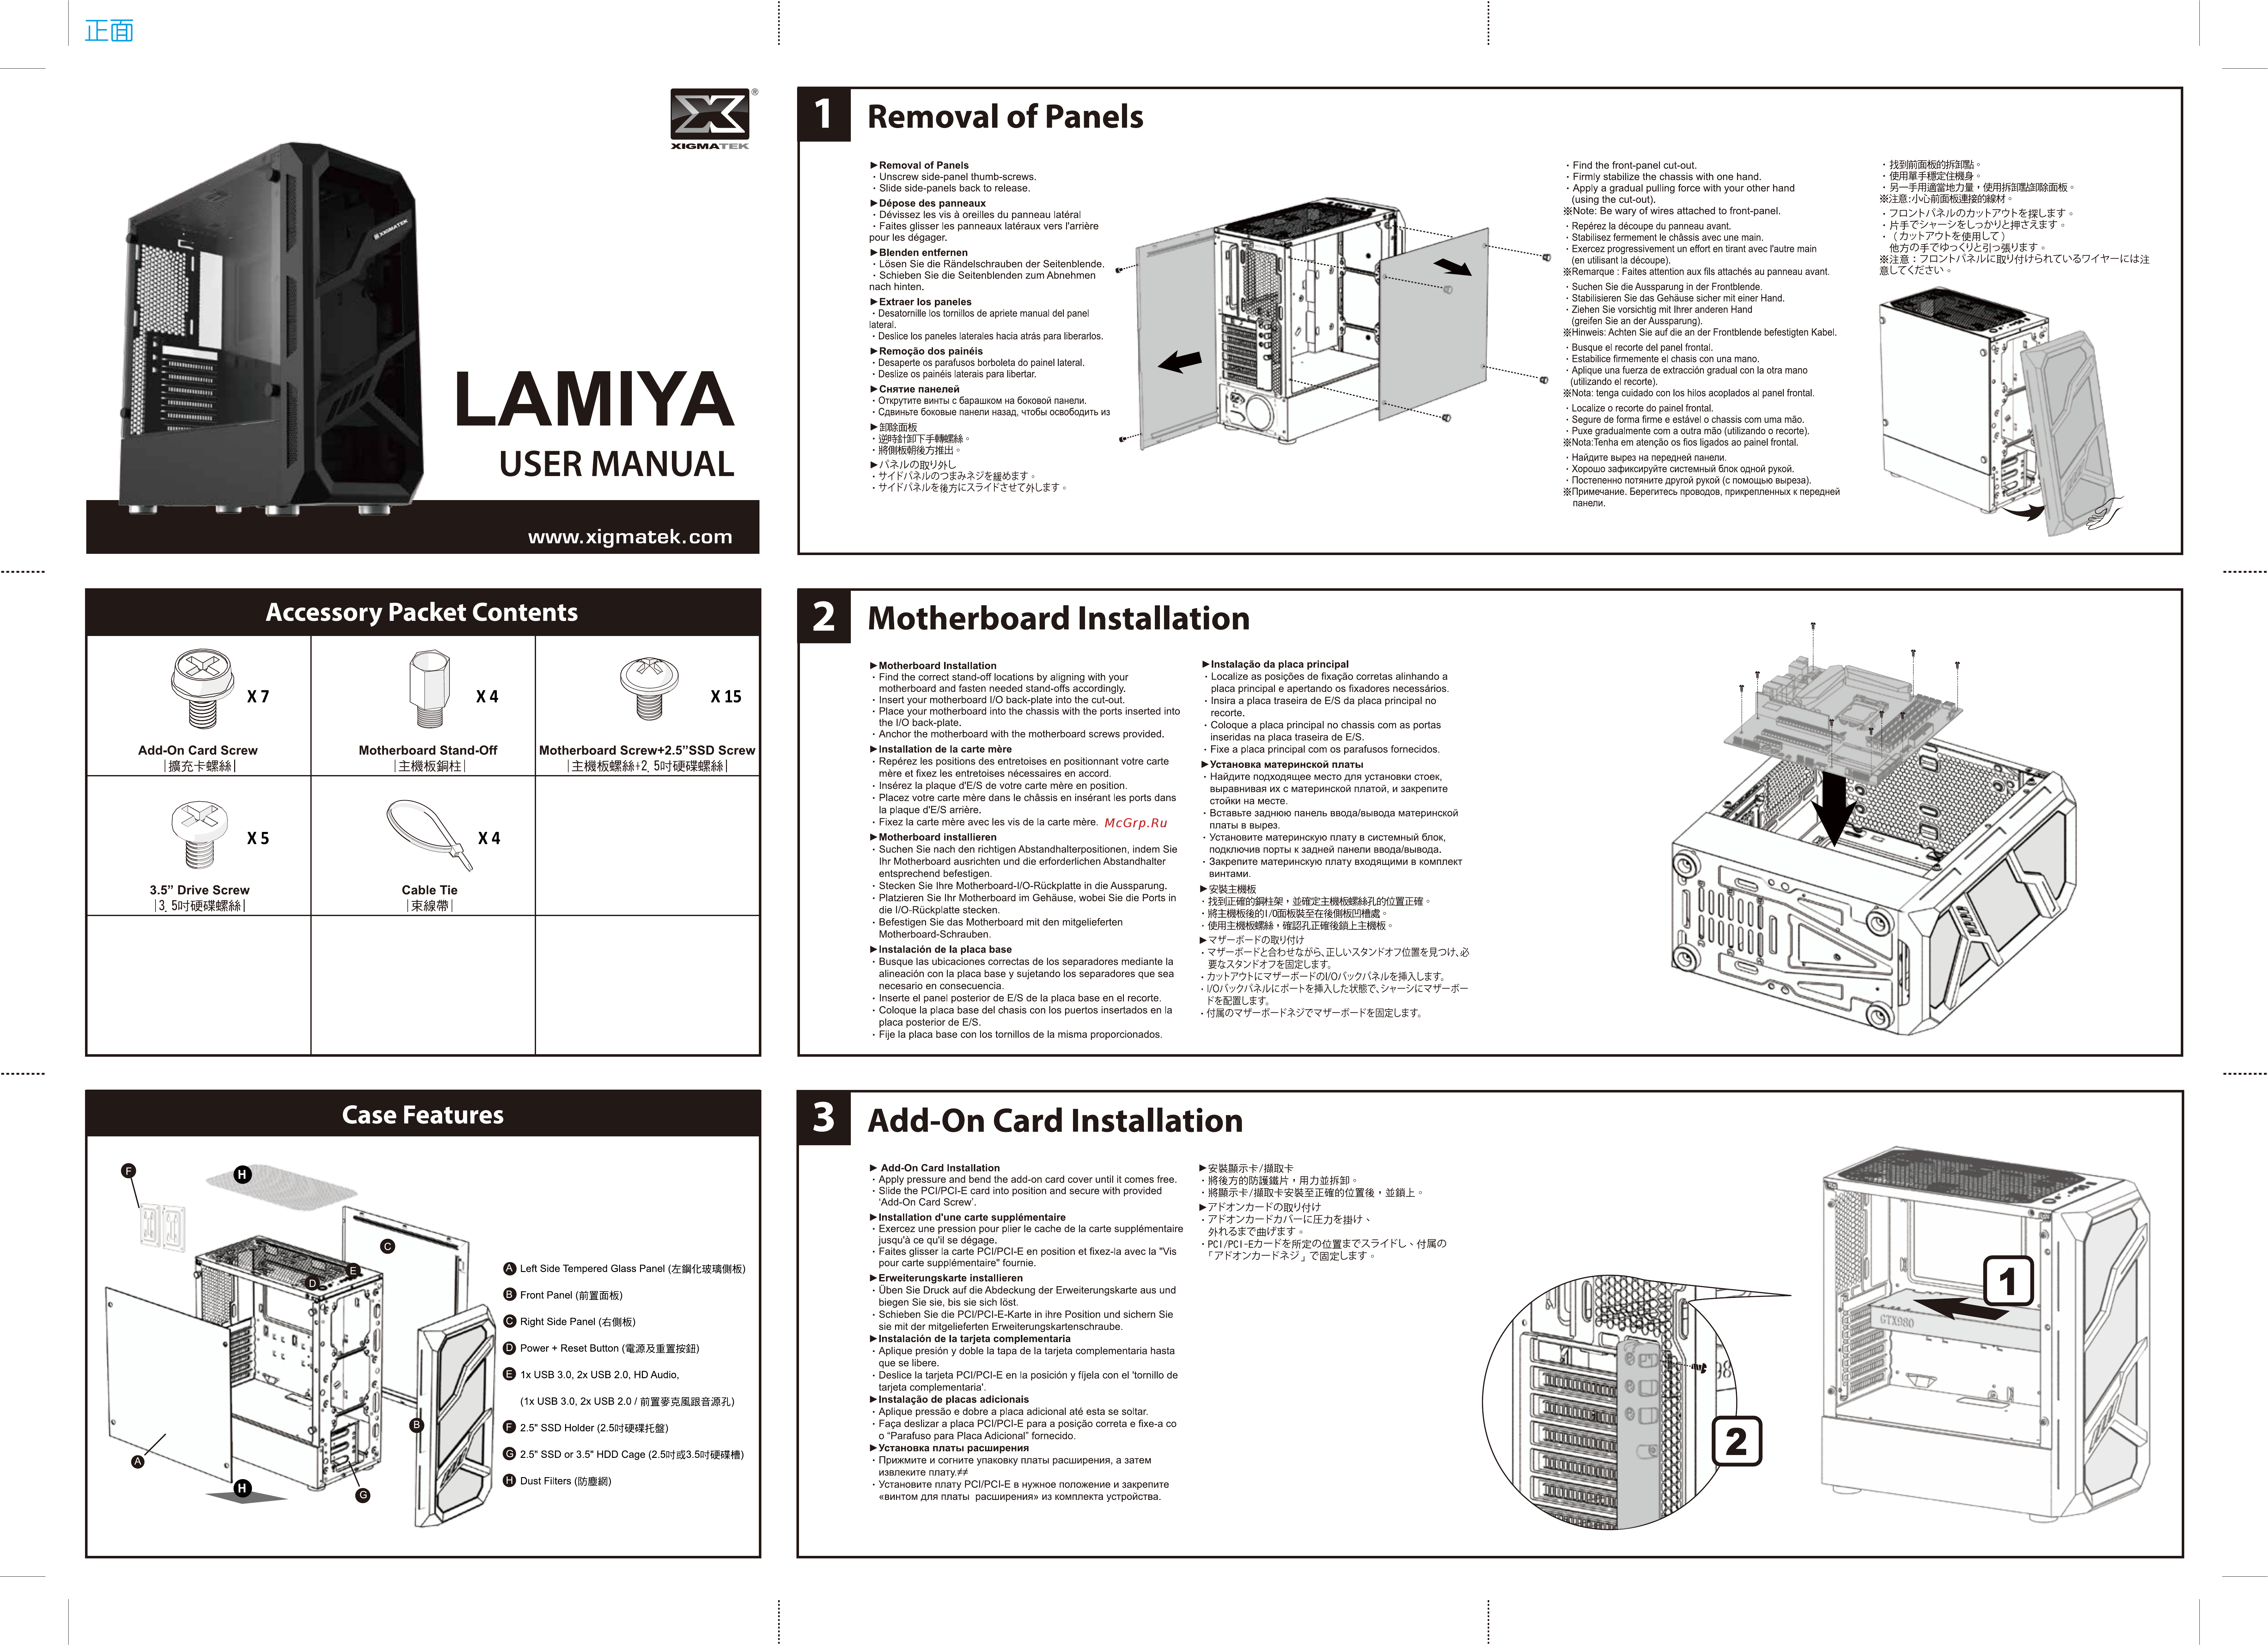
Removal of Panels XIGMA EK Removal of Panels Unscrew side panel thumb screws Slide side panels back to release Find the front panel cut out Firmiy stabilize the châssis with one hand Apply a graduai pulling force with your other hand using the cut out j Note Be wary of wires attached to front panel Dépose des panneaux Dévissez les vis á oreilles du panneau latéral Faites glisser les panneaux latéraux vers l arriére pour les dégager Repérez la découpe du panneau avant Stabilisez fermement le châssis avec une main Exercez progressivement un effort en tirant avec l autre main en utilisant la découpe Remarque Faites attention aux fils attachés au panneau avant Blenden entfernen Lösen Sie die Rändelschrauben der Seitenblende Schieben Sie die Seitenblenden zum Abnehmen nach hinten Suchen Sie die Aussparung in der Frontblende Stabilisieren Sie das Gehäuse sicher mit einer Hand Ziehen Sie vorsichtig mit Ihrer anderen Hand greifen Sie an der Aussparung Hinweis Achten Sie auf die an der Frontblende befestigten Kabel Extraer los paneles Desatornille los tornillos de apriete manual del panel lateral Deslice los paneles laterales hacia atrás para liberarlos Busque el recorte del panel frontal Estabilice firmemente el chasis con una mano Aplique una fuerza de extracción gradual con la otra mano utilizando el recorte sfNota tenga cuidado con los hilos acoplados al panel frontal Remogäo dos painéis Desaperte os parafusos borboleta do painel lateral Deslize os painéis laterais para libertar LAM I YA KHUlltlMiIlli USER MANUAL Снятие панелей Открутите винты с барашком на боковой панели Сдвиньте боковые панели назад чтобы освободить из Localize o recorte do painel frontal Segure de forma firme e estável o châssis corn urna mäo Puxe gradualmente corn a outra mäo utilizando o recorte KNota Tenha em atençâo os fios ligados ao painel frontal 0 Найдите вырез на передней панели Хорошо зафиксируйте системный блок одной рукой Постепенно потяните другой рукой с помощью выреза Примечание Берегитесь проводов прикрепленных к передней панели www xigmatek com Accessory Packet Contents Motherboard Installation X15 X7 Add On Card Screw IB X4 Motherboard Stand Off Motherboard Screw 2 5 SSD Screw 1 4 X5 3 5 Drive Screw 13 Cable Tie imi 5n irai Motherboard Installation Find the correct stand off locations by aligning with your motherboard and fasten needed stand offs accordingly Insert your motherboard I O back plate into the cut out Place your motherboard into the chassis with the ports inserted into the I O back plate Anchor the motherboard with the motherboard screws provided Installation de la carte mère Repérez les positions des entretoises en positionnant votre carte mère et fixez les entretoises nécessaires en accord Insérez la plaque d E S de votre carte mère en position Placez votre carte mère dans le châssis en insérant les ports dans la plaque d E S arrière Fixez la carte mère avec les vis de la carte mère Motherboard installieren Suchen Sie nach den richtigen Abstandhalterpositionen indem Sie Ihr Motherboard ausrichten und die erforderlichen Abstandhalter entsprechend befestigen Stecken Sie Ihre Motherboard I O Rückplatte in die Aussparung Platzieren Sie Ihr Motherboard im Gehäuse wobei Sie die Ports in die I O Rückplatte stecken Befestigen Sie das Motherboard mit den mitgelieferten Motherboard Schrauben Instalación de la placa base Busque las ubicaciones correctas de los separadores mediante la alineación con la placa base y sujetando los separadores que sea necesario en consecuencia Inserte el panel posterior de E S de la placa base en el recorte Coloque la placa base del chasis con los puertos insertados en la placa posterior de E S Fije la placa base con los tornillos de la misma proporcionados Case Features Instalaçâo da placa principal Localize as posiçôes de fixaçâo corretas alinhando a placa principal e apertando os fixadores necessários Insira a placa traseira de E S da placa principal no recorte Coloque a placa principal no chassis com as portas inseridas na placa traseira de E S Fixe a placa principal com os parafusos fornecidos Установка материнской платы Найдите подходящее место для установки стоек выравнивая их с материнской платой и закрепите стойки на месте Вставьте заднюю панель ввода вывода материнской платы в вырез Установите материнскую плату в системный блок подключив порты к задней панели ввода вывода Закрепите материнскую плату входящими в комплект винтами ШМ ЙЖЖИЯзЗ ЙуН77Нсдадада 1 0 да да Жи То I O ЪУ Й1 Й Уу У у г Add On Card Installation Add On Card Installation Apply pressure and bend the add on card cover until it cornes free Slide the PCI PCI E card into position and secure with provided Add On Card Screw Installation d une carte supplémentaire Exercez une pression pour plier le cache de la carte supplémentaire jusqu à ce qu il se dégage Faites glisser la carte PCI PCI E en position et fixez la avec la Vis pour carte supplémentaire fournie Erweiterungskarte installieren Üben Sie Druck auf die Abdeckung der Erweiterungskarte aus und biegen Sie sie bis sie sich lost Schieben Sie die PCI PCI E Karte in ihre Position und sichern Sie sie mit der mitgelieferten Erweiterungskartenschraube Instalación de la tarjeta complementaria Aplique presión y doble la tapa de la tarjeta complementaria hasta que se libere Deslice la tarjeta PCI PCI E en la posición y fíjela con el tornillo de tarjeta complementaria Instalaçâo de placas adicionáis Aplique pressâo e dobre a placa adicional até esta se soltar Faça deslizar a placa PCI PCI E para a posiçâo correta e fixe а со o Parafuso para Placa Adicional fornecido Установка платы расширения Прижмите и согните упаковку платы расширения а затем извлеките плату Установите плату PCI PCI E в нужное положение и закрепите винтом для платы расширения из комплекта устройства ш ялаш 7 НЧ7Й H OWJtW 7да7Й Н ЙА рс1 рс1 Ей н 0ежгт х ки даад âÉiiU й SJBW WHÄ дадаадаадв RíTvv Нтдадаида