
Raijintek SAMOS SA580 Руководство по установке онлайн
Creating Passion
1.Keep and store the product away from the reach of children.
2.Check the component list and condition of the product before
installation. If there is any problem, contact the shop where you
purchased to get a replacement or refund.
3.RAIJINTEK Co., Ltd. is not responsible for any damages due to
external causes, including but not limited to, improper use,
problems with electrical power, accident, neglect, alteration,
repair, improper installation, and improper testing.
4.
GPU and VGA card are subject to damage if the product in
incorrectly installed.
5.This product is a water cooling solution device, once taken apart
or any use of non RAIJINTEK’s accessories, will lead to a warran-
ty loss.
6.Liquid contaminations of other objects are in no matter under
warranty due to maintenance or possible misuse.
Precautions
SAMOS SERIES LIQUID COOLING GRAPHIC CARD WATER BLOCK
Mirror-Finished Copper Base | High Water Flow Design | Unique Micro-Channel Structure
100 mm
100 mm
100 mm
A × 2
B × 1
15
TYPE 1 TYPE 2 TYPE 3 TYPE 4
OUTIN
OUT
OUT
IN
IN
OUT IN
1
VGA water block
4
Thermal pad
7
Spring screw
8
Screw for back plate
5
Pillar
6
Spacer
2
Back plate
3
Thermal Grease
1
VGA water block
4
Thermal pad
7
Spring screw
8
Screw for back plate
5
Pillar
6
Spacer
2
Back plate
3
Thermal Grease
1
VGA water block
3
Thermal pad
6
Spring screw
4
Pillar
5
Spacer
2
Thermal Grease
1
VGA water block
3
Thermal pad
4
Spacer
5
Spring screw
2
Thermal Grease
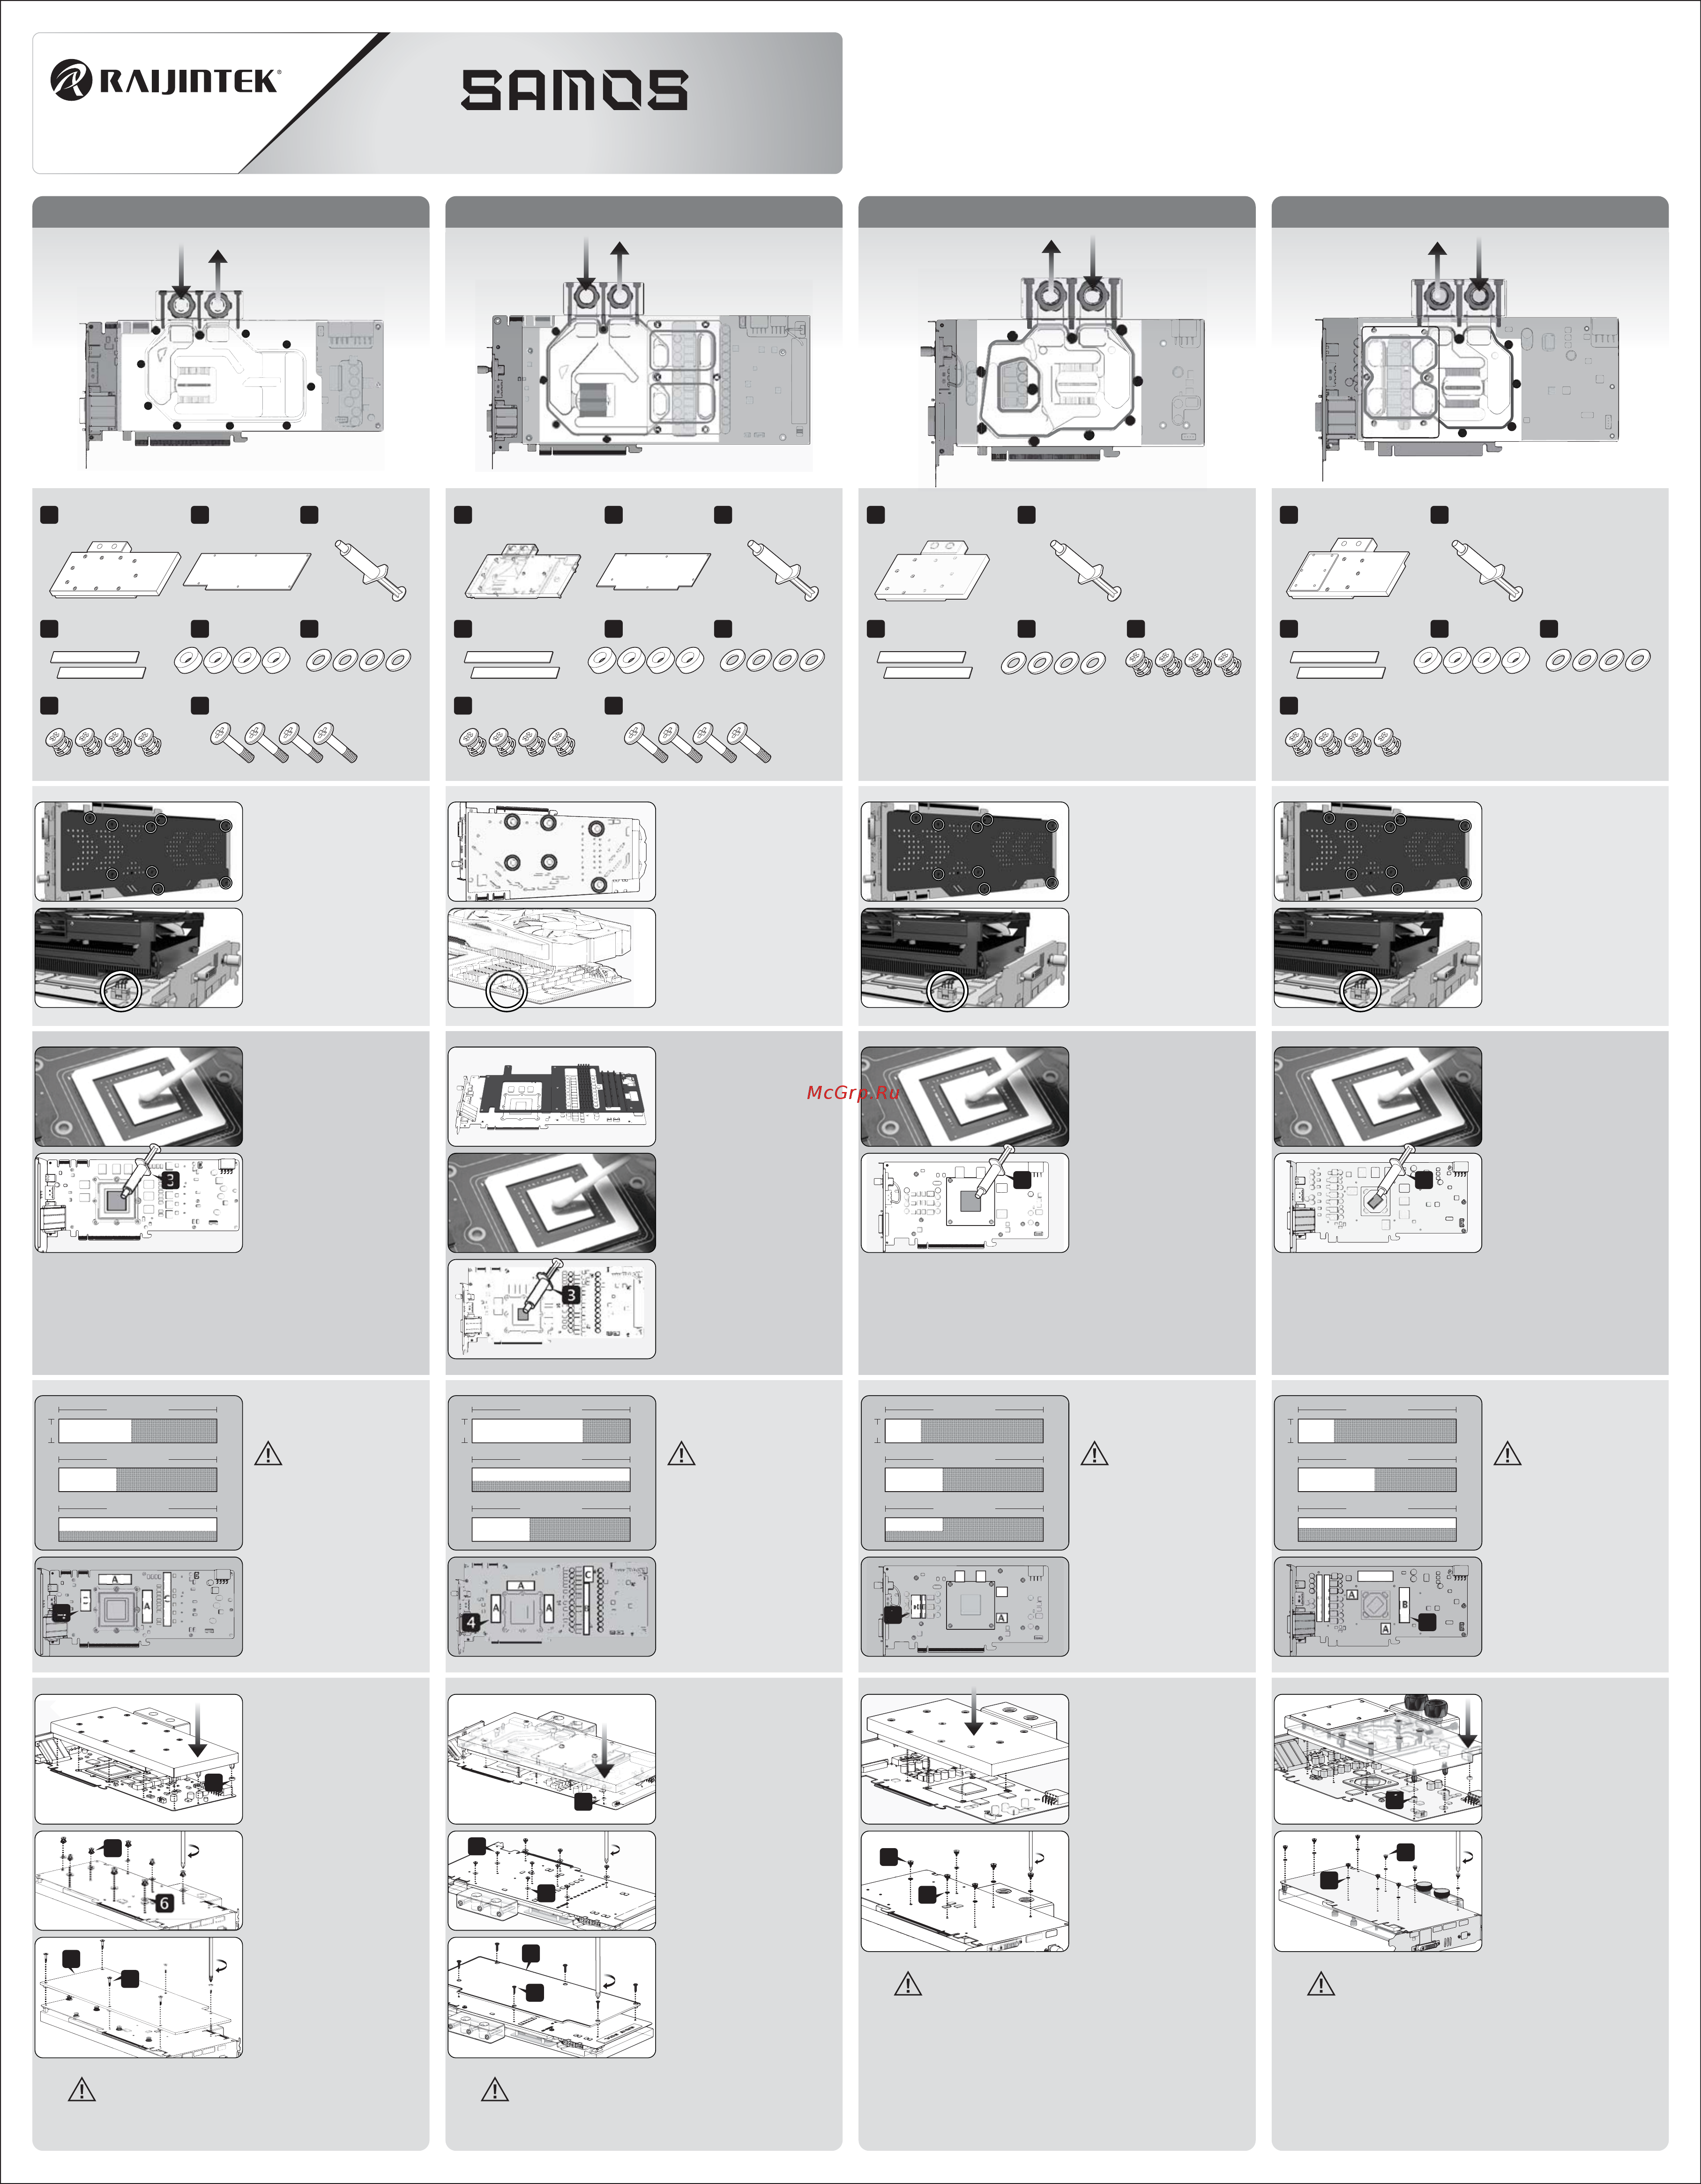
Clean the original thermal
grease off the GPU die and
thermal pad.
Remove the screws circled
on the diagram. All Back-plate
and Heat-sink assembly screws
should be removed
Apply Thermal grease on GPU
evenly.
Remove the power connector
of fan, and carefully detach
the original stock cooler
Remove the screws circled
on the diagram. All Back-plate
and Heat-sink assembly screws
should be removed
Remove the power connector
of fan, and carefully detach
the original stock cooler
Slip the pillar into the screw and
stick the VGA water block on
the VGA card. Align the screws
onto the screw holes on the
VGA card. Pay attention to
the pressure applied during
installation. Do not press the
VGA water block and PCB
board too hard.
Precaution:
Fasten the screws until the VGA water
block is balanced. To avoid damaging the chip, do not
fasten the screws to the point where it cannot be
screwed anymore.
Fasten the spring screw from
backside (Place the insulation
washer on the screw hole)
Once installing VGA water
block is done, place the back
plate and fasten the screws
on it.
Cut the thermal pads to place
on the heat-emanating chips.
Precaution: Besides GPU that
needs to have thermal grease
applied on it, the heat-
emanating chip on the VGA
card also needs the thermal
pads to be attached on it, or
the card will burn out.
Clean the original thermal
grease off the GPU die and
thermal pad.
Apply Thermal grease on GPU
evenly.
Clean the original thermal
grease off the GPU die and
thermal pad.
Apply Thermal grease on GPU
evenly.
Clean the original Heat-sink
off the GPU die.
Clean the original thermal
grease off the GPU die and
thermal pad.
Apply Thermal grease on GPU
evenly.
Remove the screws circled
on the diagram. All Back-plate
and Heat-sink assembly screws
should be removed
Remove the power connector
of fan, and carefully detach
the original stock cooler
Remove the screws circled
on the diagram. All Back-plate
and Heat-sink assembly screws
should be removed
Remove the power connector
of fan, and carefully detach
the original stock cooler
C × 1
A
A
B
C
100 mm
100 mm
100 mm
A × 3
15
Cut the thermal pads to place
on the heat-emanating chips.
Precaution: Besides GPU that
needs to have thermal grease
applied on it, the heat-
emanating chip on the VGA
card also needs the thermal
pads to be attached on it, or
the card will burn out.
C × 1
B × 1
100 mm
100 mm
100 mm
B × 2
15
Cut the thermal pads to place
on the heat-emanating chips.
Precaution: Besides GPU that
needs to have thermal grease
applied on it, the heat-
emanating chip on the VGA
card also needs the thermal
pads to be attached on it, or
the card will burn out.
C × 2
100 mm
100 mm
100 mm
A × 4
B × 1
15
Cut the thermal pads to place
on the heat-emanating chips.
Precaution: Besides GPU that
needs to have thermal grease
applied on it, the heat-
emanating chip on the VGA
card also needs the thermal
pads to be attached on it, or
the card will burn out.
C × 1
B
C
A
AA
A
A
A
A
B
C
A × 2
A
B
A
B
CC
OUT
IN
OUT
IN
Slip the pillar into the screw and
stick the VGA water block on
the VGA card. Align the screws
onto the screw holes on the
VGA card. Pay attention to
the pressure applied during
installation. Do not press the
VGA water block and PCB
board too hard.
Precaution:
Fasten the screws until the VGA water
block is balanced. To avoid damaging the chip, do not
fasten the screws to the point where it cannot be
screwed anymore.
Fasten the spring screw from
backside (Place the insulation
washer on the screw hole)
Once installing VGA water
block is done, place the back
plate and fasten the screws
on it.
Align the water block stand-
off onto the screw holes on
the VGA card. Pay attention to
the pressure applied during
installation. Do not press the
VGA water block and PCB
board too hard.
Precaution:
Fasten the screws until the VGA water
block is balanced. To avoid damaging the chip, do not
fasten the screws to the point where it cannot be
screwed anymore.
Fasten the spring screw from
backside (Place the insulation
washer on the screw hole)
5
4
4
3
7
5
6
6
7
8
8
3
2
2
22
3
3
5
4
4
5
6
Содержание
Похожие устройства
- Raijintek SAMOS TITAN XP Руководство по установке
- Raijintek CWB-RGB Руководство по установке
- Raijintek CWB-TR4 RBW Руководство по установке
- Raijintek PHORCYS EVO CD360/240 Руководство по установке
- Raijintek SAMOS NV2080Ti RBW Руководство по установке
- Raijintek PHORCYS PRO CA360/240 Руководство по установке
- Raijintek SAMOS AD5700 RBW Руководство по установке
- Raijintek ANTILA D5 EVO RBW Руководство по установке
- Raijintek ACHERON 360 SERIES Руководство по установке
- Raijintek ACHERON 240 SERIES Руководство по установке
- Raijintek FORKIS Руководство по установке
- Daikin RXYQ32PAY19 Технические данные
- Daikin RXYQ34PAY19 Технические данные
- Daikin RXYQ36PAY19 Технические данные
- Daikin RXYQ38PAY19 Технические данные
- Daikin RXYQ40PAY19 Технические данные
- Daikin RXYQ42PAY19 Технические данные
- Daikin RXYQ44PAY19 Технические данные
- Daikin RXYQ46PAY19 Технические данные
- Daikin RXYQ48PAY19 Технические данные