![Brother FAX 2600 ч.2 [6/30] User friendly programming](/img/pdf.png)
Brother FAX 2600 ч.2 [6/30] User friendly programming
![Brother FAX 2600 ч.2 [6/30] User friendly programming](/views2/1965654/page6/bg6.png)
3 - 1
ON-SCREEN PROGRAMMING
3
3
On-Screen Programming
User-Friendly Programming
We have designed your FAX/MFC with on-screen programming and a Help
key. User-friendly programming helps you take full advantage of all the
functions your FAX/MFC has to offer. (See Using This Manual, page 1-1.)
Since your fax programming is done on the LCD, we created step-by-step on-
screen prompts to help you program your FAX/MFC. All you need to do is
follow the prompts as they guide you through the function menu selections and
programming options and settings.
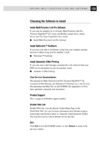
Function Mode
You can access the function mode by pressing Function. When you enter the
function mode, your FAX/MFC displays a list of main menu options from
which you can choose. These options appear one after the other on the display.
Select an option by pressing Set when the option appears on the screen.
You can “scroll” more quickly through options by pressing . When the screen
displays your selection, press Set. (Press to scroll backward if you passed
your choice or to save key strokes. Both arrow keys show all options, in the
opposite order.)
Before you press Set, you can correct a mistake you made entering information
in a field using the dial pad. Use to back up and then type over the incorrect
characters.
When you finish a function, the screen displays ACCEPTED.
Do You Have a FAX or MFC?
See the model number on your machine’s control panel to know if your machine
is a FAX or an MFC. If you have an MFC model there is an extra key press—to
access the FAX functions you must first press 1. If you have a FAX 2600, follow
the function step for FAX. If you have an MFC 4600, follow the function step
for MFC. For example,
For the FAX, press Function, 1, 3.
For the MFC, press Function, 1, 1, 3.
Note
If you want to exit the Function mode, press Stop.
Содержание
- Sequence p.1
- Connections p.1
- Connecting an external telephone answering device tad p.1
- Roll over phone lines p.2
- Recording outgoing message on external tad p.2
- Connecting an external telephone p.2
- Special line considerations p.2
- Two line phone system p.3
- Installing fax machine external two line tad and two line telephone p.3
- Converting telephone wall outlets p.3
- Multi line connections pbx p.4
- If you are installing the fax mfc to work with a pbx p.5
- Custom features on a single line p.5
- User friendly programming p.6
- On screen programming p.6
- Function mode p.6
- Do you have a fax or mfc p.6
- Function selection table p.7
- Fax no start p.7
- Fax functions p.7
- Copy press copy p.7
- Alternating displays p.7
- Fax function p.8
- Fax function p.9
- Fax function p.10
- Printer functions for mfc 4600 only p.11
- Setting station id p.12
- Setting date and time p.12
- Initial setup p.12
- Getting started p.12
- Setting tone pulse dialing for canada only p.13
- Entering text p.13
- Dialing tone select set p.13
- Special characters and symbols p.14
- Repeating letters p.14
- Notice p.14
- Making corrections p.14
- Inserting spaces p.14
- Warning p.15
- Setting the handset volume p.15
- Setting beeper volume p.15
- Setting volume amplify p.16
- Setting the speaker volume p.16
- Setting the ring volume p.16
- Set vol amplify off p.16
- Set permanent p.16
- Memory storage p.16
- Sleep mode p.17
- Set time 17 00 p.17
- Set time 12 34 enter set p.17
- Delayed timer p.17
- Setup receive p.18
- Select receive mode p.18
- Basic receiving operations p.18
- To select or change your receive mode p.19
- Tad answer mach p.19
- Setting ring delay p.19
- Manual p.19
- Fax tel p.19
- Fax only p.19
- Setting f t ring time p.20
- Ring time 20 sec p.20
- Easy receive p.20
- Reduction p.21
- Recommended reductions p.21
- Printing a reduced incoming document p.21
- Toner save p.22
- Setting the print density p.22
- Setting paper size p.22
- Change reduction 1 yes 2 no p.22
- Operation from extension telephone or external telephone p.23
- Advanced receiving operations p.23
- Setting up sequential polling receive p.24
- Setting up polling receive p.24
- Polling rx on p.24
- Polling p.24
- Enter fax no press start key p.24
- Dialing 01 p.24
- Accepted p.24
- Remaining jobs p.25
- Printing a fax in memory p.25
- Canceling a scheduled job p.25
- Telephone services p.26
- Distinctive ring p.26
- Registering your distinctive ring pattern p.27
- Long long p.27
- Very long normal pattern p.27
- Short short long p.27
- Short long short p.27
- Ring pattern p.27
- Viewing caller id list p.28
- Printing caller id list p.28
- Caller id p.28
- Call waiting caller id p.29
- Using the adf automatic document feeder p.30
- Setup send p.30
- Sending faxes using multiple settings p.30
- Before you begin p.30
Похожие устройства
-
 Brother 1350 MРуководство по эксплуатации
 -
 Brother MFX-1200 ч.4Руководство по эксплуатации
 -
 Brother MFX-1200 ч.3Руководство по эксплуатации
 -
 Brother MFX-1200 ч.2Руководство по эксплуатации
 -
 Brother MFX-1200 ч.1Руководство по эксплуатации
 -
 Brother FAX-1575mc ч.4Руководство по эксплуатации
 -
 Brother FAX-1575mc ч.3Руководство по эксплуатации
 -
 Brother FAX-1575mc ч.2Руководство по эксплуатации
 -
 Brother FAX-1575mc ч.1Руководство по эксплуатации
 -
 Brother FAX 2750 ч.5Руководство по эксплуатации
 -
 Brother FAX 2750 ч.4Руководство по эксплуатации
 -
 Brother FAX 2750 ч.3Руководство по эксплуатации