
Aten US3311 Краткое руководство по установке онлайн
A
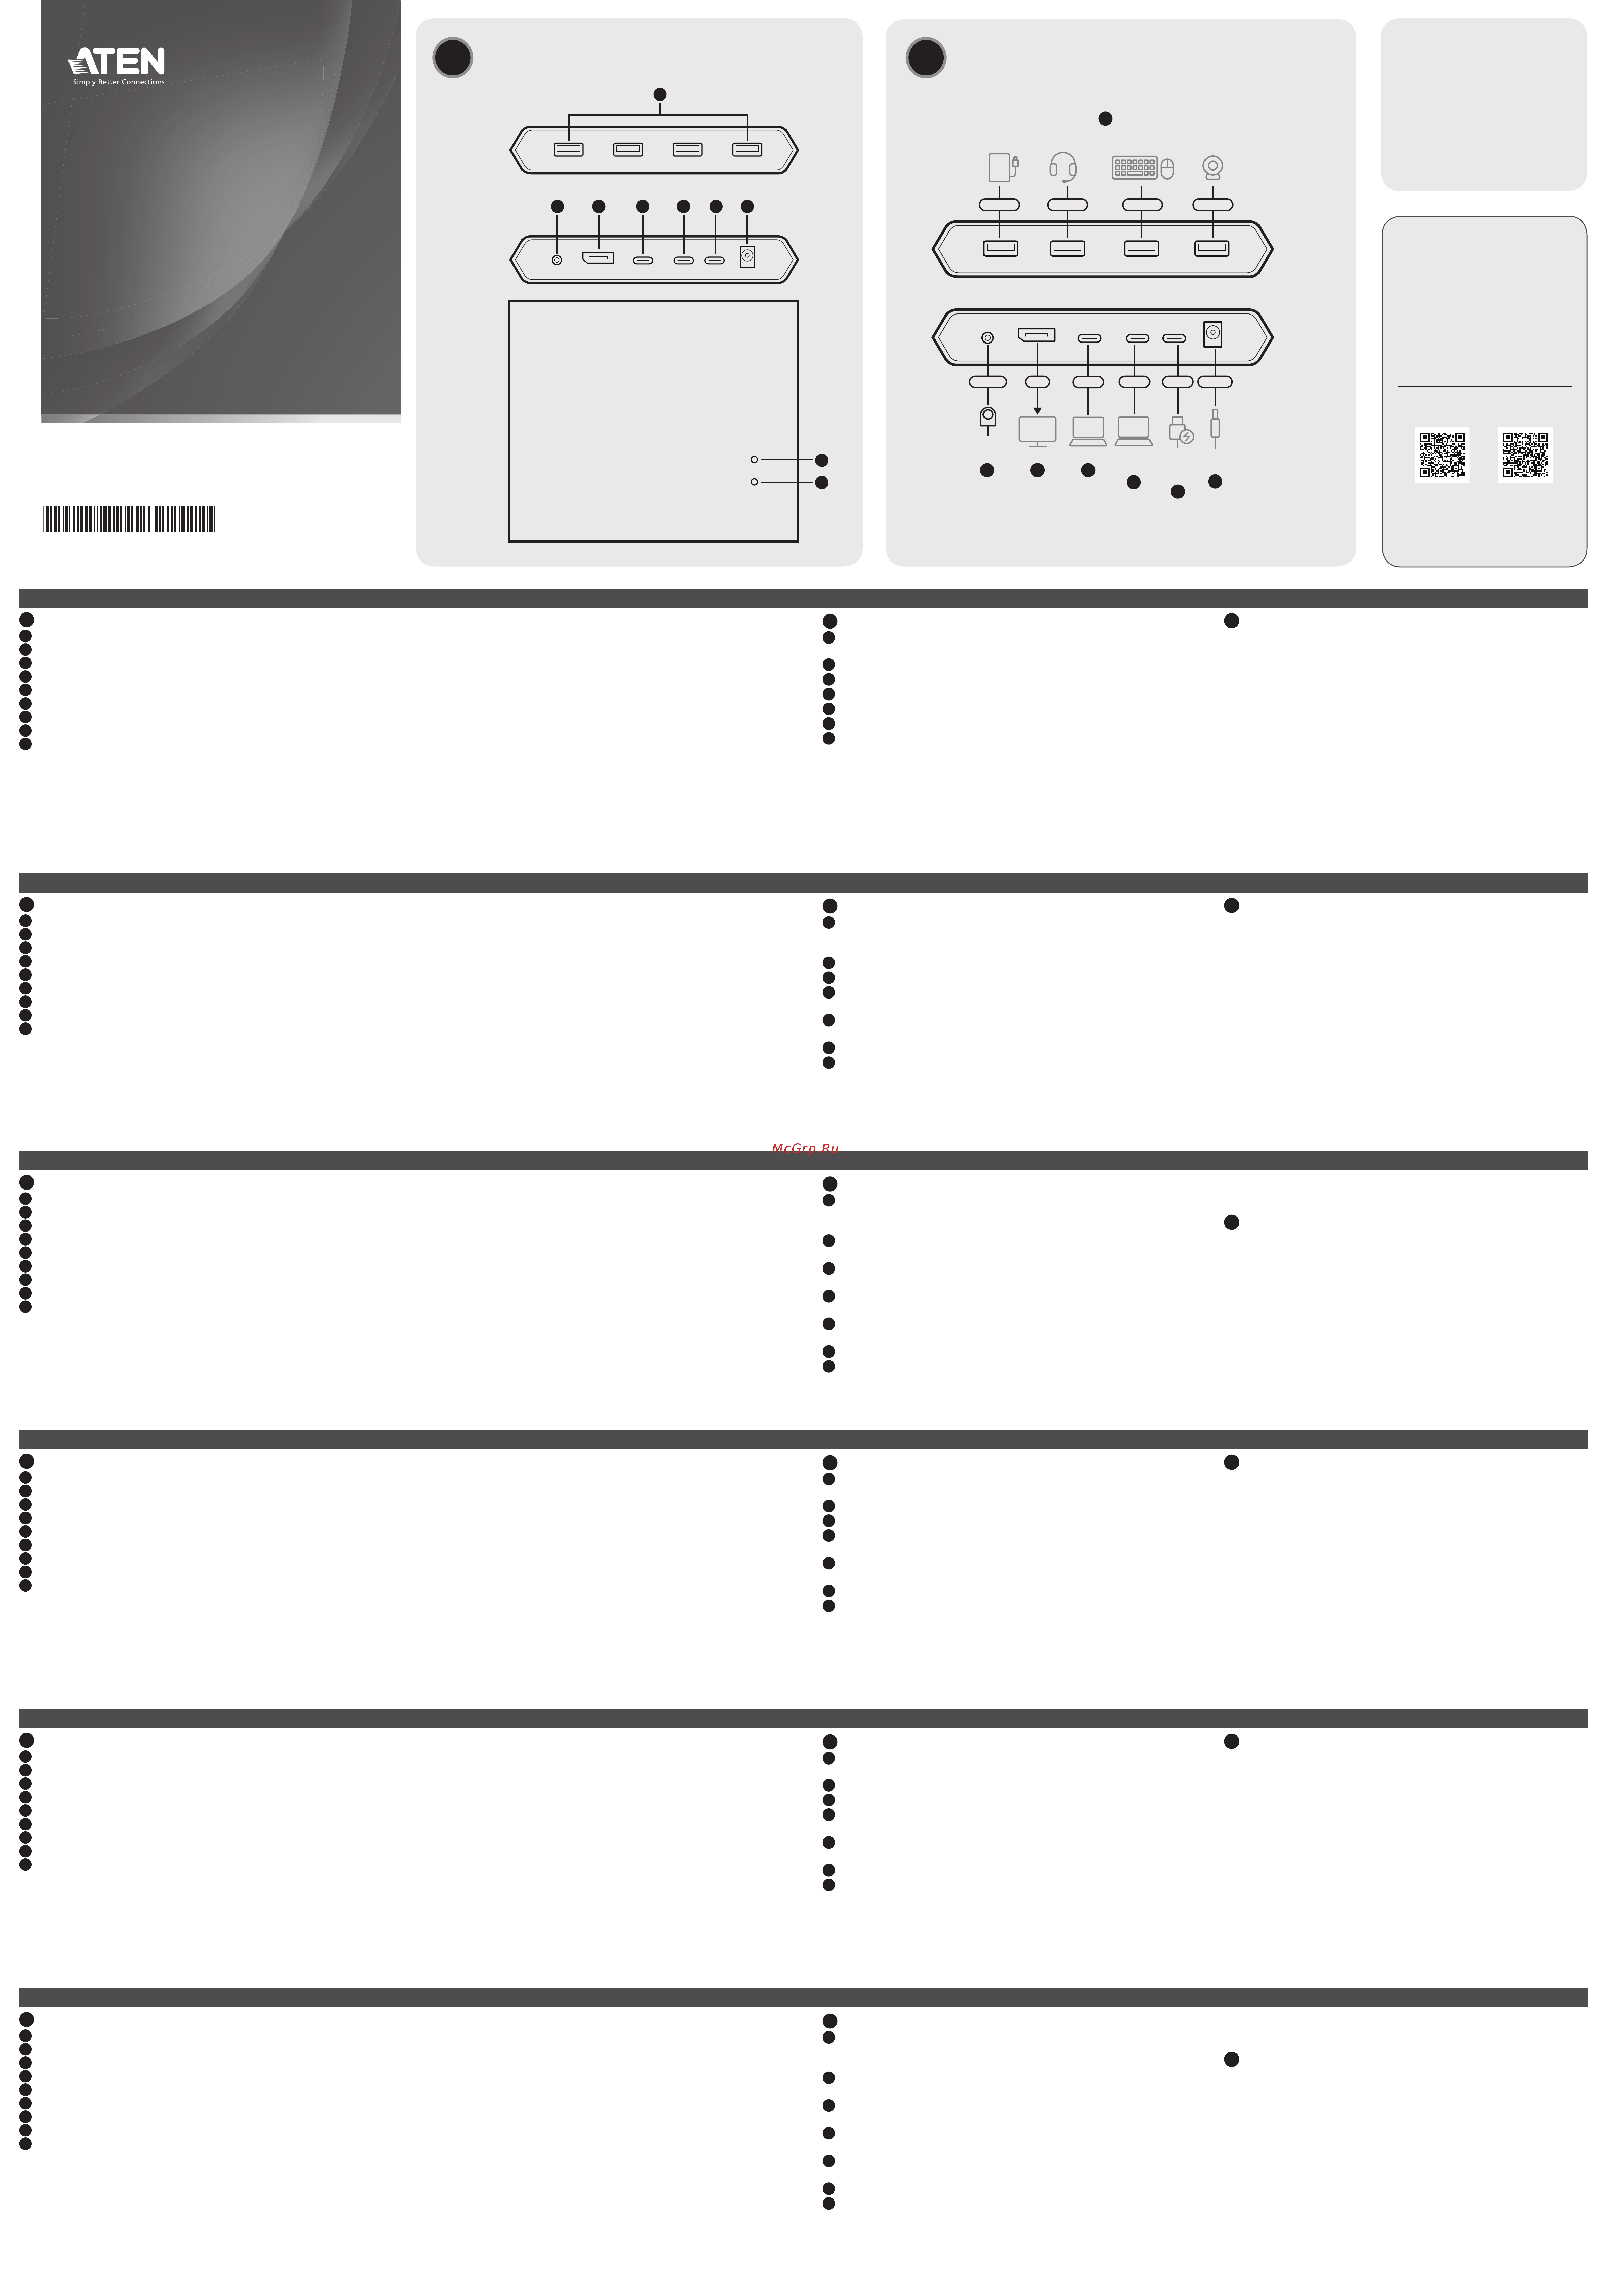
Основные элементы
1
Порты USB-А
2
Гнездо пульта дистанционного переключения порта
3
Выход DisplayPort
4
Порт USB-C (источник 2)
5
Порт USB-C (источник 1)
6
Порт USB-C (питание)*
7
Гнездо питания
8
Индикатор состояния порта 1
9
Индикатор состояния порта 2
Примечание: Порт USB-C (питание) поддерживает возможность
зарядки ноутбука по спецификации USB-C PD с выходными
напряжениями 5 В, 9 В, 15 В, 20 В. Адаптер питания с USB-C не входит
в комплект поставки.
US3311 2-портовый 4K DisplayPort USB-C KVM/док-переключатель с поддержкой функции сквозного питания
www.aten.com
Требования к хост-устройству
Компьютер или смартфон/планшет с портом USB-C и одной из
следующих операционных систем:
• Windows
®
10 (32-бит / 64-бит) с процессором Intel Core 7-го поколения
или выше
• Mac OS X 10.12 или более поздней версии
• iPadOS 13.1 или более поздней версии
• Android 8.0 или более поздней версии
Примечание: Для передачи изображения через порт USB-C убедитесь,
что режим передачи DP Alt Mode поддерживается компьютером и
включен.
B
Установка
1
Подключите до 4-х периферийных USB-устройств, таких как USB-
мышь, USB-клавиатура, принтер или внешний жесткий диск к
портам USB-A устройства.
2
Подключите источник сигнала USB-C к порту USB-C (источник 1)
устройства.
3
Подключите другой источник сигнала USB-C к порту USB-C (источник
2) устройства.
4
Подключите дисплей с интерфейсом DisplayPort к выходному порту
DisplayPlay устройства.
5
Подключите прилагаемый пульт дистанционного переключения порта к
соответствующему гнезду на устройстве.
6
Подключите адаптер питания к разъему питания на устройстве.
7
(Дополнительно) Вы можете подключить устройство-источник
сигнала к порту USB-C (питание) для зарядки по спецификации PD.
Примечание: Для зарядки устройства рекомендуется использовать
адаптер питания ограниченной мощности (LPS) мощностью выше
65 ватт, соответствующий спецификации USB-C PD. Минимальное
энергопотребление системы, требуемое для работы основных
функций USB и вывода видеосигнала, составляет 5 В, 3 А.
C
Эксплуатация
•
Для переключения KVM-управления между двумя источниками
USB-C нажмите кнопку пульта дистанционного переключения порта.
Индикатор выбранного порта загорится белым цветом.
•
При возникновении любых проблем совместимости с монитором,
нажмите и 3 секунды удерживайте кнопку пульта дистанционного
переключения порта.
A
Panoramica dell'Hardware
1
Porte USB tipo A
2
presa selettore della porta remota
3
Uscita DisplayPort
4
Porta USB-C (ingresso 2)
5
Porta USB-C (ingresso 1)
6
Porta USB-C (alimentazione)*
7
connettore di alimentazione
8
LED di stato porta 1
9
LED di stato porta 2
Nota: Questa porta USB-C (alimentazione) supporta la ricarica per laptop
USB-C PD a 5 V, 9 V, 15 V, e 20 V in uscita, e l'adattatore per l'alimentazione
USB-C non è compreso nella confezione.
US3311 Switch 4K DisplayPort USB-C KVM Dock a 2 porte con Power Pass-through
www.aten.com
Requisiti Host
Computer o smartphone/tablet abilitato per USB-C con uno dei seguenti
sistemi operativi:
• Windows
®
10 (32 bit / 64 bit) con processore 7
th
-Gen Intel Core o successivo
• Mac OS X 10.12 o versioni successive
• iPadOS 13.1 o successivo
• Android 8.0 o successivo
Nota: Per trasmettere video tramite una porta USB-C, controlla che il tuo
computer supporti DP Alt Mode tramite la porta USB-C, e che sia stato
abilitato.
B
Installazione
1
Collega fi no a 4 periferiche USB come mouse USB, tastiera USB, stampante
o disco esterno alle porte USB di tipo A dell'unità.
2
Collega una sorgente USB-C alla porta USB-C dell'unità (ingresso 1).
3
Collega un'altra sorgente USB-C alla porta USB-C dell'unità (ingresso 2).
4
Collega uno schermo abilitato DisplayPort alla porta di uscita DisplayPort
dell'unità.
5
Collega il selettore remoto delle porte fornito nella confezione alla presa
del selettore remoto delle porte dell'unità.
6
Collega l'adattatore di alimentazione alla presa di alimentazione dell'unità.
7
(Opzionale) Puoi anche collegare il tuo dispositivo sorgente alla porta
USB-C (alimentazione) per caricare il laptop tramite PD.
Nota: Per la ricarica del dispositivo, si consiglia un alimentatore PD USB-C
con capacità di alimentazione limitata (LPS) superiore a 65 Watt. Il requisito
di alimentazione del sistema per le funzioni USB di base e l'uscita video è di
almeno 5 V, 3 A.
C
Funzionamento
• Premi il selettore remoto della porta per far passare il controllo KVM da un
dispositivo USB-C sorgente all'altro. Il LED della porta selezionata si illumina
di bianco.
• Tenere premuto il selettore porta remota per 3 secondi in caso di problemi di
compatibilità del monitor.
A
Vista general del hardware
1
Puerto USB Tipo A
2
toma selector de puerto remoto
3
Salida de DisplayPort
4
Puerto USB-C (fuente 2)
5
Puerto USB-C (fuente 1)
6
Puerto USB-C (alimentación)*
7
conector de alimentación
8
LED de estado del puerto 1
9
LED de estado del puerto 2
Nota: Este puerto USB-C (alimentación) admite la carga de portátiles USB-C PD
con una salida de 5 V, 9 V, 15 V y 20 V, y el adaptador de alimentación USB-C
no se incluye en el paquete.
Conmutador de base KVM USB-C DisplayPort 4K de 2 puertos US3311 con paso de alimentación
www.aten.com
Requisito de host
Computadora o teléfono inteligente / tableta con USB-C con uno de los
siguientes sistemas operativos:
• Windows
®
10 (32-bit / 64-bit) con 7
th
-Gen Intel Core procesador o superior
• MacOS X 10.12 o posterior
• iPadOS 13.1 o posterior
• Android 8.0 o posterior
Nota: Para transmitir video a través de un puerto USB-C, asegúrese de que su
computadora admita el modo DP Alt en el puerto USB-C y que esté habilitado.
B
Instalación
1
Conecte hasta 4 periféricos USB, como un ratón USB, un teclado USB, una
impresora o un disco duro externo, a los puertos USB tipo A de la unidad.
2
Conecte un dispositivo fuente USB-C al puerto USB-C de la unidad (fuente 1).
3
Conecte otro dispositivo fuente USB-C al puerto USB-C de la unidad (fuente 2).
4
Conecte una pantalla compatible con DisplayPort al puerto de salida
DisplayPort de la unidad.
5
Conecte el selector de puerto remoto suministrado al conector del selector
de puerto remoto de la unidad.
6
Conecte el adaptador de corriente a la toma de alimentación de la unidad.
7
(Opcional) Puede conectar su dispositivo fuente al puerto USB-C
(alimentación) para cargar la computadora portátil PD.
Nota: Para cargar el dispositivo, se recomienda un adaptador de
alimentación USB-C PD con certifi cación de fuente de alimentación limitada
(LPS) de más de 65 vatios. El requisito de alimentación del sistema para las
funciones USB básicas y la salida de video debe ser de al menos 5 V, 3 A.
C
Funcionamiento
• Presione el selector de puerto remoto para cambiar el control KVM entre los
dos dispositivos fuente USB-C. El indicador LED del puerto seleccionado se
ilumina en blanco.
• Mantenga pulsado el selector de puerto remoto durante 3 segundos si tiene
cualquier problema de compatibilidad del monitor.
A
Hardware Übersicht
1
USB Typ-A Anschlüsse
2
Buchse für den Fernbedienungsanschluss
3
DisplayPort Ausgang
4
USB-C Anschluss (Quelle 2)
5
USB-C Anschluss (Quelle 1)
6
USB-C Anschluss (Strom)*
7
Netzbuchse
8
Anschluss 1 Status-LED
9
Anschluss 2 Status-LED
Hinweis: Dieser USB-C Anschluss (Strom) unterstützt das Aufl aden von USB-C
PD Laptops mit einem Ausgang von 5V, 9V, 15V und 20V. Das USB-C Netzteil
ist nicht im Lieferumfang enthalten.
US3311 2-Port 4K DisplayPort USB-C KVM Dock Switch mit Strom Passthrough
www.aten.com
Host Anforderung
USB-C-fähiger Computer oder Smartphone / Tablet mit einem der folgenden
Betriebssysteme:
• Windows
®
10 (32-Bit / 64-Bit) mit 7-Gen Intel Core Prozessor oder höher
• MacOS X 10.12 oder höher
• iPadOS 13.1 oder höher
• Android 8.0 oder höher
Hinweis: Zur Übertragung von Videos über einen USB-C Anschluss müssen Sie
sicherstellen, dass Ihr Computer den DP Alt Modus über den USB-C Anschluss
unterstützt und dass dieser aktiviert ist.
B
Installation
1
Schließen Sie bis zu 4 USB-Peripheriegeräte wie z.B. eine USB-Maus, eine
USB-Tastatur, einen Drucker oder eine externe Festplatte an die USB Typ-A
Anschlüsse des Geräts an.
2
Schließen Sie ein USB-C Quellgerät an den USB-C Anschluss des Geräts an
(Quelle 1).
3
Schließen Sie ein anderes USB-C Quellgerät an den USB-C Anschluss des
Geräts an (Quelle 2).
4
Schließen Sie ein DisplayPort-fähiges Display an den DisplayPort
Ausgangsanschluss des Geräts an.
5
Schließen Sie die mitgelieferte Fernbedienung an die Buchse für den
Fernbedienungsanschluss des Geräts an.
6
Schließen Sie das Netzteil an die Netzbuchse des Geräts an.
7
(Optional) Sie können Ihr Quellgerät an den USB-C Anschluss (Strom)
anschließen, um den PD-Laptop aufzuladen.
Hinweis: Zum Aufl aden des Geräts wird ein von der Limited Power
Source (LPS) zertifi ziertes USB-C PD-Netzteil über 65 Watt empfohlen. Der
Systemleistungsbedarf für die grundlegenden USB-Funktionen und den
Videoausgang sollte mindestens 5V, 3A betragen.
C
Bedienung
• Drücken Sie die Fernbedienung, um die KVM Steuerung zwischen den beiden
USB-C Quellgeräten umzuschalten. Die Anschluss-LED für den ausgewählten
Anschluss leuchtet weiß.
• Halten Sie den Remote-Port-Wähler 3 Sekunden lang gedrückt, wenn Sie
Probleme mit der Monitorkompatibilität haben.
A
Survol du matériel
1
Ports USB type-A
2
prise de sélecteur de port distant
3
Sortie DisplayPort
4
Port USB-C (source 2)
5
Port USB-C (source 1)
6
Port USB-C (alimentation)*
7
Prise de courant
8
LED d'état du port 1
9
LED d'état du port 2
Remarque : Ce port USB-C (alimentation) prend en charge la charge des
ordinateurs portables USB-C PD avec une sortie de 5V, 9V, 15V et 20V, et
l'adaptateur d'alimentation USB-C n'est pas fourni dans l'emballage.
Commutateur de Dock US3311 2-Port 4K DisplayPort USB-C KVM avec Transmission Electrique
www.aten.com
Exigence de l'hôte
Ordinateur ou smartphone / tablette équipé USB-C avec l'un des systèmes
d'exploitation suivants :
• Windows
®
10 (32 bits / 64 bits) avec processeur Intel Core de 7
ème
génération ou supérieur
• Mac OS X 10.12 ou version ultérieure
• iPadOS 13.1 ou version ultérieure
• Android 8.0 ou version ultérieure
Remarque : Pour transmettre une vidéo via un port USB-C, assurez-vous que
votre ordinateur prend en charge le mode DP Alt sur le port USB-C et qu'il a
été activé.
B
Installation
1
Connectez jusqu'à 4 périphériques USB tels qu'une souris USB, un clavier
USB, une imprimante ou un disque dur externe aux ports USB Type-A de
l'appareil.
2
Connectez un appareil source USB-C au port USB-C de l'unité (source1).
3
Connectez un autre appareil source USB-C au port USB-C de l'unité (source 2).
4
Connectez un écran compatible DisplayPort au port de sortie DisplayPlay de
l'unité.
5
Connectez le sélecteur de port distant fourni à la prise de sélecteur de port
distant de l'unité.
6
Connectez l'adaptateur d'alimentation à la prise d'alimentation de l'unité.
7
(Facultatif) Vous pouvez connecter votre appareil source au port USB-C
(alimentation) pour la charge de l'ordinateur portable PD.
Remarque : Pour le chargement de l'appareil, il est recommandé d'utiliser
un adaptateur d'alimentation PD USB-C certifi é LPS (Limited Power Source)
de plus de 65 watts. L'alimentation système requise pour les fonctions USB
de base et la sortie vidéo doit être d'au moins 5V, 3A.
C
Fonctionnement
• Appuyer sur le sélecteur de port distant pour basculer le contrôle KVM entre
les deux périphériques USB-C sources. La LED du port sélectionné s'allume
en blanc.
• Restez appuyé sur le sélecteur de ports distant pendant 3 secondes si vous
rencontrez un problème de compatibilité avec le moniteur.
1
8
9
5432 76
A
Hardware Overview
1
USB Type-A ports
2
jack for port switch button
3
DisplayPort out
4
USB-C port (source 2)
5
USB-C port (source 1)
6
USB-C port (power)*
7
power jack
8
port 1 status LED
9
port 2 status LED
Note: This USB-C port (power) supports USB-C PD laptop charging at 5V, 9V,
15, and 20V output, and the USB-C power adapter is not supplied in the
package.
B
Installation
© Copyright 2022 ATEN
®
International Co. Ltd.
ATEN and the ATEN logo are registered trademarks of ATEN International Co., Ltd.
All rights reserved. All other trademarks are the property of their respective owners.
Part No. PAPE-1223-Y20G Released: 12/2022
2-Port 4K DisplayPort USB-C KVM
Dock Switch with Power Pass-Through
Quick Start Guide
US3311
US3311 2-Port 4K DisplayPort USB-C KVM Dock Switch with Power Pass-Through
www.aten.com
A
Hardware Overview
Package Contents
1 US3311 2-Port 4K DisplayPort
USB-C KVM Dock Switch with
Power Pass-Through
1 power adapter
2 USB-C cables
1 port switch button
1 user instructions
Support and Documentation Notice
All information, documentation, fi rmware,
software utilities, and specifi cations
contained in this package are subject to
change without prior notifi cation by the
manufacturer.
To reduce the environmental impact of
our products, ATEN documentation and
software can be found online at
http://www.aten.com/download/
Technical Support
www.aten.com/support
Scan for more information
ATEN Website User Manual
US3311
(Front)
US3311
(Rear)
Keyboard / Mouse
External
Hard Drive
1
Monitor
Power
Power
Adapter
Port Switch
Button
Laptop
(PD Charging)
Laptop
2
3
4
5
6
7
USB-C USB-C2.5 MM DP
Laptop
Power
Adapter
USB-C
USB Headset Camera
USB 3.2
*
USB 3.2
*
USB 3.2
*
USB 3.2
*
or or or
Front View
Rear View
Top View
Host Requirement
USB-C enabled computer or smartphone / tablet with one of the following
operating systems:
• Windows
®
10 (32-bit / 64-bit) with 7
th
-Gen Intel Core Processor or above
• MacOS X 10.12 or later
• iPadOS 13.1 or later
• Android 8.0 or later
Note: To transmit video through a USB-C port, make sure your computer
supports DP Alt Mode over the USB-C port, and that it has been enabled.
B
Installation
1
Connect up to 4 USB peripherals such as a USB mouse, USB keyboard,
printer, or external hard drive to the unit’s USB Type-A ports.
2
Connect a USB-C source device to the unit’s USB-C port (source1).
3
Connect another USB-C source device to the unit’s USB-C port (source 2).
4
Connect a DisplayPort-enabled display to the unit’s DisplayPlay output port.
5
Connect the supplied port switch button to the indicated jack.
6
Connect the power adapter to the unit’s power jack.
7
(Optional) You can connect your source device to the USB-C port (power)
for PD laptop charging.
Note: For device charging, a Limited Power Source (LPS) certifi ed USB-C PD
Power Adapter over 65 watts is recommended. The system power
requirement for basic USB functions and video output should be at least
5V, 3A.
C
Operation
• Press the port switch button to switch KVM control between the two USB-C
source devices. The port LED for the selected port lights white.
• Press and hold the port switch button for 3 seconds if you encounter any
monitor compatibility issues.
*The indicated ports are USB 3.2 Gen 1 compliant.
Содержание
- Bedienung 1
- Exigence de l hôte 1
- Fonctionnement 1
- Funcionamiento 1
- Funzionamento 1
- Hardware overview 1
- Hardware übersicht 1
- Host anforderung 1
- Host requirement 1
- Instalación 1
- Installation 1
- Installazione 1
- Operation 1
- Panoramica dell hardware 1
- Port 4k displayport usb c kvm dock switch with power pass through quick start guide 1
- Requisiti host 1
- Requisito de host 1
- Survol du matériel 1
- Us3311 1
- Vista general del hardware 1
- Основные элементы 1
- Требования к хост устройству 1
- Установка 1
- Эксплуатация 1
- Ana makine gereksinimi 2
- Cerințe gazdă 2
- Donanıma genel bakış 2
- Funcionamento 2
- Instalare 2
- Instalação 2
- Kurulum 2
- Montaż 2
- Obsługa 2
- Operare 2
- Prezentare hardware 2
- Przegląd sprzętu 2
- Requisito de host 2
- Vista geral do hardware 2
- Wymagania hosta 2
- Çalıştırma 2
- Вимоги до хоста 2
- Встановлення 2
- Огляд обладнання 2
- Робота 2
- セットアップ 2
- ホスト要件 2
- 主机要求 2
- 主機需求 2
- 安装 2
- 安裝 2
- 操作 2
- 操作方法 2
- 硬件概览 2
- 硬體檢視 2
- 製品各部名称 2
- 설치 2
- 작동 2
- 하드웨어개요 2
- 호스트요구사항 2
Похожие устройства
- Aten US3310 Краткое руководство по установке
- Aten US3310 Руководство пользователя
- Aten CS1844 Краткое руководство по установке
- Aten CS1844 Руководство пользователя
- Aten CS1842 Краткое руководство по установке
- Aten CS1842 Руководство пользователя
- Aten CS1824 Краткое руководство по установке
- Aten CS1824 Руководство пользователя. Команды RS 232
- Aten CS1824 Руководство пользователя
- Aten CS1822 Краткое руководство по установке
- Aten CS1822 Руководство пользователя. Команды RS 232
- Aten CS1822 Руководство пользователя
- Aten CS1953 Руководство пользователя
- Aten CS1953 Краткое руководство по установке
- Aten CS1964 Руководство пользователя
- Aten CS1964 Руководство пользователя. Команды RS 232
- Aten CM1164A Руководство пользователя
- Aten CM1164A Краткое руководство по установке
- Aten CS1944DP Руководство пользователя
- Aten CS1944DP Руководство пользователя. Команды RS 232