![Soundcraft LX7ii-24 — обзор стерео входов и управления уровнями на микшере [27/32]](/img/pdf.png)
Soundcraft LX7ii-24 — обзор стерео входов и управления уровнями на микшере [27/32]
![Soundcraft LX7ii-24 [27/32] Stereo input channel](/views2/1990472/page27/bg1b.png)
27
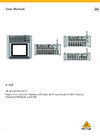
Stereo Input Channel
1 - INPUT J1 - INPUT J
1 - INPUT J1 - INPUT J
1 - INPUT J
AA
AA
A
CKSCKS
CKSCKS
CKS
These high impedance inputs accept 3-pole `A’ gauge (TRS) jacks. Use these inputs for
sources such as keyboards, drum machines, synths, tape machines or returns from
processing units. The inputs are BALANCED for low noise and top quality from professional
equipment, but you can use UNBALANCED sources by wiring up the jacks as shown in
the “Connecting Leads” section on page 22 in this manual, although you should then
keep cable lengths as short as possible to prevent ‘hum’ being induced into the sound
system. Mono sources may be used by plugging into the left jack only.
2 - G2 - G
2 - G2 - G
2 - G
AINAIN
AINAIN
AIN
The GAIN control sets the input level to the channel, allowing matching to a wide range
of line level sources.
3 - EQU3 - EQU
3 - EQU3 - EQU
3 - EQU
ALISERALISER
ALISERALISER
ALISER
HF EQHF EQ
HF EQHF EQ
HF EQ
Turn clockwise to boost high (treble) frequencies, adding crispness to percussion from
drum machines, synths and electronic instruments. Turn anticlockwise to cut these
frequencies, reducing hiss or excessive brilliance. Set the knob in the centre-detented
position when not required. The control has a shelving response giving 15dB of boost or
cut at 12kHz and above.
LF EQLF EQ
LF EQLF EQ
LF EQ
Turn clockwise to boost low (bass) frequencies, adding extra punch to synths, guitars
and drums. Turn anticlockwise to reduce hum, boominess or improve a mushy sound.
Set the knob to the centre-detented position when not required. The control has a
shelving response giving 15dB of boost or cut at 60Hz and below.
4 - A4 - A
4 - A4 - A
4 - A
UX SENDSUX SENDS
UX SENDSUX SENDS
UX SENDS
These are used to set up separate mixes for FOLDBACK, EFFECTS or recording, and the
combination of each Aux Send is mixed to the respective Aux Output at the rear of the
mixer. The sends are always PRE-FADE which is most appropriate for Foldback or Monitor
feeds, but note that the Line Inputs on pairs of Mono channels may be used as alternative
stereo inputs if post-fade sends are essential for effects.
5 - LEVEL5 - LEVEL
5 - LEVEL5 - LEVEL
5 - LEVEL
The rotary level control adjusts the overall level of the signal which is fed to the Mix or
selected pair of Groups.
6 - R6 - R
6 - R6 - R
6 - R
OUTINGOUTING
OUTINGOUTING
OUTING
The Stereo channel signal is fed either to a pair of Subgroups (switch UP) or the stereo
Mix (switch DOWN), at a level set by the LEVEL control. Stereo 1 feeds to Subgroups 1
& 2, Stereo 2 feeds to Subgroups 3 & 4.
7 - PFL7 - PFL
7 - PFL7 - PFL
7 - PFL
When the latching PFL switch is pressed, the pre-fade, post-EQ signal is fed in mono to
the headphones, control room output and meters, where it replaces the selected monitor
source. The PFL/AFL LED on the Master section illuminates to warn that a PFL is active.
The Left and Right meters display the PFL signal in mono.
Содержание
- Important please read this manual carefully before using your mixer for the first time p.2
- Introduction introduction introduction introduction introduction 55555 p.3
- Inst inst inst inst installa alla alla alla allation tion tion tion tion 99999 p.3
- Contents contents contents contents contents p.3
- Block diagram block diagram block diagram block diagram block diagram 19 19 19 19 19 p.3
- Using the console using the console using the console using the console using the console 21 21 21 21 21 p.3
- Specifica specifica specifica specifica specifications tions tions tions tions 31 31 31 31 31 p.3
- Featur featur featur featur features es es es es p.6
- W w w w war ar ar ar arranty ranty ranty ranty ranty p.7
- W w w w warning arning arning arning arning p.10
- Under no circumstances should the mains earth be disconnected from the mains lead p.10
- To avoid the risk of fire replace the mains fuse only with the correct value fuse as marked on the rear panel p.10
- This unit must be earthed p.10
- The internal power supply unit contains no user serviceable parts refer all servicing to a qualified service engineer through the appropriate soundcraft dealer p.10
- Pr pr pr pr precautions and safety instr ecautions and safety instr ecautions and safety instr ecautions and safety instr ecautions and safety instructions uctions uctions uctions uctions p.11
- Power cable p.11
- Mains installation mains installation mains installation mains installation mains installation p.11
- Handling and transport p.11
- General wiring procedures p.11
- General precautions p.11
- Caution in all cases refer servicing to qualified personnel p.11
- W a r n i n g in the event of an electrical storm or large mains voltage fluctuations immediately switch off the mixer and unplug from the mains p.11
- Signal levels p.11
- Shielding p.12
- Initial wiring considerations p.12
- Audio wiring p.12
- Points to remember p.13
- Troubleshooting p.14
- Setting up t setting up t setting up t setting up t setting up trrrrroubleshooting oubleshooting oubleshooting oubleshooting oubleshooting p.14
- Nnnnno p o p o p o p o pooooowwwwwer er er er er p.14
- Initial set up p.14
- Condenser mic n condenser mic n condenser mic n condenser mic n condenser mic nooooot w t w t w t w t wor or or or orking king king king king p.14
- Take care when using unbalanced sources which may be damaged by the phantom power voltage on pins 2 3 of the xlr connector p.23
- Only connect condenser microphones with the 48v powering off switch up and only turn the 48v powering on or off with all output faders down to prevent damage to the mixer or external devices p.23
- Mono input channel p.23
- Mics should always be plugged in and all output faders set to minimum before switching 48v on to avoid damage to external equipment p.23
- Do not use unbalanced mics with 48v switched on as they may be damaged by the phantom power voltage balanced dynamic mics and leads can normally be used with 48v switched on contact your microphone manufacturer for guidance p.23
- Stereo input channel p.27
- Master section p.28
- Caution pressing this switch cuts off the normal mix l r signal and it should therefore not be used during live performance or recording p.29
- Specifica specifica specifica specifica specifications tions tions tions tions p.31
Похожие устройства
-
 Soundcraft Si Performer 2Руководство по эксплуатации
 -
 Soundcraft Si Performer 1Руководство по эксплуатации
 -
 Soundcraft MSB16-Cat5Руководство по эксплуатации
 -
 Soundcraft Si ImpactРуководство по эксплуатации
 -
 Behringer X18Руководство по использованию
 -
Behringer XR18Инструкция пользователя
-
 MIDAS VF16Руководство по эксплуатации
 -
 Behringer X18Руководство по эксплуатации
 -
 ALLEN & HEATH dLive DM64Руководство по эксплуатации
 -
 ALLEN & HEATH dLive S3000Руководство по эксплуатации
 -
 ALLEN & HEATH dLive S5000Руководство по эксплуатации
 -
 ALLEN & HEATH dLive S7000Руководство по эксплуатации
Изучите возможности стерео входов, управления уровнем и эквалайзера на микшере. Узнайте, как подключать различные источники и настраивать звук для профессионального качества.