![Soundcraft Si Performer 1 [97/135] User manual](/img/pdf.png)
Soundcraft Si Performer 1 [97/135] User manual
![Soundcraft Si Performer 1 [97/135] User manual](/views2/2007969/page97/bg61.png)
User Manual
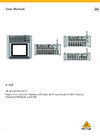
SHOWS, CUELIST > CUELIST > EDIT CUE
9.2.1: SHOWS, CUELIST > CUELIST > EDIT CUE
MIDI Receive
Set the Cue to recall when the console receives a particular program change message.
In the event two or more cues are set to receive the same program change on the same MIDI channel the console
shall play the first cue in the CUE LIST that satisfies the condition.
MIDI Program Change
Turn the program change function On or Off.
The Snapshot will be added to the end of the Cuelist and named automatically "Unnamed Snapshot n" where 'n' is
the snapshot's numbered position
MIDI Program Number
Choose a MIDI Program Change number.
MIDI Channel
Choose a MIDI channel for the specied Program Change number.
MIDI Receive settings can specify Omni (all MIDI channels) as an option here.
Fade Time - DMX
Set the DMX dimmer transition (fader) time from the last Cue to this one.
Range is 0-30 seconds in 1 second increments. If a DMX fade is in progress and another cue is recalled the
current fade stops and a new fade is calculated based on the new target and fade time.
MIDI Transmit
Set the console to send MIDI program change messages when the Cue Is recalled.
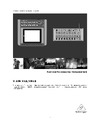
9.2.1: EDIT CUE
Содержание
- For soundcraft si performer 1 2 3 p.1
- User guide p.1
- Incorporating software version 1 p.1
- User manual p.2
- Information p.2
- Important please read this manual carefully before using your mixer for the first time p.2
- Usermanual p.3
- Contents p.3
- User manual p.4
- The soundcraft si performer is a compact digital console optimised for live sound it is designed to be powerful yet simple to use with intuitive controls consistent colour coded feedback and rapid parameter access features such as motorised faders the assignable channel strip acs totem fader follow buttons vcas and incorporated dmx512 control mean that any aspect of the performance can be served to the surface in an instant with analogue style control of its comprehensive feature set p.4
- Introduction to performer p.4
- Introduction p.4
- Welcome to performer p.4
- User manual p.5
- Safety notices p.5
- Safety p.5
- Important symbols p.5
- For your own safety and to avoid invalidation of the warranty please read this section carefully p.5
- Warnings p.6
- User manual p.6
- Safety p.6
- Warnings p.7
- User manual p.7
- Safety p.7
- Warranty p.8
- User manual p.8
- User manual p.9
- Specifications p.9
- User manual p.10
- Starting off an introduction to this manual p.10
- Getting started p.10
- Geting started p.10
- User manual p.11
- Overview p.11
- User manual p.12
- Parts of the console p.12
- User manual p.13
- Parts of the console p.13
- User manual p.14
- The si performer faderglow colours are p.14
- Faderglow p.14
- User manual p.15
- At the heart of the si performer is a group of assignable controls that make the console easier and faster to navigate and operate assignable controls work by changing the function of sections of the console surface in this way a single control can do several jobs depending on the mode the console is working in it is important that you understand the assignable controls on the console in order to use it effectively especially the way in which the faders and fader follow buttons together determine the functionality of the control channels and faders p.15
- Assignable controls p.15
- User manual p.16
- The are four main fader layers on the expression console selected by the faders button a b c and d group to the right of the control channels the additional buttons in this group assign graphic eq bands across the faders for convenient control p.16
- Fader layers p.16
- Control channels p.17
- User manual p.17
- User manual p.18
- Slot number p.18
- Fader bank p.18
- Control channel assignment p.18
- Assignment p.18
- Assign mono inputs p.18
- User manual p.19
- Control channel assignment p.19
- Insert a blank control channel into the currently selected control channel slot and shift the others to the left or right p.20
- Control channel assignment p.20
- Assignment p.20
- User manual p.20
- Shift the currently selected channel allocation to the left or the right as long as there is an unassigned slot available p.20
- Insert blank p.20
- User manual p.21
- Global encoder mode p.21
- User manual p.22
- Assignable channel strip p.22
- User manual p.23
- Totem fader follow p.23
- User manual p.24
- Touch screen p.24
- User manual p.25
- The touch screen main menu can be accessed at any time by pressing the menu button next to the touch screen from here you can navigate to any of the settings menus p.25
- Security p.25
- Main menu p.25
- Copy paste p.25
- User manual p.26
- System information hiqnet and ip addressing selective console reset functions and the event log p.26
- System p.26
- Solo system settings p.26
- Setup and patching of the four available insert sends and returns p.26
- Main menu p.26
- Insert p.26
- Fader setup p.26
- Brightness settings and d o g s system direct out gain stabiliser on off p.26
- Assign dsp channels to control channel slots p.26
- Output channel or dmx specific settings p.27
- Monitor p.27
- Main menu p.27
- Inputs vca p.27
- Input channel or vca master specific settings p.27
- Graphic representation of the eq for the selected channel p.27
- User manual p.27
- Settings for the monitoring systems p.27
- Settings and operations for the built in oscillator p.27
- Outputs dmx p.27
- User manual p.28
- Inputs outputs p.28
- Inputs and outputs p.28
- User manual p.29
- Patching p.29
- User manual p.30
- Patching p.30
- User manual p.31
- Soundweb control p.31
- Soundweb p.31
- External control status p.32
- Disable enable soundweb london preamp control for this patch p.32
- User manual p.32
- Soundweb control p.32
- Soundweb p.32
- Set the soundweb london devices node address to send and receive hiqnet values to your si console p.32
- Select an input channel on the selected card and device p.32
- Select an input card on the soundweb london device p.32
- Node address p.32
- Input channel p.32
- Input card p.32
- User manual p.33
- Default patching p.33
- Visi connect p.34
- User manual p.34
- Visi connect cards p.35
- User manual p.35
- User manual p.36
- Visi connect cards p.36
- User manual p.37
- Stageboxes p.37
- User manual p.38
- Channels busses p.38
- User manual p.39
- Input channels receive either external input from instruments microphones and so on or they receive input from the internal lexicon fx units in which case they are an fx return p.39
- Input channels p.39
- User manual p.40
- Input channels p.40
- Pan mode p.41
- Name the selected input channel p.41
- Isolate this channel from automation playback p.41
- Isolate p.41
- Input setup p.41
- An input channel can either be mono linked or stereo p.41
- User manual p.41
- There are various input specific options found via the touch screen main menu inputs button these offer channel naming linking lr or lcr panning routing pre post routing options for mix busses and direct out puts and physical input and direct output patching p.41
- Set pan mode for this channel to lr left right or lcr left centre right p.41
- Set the proportion of centre channel signal sent to left and right p.42
- Set individual pre or post fade routing to mix busses 1 14 p.42
- Set global post pre p.42
- Set a global pre or post fader routing for all mix bus contributions from the input channel p.42
- Mix 1 14 pre post p.42
- Lcr pan width p.42
- Input setup p.42
- Input patch p.42
- Directout pre post p.42
- Directout patch p.42
- Choose whether the direct output patch is sourced pre filter or post filter p.42
- Choose an analogue or digital output for this channel s direct output p.42
- Choose an analogue or digital input for this input channel p.42
- User manual p.42
- User manual p.43
- Mix outputs p.43
- All contributions to a mix bus are summed into mix bus master dsp channels mix 1 14 they have various uses including feeding auxiliary effects as monitoring mixes or creating unique mixes for zoned areas contribution to the main mix and more p.43
- User manual p.44
- Mix outputs p.44
- User manual p.45
- Pan mode p.45
- Outputs setup p.45
- Mix width p.45
- Mix outputs setup p.45
- Isolate p.45
- Output patching p.46
- Mix outputs setup p.46
- Lcr pan width p.46
- Choose specific analogue or digital outputs for this dsp channel p.46
- User manual p.46
- Set the proportion of centre channel signal sent to left and right p.46
- Set mix sends pre post p.46
- Set all contributions to the mix bus pre or post fade p.46
- Select which pre fader tap source is used to supply this mix bus p.46
- Pre fader source p.46
- Outputs setup p.46
- User manual p.47
- The matrix busses feed the matrix master channels matrix busses can be used for many things including a convenient way to send the same mix to several monitor destinations at differing levels or to use as an alternative main mix of mix groups to feed additional front of house zones p.47
- Matrix outputs p.47
- User manual p.48
- Matrix outputs p.48
- Isolate the matrix master dsp channel from automation playback p.49
- Isolate p.49
- Choose specific analogue or digital outputs for the master output channel p.49
- Choose mono or stereo type for the matrix master output p.49
- User manual p.49
- There are various matrix output specific options found via the touch screen main menu outputs button these offer naming isolate width and physical output patching p.49
- Patching p.49
- Name the selected matrix bus p.49
- Matrix width p.49
- Matrix outputs setup p.49
- User manual p.50
- The main left right and mono centre busses and master channels are used for the main mix output and receive their inputs from the input channels and mix bus master channels the mono bus is the centre bus when the panning mode of contributing channels is set to lcr and mono routing is enabled p.50
- Main mix outputs p.50
- Main mix out p.50
- Patching p.51
- Name the selected main output bus p.51
- Main mix outputs setup p.51
- Isolate the main output master dsp channel from automation playback p.51
- Isolate p.51
- Choose specific analogue and digital outputs for this dsp channel p.51
- User manual p.51
- There are various main lr and m specific options found via the touch screen main menu outputs dmx button these offer naming isolate and physical output patching p.51
- User manual p.52
- Fx busses p.52
- User manual p.53
- Dsp elements p.53
- Channel elements p.53
- User manual p.54
- Function focus p.54
- User manual p.55
- The assignable channel strip acs follows the currently selected dsp channel and provides al most all of the controls relating to that it is broken down in to small colour coded sections making it easy to identify control groups and functions at a glance p.55
- Acs elements p.55
- User manual p.56
- The input section mainly provides the features required for input channels such as phantom power and mic line level metering is applicable to all dsp channel types and hpf high pass filter is available in mix bus master channels p.56
- Metering p.56
- Acs input section p.56
- V phantom power p.56
- User manual p.57
- Switches the high pass filter on and off p.57
- Phase invert p.57
- Invert signal phase 180 degrees p.57
- Hpf on off p.57
- Hpf frequency p.57
- Gain trim p.57
- Adjust the cut off 3db frequency of the high pass filter p.57
- Adjust mic gain or line trim for input channels p.57
- Acs input section p.57
- User manual p.58
- Release p.58
- Attack p.58
- Acs gate section p.58
- Acs gate section p.59
- User manual p.59
- User manual p.60
- Release p.60
- Compressor p.60
- Attack p.60
- Acs compressor section p.60
- Threshold p.61
- Switch the compression process on or off p.61
- Indicates amount of gain reduction currently being applied by the compression process p.61
- Gain reduction meter p.61
- Compressor p.61
- Comp on off p.61
- Adjust the threshold level of the compressor p.61
- Adjust the ratio value for the compressor p.61
- Adjust the make up gain of the compressor p.61
- Acs compressor section p.61
- User manual p.61
- User manual p.62
- Hf level p.62
- Hf freq p.62
- Equaliser p.62
- Acs equaliser section p.62
- Lo mid freq p.63
- Hi mid q p.63
- Hi mid level p.63
- Hi mid freq p.63
- Equaliser p.63
- Adjust the q of the hi mid filter p.63
- Adjust the centre frequency of the hi mid filter p.63
- Adjust the boost attenuation of the lo mid filter p.63
- Adjust the boost attenuation of the hi mid filter p.63
- Acs equaliser section p.63
- User manual p.63
- Lo mid level p.63
- User manual p.64
- Switch the eq process for this channel on and off p.64
- Lo mid q p.64
- Lf level p.64
- Lf freq p.64
- Equaliser p.64
- Eq on off p.64
- Adjust the q of the lo mid filter p.64
- Adjust the q of the hi mid filter and switch bell shelf mode p.64
- Adjust the cut off frequency of the lf bell filter p.64
- Adjust the boost attenuation of the lf bell filter p.64
- Acs equaliser section p.64
- Output p.65
- Acs output section p.65
- User manual p.65
- User manual p.66
- Acs output section p.66
- User manual p.67
- Encoder p.67
- Control channels contain the primary performance controls and indicators layers of control channels assigned to various actual channels are selected using the faders fader layers button group control channel positions are assigned to channels using the touch screen fader setup menu see section 3 p.67
- Control channel p.67
- On key function is dependant on the channel type and selected fader layer momentary latch ing behaviour available from software version 1 see below p.68
- Level meter p.68
- Indicates the selected channel s gate is closed p.68
- Indicates gain reduction for the selected channel p.68
- Indicates audio level for the selected channel dbfs p.68
- Gate closed x p.68
- Gain reduction meter p.68
- Control channel p.68
- Channel name function p.68
- User manual p.68
- Text screen plus status colour p.68
- User manual p.69
- Select this control channel p.69
- Press to solo this dsp channel input channel mix bus master matrix master p.69
- Control channel p.69
- Adjust signal level p.69
- User manual p.70
- Graphic eq geq p.70
- User manual p.71
- On red p.71
- Graphic eq geq p.71
- Geq lo p.71
- Geq hi p.71
- Clr geq p.71
- A channel s graphic eq setting does not affect the touch screen eq response graphic eq main menu button p.71
- When a band is moved from its zero position 0db the control channel on button will light red to show that band is active you can press a red on button to zero that band p.71
- User manual p.72
- Mute groups p.72
- Mix features p.72
- User manual p.73
- Mute mute group setup p.73
- Mute groups enable group muting of selected channels at any time create up to eight mute groups operated from the mute vca group masters button group 1 8 mute groups can be cumulative while not in vca or mute setup modes the buttons are always mute group masters p.73
- Mute groups p.73
- Mute group master p.73
- User manual p.74
- Select control channels p.74
- Mute status indication p.74
- Mute groups p.74
- Clear selection p.74
- Clear all p.74
- Alt clr p.74
- Vca groups p.75
- User manual p.75
- Mute groups p.75
- Vca vca group setup p.76
- Vca groups p.76
- Vca group master p.76
- User manual p.76
- Vca master fader p.77
- Vca groups p.77
- Vca group mute status indication p.77
- User manual p.77
- Offset the level of vca group member channels p.77
- Clear selection p.77
- Clear all p.77
- Alt clr p.77
- Copy and paste p.78
- User manual p.78
- This facility allows almost any processing section to be copied easily and quickly from a channel or bus and pasted to another channel or bus you can also copy and paste the internal lexicon fx settings and aux fx send and matrix mixes p.78
- Paste hold p.78
- Copy paste p.78
- User manual p.79
- Copy and paste p.79
- User manual p.80
- Interrogate p.80
- Audio interrogate is a powerful method of checking and changing a particular switch status across all channels on the currently selected fader layer for example you can check at a glance which channels are routed to the main lr mix bus and change that status rapidly for all visible channels p.80
- Audio interrogate p.80
- User manual p.81
- Solo system p.81
- Solo provides a way of monitoring and checking individual channels and groups of channels quickly by routing only the soloed channels either to the monitoring system normal operation or to the main mix outputs solo in place sip p.81
- Indicators light to show solo mode status p.82
- Highlight level p.82
- Access solo settings menu p.82
- User manual p.82
- The attenuation level of the unhighlighted soloed channels while highlight is active p.82
- Switch solo in place sip mode on or off p.82
- Solo touch screen p.82
- Solo system p.82
- Solo status indicators p.82
- Solo in place p.82
- Solo clr p.82
- Press to solo the assigned channel p.82
- Press to clear any active solos p.82
- Input solo mode p.83
- Input priority p.83
- Enable or disable select follows solo mode p.83
- Blend level p.83
- Allow input solos to temporarily override an output afl p.83
- 10db of trim to the level of the solo bus to the monitor system p.83
- User manual p.83
- The attenuation level of the primary monitor source while a pfl or afl is active p.83
- Solo trim p.83
- Solo system p.83
- Set the input solo mode to auto afl or pfl p.83
- Select follows solo p.83
- User manual p.84
- The si performer monitoring system is comprehensive yet simple the monitoring source active monitor signal will normally be the main lr mix though will switch to any selection made in the solo system afl or pfl busses p.84
- Monitors p.84
- Monitoring p.84
- Mon level p.84
- Mono check p.85
- Monitoring p.85
- Monitor l r out patch p.85
- L r monitor speaker p.85
- Delay time samples milliseconds p.85
- User manual p.85
- User manual p.86
- The clr clear button located to the right of the channel faders area is used in conjunction with individual input channels output channels channel parameters and mutes to clear or reset to default p.86
- The alt button above right of lrm mix faders can be used in conjunction with the clr button to clear or reset parameters channels and bus mixes across the whole of the console p.86
- Clr functions p.86
- Clr alt clr p.86
- User manual p.87
- Clr alt clr p.87
- Alt clr functions p.87
- User manual p.88
- Other alt button functions p.88
- Clr alt clr p.88
- User manual p.89
- Shows cuelist snapshots p.89
- Shows cuelist and snapshots p.89
- Delete p.90
- User manual p.90
- New show p.90
- User manual p.91
- Show name p.91
- Select and isolate parameters from recall by the automation system p.91
- Save as p.91
- Reset config p.91
- Re establish the system configuration p.91
- Name the current show p.91
- Initiate the process of saving the current show p.91
- Initiate the load show process p.91
- Global isolate filters p.91
- User manual p.92
- Cuelist snapshots p.92
- Bring up the cuelist screen in the console touch screen p.93
- Alt next p.93
- User manual p.93
- Store the current snapshot in the cuelist p.93
- Recall p.93
- Load the previous cue p.93
- Load the next cue p.93
- Load the currently highlighted cue p.93
- Cuelist snapshots p.93
- Cue list p.93
- Move the currently highlighted cue up one in the cue list p.94
- Move the currently highlighted cue down one in the cue list p.94
- Move down p.94
- Edit the cue details in the touch screen p.94
- Edit cue p.94
- Delete the currently highlighted cue p.94
- Delete p.94
- Cuelist snapshots p.94
- User manual p.94
- Update the currently active cue with the current snapshot p.94
- Update p.94
- Move up p.94
- User manual p.95
- Cuelist snapshots p.95
- User manual p.96
- Edit cue p.96
- Cue type p.96
- Cue name p.96
- User manual p.97
- Edit cue p.97
- User manual p.98
- Edit cue p.98
- The console comes with four lexicon fx processors each with 29 available algorithms each fx unit has its own dedicated fx send bus and stereo return path p.99
- Lexicon fx p.99
- User manual p.99
- User manual p.100
- Lexicon fx p.100
- Fx encoders p.100
- Adjust scroll touch screen control p.100
- User manual p.101
- Reverbs p.101
- Plate reverbs p.101
- Chamber reverb p.101
- User manual p.102
- Spring reverb p.102
- Room reverb p.102
- Reverse reverb p.102
- Reverbs p.102
- Ambience reverb p.102
- Adjust the amount of time before reverb early reflections occur p.103
- User manual p.103
- Rt high cut p.103
- Rt hc sets the frequency above which a 6db octave low pass filter attenuates the reverberated signal p.103
- Reverb parameters p.103
- Pre dly pre delay p.103
- Mid rt mid range reverb time p.103
- Er time early reflections time p.103
- Er level early reflections level p.103
- Build up rate of diffusion after the initial period which is controlled by diffusion p.103
- Adjust time delay between the source signal and the onset of reverberation p.103
- Adjust the level of early reflections within the reverb p.103
- Adjust the amount of time the mid range reverb can be heard p.103
- Bass bst bass boost p.104
- Adjust the contour of the reverberation envelope p.104
- Adjust the amount of high frequency content in the reverberation tails p.104
- Adjust reverb onset and sustain p.104
- User manual p.104
- Spread p.104
- Set the frequency of a 6db octave low pass filter on the reverberated signal p.104
- Rt hi cut reverb time high cut p.104
- Reverb parameters p.104
- Initial echo density p.104
- Hi cut p.104
- Diff diffusion p.104
- Boost or cut frequencies below the bass boost frequency the transition point from mid rt to low rt p.104
- Tap delay p.105
- Studio delay p.105
- Reverse delay p.105
- Pong delay p.105
- Mono delay p.105
- Modulated delay p.105
- Delays p.105
- User manual p.105
- Tape delay p.105
- User manual p.106
- Set the input signal level at which ducking occurs p.106
- Lo pass p.106
- Hi pass p.106
- Frequencies below this are filtered removed p.106
- Frequencies above this are filtered removed p.106
- Feedback p.106
- Ducking attenuation amount p.106
- Duck thr duck threshold p.106
- Duck lvl duck level p.106
- Dly time delay time p.106
- Delay parameters p.106
- Controls the number of delay repeats by feeding the delay output signal back into the delay input p.106
- Controls the length of the delay time relative to tempo p.106
- User manual p.107
- Swaps the delay time tap offset set by the tap ratio p.107
- Swap tap swap p.107
- Ratio tap ratio p.107
- Ratio of wet to dry signal p.107
- Pan tap pan p.107
- Ducking attenuation amount p.107
- Depth modulation depth p.107
- Delay parameters p.107
- Controls the tap ratio of left and right outputs relative to the delay time p.107
- Control the intensity of modulation or depth in the modulated delay p.107
- Adjust the pan positions in the stereo field of tap 1 and tap 2 p.107
- Misc fx p.108
- Flanger p.108
- Detune p.108
- Chorus p.108
- Vibrato p.108
- User manual p.108
- Tremolo p.108
- Rotary p.108
- Pitch shift p.108
- Phaser p.108
- User manual p.109
- Misc fx parameters p.109
- User manual p.110
- Misc fx parameters p.110
- User manual p.111
- Misc fx parameters p.111
- User manual p.112
- Misc fx parameters p.112
- System settings p.113
- Preferences system security p.113
- User manual p.113
- User manual p.114
- Preferences p.114
- User manual p.115
- Preferences p.115
- User manual p.116
- System menu p.116
- User manual p.117
- System menu p.117
- System menu p.118
- Subnet mask p.118
- Set ip resolution to dhcp dynamic or manual p.118
- Mac address p.118
- Ip address resolution p.118
- Ip address p.118
- Choose an internal external or option card wordclock reference p.118
- Wordclock p.118
- User manual p.118
- Used to specify the subnet for this device p.118
- The media access control address read only p.118
- The ip address of this console on the network p.118
- System time p.118
- User manual p.119
- System menu p.119
- User manual p.120
- Security menu p.120
- Edit user p.120
- Add user p.120
- User manual p.121
- Security menu p.121
- User manual p.122
- Add edit user p.122
- User manual p.123
- Add edit user p.123
- User manual p.124
- Profiles p.124
- New profile p.124
- Delete profile p.124
- User manual p.125
- Profiles p.125
- User manual p.126
- Software update p.126
- User manual p.127
- The following procedure will restore the console back to the factory defaults and re format the internal sd card do not do this is you wish to keep saved data shows p.127
- Reset console p.127
- Route to mix mtx p.128
- Route to all p.128
- Oscillator p.128
- User manual p.128
- User manual p.129
- Oscillator p.129
- User manual p.130
- User manual p.131
- Alt fader layer button p.131
- Set a dimmer fade time for dmx cue transitions p.132
- Select a dmx control channel p.132
- Select a cue type p.132
- Flash the dmx channel p.132
- Edit cue p.132
- Dmx sel p.132
- Dmx on p.132
- Dmx fader p.132
- Dmx channel master name outputs dmx p.132
- Adjust dimmer level or master level p.132
- User manual p.132
- Set a name for the selected dmx channel or master p.132
- You can check the exact audio path of any signal by referring to the signal path diagrams in chapter 6 p.133
- User manual p.133
- No sound p.133
- Is there anything on the meters p.133
- Are they in phase p.133
- Are the control channel input channel and input patch correct p.133
- Are solos inactive p.133
- Appendix 01 no sound p.133
- A troubleshooting guide one of the most common problems experienced with mixing consoles is finding that an input isn t appearing at an output there are many possible reasons for this but the best way to troubleshoot it is to first make sure the control channel is set up correctly and to go through the signal path and workout where the break is p.133
- Is the fader up p.134
- Is the channel panned to a valid output p.134
- Is the channel on and unmuted p.134
- If there is an insert point assigned is the signal returned p.134
- Appendix 01 no sound p.134
- User manual p.134
- No sound p.134
- Is the gate shut p.134
- User manual p.135
- To check the physical output patch select the relevant bus master channel and then go to the outputs menu in the touch screen p.135
- Routing can cover lr and mono routing as well as mix bus routing p.135
- No sound p.135
- Is the signal routed to a valid output bus or channel p.135
- Is the output patch valid p.135
- Is the output master channel path valid p.135
- Appendix 01 no sound p.135
- Almost exactly the same checks as above can be done on the output master channel whether it s a mix matrix or lr m master p.135
Похожие устройства
-
 Soundcraft Si Performer 2Руководство по эксплуатации
 -
 Soundcraft LX7ii-24Руководство по эксплуатации
 -
 Soundcraft MSB16-Cat5Руководство по эксплуатации
 -
 Soundcraft Si ImpactРуководство по эксплуатации
 -
 Behringer X18Руководство по использованию
 -
Behringer XR18Инструкция пользователя
-
 MIDAS VF16Руководство по эксплуатации
 -
 Behringer X18Руководство по эксплуатации
 -
 ALLEN & HEATH dLive DM64Руководство по эксплуатации
 -
 ALLEN & HEATH dLive S3000Руководство по эксплуатации
 -
 ALLEN & HEATH dLive S5000Руководство по эксплуатации
 -
 ALLEN & HEATH dLive S7000Руководство по эксплуатации