
Buffalo TS5200D0802S-EU Инструкция по эксплуатации онлайн
1) Schließen Sie das Ethernet und
Stromkabel der TeraStation an.
2) Sie können die TeraNavigator-Software
unter http://d.buffalo.jp/TS5200DS/
herunterladen.
3) Entpacken Sie die heruntergeladenen
Datei und doppelklicken Sie
TSNavi.exe im extrahierten Ordner.
TeraNavigator wird gestartet.
4) Klicken Sie auf [Installation starten]. Der
Assistent führt Sie durch die
Installation von NAS Navigator2.
5) Öffnen Sie NAS Navigator2. Klicken Sie
mit der rechten Maustaste auf das
TeraStation-Symbol in NAS Navigator2
und klicken Sie anschließend auf
[Eigenschaften]. Legen Sie die
IP-Adresse der TeraStation fest. Melden
Sie sich anschließend in Einstellungen
(wie nachfolgend beschrieben) an und
stellen Sie die Systemuhr der
TeraStation ein.
Weitere Informationen finden Sie im
Benutzerhandbuch der TeraStation. Dieses
können Sie über den Link in der Software
auf Ihrer TeraNavigator-CD oder von der
Website www.buffalo-technology.com
herunterladen. Ihr Computer muss mit
dem Internet verbunden sein, damit der
Zugriff auf das Benutzerhandbuch möglich
ist und es heruntergeladen werden kann.
Vielen Dank für den Kauf der TeraStation
von Buffalo.
Installation
Informationen zur
Regelkonformität
CE-Zeichen-Warnung
Dies ist ein Produkt der Klasse A. In einer
häuslichen Umgebung kann dieses Produkt
Funkstörungen verursachen. Um diese zu
beheben, müssen ggf. entsprechende
Maßnahmen ergriffen werden.
1) Connectez le câble Ethernet et le
câble d'alimentation de la TeraStation.
2) Téléchargez le logiciel TeraNavigator
depuis le site:
http://d.buffalo.jp/TS5200DS/.
3) Décompressez le fichier téléchargé et
double-cliquez sur TSNavi.exe dans le
dossier qui a été extrait. Le logiciel
TeraNavigator se lance.
4) Cliquez sur [Lancement l'installation].
L'assistant vous guide à travers
l'installation de NAS Navigator2.
5) Ouvrez le NAS Navigator2. Effectuez un
clic-droit sur l'icône de la TeraStation
dans le NAS Navigator2 et sélectionnez
[Propriétés]. Configurez l'adresseIP de
l'unité TeraStation. Puis accédez aux
Réglages (comme indiqué ci-après) et
configurez l'heure de la TeraStation.
Pour de plus amples informations,
reportez-vous au manuel d'utilisation de
la TeraStation. Il est accessible à partir
d'un lien situé sur le logiciel du CD
TeraNavigator ou peut être téléchargé
sur le site www.buffalo-technology.com.
Votre ordinateur doit être connecté à
Internet pour que vous puissiez consulter
ou télécharger le manuel d'utilisation.
Merci d’avoir acheté une TeraStation
Buffalo.
Installation
Informations relatives à la
conformité aux règlements
Avertissement concernant le
marquage CE
Cet appareil est un produit de Classe A. Dans
un environnement domestique, ce produit est
susceptible de provoquer des interférences
radio, auquel cas l’utilisateur peut être mis en
demeure de prendre des mesures
appropriées.
Grazie per aver acquistato TeraStation
Buffalo.
Installazione
Aprire Impostazioni (per più
opzioni)
Informazioni sulla conformità alle
normative
Avvertenza relativa al marchio CE
Questo è un prodotto di Classe A. In ambienti
domestici il prodotto può causare
radiointerferenza, nel qual caso potrebbe
rendersi necessaria l'adozione di opportune
misure.
1) Conecte los cables de Ethernet y de
alimentación de la TeraStation y
enciéndala.
2) Descargue el software TeraNavigator
en http://d.buffalo.jp/TS5200DS.
3) Descomprima el archivo descargado y
haga doble clic en el archivo
TSNavi.exe incluido en la carpeta
extraída. Se iniciará TeraNavigator.
4) Haga clic en [Iniciar instalación]. El
asistente le guiará durante la
instalación de NAS Navigator2.
5) Abra NAS Navigator2. Haga clic con el
botón derecho del ratón en el icono de
la TeraStation en NAS Navigator2 y
seleccione [Propiedades]. Establezca la
dirección IP de la TeraStation. A
continuación, inicie sesión en
Configuración (tal y como se describe a
continuación) y configure el reloj de la
TeraStation.
Para obtener más información, consulte el
manual de usuario de la TeraStation, que
encontrará al hacer clic en el enlace de
TeraNavigator o en
www.buffalo-technology.com. Su
ordenador debe estar conectado a
Internet para acceder al manual de usuario
o para descargarlo.
Gracias por adquirir TeraStation de
Buffalo.
Instalación
Apertura de Configuración
(para obtener más opciones)
Información sobre el
cumplimiento de las normas
Advertencia sobre el marcado “CE”
Este es un producto de Clase A. En una
situación domestica, este producto puede
producir interferencias de radio, en ese caso el
usuario deberá tomar las medidas adecuadas.
1) Después de instalar NAS Navigator2,
aparecerá el icono de NAS Navigator en
el escritorio de su equipo. Si dispone de
un equipo Mac, aparecerá en el Dock.
2) Haga doble clic en el icono para abrir
NAS Navigator2, la utilidad de cliente
de TeraStation. Haga clic con el botón
derecho del ratón en el icono de la
TeraStation en NAS Navigator2 y
seleccione [Configuración].
Configuración se abrirá.
3) Introduzca el nombre de usuario y la
contraseña de administrador y haga
clic en [OK] para iniciar sesión en
Configuración. Hasta que no se cambie,
el nombre de usuario predeterminado
será "admin" y la contraseña,
"password".
1) Collegare il cavo Ethernet e di
alimentazione della TeraStation.
2) Scaricare il software TeraNavigator da
http://d.buffalo.jp/TS5200DS/.
3) Aprire il file scaricato e fare doppio clic
su TSNavi.exe nella cartella estratta.
TeraNavigator si avvierà.
4) Fare clic su [Avvia installazione]. La
procedura guidata assisterà l'utente
nell'istallazione del NAS Navigator2.
5) Aprire NAS Navigator2. Fare clic con il
tasto destro sull'icona di TeraStation
in NAS Navigator2 e selezionare
[Proprietá]. Impostare l'indrizzo IP
della TeraStation. Inoltre, accedere a
Impostazioni (come descritto di
seguito) e impostare l'orologio della
TeraStation.
Per maggiori informazioni, far riferimento
al manuale utente della TeraStation,
disponibile dal link sul TeraNavigator o su
www.buffalo-technology.com. Per
accedere o scaricare il manuale utente è
necessario che il computer sia connesso a
Internet.
1) Dopo l'installazione del NAS
Navigator2, sul desktop del PC
apparirà l'icona del NAS Navigator. Su
un Mac, l'icona sarà visibile nel Dock.
2) Fare doppio clic sull'icona per aprire
NAS Navigator2, l'utility client di
TeraStation. Fare clic con il tasto
destro sull'icona della TeraStation sul
NAS Navigator2 e selezionare [Apri
impostazioni Web]. Si apriranno le
impostazioni.
3) Inserire il nome utente e la password
di amministratore, quindi cliccare su
[OK] per accedere alle impostazioni. Si
consiglia di cambiare la password
amministratore. Finché non
cambiano, il nome utente e la
password predefiniti sono,
rispettivamente "admin" e "password".
1) Nach der Installation von NAS
Navigator2 finden Sie ein NAS
Navigator-Symbol auf dem Desktop.
Auf einem Mac wird dieses im Dock
angezeigt.
2) Doppelklicken Sie auf dieses Symbol,
um NAS Navigator2, das
Client-Dienstprogramm der
TeraStation, zu öffnen. Klicken Sie mit
der rechten Maustaste auf das
TeraStation-Symbol in NAS Navigator2,
und klicken Sie anschließend auf
[Öffnen Sie die Webeinstellungen]. Die
Einstellungen werden geöffnet.
3) Geben Sie den Benutzernamen und das
Kennwort des Administratorkontos ein,
und klicken Sie auf [OK], um sich bei
den Einstellungen anzumelden. Wir
empfehlen, das Administratorkennwort
zu ändern. Bis es geändert wird, lautet
der standardmäßige Benutzername
"admin" und das Kennwort "password".
Öffnen der Einstellungen (für
weitere Einstellungen)
1) Une fois le NAS Navigator installé, une
icône NAS Navigator apparaîtra sur le
bureau de votre PC. Sous Mac, elle
apparaîtra sur le Dock.
2) Double-cliquez sur l'icône pour ouvrir
le NAS Navigator2, l'utilitaire client de
la TeraStation. Effectuez un clic-droit
sur l'icône de la TeraStation dans le
NAS Navigator2 et sélectionnez
[Ouvrir les paramètres Web]. Les
Réglages s'ouvrent.
3) Pour vous connecter aux Settings,
saisissez le nom d'utilisateur et le mot
de passe administrateur, puis cliquez
sur [OK]. Il est recommandé de
modifier le mot de passe
administrateur. Par défaut, le nom
d'utilisateur est “admin” et le mot de
passe "password".
Ouvrir Réglages (pour plus
d'options)
Diese TeraStation unterstützt
Axis-Überwachungskameras und
Software zu ihrer Verwaltung. Sie können
AXIS Camera Companion unter
http://d.buffalo.jp/TS5200DS/
herunterladen. Auf dieser Website stehen
darüber hinaus Dokumentation und
Benutzerhandbücher zur Verfügung.
Nutzung mit
Axis-Überwachungskameras
Cette TeraStation prend en charge les
caméras de surveillance Axis et dispose
du logiciel pour les gérer. Téléchargez le
logiciel AXIS Camera Companion depuis
le site: http://d.buffalo.jp/TS5200DS/. La
documentation ainsi que les manuels
d'utilisation sont également disponibles
sur ce site.
Utilisation avec les caméras
de surveillance Axis
Questa TeraStation supporta le
videocamere di sorveglianza Axis e
include un software per gestirle. Scaricare
AXIS Camera Companion da
http://d.buffalo.jp/TS5200DS/. Su questo
sito sono anche disponibili
documentazioni e manuali utente.
Per l'uso con le videocamere
di sorveglianza Axis
Esta TeraStation admite el uso de las
cámaras de vigilancia Axis e incluye el
software para administrarlas. Descargue la
guía de AXIS Camera Companion en
http://d.buffalo.jp/TS5200DS/. También se
encuentran disponibles en este sitio web
otros manuales de usuario y
documentación.
Uso conjunto con las cámaras
de vigilancia Axis
Français
Español
Italiano
Deutsch
CE Mark Warning
This is a Class A product. In a domestic environment, this product may cause radio interference, in which case the user may be required to take adequate
measures.
Regulatory Compliance Information
Installation
Thank you for purchasing Buffalo’s TeraStation.
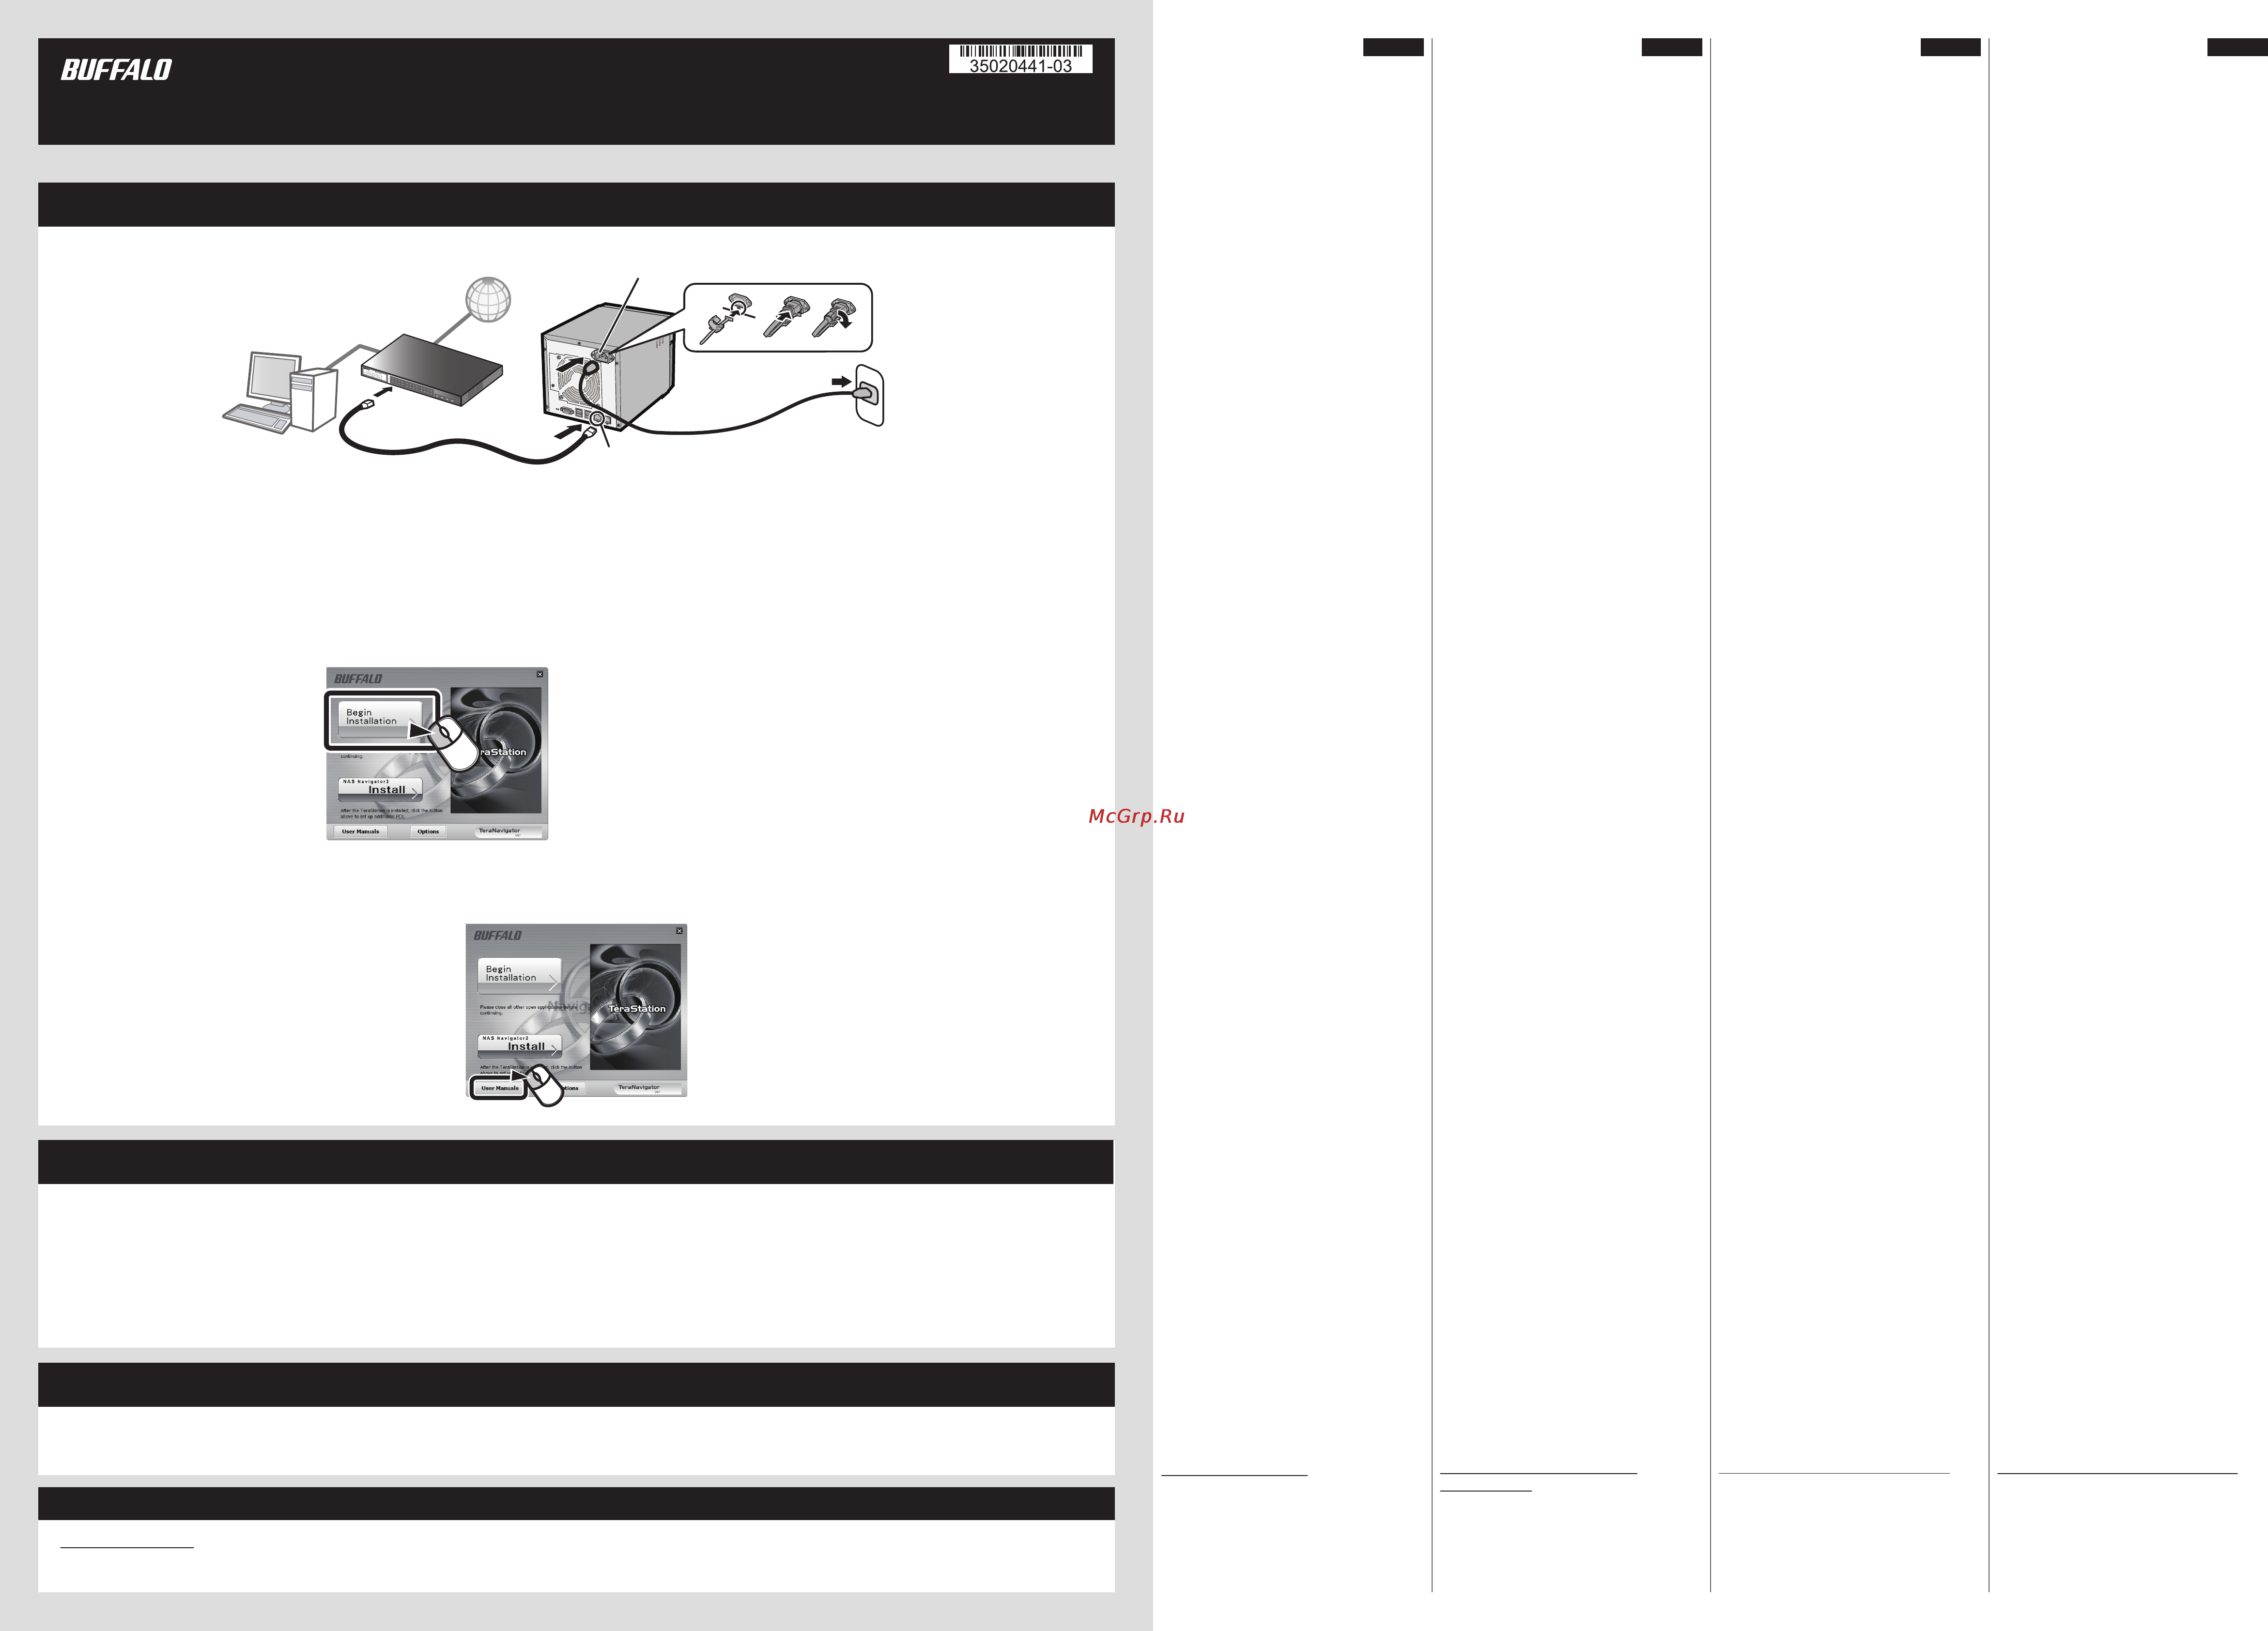
1) Connect the TeraStation’s Ethernet and power cables and turn it on.
The socket-outlet shall be installed near the equipment and shall be easily accessible.
Power cable
LAN port 1
Insert the Ethernet cable until it clicks.
TeraStation
① ② ③
Power connector
Ethernet cable
PC
2) Download the TeraNavigator software from http://d.buffalo.jp/TS5200DS/.
3) Unzip the downloaded file and double-click TSNavi.exe in the extracted folder. TeraNavigator will launch.
TS5200DS Quick Setup Guide
Opening Settings (for more options)
1) After installing NAS Navigator2, your PC will have a NAS Navigator icon on the desktop. On a Mac, it will appear in the Dock.
2) Double-click the icon to open NAS Navigator2, the TeraStation’s client utility. Right-click on the TeraStation’s icon in NAS
Navigator2 and select Settings. Settings will open.
3) Enter the administrator username and password, then click OK to log in to Settings. We recommend that you change the
administrator password. Until it is changed, the default username is “admin” and the password is “password”.
4) Click Begin Installation. The wizard will guide you through
installing NAS Navigator2.
5) Open NAS Navigator2. Right-click on the TeraStation’s icon
in NAS Navigator2 and select Properties. Set the
TeraStation’s IP address. Then, log in to Settings (as
described below) and set the TeraStation’s clock.
For more information, refer to the TeraStation’s user manual, available from the link in TeraNavigator or from
www.buffalotech.com. Your computer must be connected to the Internet to access or download the user manual.
To Use with Axis Surveillance Cameras
This TeraStation supports Axis surveillance cameras and includes software to manage them. Download the AXIS Camera
Companion from http://d.buffalo.jp/TS5200DS/. Documentation and user manuals are also available from this site.
2014.09
Содержание
- Advertencia sobre el marcado ce 1
- After installing nas navigator2 your pc will have a nas navigator icon on the desktop on a mac it will appear in the dock 1
- Avertissement concernant le marquage ce 1
- Avvertenza relativa al marchio ce 1
- Ce zeichen warnung 1
- Double click the icon to open nas navigator2 the terastation s client utility right click on the terastation s icon in nas navigator2 and select settings settings will open 1
- Enter the administrator username and password then click ok to log in to settings we recommend that you change the administrator password until it is changed the default username is admin and the password is password 1
- Ethernet cable 1
- Gracias por adquirir terastation de buffalo 1
- Grazie per aver acquistato terastation buffalo 1
- Installation 1
- Lan port 1 insert the ethernet cable until it clicks 1
- Merci d avoir acheté une terastation buffalo 1
- Opening settings for more options 1
- Power cable 1
- Power connector 1
- Terastation ① ② ③ 1
- Thank you for purchasing buffalo s terastation 1
- The socket outlet shall be installed near the equipment and shall be easily accessible 1
- This is a class a product in a domestic environment this product may cause radio interference in which case the user may be required to take adequate measures 1
- To use with axis surveillance cameras 1
- Ts5200ds quick setup guide 1
- Vielen dank für den kauf der terastation von buffalo 1
- Abrir a interface web admin para mais opções 2
- Agradecemos pela compra do terastation da buffalo 2
- Asennus 2
- Att öppna gränssnittet web admin för ytterligare alternativ 2
- Aviso sobre a marca ce 2
- Axis gözetleme kameraları ile kullanmak için 2
- Axis valvontakameroiden käyttö 2
- Ayarlar açılması diğer seçenekler için 2
- Brukes med axis overvåkingskameraer 2
- Ce i şareti uyarısı 2
- Ce merkeadvarsel 2
- Ce merkintää koskeva varoitus 2
- Ce märkningsvarning 2
- Ce mærkeadvarsel 2
- Ce tekenwaarschuwing 2
- De web admin interface openen voor meer opties 2
- För användning med axis övervakningskameror 2
- Information om uppfyllda förordningar 2
- Informações sobre conformidade com as normas 2
- Instalação 2
- Installatie 2
- Installation 2
- Installering 2
- Mevzuata uygunluk bilgileri 2
- Montaj 2
- Montering 2
- Oplysninger om regulerende overholdelse 2
- Oppfyllelse av lovbestemte krav 2
- Para utilizar com câmaras de vigilância axis 2
- Regelgevende nalevingsinformatie 2
- Takk for at du kjøpte buffalo terastation 2
- Te gebruiken met axis bewakingscamera s 2
- Tietoja säännösten noudattamisesta 2
- Til brug med axis overvågningskameraer 2
- Web admin käyttöliittymä avaus lisätoimintoja varten 2
- Åben web admin interfacet for yderligere valgmuligheder 2
- Åpne web admin grensesnittet for flere alternativer 2
- Использование с камерой видеонаблюдения axis 2
- Открытие настройки для дополнительных возможностей 2
- Установка 2
Похожие устройства
- Logitech F710 Инструкция по эксплуатации
- Packard Bell EN LJ63 Инструкция по эксплуатации
- Buffalo LS441DE-EU Инструкция по эксплуатации
- Speedlink Strike Silver SL-6535-SR Инструкция по эксплуатации
- Buffalo LS441D0404-EU Инструкция по эксплуатации
- Logitech Driving Force GT (941-000101) Инструкция по эксплуатации
- Packard Bell EN F Инструкция по эксплуатации
- Buffalo LS441D0804-EU Инструкция по эксплуатации
- Tp-Link TL-WDR3600 Инструкция по эксплуатации
- Buffalo LS441D1204-EU Инструкция по эксплуатации
- Packard Bell EN DT85 Инструкция по эксплуатации
- Sven 249 Инструкция по эксплуатации
- Buffalo LS441D1604-EU Инструкция по эксплуатации
- Packard Bell EN BG48 Инструкция по эксплуатации
- Sven 312 Инструкция по эксплуатации
- Buffalo LS210D0201-EU Инструкция по эксплуатации
- Packard Bell EN BG35 Инструкция по эксплуатации
- Western Digital Elements Desktop 3TB ( Инструкция по эксплуатации
- Buffalo LS210D0301-EU Инструкция по эксплуатации
- Packard Bell DOT VR46 Инструкция по эксплуатации