
Velomann S1.20 Инструкция по эксплуатации онлайн
WWW.VELOMANN.COM
> S1.41 <
WWW.VELOMANN.COM
- 1 - - 2 - - 3 - - 4 - - 6 -
- 12 -- 11 -- 10 -- 9 -
- 8 -- 7 -
- 13 - - 14 - - 15 - - 16 - - 17 - - 18 -
- 23 -- 22 -- 21 -- 20 -- 19 -
- 5 -
- 27 -- 26 -- 25 -
- 29 - - 30 -- 28 -
- 33 -- 32 -- 31 - - 35 -- 34 -
SPECIFICATIONS
Operating Temperature
0℃~ 40℃
-10℃~ 50℃
0℃~ 40℃
-10℃~ 50℃
Storage Temperature
3 volt lithium
2032 cell
30.6 grams 20 grams
3 volt lithium
2032 cell
Emitted Frequency
Battery
Weight
Receiver
Cadence & Speed Sensor Transmitter / Belt
S1.41 cycle computer
Nylon ties
Cadence & Speed Sensor
Battery cover
Air pressure sensor
MagnetRubberBracket
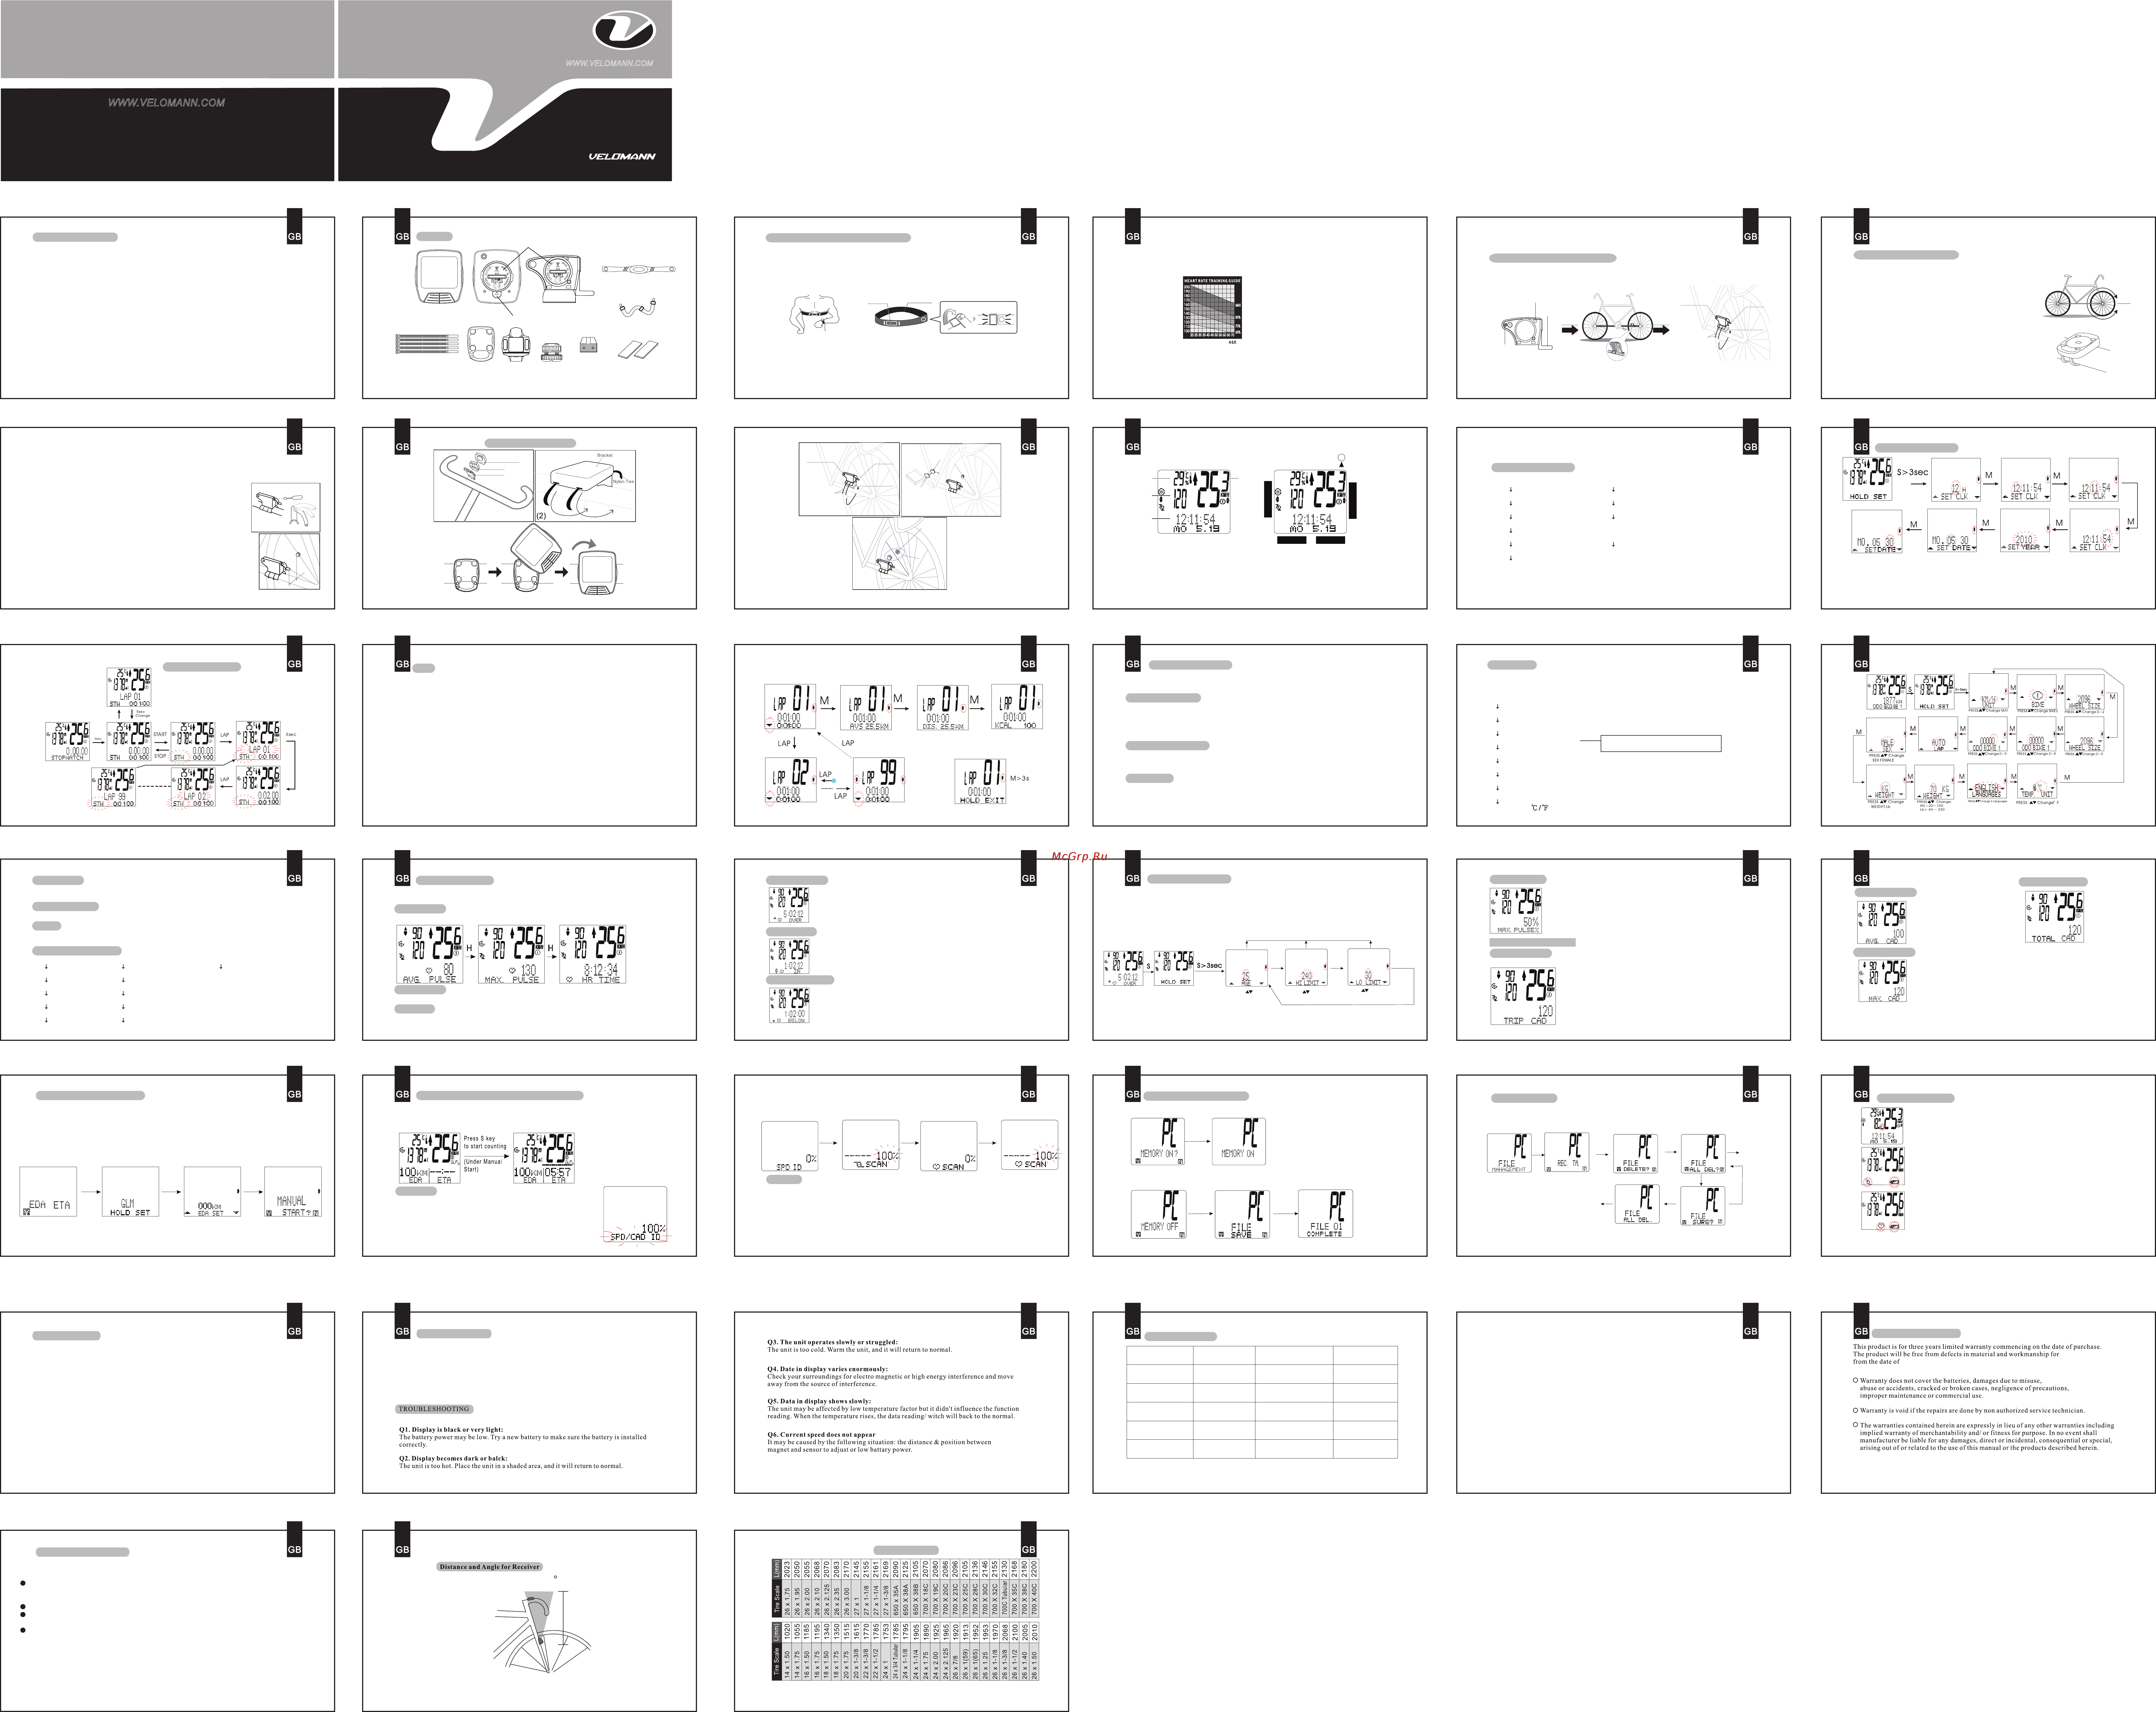
Congratulation!
Cycle Computer - S1.41
Item List
You have decided for a cycle computer to help you achieve your health & wellness.
It gives you the true image of your work out in precise way.
S1.41 is designed to give feedback required by the most discerning cyclists,
in which is with all the functionality on one large easy to read display.
S1.41 is a premier cycle computer for your challenge ride.Altitude functions with the
wireless technology,users can enjoy their cycling and riding ascending as well.
Before using S1.41, please read through the manual that guides you on how to operate
it correctly & quickly. S1.41 offers you very useful features to customize your exercise.
S1.41 offers you very useful features to customize your exercise and gain the best &
accurate measurement. After exercise, you may view your fitness result by pressing the
button. It would be better to keep this manual for reference.
30
60cm
max
max
It displays the Cycling Time and Distance from the beginning to current period.
-Press S key for 3 sec to CLEAR the data (TM, AVG/MAX Speed, TRIP DST)
TRIP TIME / TRIP DST
It displays the Average Speed from the beginning to current period.
When Current Speed below/above the AVG. Speed, a Symbol of up-down Arrow will
show up next to Current Speed.
-Press S key for 3 sec to CLEAR the data. (TM, AVG/MAX Speed, TRIP DST)
Average Speed (AVG)
It displays the maximum speed from the beginning to current period.
-Press S key for 3 sec to CLEAR the data. (TM, AVG/MAX Speed, TRIP DST)
Maximum Speed (MAX)
It displays the cycling time from the beginning of day to current period.
The data will return to zero when cross another day OR press S key for 3 sec to CLEAR the data.
DAILY DST
-Press G key to set LAP (1.2.3…99) when STW operating.
*The STW has memory of 99 Laps (LAP01-LAP99), it overwrites after LAP 01.
(i.e. The data of LAP 01 will be overwrote by LAP 100, etc.)
*It will not be recorded when each LAP less than 6 seconds.
-When finish recorded each LAP, press G key for details of each LAP.
-Press G key to change LAP by LAP.
-Press M key to view Average Speed (AVS.), DST, KCAL for each LAP.
-Then Press M key for 3 seconds back to STW. Mode.
LAP
-Press S key to start/stop.
-Press S key for 3 sec to return to zero (rz)
STOPWATCH MODE
It displays the Total ODO from adding Bike1 & Bike 2. (Bike 1 + Bike 2)
-Press S key for 3 seconds will have the same setting process under ODO Bike 1/2.
TOTAL ODO
It displays the average heart rate during the trip. Hold S key for 3 seconds to clear the data.
AVG. PULSE
It displays the maximum heart rate during the trip. Hold S key for 3 seconds to clear the data.
MAX. PULSE
It displays the time counting for heart rate.
HR TIME
It shows the maximum heart rate in percentage (%) during the trip.
It displays the Cadence Count during the trip.
MAX PULSE %
CADENCE FUNCTIONS
TRIP CADENCE
It displays the average cadence
in RPM during the trip.
AVG. CADENCE
It displays the maximum cadence
in RPM during the trip
MAX. CADENCE
It displays the accumulated Cadence
Count for all TRIP CADENCE data.
TOTAL CADENCE
Under HR OVER/ IN/ BELOW TIME Mode, press S key for 3 seconds to set the Age and
Target Zone.
AGE→High Limit→Low Limit
Press M key for 3 seconds to complete setting.
How to set Target Zone?
How long does the heart rate OVER Target Zone.
HR OVER TIME
How long does the heart rate OVER Target Zone.
HR IN TIME
How long does the heart rate BELOW Target Zone.
HR BELOW TIME
ALL HEART RATE FUNCTIONS WORKING/ CALCULATING WHEN COMPUTER
DETECTING CURRENT SPEED. (i.e. Only Current Heart Rate Working without Detecting Speed)
HEART RATE MODE
It displays the high/low temperature limit after re-set.
KCAL
It displays the accumulated calories consumed from the beginning of the trip onwards.
Press and hold S key for 3 seconds to clear data.
Min Tem/Max Tem
CLK
AVG. PULSE
MAX. PULSE
HR TIME
HR OVER TIME
HR IN TIME
HR BELOW TIME
MAX. PULSE%
TRIP CADENCE
AVG. CADENCE
MAX. CADENCE
TOTAL CADENCE
Mode Change for H/C key
How to apply EDA/ETA – G Key
EDA: Estimated Distance of Arrival
ETA: Estimated Time of Arrival
Press G key to enter EDA/ETA Mode
Press S key for 3 seconds to set EDA. Then press M key to set Manual/ Auto start.
Press M key for 3 seconds to finish setting. Then Press Y (G key) to ENJOY a RIDE with
EDA/ETA. (Under Auto Start)
ID Pairing
Due to the Digital Coded Wireless Cycle Computer, each speed
sensor has its own ID, computer will recognize ID after pairing.
It can avoid most of electronic interferences during cycling.
What is difference between Manual and Auto start?
Auto: It starts automatically when computer defects the speed. Press G key to EDA/ETA
mode then press S key to TURN OFF.
Manual: It starts with your command. After pressing Y symbol, then press S key,
EDA/ETA will start calculating.
PC Link
Please install the S1.41 software by provided CD-Disk. After installation, try to create your
own User ID, and then press Login.
Please go to “PC TO DEVICE” to set Bike Information, Recording Rate (i.e. computer will
record cycling data every 5, 10, 30, 180 seconds), Home Altitude, Lap Style. Lap Use, Goal
Style (Goal Mode). Once completed, press save to record your Bike Data. Then please go to
“USER INFO” to create Personal Information. Once completed, press save to record personal
data. Then press “PC TO DEVICE” to download your information into your S1.41.
Under any mode, press H/C key and M key simultaneously for “6” seconds,
then press S key to start ID Pairing. Meanwhile, use the spoke magnet to wake up
speed sensor and wake up chest belt by knocking both sides or wear the chest belt for ID Pairing.
NOTE: It had been paired when purchasing in SET.
S SS
- 24 -
How to record my cycling data?
Once all information is downloaded, press P key to “PC MEMORY OFF?”, then press Y (G key),
and computer will start to record cycling data.
Press P key to turn off recording feature when finish cycling, press Y (G key) to save file.
And then, plug the USB device to upload the data to PC.
Pre ss Y
Press YPress Y
How to delete file?
Press P key to enter PC MEMORY, press S key for 4 seconds to go to FILE MANAGEMENT.
Record Time (Rate)→FILE DELET→FILE ALL DELETE
Press M key for 4 seconds back to CLK Mode.
Y
N
N
N
Y
3sec
3sec
3s e c
N
3s e c
2sec
M>3s
M>3s
MAINTENANCE
S1.41 cycle computer
If the display contrast changes and figures become faint, it’s time to replace the battery.
Consider changing the computer sensor and transmitter batteries at the same time.
NOTE: Do not expose S1.41 computer to extremely cold or hot temperatures i.e. don’t
leave the unit in direct sunlight for extended period of time.
Sensor
Check the position of sensor and magnet periodically. For current measurement, the
sensor, magnet should not get wet / rust, otherwise it may cause function error.
Bracket / Magnet / Sensor band
The above items can be rinsed in surface fresh water or washed with a mild soap.
Battery replacement
S1.41 cycle computer
Unscrew the back cover. Look closely at the battery. Gently remove the battery and
replace it with a new battery model CR2032. The (+) side should be facing up.
Sensor
Unscrew the back cover. Look closely at the battery. Gently remove the battery and
replace it with a new battery model CR2032. The (+) side should be facing up.
Stopwatch Range : 0~29(hour) : 59(minute) :59(second)
Accuracy 1/100 seconds
Timer Range : 0~29(hour) : 59(minute) :59(second)
SPEED: 0~99.9KM/H,0~62.4M/H
TM: 0:00:00~29:59:59
MXS: 99.9KM/H, 62.4M/H
AVS: 99.9KM/H,
TripDIST:0.00~999.99KM,624.99ML
ODOBIKE1:0~99999
ODOBIKE2:0~99999
TOTODO:0~199998
ALTIBIKE
WHEELSIZE1/2:100~2999(mm)
AVCAD:999
MAXCAD:999
KCAL:999999
62.4M/H
KM0~62499ML
KM0~62499ML
KM0~124998ML
ACT.ALTI:-699~3999(m) -999~9999(ft)
1:0~99999(m/ft) ALTIBIKE2:0~99999(m/ft)
TOT.ALTI:0~199998(m/ft) MAXALTI:3999(m)/9999(ft)
TRIPCLIMB:0~9999(m/ft) ALTI.GAIN/LOSS:0~9999(m/ft)
、
、
、
、
one and half year
production.
LIMITED WARRANTY
Important Health Notice!!
Never use the cycle computer in combination with other medical / implanted electronic
equipment and device (especially heart pacemakers, EKG equipment, TENS equipment,
cardio-pulmonary machines and pacemaker).
If you are severely ill or pregnant, please consult your doctor before using cycle computer.
Keep this device away from children. It contains batteries, which might be swallowed by
chilren.
As with most electronic receiving devices, there can sometimes be interference that causes
inaccurate display readouts. Avoid using your cycle computer near commom sources of
interference. These include high voltage power lines, air conditioning motor units, fluorescent
lights, wristwatches, mobiles and computer.
Please read over the following information before using the Cycle computer.
Wheel Size Chart
- 36 -
- 39 -- 38 -- 37 -
ODO BIKE1/2
It displays the first setting of wheel size for odometer.
-Press S key for 3 seconds to set each requirements.
KM/H or M/H
Bike 1 or Bike 2
Wheel Size (Chosen Bike 1/2)
ODO Bike (Chosen Bike 1/2)
MANUAL/ AUTO LAP
Gender
KG/LB WEIGHT
LANGUAGE
Temperature ℃/℉
ODO MODE
ODO will be erased when out of battery.
This is a pre-set for total ODO.
Low Battery Indicator
When battery sign shows up, it tells computer is running out of battery.
Please replace a new battery as soon as possible.
Computer Unit: It shows 4 seconds in every 64 seconds.
When Speed Sensor is running out of battery:
It shows above symbol 2 seconds in every 64 seconds.
When Chest Belt is running out of battery:
It shows above symbol 2 seconds in every 64 seconds.
m
Stabling Pads
Cadence
Magnet
Transimitter
Elastic Strap
B: Temperature / HR
C: Current Cadence
D: Sub Display
E: Current Speed
S: SET/ ST/ SP/ CLR/ ▼
M: MODE/+
H/C: HR/ CAD/ -
G: GOAL/ ▲ / LAP/ RECALL
P: PC
P
M
SG
H/C
B E
D
C
CLK
STOPWATCH
TRIP TIME
AVG. SPEED
MAX SPEED
DAILY DISTANCE
TRIP DISTANCE
ODO BIKE 1 / BIKE 2
TOTAL ODO
MIN. TEMPERATURE
MAX TEMPERATURE
KCAL
Mode Change for M key
-Press S Key for 3 sec to set 12/24H.
-Press M Key to set Time. Press ▲ ▼ to change hour/min/sec.
-Press M key to set year. Press ▲ ▼ to change year.
-Press M key to set Date. Press ▲ ▼ to change Date.
-Finish setup, press and hold the M key for 3 sec.
OPERATION PROCESS – M Key CLK MODE
Wearing Chest Belt for Heart Rate Function
The transmitter should be positioned right below the breasts/ pectoral muscles.
The strap should be comfortable, but secure.
Note: Transmitter will automatically get into "wake up" mode after the user wear it.
Elastic Strap
Press to fix
Transmitter
Note: Do not use S 1.41 near high voltage power cables .
Beats per minutes (bpm)
Training Areas:
50% - 60% Maintain Fitness
60% - 70% Endurance
70% - 80% Slight Resistance
80% - 90% Sustained Resistance
Target zone will vary for each individual, depending on Age, Personal fitness goals,
Existing health considerations (High blood pressure, circulation or respiration) ,
Medications and Doctor's recommendations.
S 1.41 contains Heart Rate target zone function, it can help the user to set up the personal
target zone.
Installing the Cadence &Speed Sensor
Nylon Ties
Speed Sensor
Stabling Pads
Cadence Sensor
Green light
Speed sensor
Cadence sensor
How to Setup Cycle Computer
1) Wheel Circumference
Circumference (mm) = 2x3.14xR (inch) x2.54 (1 inch = 2.54 cm)
R=Radius in centimeter
2) Installing the Bracket
To get the accurate result, the wheel size should be correct. Mark
the symbol on the tire and ride one circle. Then measure the
length between two points to get the circumference.Or you can
get wheel circumference by the following equation:
Use the rubber pad to tighten the bracket to the handlebar or stem
with the nylon ties.
3)Installing the Cadence & Speed Sensor
Find a suitable point on the left Chain Stay to attach the Cadence & speed senso r. The
distance between cycle computer & the sensor would approximately be 150 cm.
4)Installing the Speed Magnet
Secure the Speed Magnet on the spoke of the back wheel and must face the Speed
Sensor.
Note: Turn the speed handle to adjust speed sensor.
The Max distance between speed sensor and Magnet should is 5mm
5) Installing the Cadence Magnet
Secure the Cadence Magnet on the Crank and must face the Cadence Sensor
Note: The
max distance between the Cadence sensor and Magent is 5mm.
Note:
To make sure that everything has been setup correctly before riding the bicycle.
Please rotate the wheel to check the the sensor and magnet installation ,
initial flashing green light indicates the sensor detected magnet signa ls normally.
Adjustable
1~5mm
Rubber
Bracket
Cycle Computer
(1)
How to mount the bracket
Speed Magnet
Screw
(6)
(7)
Cadence Magnet
Stabling Pads
Nylon Ties
Speed Sensor
Stabling Pads
Cadence Sensor
M
PRESS Chang e
Age 8~ 9 9
PRESS Change
HR L o Limit 30~(HI LIMIT -10)
PRESS Ch ang e
HR H i Limit 50~240
+
+
+
M M
M >3sec TO CLOCK
2.4GHz
2.4GHz±10%
0℃~ 40℃
-10℃~ 50℃
65 grams±5%
3 volt lithium
2032 cell
2.4GHz±10%
m
Содержание
Похожие устройства
- Stiga ST 10216 Инструкция по эксплуатации
- Velomann S1.15 Инструкция по эксплуатации
- Stiga ST 10216 H Инструкция по эксплуатации
- Velomann V1.31 Инструкция по эксплуатации
- Stiga SD 108H Инструкция по эксплуатации
- Velomann V1.28 Инструкция по эксплуатации
- Stiga SD 98H Инструкция по эксплуатации
- Velomann V1_23 Инструкция по эксплуатации
- Stiga DECK 100 COMBI 3 Инструкция по эксплуатации
- Velomann V1.20HR Инструкция по эксплуатации
- Stiga DECK 100 COMBI 3 EL Инструкция по эксплуатации
- Velomann V1.20A Инструкция по эксплуатации
- Stiga DECK 125 B TITAN COMBI Инструкция по эксплуатации
- Velomann V1.16C Инструкция по эксплуатации
- Stiga DECK 125 H TITAN COMBI Инструкция по эксплуатации
- Velomann V1.11W Инструкция по эксплуатации
- Stiga DECK 135 B TITAN DOD Инструкция по эксплуатации
- Velomann V1.10 Инструкция по эксплуатации
- Stiga DECK 135 H TITAN DOD Инструкция по эксплуатации
- Velomann V1.07W Инструкция по эксплуатации